
Welcome to ECWoC '26! We're thrilled to have you here! 🎉

Contributing to open source is more than just code—it's about:
- 🎓 Learning: Gain real-world development experience
- 🤝 Collaboration: Work with developers worldwide
- 🌟 Portfolio: Build projects that showcase your skills
- 💼 Career: Stand out in job applications and interviews
- 🏆 Recognition: Get featured in our Hall of Fame
- 🎯 Impact: Help thousands of learners on their journey
"Every expert was once a beginner. Every contribution matters!"
- About the Project
- Who Can Contribute?
- Ways to Contribute
- Project Structure
- Getting Started
- Contribution Workflow
- Pull Request Guidelines
- Issue Guidelines
- Code Standards
- Commit Message Convention
- Review Process
- Code of Conduct
- Need Help?
- Recognition
100 Days Of Web Development is a structured learning challenge designed to help developers:
| ✅ Master HTML, CSS, JavaScript | ✅ Build 150+ real projects |
| ✅ Learn modern frameworks (React, Next.js) | ✅ Practice Git & GitHub |
| ✅ Create a portfolio-worthy collection | ✅ Prepare for internships & jobs |
This repository is community-driven, beginner-friendly, and open to everyone participating in ECWoC '26.
🔗 Live Website: 100dayswebdevelopment-ecwoc.netlify.app
You don't need to be an expert to contribute. We welcome:
|
Learning web development? |
First-time contributors? |
Experienced coders? |
|
Creative minds? |
Good with words? |
Event contributors? |
If you can learn, you can contribute! 💙
Click to expand
- Create daily challenge projects (Day 1 - Day 150+)
- Follow the existing structure
- Ensure projects are beginner-friendly
- Include proper documentation
- Optimize HTML/CSS/JS
- Fix bugs and errors
- Improve responsiveness
- Add accessibility features
- Enhance performance
- Add authentication (Firebase/Supabase/Appwrite)
- Create interactive components
- Build dashboard features
- Integrate APIs
Example Projects to Contribute:
- 🌤️ Weather applications
- 📝 Todo lists with advanced features
- 🎮 Interactive games
- 📊 Data visualization tools
- 💬 Chat applications
- 🛒 E-commerce components
Click to expand
- Add clear explanations
- Include screenshots/GIFs
- Write setup instructions
- Document features
- Step-by-step guides
- Video walkthroughs
- Code explanations
- Learning resources
- Correct typos and grammar
- Update outdated information
- Add missing details
- Improve formatting
Example Contributions:
# Project Name

## Features
- Feature 1
- Feature 2

## Technologies Used
- HTML5
- CSS3
- JavaScript

## Setup Instructions
1. Clone the repository
2. Open index.html
3. Start coding!Click to expand
- Create better layouts
- Design color schemes
- Add animations
- Improve typography
- Enhance navigation
- Improve accessibility
- Add responsive design
- Create better forms
- Design icons
- Create illustrations
- Make banners
- Design badges
Tools You Can Use:
- Figma
- Adobe XD
- Canva
- CSS animations
- SVG graphics
Click to expand
- Test on different browsers
- Check mobile responsiveness
- Fix broken links
- Resolve console errors
- Test user flows
- Verify forms work
- Check API integrations
- Test accessibility
- Document bugs clearly
- Provide screenshots
- Suggest solutions
- Test on multiple devices
Click to expand
- Suggest project ideas
- Recommend improvements
- Share learning resources
- Propose new challenges
- Answer questions
- Help other contributors
- Write blog posts
- Share on social media
Understanding the structure helps you contribute effectively:
100-Days-Of-Web-Development-ECWoC26/
│
├── 📁 public/                          # All daily projects
│   ├── 📁 Day 01/                      # Beginner projects
│   │   ├── index.html
│   │   ├── style.css
│   │   ├── script.js
│   │   └── README.md                   # Project documentation
│   ├── 📁 Day 02/
│   ├── 📁 Day 30/
│   ├── 📁 Day 60/                      # Intermediate projects
│   ├── 📁 Day 90/                      # Advanced projects
│   └── 📁 Day 150+/                    # Expert/Capstone projects
│
├── 📁 website/                         # Main portfolio website
│   ├── 📁 assets/                      # Images, fonts, icons
│   │   ├── images/
│   │   ├── fonts/
│   │   └── icons/
│   ├── 📁 pages/                       # Website pages
│   │   ├── home.html
│   │   ├── projects.html              # Project showcase
│   │   ├── login.html                 # Auth page (needs implementation)
│   │   └── about.html
│   ├── 📁 styles/                      # CSS files
│   │   ├── main.css
│   │   ├── projects.css
│   │   └── responsive.css
│   └── 📁 scripts/                     # JavaScript files
│       ├── main.js
│       ├── projects.js
│       └── auth.js
│
├── 📁 .github/                         # GitHub specific files
│   ├── ISSUE_TEMPLATE/
│   └── workflows/
│
├── 📄 index.html                       # Entry point
├── 📄 README.md                        # Main documentation
├── 📄 CONTRIBUTING.md                  # This file
├── 📄 CODE_OF_CONDUCT.md              # Community guidelines
├── 📄 LICENSE                          # MIT License
└── 📄 .gitignore                       # Git ignore rules
- Folders:
Day 01,Day 02(with leading zero for days 1-9) - HTML Files:
index.html(lowercase) - CSS Files:
style.cssorstyles.css - JS Files:
script.jsor descriptive names (auth.js,api.js) - Images: Descriptive names (
project-screenshot.png)
Before you begin, make sure you have:
- ✅ Git installed (Download)
- ✅ GitHub account (Sign up)
- ✅ Code editor (VS Code recommended)
- ✅ Basic knowledge of HTML/CSS/JavaScript
- ✅ Familiarity with Git commands (optional but helpful)
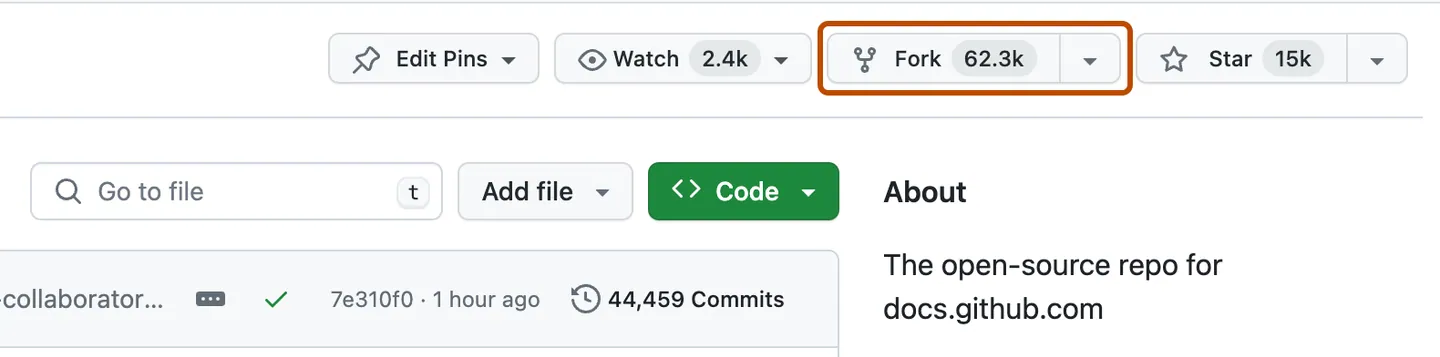
What is forking?
Forking creates a copy of the repository under your GitHub account. This allows you to make changes without affecting the original project.
- Visit the repository: 100-Days-Of-Web-Development-ECWoC26
- Click the "Fork" button in the top-right corner
- Wait for GitHub to create your fork
What is cloning?
Cloning downloads the repository to your local machine so you can work on it.
Open your terminal/command prompt and run:
# Replace YOUR-USERNAME with your GitHub username
git clone https://github.com/YOUR-USERNAME/100-Days-Of-Web-Development-ECWoC26.git

# Navigate into the project folder
cd 100-Days-Of-Web-Development-ECWoC26
Example:
git clone https://github.com/john-doe/100-Days-Of-Web-Development-ECWoC26.git
cd 100-Days-Of-Web-Development-ECWoC26Why add upstream?
The upstream remote points to the original repository. This allows you to sync your fork with the latest changes.
# Add the original repository as upstream
git remote add upstream https://github.com/Shubham-cyber-prog/100-Days-Of-Web-Development-ECWoC26.git

# Verify remotes
git remote -v
Expected output:
origin    https://github.com/YOUR-USERNAME/100-Days-Of-Web-Development-ECWoC26.git (fetch)
origin    https://github.com/YOUR-USERNAME/100-Days-Of-Web-Development-ECWoC26.git (push)
upstream  https://github.com/Shubham-cyber-prog/100-Days-Of-Web-Development-ECWoC26.git (fetch)
upstream  https://github.com/Shubham-cyber-prog/100-Days-Of-Web-Development-ECWoC26.git (push)
Why create a branch?
Branches allow you to work on features/fixes independently without affecting the main codebase.
# Create and switch to a new branch
git checkout -b feature/your-feature-name

# Or use the newer syntax
git switch -c feature/your-feature-name
Branch Naming Convention:
| Type | Example |
|---|---|
| Feature | feature/add-weather-app |
| Bug Fix | bugfix/fix-navbar-alignment |
| Documentation | docs/update-readme |
| UI/Design | ui/improve-landing-page |
Examples:
git checkout -b feature/add-day-45-project
git checkout -b bugfix/fix-mobile-menu
git checkout -b docs/add-setup-guideNow you can start contributing! Here's what to do:
-
Create a new folder in
public/:mkdir "public/Day 45" cd "public/Day 45"
-
Create required files:
touch index.html style.css script.js README.md
-
Add your project code
-
Create a README.md:
# Project Name ## Description Brief description of what this project does. ## Features - Feature 1 - Feature 2 - Feature 3 ## Technologies Used - HTML5 - CSS3 - JavaScript ## Demo  ## How to Use 1. Open `index.html` in your browser 2. Interact with the application
All projects must meet WCAG 2.1 AA accessibility standards. Our CI pipeline automatically tests accessibility using Lighthouse CI.
- Accessibility Score: Minimum 90/100 on Lighthouse
- Color Contrast: 4.5:1 ratio for normal text, 3:1 for large text
- Keyboard Navigation: All interactive elements must be keyboard accessible
- Screen Reader Support: Proper semantic HTML and ARIA labels
<!-- Bad -->
<img src="photo.jpg">

<!-- Good -->
<img src="photo.jpg" alt="Team photo at hackathon">/* Bad - contrast ratio 2.1:1 */
.text { color: #888; background: #fff; }
/* Good - contrast ratio 7.5:1 */
.text { color: #595959; background: #fff; }<!-- Bad -->
<input type="text" placeholder="Name">
<!-- Good -->
<label for="name">Name</label>
<input type="text" id="name" name="name"><!-- Bad -->
<html>
<!-- Good -->
<html lang="en"><!-- Bad -->
<div onclick="doSomething()">Click me</div>
<!-- Good -->
<button onclick="doSomething()">Click me</button># Install Lighthouse CLI
npm install -g lighthouse
# Run accessibility audit
lighthouse http://localhost:3000 --only-categories=accessibility --view- Use Tab key to navigate through all interactive elements
- Ensure focus indicators are visible
- Test with Enter/Space for activation
- Escape should close modals/dialogs
All code contributions must pass automated quality checks. Our CI pipeline runs linters on every pull request.
# Install dependencies
npm install

# Run all linters
npm run lint

# Run specific linters
npm run lint:js      # ESLint for JavaScript
npm run lint:css     # Stylelint for CSS
npm run lint:html    # HTMLHint for HTML

# Auto-fix issues
npm run lint:fix     # Fix ESLint and Stylelint issues
npm run format       # Format all files with Prettier
Pre-commit hooks automatically run linters on staged files before each commit:
- JavaScript files: ESLint + Prettier
- CSS files: Stylelint + Prettier
- HTML files: HTMLHint + Prettier
- JSON/Markdown: Prettier
| Issue | Fix |
|---|---|
no-unused-vars |
Remove unused variables or prefix with underscore |
no-undef |
Declare variables before use |
semi |
Add or remove semicolons consistently |
| Issue | Fix |
|---|---|
declaration-block-no-duplicate-properties |
Remove duplicate CSS properties |
no-descending-specificity |
Reorder selectors by specificity |
property-no-unknown |
Use valid CSS property names |
| Issue | Fix |
|---|---|
tag-pair |
Ensure all tags are properly closed |
id-unique |
Use unique ID attributes |
attr-lowercase |
Use lowercase attribute names |
.eslintrc.json- JavaScript linting rules.stylelintrc.json- CSS linting rules.htmlhintrc- HTML linting rules.prettierrc- Code formatting rules
- Run linters before committing:
npm run lint - Fix issues immediately:
npm run lint:fix - Format code:
npm run format - Check formatting:
npm run format:check - Review CI results: Check the workflow output on your PR