English | 简体中文
Cloudflare Tunnel lets SublinkPro serve Web access through the Cloudflare network without exposing a public IP or opening inbound ports. SublinkPro includes a Cloudflare Tunnel management page that saves the Tunnel token, starts and stops the cloudflared process, and shows connection status.
Note
This document is for publishing the SublinkPro Web admin UI to a public domain. Cloudflare's official docs also cover private networks, SSH, RDP, and more Zero Trust use cases. See Cloudflare Tunnel official docs for details.
Traditional reverse proxy setups usually need a public IP, open inbound 80/443 ports, Nginx/Caddy configuration, and certificate maintenance. Cloudflare Tunnel works differently:
Browser
  │
  ▼
Cloudflare edge network
  │  HTTPS / Zero Trust / DNS
  ▼
cloudflared actively creates an outbound connection to Cloudflare
  │
  ▼
SublinkPro http://localhost:8000
cloudflared runs on the same machine or container as SublinkPro. It only creates outbound connections to Cloudflare. External traffic reaches Cloudflare first, then returns to SublinkPro through the Tunnel.
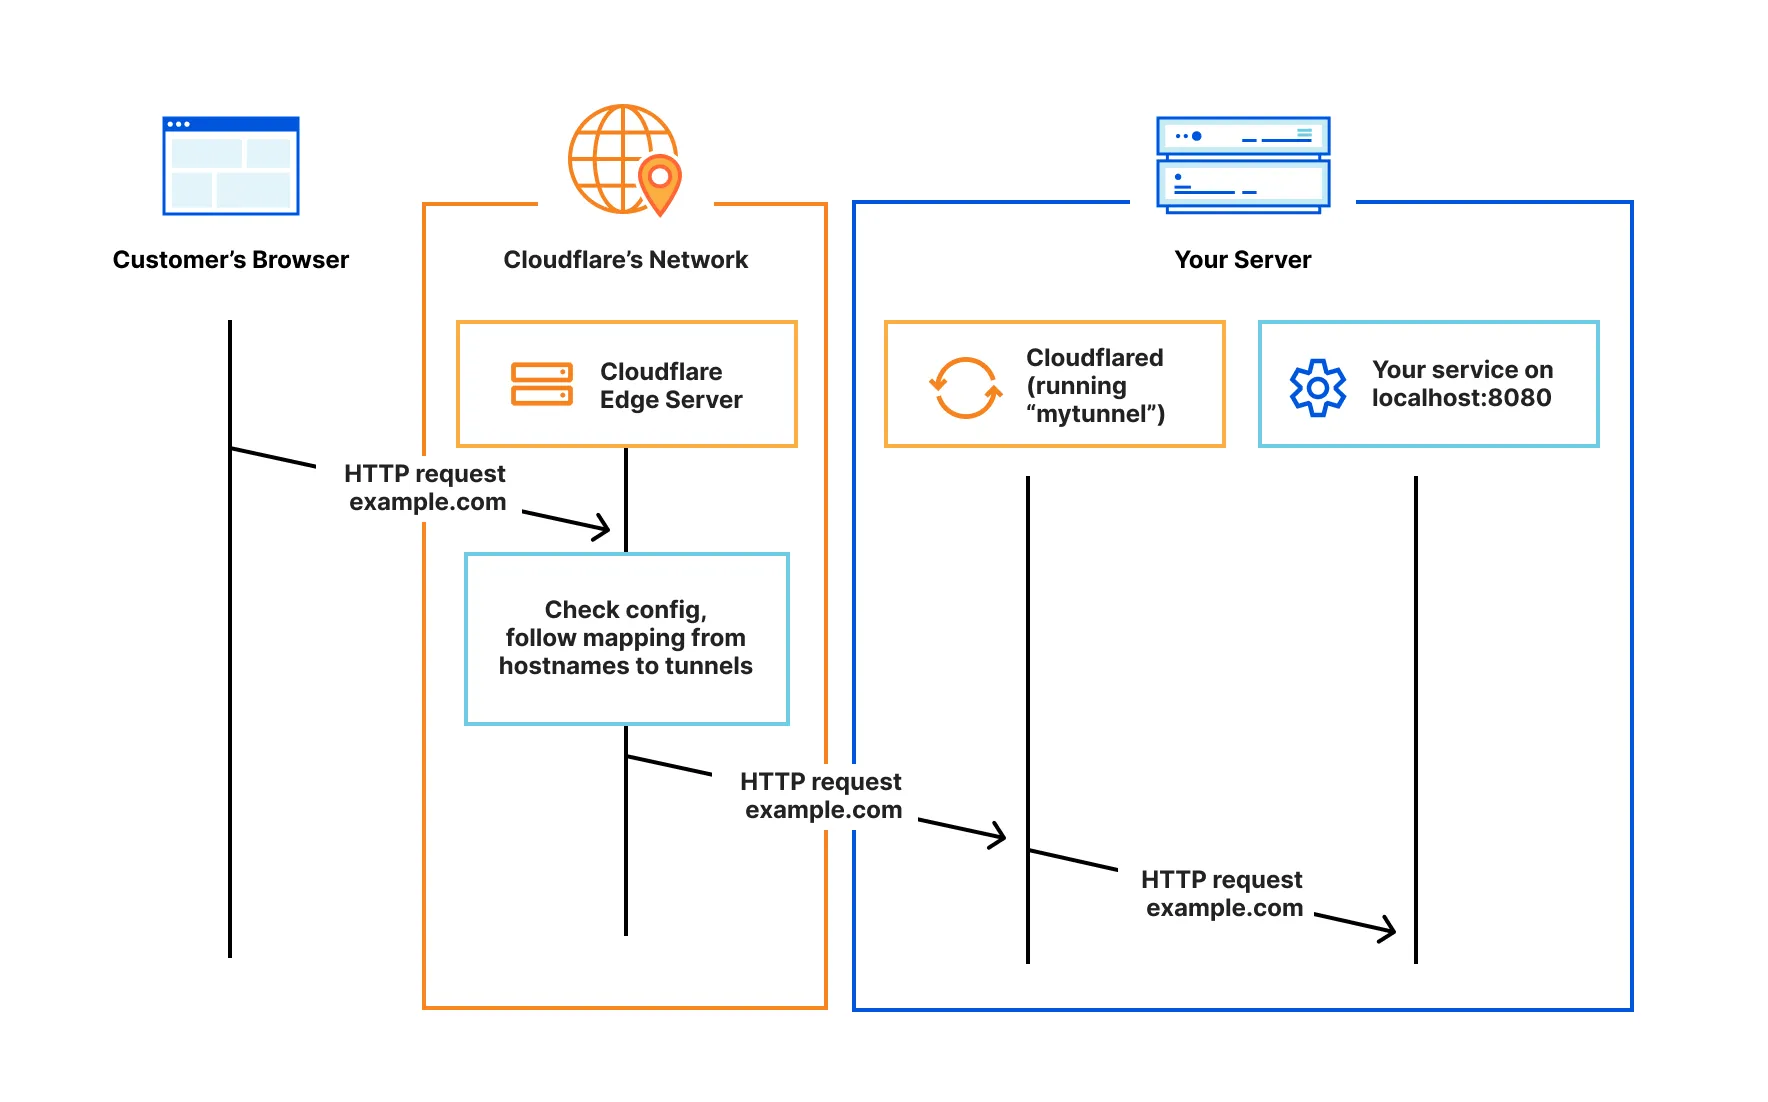
Suitable scenarios:
| Scenario | Why it fits |
|---|---|
| Home broadband / NAT / no public IP | No public IP or port mapping required |
| Docker deployment | SublinkPro image includes cloudflared; enter token on the page and start |
| No desire to maintain Nginx / Caddy | Public entry, HTTPS, and DNS are handled by Cloudflare |
| Smaller exposed surface | The server only needs outbound access to Cloudflare |
- You have a Cloudflare account.
- Your domain has been added to Cloudflare and DNS is hosted by Cloudflare.
- SublinkPro can be accessed locally, for example
http://localhost:8000. - The server can reach Cloudflare Tunnel connection ports outbound. Cloudflare recommends checking
7844connectivity in restricted firewall environments. See Connectivity pre-checks.
Deployment differences:
| Deployment | cloudflared source |
|---|---|
| Official Docker image | Image includes cloudflared |
| Binary / systemd / manual deployment | Install cloudflared according to Cloudflare official docs and make sure it is in PATH |
If you use the official SublinkPro Docker image, skip this section. The image already includes cloudflared. If you run SublinkPro with a binary, systemd, BaoTa, a panel, or another method, install cloudflared on the same machine and confirm the SublinkPro process can find it in PATH.
After installation, run:
cloudflared versionIf the version prints successfully, return to SublinkPro Application Settings -> Cloudflare Tunnel and start it.
Homebrew is recommended:
brew install cloudflared
cloudflared version
To upgrade later:
brew upgrade cloudflaredWinget is recommended first:
winget install --id Cloudflare.cloudflared
cloudflared version
You can also download the Windows executable from Cloudflare Downloads or GitHub Releases:
If you download a single cloudflared.exe, add its directory to system PATH, then reopen the terminal and verify:
cloudflared versionCloudflare recommends using the Cloudflare Package Repository for Debian, Ubuntu, Linux Mint, and other Debian based distributions:
sudo mkdir -p --mode=0755 /usr/share/keyrings
curl -fsSL https://pkg.cloudflare.com/cloudflare-main.gpg | sudo tee /usr/share/keyrings/cloudflare-main.gpg >/dev/null
echo 'deb [signed-by=/usr/share/keyrings/cloudflare-main.gpg] https://pkg.cloudflare.com/cloudflared any main' | sudo tee /etc/apt/sources.list.d/cloudflared.list
sudo apt-get update
sudo apt-get install cloudflared
cloudflared version
If your system does not support the any source, choose the distribution codename:
| System | APT source codename |
|---|---|
| Debian 12 | bookworm |
| Ubuntu 20.04 | focal |
| Ubuntu 22.04 | jammy |
| Ubuntu 24.04 | noble |
Example for Ubuntu 24.04:
echo 'deb [signed-by=/usr/share/keyrings/cloudflare-main.gpg] https://pkg.cloudflare.com/cloudflared noble main' | sudo tee /etc/apt/sources.list.d/cloudflared.list
sudo apt-get update
sudo apt-get install cloudflared
cloudflared versionRPM based distributions can use the Cloudflare Package Repository or directly download the RPM package. General quick method:
curl -L --output cloudflared.rpm "https://github.com/cloudflare/cloudflared/releases/latest/download/cloudflared-linux-x86_64.rpm"
sudo rpm -i cloudflared.rpm
cloudflared version
For ARM64 servers, use:
curl -L --output cloudflared.rpm "https://github.com/cloudflare/cloudflared/releases/latest/download/cloudflared-linux-aarch64.rpm"
sudo rpm -i cloudflared.rpm
cloudflared version
If an older version is already installed, use:
sudo rpm -U cloudflared.rpmCloudflare mainly provides binary, deb, rpm, pkg, and similar packages. Arch users can usually download the Linux binary directly:
sudo curl -L "https://github.com/cloudflare/cloudflared/releases/latest/download/cloudflared-linux-amd64" -o /usr/local/bin/cloudflared
sudo chmod +x /usr/local/bin/cloudflared
cloudflared version
For ARM64 devices:
sudo curl -L "https://github.com/cloudflare/cloudflared/releases/latest/download/cloudflared-linux-arm64" -o /usr/local/bin/cloudflared
sudo chmod +x /usr/local/bin/cloudflared
cloudflared version
Alpine users can also use the official Linux binary directly:
sudo mkdir -p /usr/local/bin
sudo curl -L "https://github.com/cloudflare/cloudflared/releases/latest/download/cloudflared-linux-amd64" -o /usr/local/bin/cloudflared
sudo chmod +x /usr/local/bin/cloudflared
cloudflared version
For ARM64 devices, replace cloudflared-linux-amd64 with cloudflared-linux-arm64.
If you are unsure whether your distribution package manager is supported, download directly by CPU architecture:
| Architecture | Download URL |
|---|---|
| x86_64 / amd64 | https://github.com/cloudflare/cloudflared/releases/latest/download/cloudflared-linux-amd64 |
| ARM64 / aarch64 | https://github.com/cloudflare/cloudflared/releases/latest/download/cloudflared-linux-arm64 |
| ARM | https://github.com/cloudflare/cloudflared/releases/latest/download/cloudflared-linux-arm |
| 32 bit x86 | https://github.com/cloudflare/cloudflared/releases/latest/download/cloudflared-linux-386 |
Example:
sudo curl -L "https://github.com/cloudflare/cloudflared/releases/latest/download/cloudflared-linux-amd64" -o /usr/local/bin/cloudflared
sudo chmod +x /usr/local/bin/cloudflared
cloudflared version
Tip
SublinkPro does not require you to run cloudflared service install. You only need to install the cloudflared command, then paste the final token segment from Cloudflare's install command into the SublinkPro page. SublinkPro hosts the cloudflared process start and stop lifecycle.
Official download page: Cloudflare Downloads.
- Open Cloudflare Dashboard.
- Open Zero Trust.
- In the left menu, open Networks -> Connectors -> Cloudflare Tunnels. Some newer interfaces may show Networks -> Tunnels.
- Click Create a tunnel.
- Choose Cloudflared as Connector type, then click Next.
- Enter a Tunnel name, such as
sublinkpro-homeorsublinkpro-prod. - Click Save tunnel.
Official steps: Create a tunnel, dashboard.
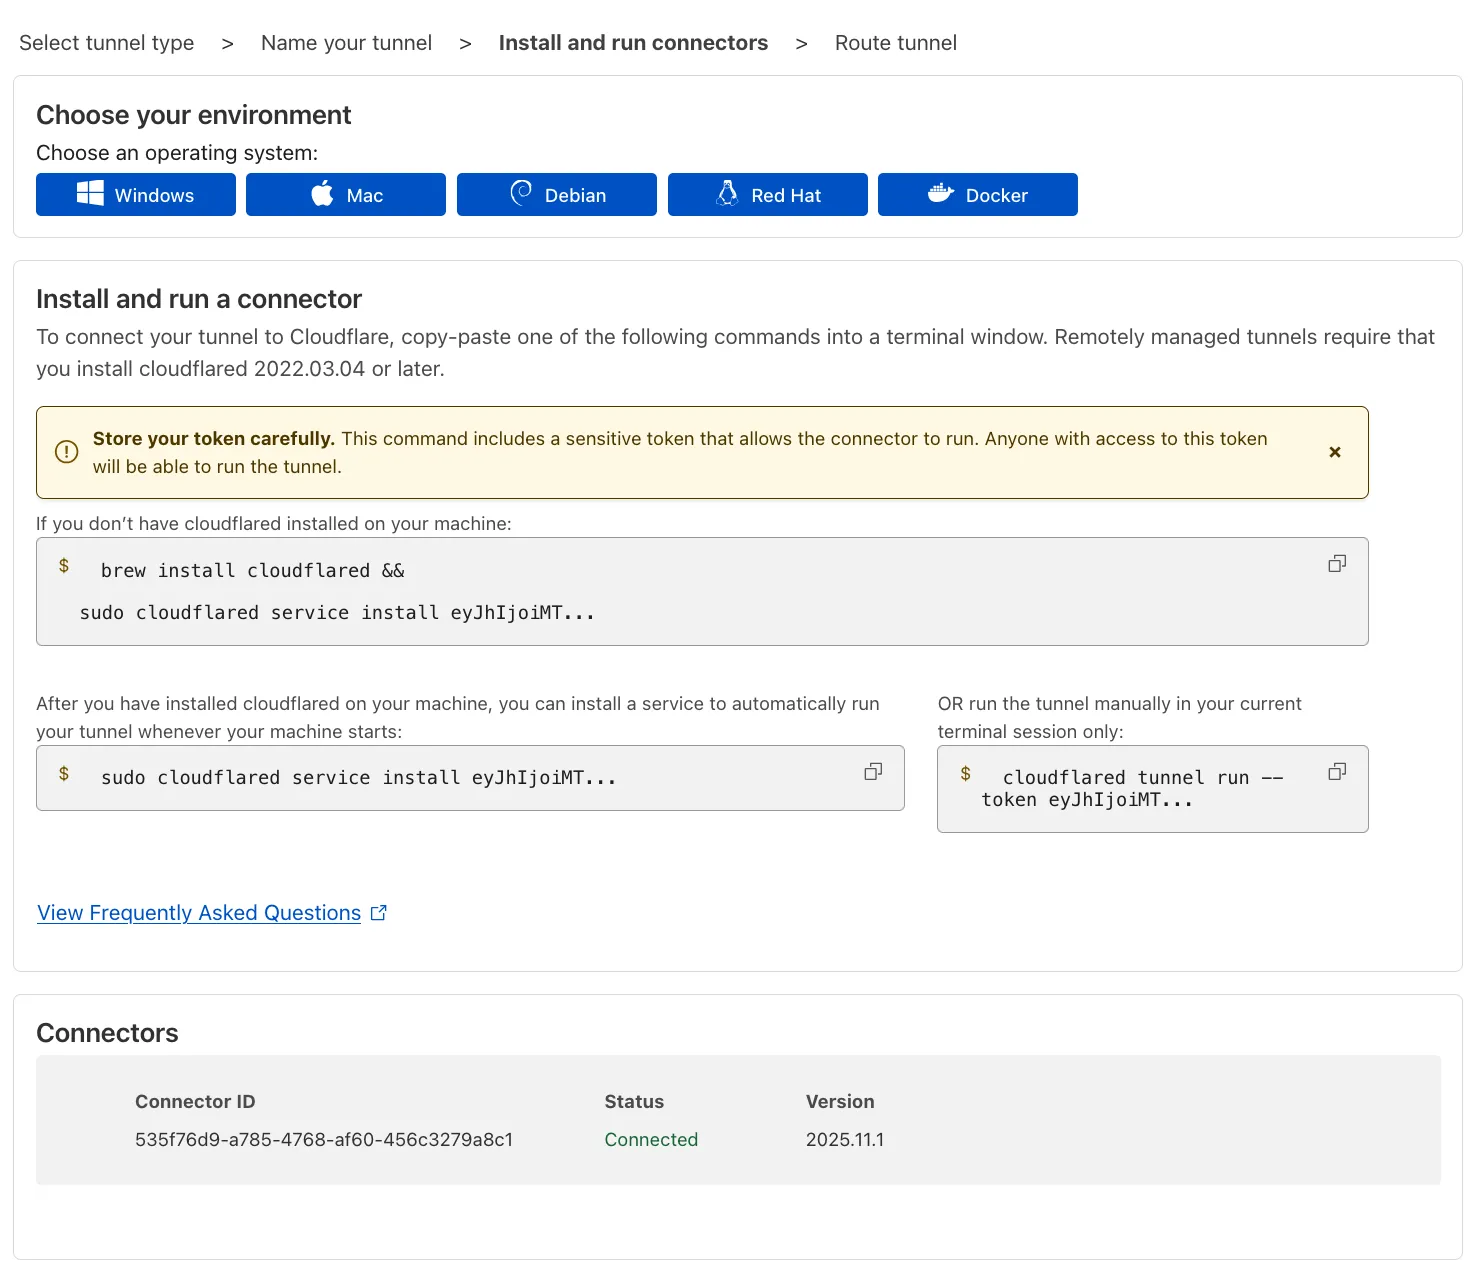
After saving the Tunnel, Cloudflare opens the connector install page and asks you to choose a runtime environment. The page shows an install command like:
sudo cloudflared service install eyJhIjoi...省略...In0=Or on Windows:
cloudflared.exe service install eyJhIjoi...省略...In0=You can copy the whole command or only the final token. SublinkPro splits by whitespace and uses the final segment as the token, so all of these are accepted:
eyJhIjoi...In0=
sudo cloudflared service install eyJhIjoi...In0=
brew install cloudflared && sudo cloudflared service install eyJhIjoi...In0=
Important
A Tunnel token is a credential for connecting to that Tunnel. Don't post it in issues, chat groups, logs, or screenshots. SublinkPro encrypts the submitted token and status APIs only return a masked token.
When creating the Tunnel, Cloudflare continues to guide you through publishing an application. Choose Published applications and add a public entry:
| Field | Recommended value |
|---|---|
| Subdomain | sub, sublink, or your preferred subdomain |
| Domain | Choose the domain hosted on Cloudflare, such as example.com |
| Path | Usually leave empty |
| Type | HTTP |
| URL | localhost:8000 |
If SublinkPro is not using the default port, replace 8000 with the actual port.
Public hostname: https://sub.example.com
Service type:    HTTP
Service URL:     localhost:8000
Save after configuration. Cloudflare automatically creates the DNS record for this hostname and forwards traffic to the Tunnel.
- Sign in to the SublinkPro admin UI.
- Open Application Settings from the avatar menu in the upper right.
- Open the Cloudflare Tunnel tab.
- Paste the token or Cloudflare install command into Cloudflare Tunnel Token.
- Click Save Configuration.
- Click Start Cloudflared.
After successful start, the page shows:
cloudflared installedRunningSaved token: eyJh********...Registered tunnel connectionand similar logs inRuntime logs
If you want SublinkPro to connect the Tunnel automatically after restart, enable Auto connect Tunnel on service startup and save the configuration. This switch uses only the token saved on the page. It does not support injecting the token through environment variables.
- Return to the Cloudflare Zero Trust Tunnel page and confirm the connector is online.
- Open the public domain you configured, for example:
https://sub.example.com
- Confirm that the SublinkPro login page is visible.
- After signing in, check that subscription, node, task, and other pages load normally.
Tip
If you access SublinkPro only through Cloudflare Tunnel, Docker deployments can avoid mapping host ports. Before first configuration, you still need internal network access or a temporary port to reach the admin UI.
SublinkPro cannot find the cloudflared command in the current runtime environment.
- Official Docker image: confirm that you are using a new image that includes this feature, and pull the image again.
- Non Docker: install
cloudflaredaccording to Cloudflare official docs, and make surecloudflared versioncan run in the SublinkPro processPATH.
Check:
- Whether the token belongs to the current Tunnel.
- Whether the server can access Cloudflare outbound.
- Whether the firewall allows
cloudflaredto connect to Cloudflare, especially port7844in restricted networks. - Whether the Cloudflare Zero Trust connector page shows an online instance.
This usually means Cloudflare can reach the Tunnel, but the Tunnel cannot reach local SublinkPro.
Check the Service URL in Public Hostname:
- When built in
cloudflaredand SublinkPro run in the same Docker container,localhost:8000is usually correct. - For non Docker deployments, use the actual SublinkPro listening address and port.
- If
SUBLINK_PORTwas changed, update this value too.
This is expected. Cloudflare Tunnel is the external access entry. After cloudflared stops, Cloudflare cannot forward requests to SublinkPro.
Usually no. Cloudflare Tunnel already handles the public entry and HTTPS termination. If you need complex path routing, aggregation of multiple internal services, or custom auth on the local machine, you can still use Nginx / Caddy locally and point the Tunnel to the reverse proxy address.
- Don't write Tunnel tokens into public docs, screenshots, or issues.
- If you suspect token leakage, delete the old connector or regenerate the install command in Cloudflare Zero Trust, then clear the old token in SublinkPro and save the new one.
- Enable a strong password and MFA for the SublinkPro admin UI.
- If the admin UI is exposed publicly, consider Cloudflare Access, IP rules, or other access control policies to restrict who can reach it.