As can be seen in the github logs, the credit for these contents are from Manuel Parra's course on Cloud Computing: https://github.com/manuparra/cc2122
We will talk much about Containers and Virtual Machines (VMs) in this course. For a quick reference to check the differences between the two, please check:
- https://learn.microsoft.com/en-us/virtualization/windowscontainers/about/containers-vs-vm
- https://www.ibm.com/cloud/blog/containers-vs-vms
Our class today is about Virtual Machines. Azure virtual machines can be created through the Azure portal. The Azure portal is a browser-based user interface to create Azure resources. This tutorial shows you how to use the Azure portal to deploy a Linux virtual machine (VM) running Ubuntu (version 20.04 LTS). To see your VM in action, you also SSH to the VM and install the NGINX web server.
If you don't have an Azure subscription, create a free account before you begin. You can create a Student account here: https://azure.microsoft.com/es-es/free/students/
You can find more information about Azure accounts, suscriptions and resources here: https://learn.microsoft.com/es-mx/training/modules/describe-core-architectural-components-of-azure/3-get-started-azure-accounts
After creating the account, sign in to the Azure portal.
The contents of the session are listed here:
-
Type virtual machines in the search.
-
Under Services, select Virtual machines.
-
In the Virtual machines page, select Create and then Virtual machine. The Create a virtual machine page opens.
-
In the Basics tab, under Project details, make sure the correct subscription is selected and then choose to Create new resource group. Type myResourceGroup for the name. More on resource groups here.
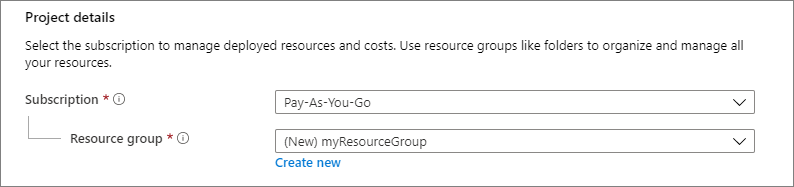
Screenshot of the Project details section showing where you select the Azure subscription and the resource group for the virtual machine
- Under Instance details, type myVM for the Virtual machine name, and choose Ubuntu 20.04 LTS - Gen2 for your Image. Leave the other defaults. The default size and pricing is only shown as an example. Size availability and pricing are dependent on your region and subscription. More on sizes for VMs in Azure here.
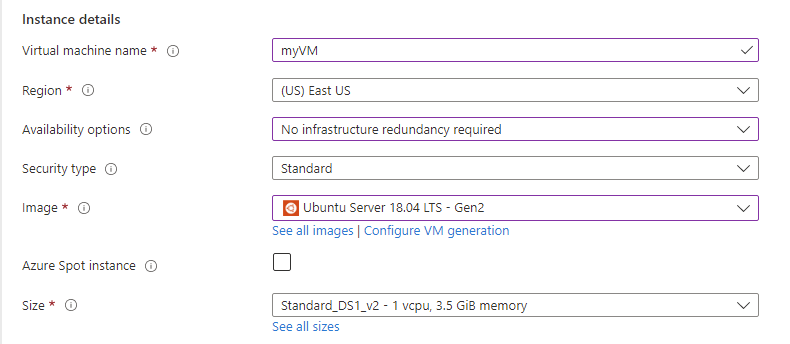
Screenshot of the Instance details section where you provide a name for the virtual machine and select its region, image, and size.
-
Under Administrator account, select SSH public key.
-
In Username type azureuser.
-
For SSH public key source, leave the default of Generate new key pair, and then type myKey for the Key pair name.
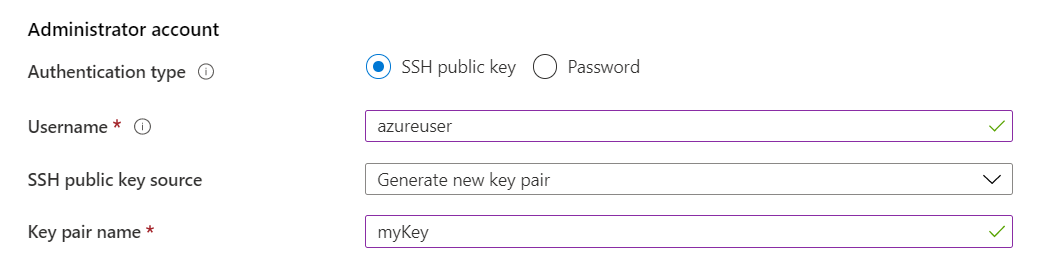
Screenshot of the Administrator account section where you select an authentication type and provide the administrator credentials
- Under Inbound port rules > Public inbound ports, choose Allow selected ports and then select SSH (22) and HTTP (80) from the drop-down.
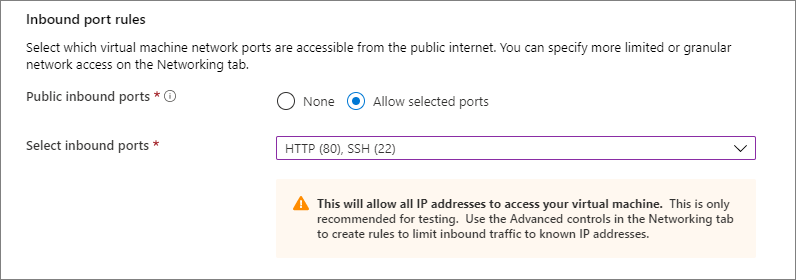
Screenshot of the inbound port rules section where you select what ports inbound connections are allowed on
-
Leave the remaining defaults and then select the Review + create button at the bottom of the page.
-
On the Create a virtual machine page, you can see the details about the VM you are about to create. When you are ready, select Create.
-
When the Generate new key pair window opens, select Download private key and create resource. Your key file will be download as myKey.pem. Make sure you know where the .pem file was downloaded, you will need the path to it in the next step.
-
If you get an error message: "The suscription is not registered to use namespace Microsoft.Compute" means you need to register the computing service in your Azure subscription. To do so, please proceed as described here --see the "Portal" instructions here
-
When the deployment is finished, select Go to resource.
-
On the page for your new VM, select the public IP address and copy it to your clipboard.
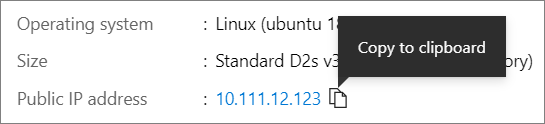
Screenshot showing how to copy the IP address for the virtual machine
Create an SSH connection with the VM.
- If you are on a Mac or Linux machine, open a Bash prompt. If you are on a Windows machine, open a PowerShell prompt.
- At your prompt, open an SSH connection to your virtual machine. Replace the IP address with the one from your VM, and replace the path to the .pem with the path to where the key file was downloaded.
ssh -i ./Downloads/myKey1.pem azureuser@10.111.12.123
- If you get an error:
@@@@@@@@@@@@@@@@@@@@@@@@@@@@@@@@@@@@@@@@@@@@@@@@@@@@@@@@@@@
@         WARNING: UNPROTECTED PRIVATE KEY FILE!          @
@@@@@@@@@@@@@@@@@@@@@@@@@@@@@@@@@@@@@@@@@@@@@@@@@@@@@@@@@@@
Permissions 0644 for './Downloads/myKey1.pem' are too open.
It is required that your private key files are NOT accessible by others.
This private key will be ignored.
Load key "./Downloads/myKey1.pem": bad permissions
azureuser@10.111.12.123: Permission denied (publickey).
Then you need to adjust the permissions for your key file:
chmod 400 ./Downloads/myKey1.pem
To see your VM in action, install the NGINX web server. From your SSH session, update your package sources and then install the latest NGINX package.
sudo apt-get -y update
sudo apt-get -y install nginx
exit
When done, type exit to leave the SSH session.
Use a web browser of your choice to view the default NGINX welcome page. Type the public IP address of the VM as the web address. The public IP address can be found on the VM overview page or as part of the SSH connection string you used earlier.
