A polished Dashboard card for the dreame_vacuum Home Assistant integration — fully responsive, looks great on both desktop dashboards and mobile views. Designed for the Dreame X40 Ultra but works with any Dreame robot vacuum the integration supports.
Status: v1.0.0 — initial public release. The card auto-discovers all related select / number / switch / sensor / time / button entities from the entity prefix, so no extra wiring is required beyond enabling the entities you want.
This card is a frontend for the dreame_vacuum integration by @Tasshack — install that integration first, otherwise the card has nothing to display.
The card itself contains no logic for talking to the robot; it reads from and writes to the entities the integration creates (vacuum, sensors, selects, switches, numbers, times, buttons). Without the integration set up and connected to your Dreame robot, the card will just show "Entity not found".
Install the integration via HACS:
- In HACS, click the three-dot menu → Custom repositories.
- Add
https://github.com/Tasshack/dreame-vacuumwith type Integration. - Find Dreame Vacuum in HACS, download it, and restart Home Assistant.
- Settings → Devices & Services → Add Integration → Dreame Vacuum and follow the prompts (Mi Home / Dreamehome account, or local connection).
- Once your robot shows up as
vacuum.<your_robot_name>in HA, you're ready to add this card.
The integration also ships a long list of disabled entities (per-room cycles, suction, wetness, DnD timers, …). Open Settings → Devices & Services → Dreame Vacuum → click your robot → "+x disabled entities" and enable the ones this card needs (see the Recommended Dreame entities section further down).
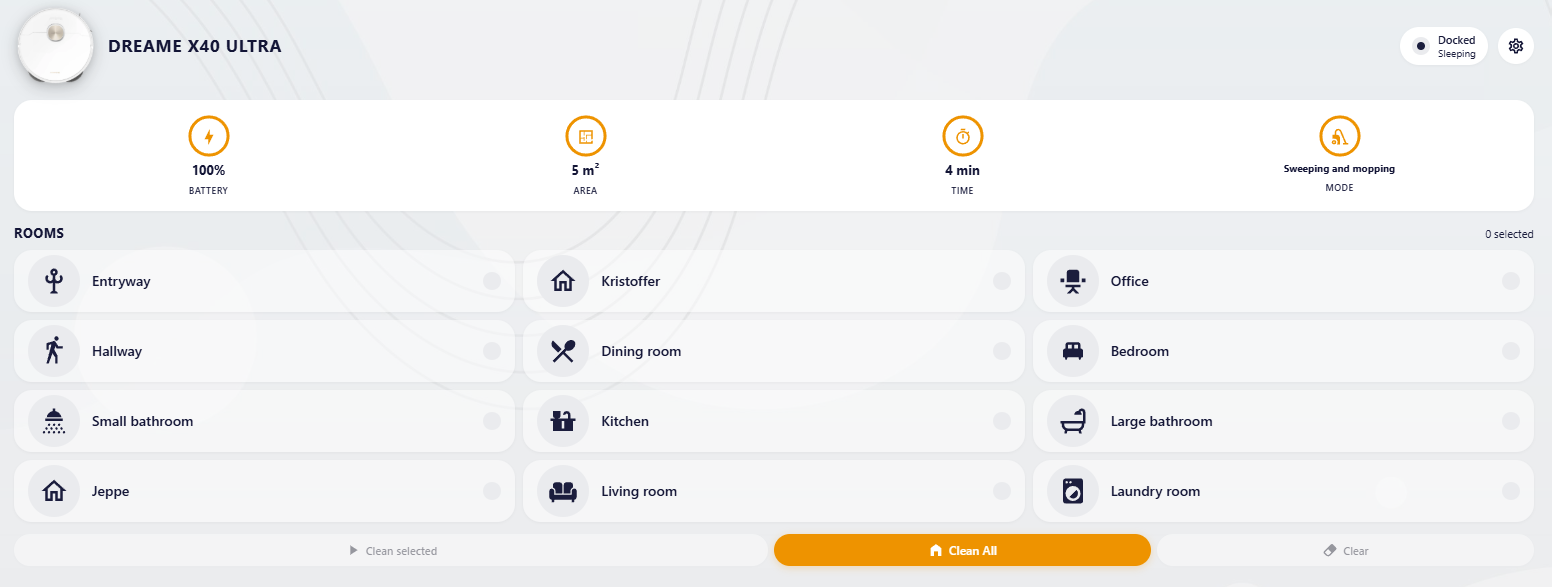
- Drop-in replacement for the default vacuum card with a layout tuned for everyday use: pick rooms or send the robot home with one tap, see status / battery / area / time at a glance.
- All the controls in one place — three tabs cover cleaning behaviour (auto vs. manual), robot preferences (DnD, volume, child lock, carpets) and dock care (auto-empty, drying, detergent dosing).
- Dreame-app-style sliders for granular controls: 1–32 wetness level, 1x/2x/3x cleaning cycles, etc.
- Theme-aware — picks up your HA theme's accent and surface colors automatically. Looks like part of your dashboard, not a sticker on top.
- Respects what's enabled in HA — sections and rows simply don't render when their underlying entity is disabled in the Dreame integration. No empty boxes, no broken UI, no extra config.
While a job runs, the room grid is replaced with a focused overlay that shows the present location, the room being cleaned, and quick actions for Pause/Resume, Self-clean, and End job. The robot image rotates slowly and pulses with the accent color so you can tell at a glance the job is alive.
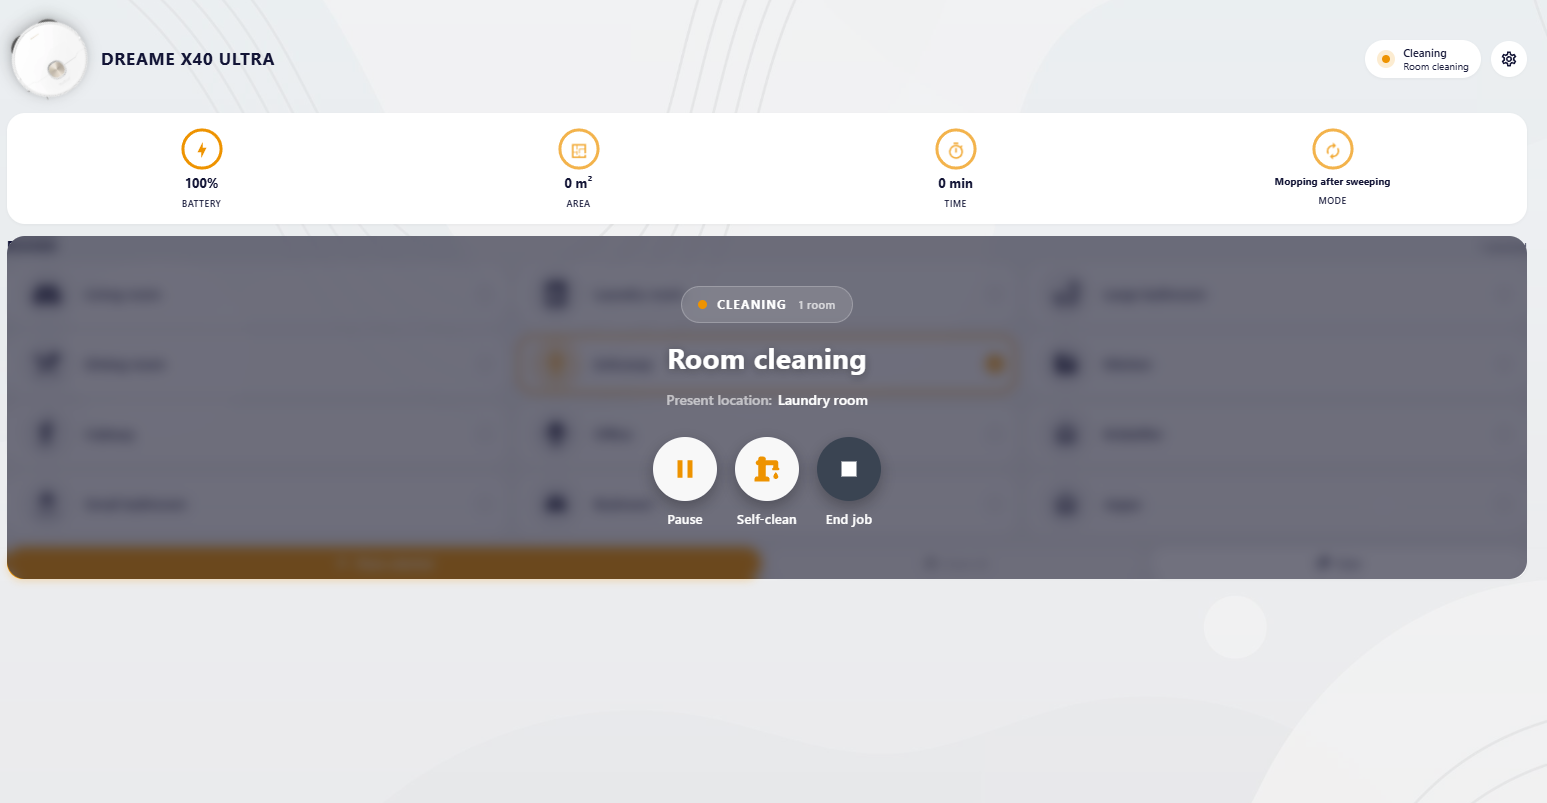
The overlay survives mid-job dock visits (mop wash, drying) so it doesn't flash off while the robot is briefly stationary. It auto-closes when Dreame reports the task as completed.
Whenever the integration reports an issue (cleanup route blocked, low water, dirty water tank full, missing mop pad, brush due for replacement, sensors that need cleaning, dust bag full, etc.) a white card with a red warning triangle appears between the hero and the rooms grid. The banner shows the most important warning by name and indicates how many additional issues are queued (e.g. "+2 more"). It disappears completely when there's nothing to flag — no permanent empty box wasting space.
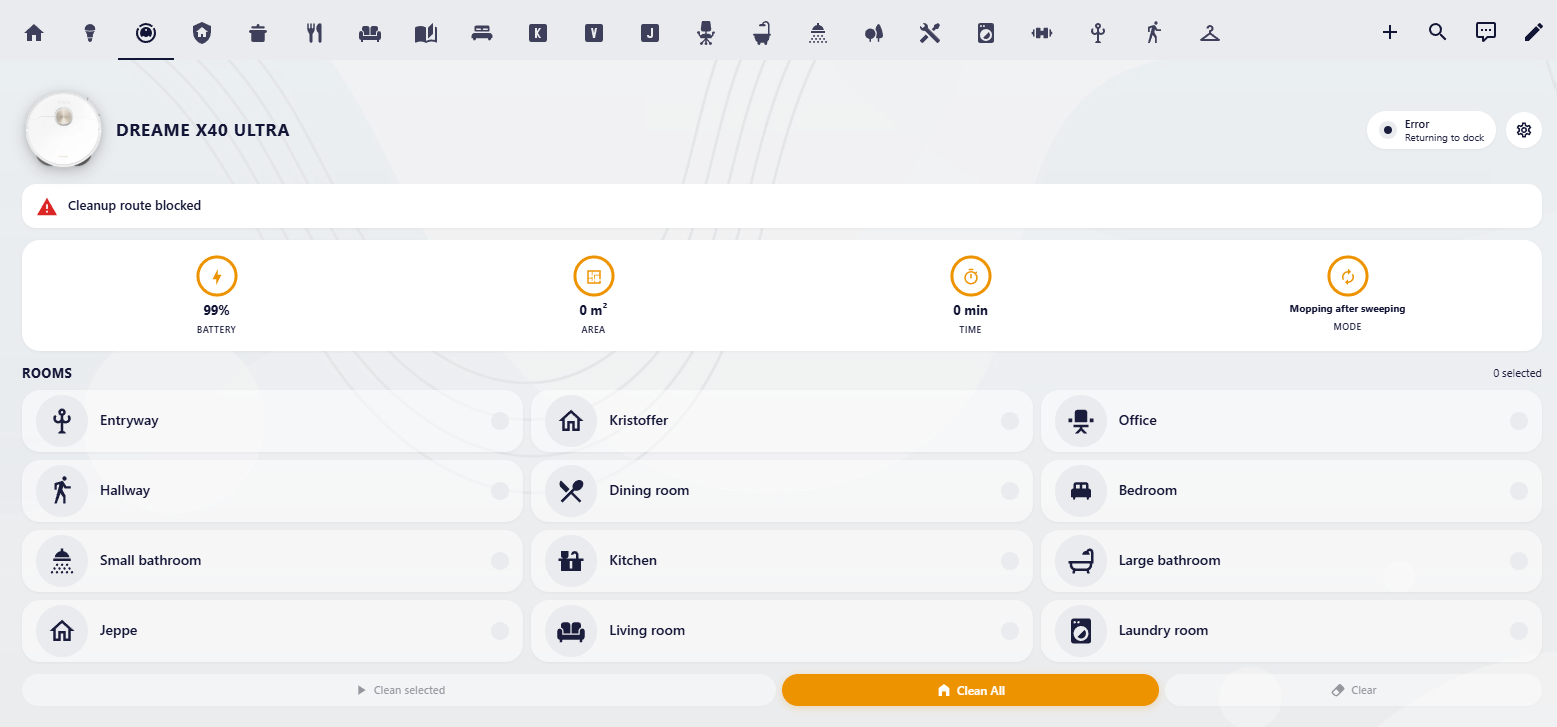
The status pill on the right of the hero also flips to "Error" with a sub-label describing what the robot is currently doing about it (e.g. "Returning to dock"), so you get the cause + the consequence in one glance.
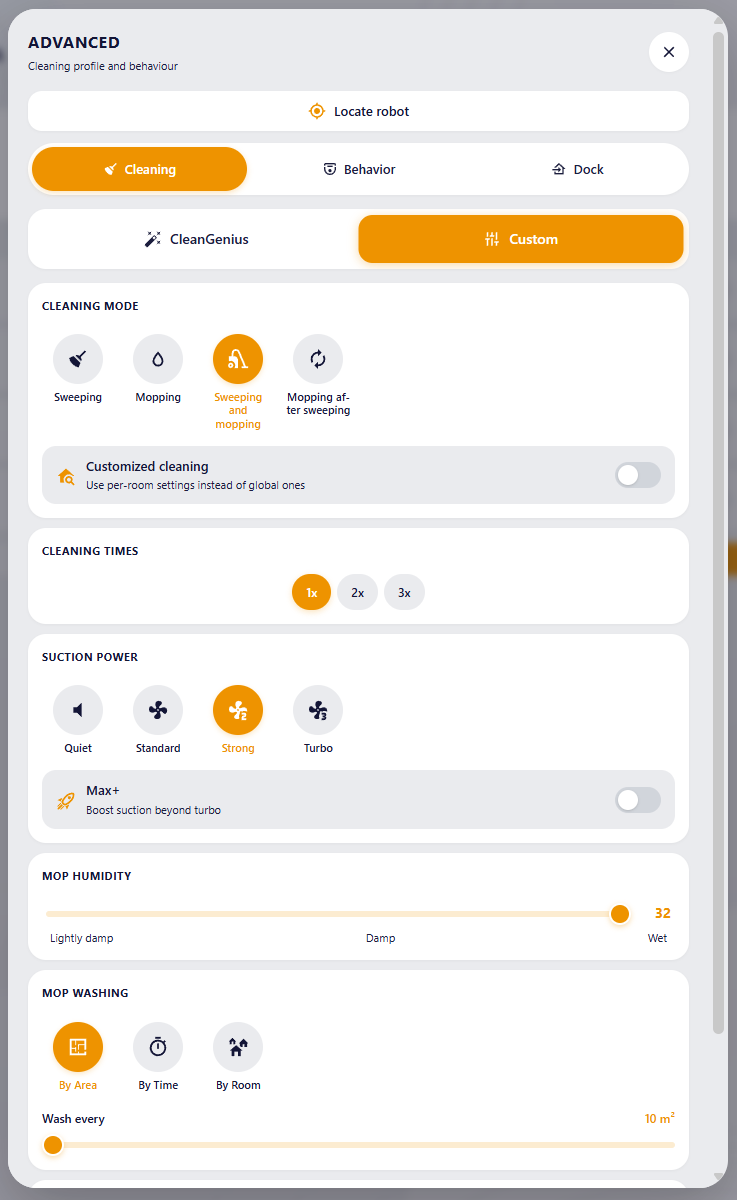
The Cleaning tab uses a slide-toggle between CleanGenius (smart auto) and Custom (manual). When in Custom, the visible controls adapt to the cleaning mode you pick — only options that affect the active job show up. This keeps the menu short and focused on what actually changes the result.
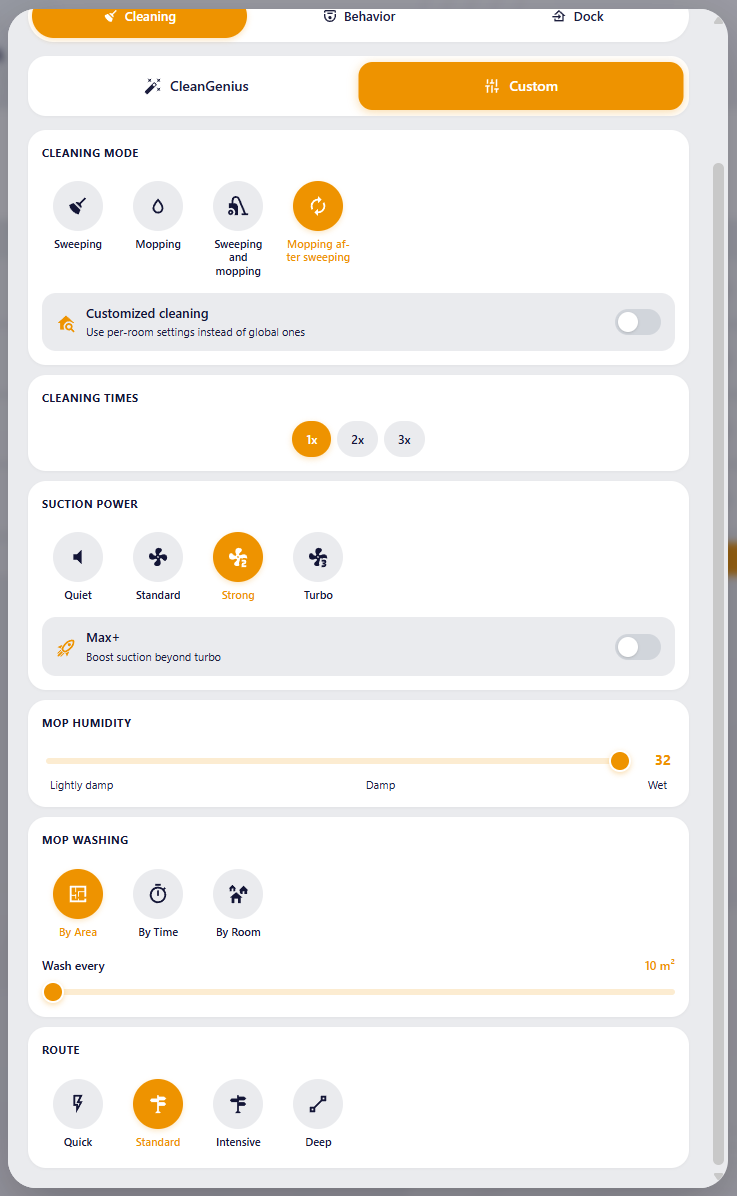
When the robot is doing both, you see suction power, mop humidity, mop washing schedule, and route together — everything that matters for combined jobs.
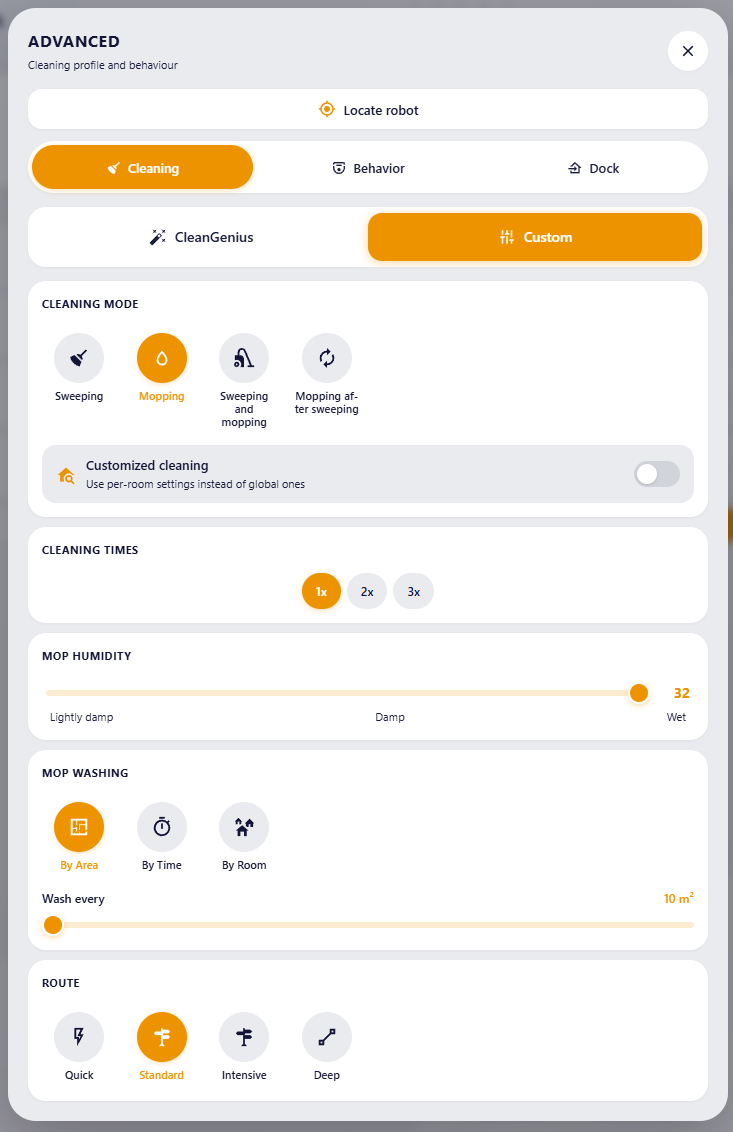
Mop-related sections (humidity, washing) hide automatically because they don't apply to a vacuum-only job.
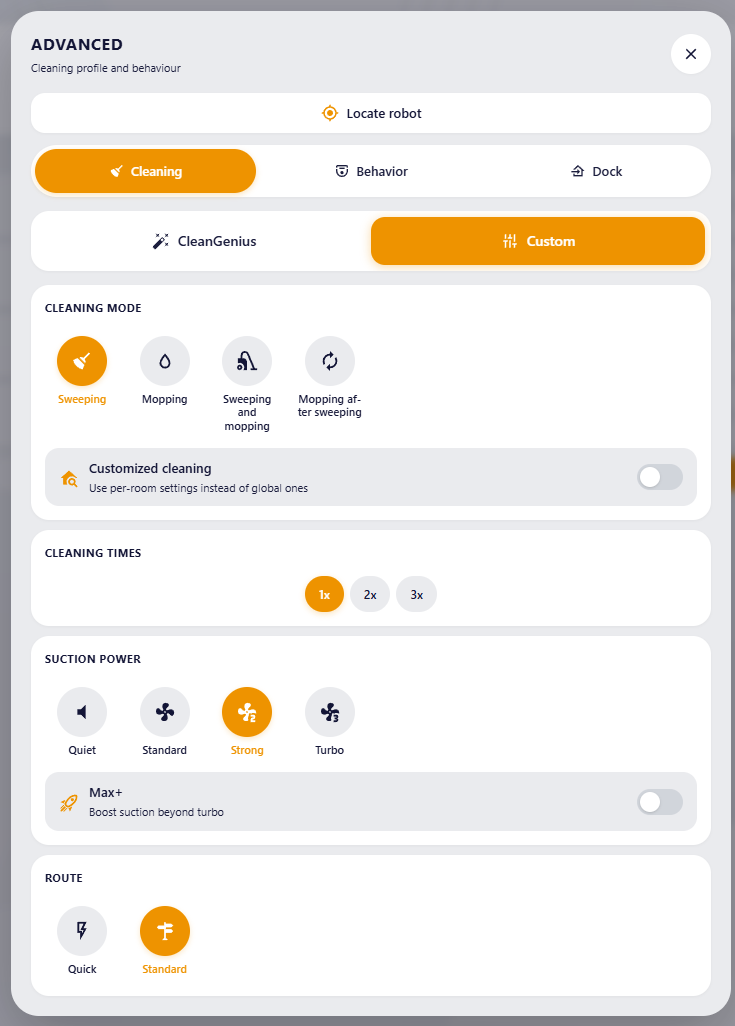
Suction Power hides since the robot won't be vacuuming. Mop-specific controls take center stage.
Both flows in sequence — same full controls as Sweep+Mop, plus the four-option Route selector at the bottom.
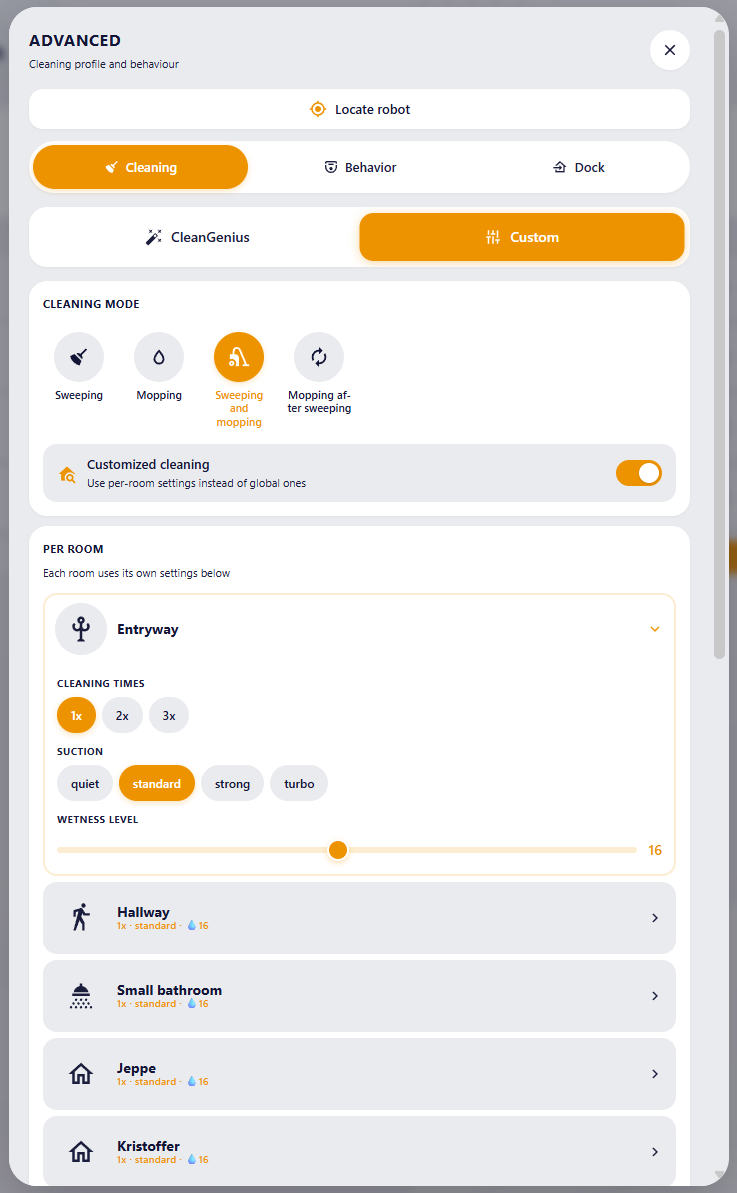
Toggle Customized cleaning on and the global controls are replaced with a collapsible per-room view. Each room gets its own cleaning times, suction level and wetness level slider — independent of the global settings. Closed rooms show their current settings as a one-line preview ("1x · standard · 💧16") so you can scan the whole house without opening every accordion.
Settings that affect how the robot behaves on the floor and at the dock.
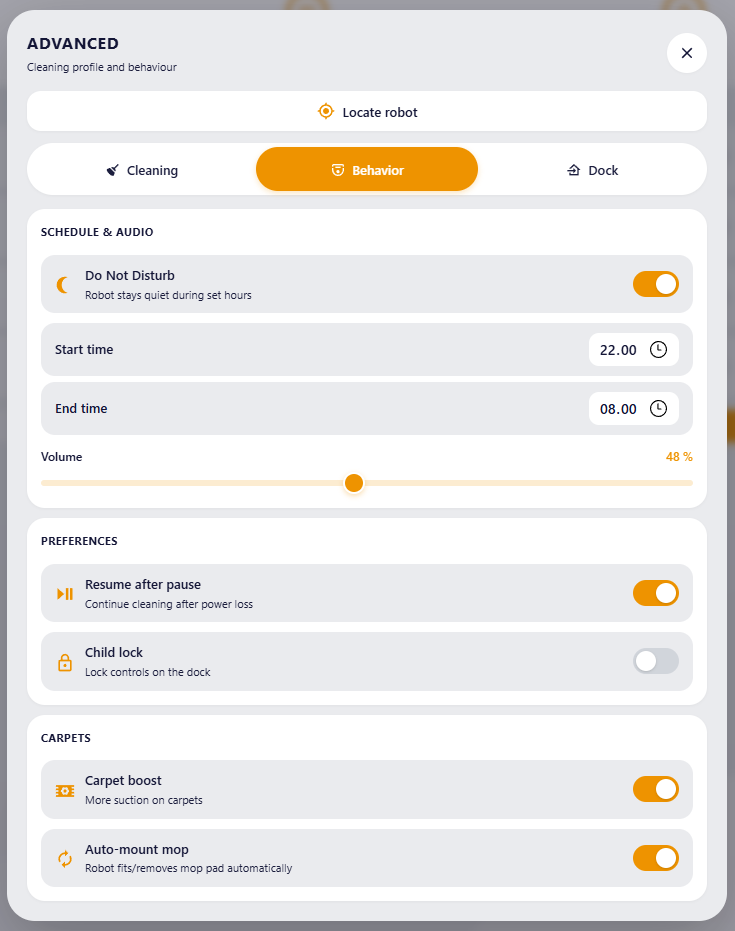
- Schedule & Audio — DnD toggle, with start/end time pickers that appear only when DnD is on, plus a volume slider.
- Preferences — Resume after pause (continue cleaning after a power blip), Child lock (disable physical buttons on the dock).
- Carpets — Carpet boost (extra suction on carpets), Carpet avoidance (skip carpeted areas during mop jobs), Auto-mount mop (robot fits / removes the mop pad on its own).
Each toggle, slider and section is independent: if you only have, say, the carpet entities enabled in HA, the Schedule & Audio and Preferences sections simply don't appear.
Settings and quick actions for the dock itself.
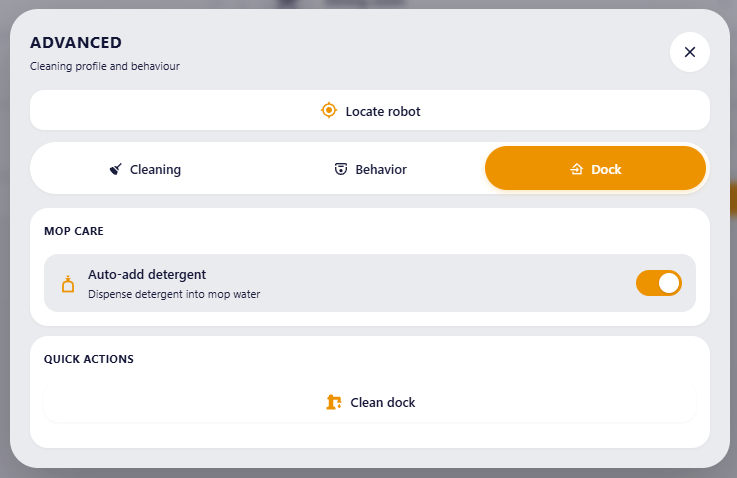
- Auto Empty — toggle the dock's automatic dust collection plus a frequency picker (Smart / Auto / Always / etc.) that only shows when auto-empty is on.
- Mop Care — Detergent dosing (the dock automatically blends floor cleaner into the mop water — only useful if you have the detergent cartridge installed), and a drying time slider.
- Quick Actions — One-tap buttons that fire HA
button.pressservices. Currently shipping with Clean dock (button.<prefix>_base_station_cleaning) — runs the dock's self-cleaning cycle on demand.
More quick actions can be added in future versions (manual mop wash, drain dirty water, manual mop drying, etc.) — the entities already exist in the integration; we just haven't surfaced them as buttons yet.
The card never throws "entity not found" errors. Instead, every section is rendered conditionally based on what's actually enabled in your Home Assistant. Concretely:
- Per-room sliders / pills show "entity not enabled" muted text or skip the section when their per-room entity isn't enabled.
- Sub-toggles like Max+, Resume after pause, Child lock, Carpet boost, Carpet avoidance, Auto-mount mop, Auto-empty, Detergent — each appears only when its switch entity exists. A whole section (e.g. Carpets) hides if none of its three toggles are enabled.
- DnD time pickers appear only when (a) DnD is currently turned on AND (b) at least one of
time.<prefix>_dnd_start/time.<prefix>_dnd_endis enabled. - Volume slider hides if
number.<prefix>_volumeisn't enabled. - Drying time slider hides if
number.<prefix>_drying_timeisn't enabled. - Mop Humidity prefers the granular
wetness_levelslider (1–32 with Lightly damp / Damp / Wet labels). If only the legacymop_pad_humidityselect is enabled, it falls back to a 4-circle preset row. If neither is available, the whole section is omitted. - Cleaning Times pills (1x / 2x / 3x) show only when Customized cleaning is OFF (because per-room overrides handle this when ON).
- Mop Washing area / time slider appears only when the corresponding self-clean frequency mode is selected (By Area shows the m² slider; By Time shows the minutes slider).
- Suction Power stays visible whenever the suction list OR the Max+ toggle exist — so you can never get stuck with Max+ on and no way to turn it back off.
- Cleaning Modes that don't apply (e.g. mop options when in Sweep mode) are hidden — see the four mode-specific screenshots above.
- Cleaning overlay only appears while the robot is actively cleaning (or during a mid-job dock visit). It auto-closes when Dreame reports the task as
completed. - Alert banner only renders when there is at least one active warning (low water, dirty water full, mop pad missing, brush due for replacement, sensor cleaning, dust bag full, …).
- Image in the hero defaults to a
mdi:robot-vacuumicon if you don't setimage:in the YAML. - Title falls back to the entity's
friendly_nameif you don't settitle:.
- In Home Assistant, open HACS.
- Click the three-dot menu in the top right → Custom repositories.
- Add this repository:
- Repository:
https://github.com/hedegaard1/dreame-vacuum-card - Type:
Dashboard
- Repository:
- Find Dreame Vacuum Card in HACS, click Download, and select the latest version.
- Refresh your browser (hard refresh: Ctrl+F5 or Cmd+Shift+R) so HA picks up the new resource.
- Download
dreame-vacuum-card.jsfrom the latest release. - Copy it to
/config/www/dreame-vacuum-card/on your HA host. - In Home Assistant, go to Settings → Dashboards → Resources and add:
- URL:
/local/dreame-vacuum-card/dreame-vacuum-card.js - Resource type: JavaScript Module
- URL:
- Hard-refresh your browser.
type: custom:dreame-vacuum-card
entity: vacuum.dreame_x40_ultratype: custom:dreame-vacuum-card
entity: vacuum.dreame_x40_ultra # required — your Dreame vacuum entity
title: Dreame X40 Ultra # optional — header title (defaults to friendly_name)
image: /local/DreameX40Ultra.png # optional — path to a robot image (falls back to mdi:robot-vacuum icon)The card auto-discovers everything else (suction level, mop humidity, CleanGenius, DnD, room settings, …) from the entity prefix. No extra wiring required.
A bundled top-down image of a Dreame robot vacuum is included at images/dreame-vacuum.png — feel free to use it as-is.
To use the bundled image:
- Download
images/dreame-vacuum.pngfrom this repo. - Copy it to
/config/www/on your Home Assistant host (creates the path/local/dreame-vacuum.pngfor use in YAML). - Reference it in your card config:
type: custom:dreame-vacuum-card
entity: vacuum.dreame_x40_ultra
image: /local/dreame-vacuum.png
To use your own image:
The hero icon area is square (around 84 × 84 px on desktop, 56 × 56 px on mobile). For best results:
- Aspect ratio: roughly 1:1 (square). Wider or taller images are letterboxed (
object-fit: contain) so nothing gets cropped, but they look best square. - Resolution: at least 400 × 400 px so the image stays crisp on high-DPI screens. The bundled image is 543 × 521 px.
- Background: transparent PNG is recommended — the soft drop-shadow that the card applies works much better when the image cuts out cleanly from its background.
- Subject framing: centered, with a small margin so the rotation animation (when the robot is active) doesn't clip the corners.
If your image doesn't follow these guidelines the card will still render — but the drop-shadow may look odd on a hard-edged photo, and the slow-rotation animation may show empty rectangular corners spinning around.
If you don't set image: at all, the hero falls back to a built-in mdi:robot-vacuum icon — also rotates and pulses with the accent color when the robot is active.
The card hides any section whose entity is disabled. To unlock the full feature set, enable these in Settings → Devices & Services → Dreame Vacuum → click your robot → "+x disabled entities":
Per-room (one set per room id):
select.<prefix>_room_<id>_order— used to sort the room gridselect.<prefix>_room_<id>_cleaning_timesselect.<prefix>_room_<id>_suction_levelnumber.<prefix>_room_<id>_wetness_level
Global behaviour:
switch.<prefix>_dnd+time.<prefix>_dnd_start+time.<prefix>_dnd_endnumber.<prefix>_volumeswitch.<prefix>_resume_cleaning,switch.<prefix>_child_lockswitch.<prefix>_carpet_boost,switch.<prefix>_carpet_avoidance,switch.<prefix>_auto_mount_mop
Cleaning controls:
switch.<prefix>_customized_cleaning(toggle per-room overrides)switch.<prefix>_max_suction_power(Max+)number.<prefix>_wetness_level(the slider — falls back tomop_pad_humiditycircles if missing)
Dock:
switch.<prefix>_auto_dust_collecting,select.<prefix>_auto_empty_frequencyswitch.<prefix>_auto_add_detergent,number.<prefix>_drying_timebutton.<prefix>_base_station_cleaning
The card ships with English (default) and Danish. To add another language:
- Open
dreame-vacuum-card.jsand find theTRANSLATIONSobject near the top. - Locate your language stub (e.g.
de: {}). Replace it with the same keys as thedablock above and translate each value. - Find
LOCALIZED_LABELS(the next big object). Mirror the structure ofdafor your language — only fill in the keys you can confidently translate; missing keys fall back to English automatically. - Open a Pull Request titled
Add <Language> translationand link to any sources you used.
The card uses
hass.locale.languagesliced to 2 characters, sopt-BR→ptandzh-Hans→zh. If you need locale-specific variants (e.g. distinct pt-BR), open an issue first so we can plan a small change to the language detection.
- Fork the repo, work on a feature branch, open a PR against
main. - Keep the file as a single
dreame-vacuum-card.js(HACS expects this). - Don't break existing config keys; add new optional ones with sensible defaults.
- Test on at least one mobile and one desktop dashboard layout if your change touches CSS.
Built on top of the excellent dreame-vacuum integration by @Tasshack, without which this card would have nothing to display.
MIT — © Martin Fiil