Building
Last revision: ver. 5.0-alpha1 - 31 October 2013
On most platforms, omegalib is distributed as a source-only project. Users are responsible for creating binaries for their operating system and architecture. The build process is kept as simple as possible and should require very little configuration effort by the user. Omegalib can build out-of-the-box and has no external dependencies, unless the user wants to activate advanced functionalities like vtk support and osgEarth.
This is the current supported status of omegalib:
- Windows XP/Vista/7: VS2010 32bit builds and is regularly tested. VS2008 32bit deprecated and may not work. 64bit builds should work but are not tested regularly.
- Linux: 64bit builds and is regularly tested (SUSE). 32bit tested and running on Ubuntu.
- OSX, Intel: Works only on Mac OSX 10.7 and higher
This section explains how to build omegalib on Windows. The basic procedure and requirements are similar for all supported operating systems, so you can use this as a general guideline.
- An Git client (I suggest TortoiseGit: https://code.google.com/p/tortoisegit/)
- Visual Studio 2010 (Visual C++ 2010 Express edition works too, Download it here)
- CMake Download it here
- (Optional) Vtk Download here. You need this only if you want to build omegaVtk and add vtk support.
- clone the repository, in recursive mode (to make sure the omicron submodule is initialized):
git clone https://github.com/febret/omegalib.git --recursive - Run cmake-gui.
- In the where is the source code field, specify the directory where you checked out the source code.
- In the where to build the binaries field, specify a directory you will want your project files and binaries to be generated.
- Hit Configure: The option table will look simlar to the following figure:

*The Windows CMake GUI. Versions on other operating systems have a similar layout.*
- Enable and disable desired options. For a guide on options go to the bottom of this page. **Note:** omegalib should build just fine if you leave everything to their default values. - **Important!** hit **configure** again, **even if you didn't change anything**. You may have to repeat this process multiple times if you changed options and new options appear. - Once you are done configuring all build options, hit **Generate**. If the process ends without errors, you will have Visual Studio solution files under your build directory.SUGGESTION: Keep both directories under a single 'root' folder. For example you can have something like this
-
omegalib: your root folder -
core: the source code directory, cloned from https://github.com/febret/omegalib.git -
build: the build and binaries directory
You should now be able to open the generated Visual Studio solution and build everything. If you encounter any problem take a look at the How to guide.
You can run a demo by going on the output folder of your binary directory (bin/debug or bin/release depending on which configuration you built). A good basic demo to test is ohello.exe:

*If you see this, you have succesfully built omegalib. You deserve ice cream!*
Another way to run an application is to right click on it inside visual studio (all applications are in the apps solution folder), select Set as StartUp Project and click on the run button.
As for windows, you will need git and cmake installed. Use the package manager that comes with your OS/Distro to find and install them. On linux, you will also need the following installed
flexbisonlibreadline-dev-
zlibcTogether with other basic libraries and tool like the openGL developement libs and the g++ compiler
To perform a quick download and build of omegalib on Linux or OSX, you can use this script: http://uic-evl.github.io/omegalib/getomega
Just download the script somewhere, make it executable and run it:
> wget http://uic-evl.github.io/omegalib/getomega
> chmod +x getomega
> ./getomega
That's it! The script will clone the git repository, generate a makefile for your platform and start a build. Go get a coffee. This will take a bit :)
By default the command builds the master version of omegalib. If you want to build a specific tagged version, add its name as a command line argument, like ./getomega v4.1. The script will create a separate directory for every version you build, so you can have more than one side-by-side.
If you want to see a list of available versions type ./getomega versions.
The basic instructions are the same as for the Windows guide. Under linux, you will use make as your build system. To summarize, the process will be:
- create a new directory for omegalib:
mkdir omegalibcd omegalib- Download the omegalib source code:
git clone https://github.com/febret/omegalib.git --recursivegit svn clone https://omegalib-apps.googlecode.com/svn/trunk apps --username<your-username>- create a build directory
mkdir buildcd build- run cmake using one of the following commands:
cmake -i ../coreccmake ../core-
cmake-gui. - (The commands will respectively run an interactive shell version of cmake, a curses based version, and a gui version similar to the windows one)
- Follow the same steps as the one in windows to generate a makefile
- run
make - if the build succeeds, get in the
build/bindirectory and you should find your libraries and compiled demo applications.
On some linux distributions, the build may fail due to a missing eq/eq.h include. For some reason cmake won't compute project dependencies correctly and it will forget to build the Equalizer project before building omega. A quick solution to this problem is building equalizer manually:
run make equalizer and wait for equalizer to build, then run make.
To run any omegalib app, you initially need to have X11 running. Go to /Applications/Utilities/ and run X11. If X11 is not running, you will get an error that the display cannot be initialized and see nothing!
If you want to run omegalib applications from any directory, you will need to set some environment variables. What follows is an example of environment variables you should set on your system, where <OMEGA_BUILD_DIR> should be substituted to the path of your omegalib build directory.
setenv PATH <OMEGA_BUILD_DIR>/bin:/usr/bin/qmake:/usr/local/bin:.
setenv OSG_LIBRARY_PATH <OMEGA_BUILD_DIR>/bin/osgPlugins-3.0.1:<OMEGA_BUILD_DIR>/bin
setenv PYTHONPATH <OMEGA_BUILD_DIR>
setenv DYLD_LIBRARY_PATH <OMEGA_BUILD_DIR>/bin:<OMEGA_BUILD_DIR>/osgPlugins-3.0.1
Starting form version 5.0, omegalib features a fully modular design. This new design allows users to start with a very lightweight version of omegalib, and customize it with the modules they need. Modules are kept in separate repositories so each revision history is separate, and development by different users is easier. Modules can be installed at configuration time in CMake, either by clicking on the checkboxes for modules you want to install, or by listing the desired module names in the MODULES cmake variable.
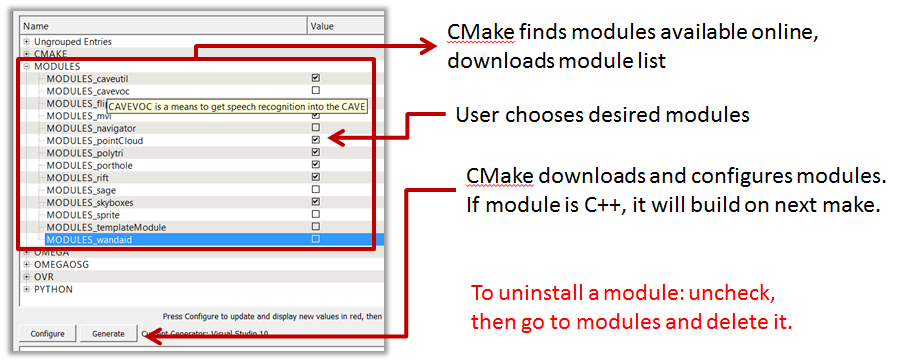
*How to install omegalib modules using the CMake GUI*
Omegalib does the following to perform module search and installation:
- During the first cmake configuration, a module list file is downloaded from a specific github repository, called the module hub. The predefined module hub is http://github.com/omega-hub/hub, and it can be customized by setting the
OMEGA_HUB_URLCMake variable. Changing the hub repository is useful if you want to maintan your own module list. - The module list file is simply a
CMakeLists.txtfile containing a list of available modules, the url of their github repository and a brief description. - CMake populates a list with checkable boxes for each module in the list
- The user clicks on modules that should be installed, or lists their names in the
MODULESCMake variable. The variable is particularly useful for command line configurations: for instance, typingcmake [path-to-omega-source] -DMODULES="cyclops sprite omegaVtk"will setup an omegalib build environment with the cyclops, sprite and omegaVtk modules (and all their dependencies) - CMake clones the github repositories of all the selected modules. The repositories get cloned in the
<omegaSource>/modulesdirectory. CMake then runs theCMakeLists.txtfile for each module. This file is used to setup the builds of native C++ modules, specify install commands, and lists module dependencies. The module dependencies are used to install additional required modules. - The user does a cmake configure (possibly multiple times), until all the modules are downloaded and all the dependencies have been resolved.
- the build environment is ready
Due to its new modular design, a few modules that were previously included in the omegalib core are now offered as separate modules. In particular these modules are cyclops, omegaOsg, omegaVtk, rift, mvi, caveutil, cavevoc, sprite, pointCloud.
If you want to create a cmake build that contains all the modules previously offered with omegalib 4.x (and a few more), simply use this cmake command:
build> cmake <path-to-omega-source> -DMODULES="vr-bundle"
The vr-bundle module (you can see it here: https://github.com/omega-hub/vr-bundle/blob/master/CMakeLists.txt) is a simple, empty bundle module that just installs all the previously listed modules as its dependencies.
At startup, omegalib looks for a file named default.cfg to configure the system and application. This file can be in your current working directory or, if one is not found there, omegalib will look in up in the omegalib source directory under data. You can see the content of this file here: https://github.com/febret/omegalib/blob/master/data/default.cfg
By default, this file just redirects omegalib to the right system configuration file. If you are running on your laptop, you want to make sure `systemConfig="system/desktop.cfg' is the only uncommented line in the file.
For a full reference on configuration files check the [ConfigReference] page.
This section is a quick guide to some build options offered in cmake.
-
OMEGA_ENABLE_VLD: WIndows only, enabled a memory leak detector for debug builds of the library. Will significantly slow down omegalib applications. -
OMEGA_USE_DISPLAY_EQUALIZER: Enables Equalizer display system support. You should leave this turned on. -
OMEGA_USE_DISPLAY_GLUT: Enables GLUT display system support. GLUT support is not really tested and may be broken. By default, omegalib uses the Equalizer display system even if you leave this option on, so you should not need to change it. -
OMEGA-ENABLE-AUTO-UPDATE: WIndows only, enables the omegalib auto-updater in orun -
OMEGA-HUB-URL: The url of the github repository containing the module list -
MODULES: A space-separated list of modules to install. Alternative to checking modules in theMODULES_section of the CMake configuration.