
Estimated time needed: 30 minutes
After completing this lab you will be able to:
- Extract data from a delimited file.
- Transform text data.
- Load data into a database using shell commands.
Skills Network Cloud IDE (based on Theia and Docker) provides an environment for hands on labs for course and project related labs. Theia is an open source IDE (Integrated Development Environment), that can be run on desktop or on the cloud. to complete this lab, we will be using the Cloud IDE based on Theia and Postgres running in a Docker container.
Please be aware that sessions for this lab environment are not persisted. Every time you connect to this lab, a new environment is created for you. Any data you may have saved in the earlier session would get lost. Plan to complete these labs in a single session, to avoid losing your data.
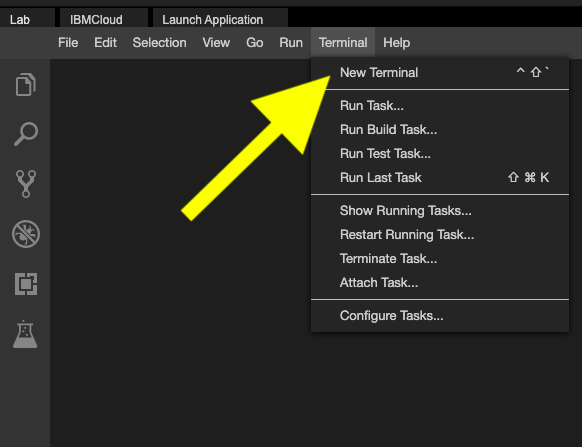
Open a new terminal, by clicking on the menu bar and selecting Terminal->New Terminal, as in the image below.
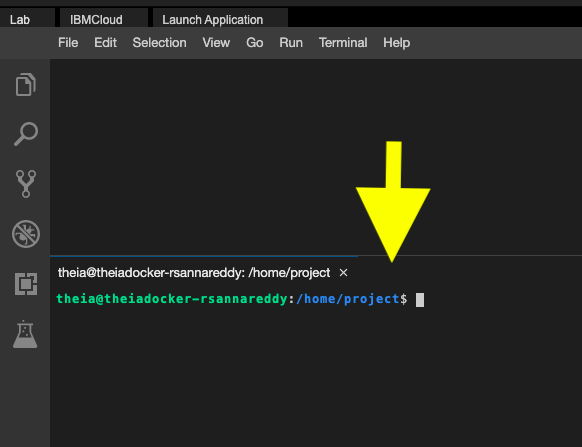
This will open a new terminal at the bottom of the screen as in the image below.
Run all the commands on the newly opened terminal. (You can copy the code by clicking on the little copy button on the bottom right of the codeblock below and then paste it, wherever you wish.)
The filter command cut helps us extract selected characters or fields from a line of text.
1.1 Extracting characters.
The command below shows how to extract the first four characters.
echo "database" | cut -c1-4
{: codeblock}
You should get the string 'data' as output.
The command below shows how to extract 5th to 8th characters.
echo "database" | cut -c5-8
{: codeblock}
You should get the string 'base' as output.
Non-contiguous characters can be extracted using the comma.
The command below shows how to extract the 1st and 5th characters.
echo "database" | cut -c1,5
{: codeblock}
You get the output : 'db'
1.2. Extracting fields/columns
We can extract a specific column/field from a delimited text file, by mentioning
- the delimiter using the
-doption, or - the field number using the
-foption.
The /etc/passwd is a ":" delimited file.
The command below extracts user names (the first field) from /etc/passwd.
cut -d":" -f1 /etc/passwd
{: codeblock}
The command below extracts multiple fields 1st, 3rd, and 6th (username, userid, and home directory) from /etc/passwd.
cut -d":" -f1,3,6 /etc/passwd
{: codeblock}
The command below extracts a range of fields 3rd to 6th (userid, groupid, user description and home directory) from /etc/passwd.
cut -d":" -f3-6 /etc/passwd
{: codeblock}
tr is a filter command used to translate, squeeze, and/or delete characters.
2.1. Translate from one character set to another
The command below translates all lower case alphabets to upper case.
echo "Shell Scripting" | tr "[a-z]" "[A-Z]"
{: codeblock}
You could also use the pre-defined character sets also for this purpose:
echo "Shell Scripting" | tr "[:lower:]" "[:upper:]"
{: codeblock}
The command below translates all upper case alphabets to lower case.
echo "Shell Scripting" | tr "[A-Z]" "[a-z]"
{: codeblock}
2.2. Squeeze repeating occurrences of characters
The -s option replaces a sequence of a repeated characters with a single occurrence of that character.
The command below replaces repeat occurrences of 'space' in the output of ps command with one 'space'.
ps | tr -s " "
{: codeblock}
In the above example, the space character within quotes can be replaced with the following : "[:space:]".
2.3. Delete characters
We can delete specified characters using the -d option.
The command below deletes all digits.
echo "My login pin is 5634" | tr -d "[:digit:]"
{: codeblock}
The output will be : 'My login pin is'
On the terminal run the following command to start the PostgreSQL database.
start_postgres
{: codeblock}
Note down the access information presented towards the end of these messages, especially the CommandLine:.
A sample commandline displayed looks as given below.
`psql --username=postgres --host=localhost`
Running this command from the shell prompt will start the interactive psql client which connects to the PostgreSQL server.
In this exercise we will create a table called 'users' in the PostgreSQL database. This table will hold the user account information.
The table 'users' will have the following columns:
- uname
- uid
- home
Step 1: Connect to the database server
Use the connection string saved in the previous exercise to connect to the PostgreSQL server.
Run the command below to login to PostgreSQL server.
psql --username=postgres --host=localhost
{: codeblock}
You will get the psql prompt: 'postgres=#'
Step 2: Connect to a database.
We will use a database called template1 which is already available by default.
To connect to this database, run the following command at the 'postgres=#' prompt.
\c template1
{: codeblock}
You will get the following message.
You are now connected to database "template1" as user "postgres".
Also, your prompt will change to 'template1=#'.
Step 3: Create the table
Run the following statement at the 'template1=#' prompt:
create table users(username varchar(50),userid int,homedirectory varchar(100));
{: codeblock}
If the table is created successfully, you will get the message below.
CREATE TABLE
Step 4: Quit the psql client
To exit the psql client and come back to the Linux shell, run the following command:
\q
{: codeblock}
In this exercise, we will create a shell script which does the following.
- Extract the user name, user id, and home directory path of each user account defined in the /etc/passwd file.
- Save the data into a comma separated (CSV) format.
- Load the data in the csv file into a table in PostgreSQL database.
5.1. Create a shell script
Step 1: On the menu on the lab screen, use File->New File to create a new file.
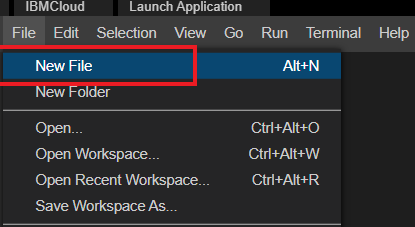
Step 2: Give the name as 'csv2db.sh' and click 'OK'.

Step 3: State the objective of the script using comments.
Copy and paste the following lines into the newly created file.
# This script
# Extracts data from /etc/passwd file into a CSV file.

# The csv data file contains the user name, user id and
# home directory of each user account defined in /etc/passwd

# Transforms the text delimiter from ":" to ",".
# Loads the data from the CSV file into a table in PostgreSQL database.
{: codeblock}
Step 4: Save the file using the File->Save menu option.
5.2. Extract required user information from /etc/passwd
In this step, we will extract user name (field 1), user id (field 3), and home directory path (field 6) from /etc/passwd file using the cut command.
The /etc/passwd has ":" symbol as the column separator.
Copy the following lines and add them to the end of the script.
# Extract phase

echo "Extracting data"

# Extract the columns 1 (user name), 2 (user id) and
# 6 (home directory path) from /etc/passwd

cut -d":" -f1,3,6 /etc/passwd
{: codeblock}
Save the file.
Run the script.
bash csv2db.sh
{: codeblock}
Verify that the output contains the three fields, that we extracted.
5.3. Redirect the extracted output into a file.
In this step, we will redirect the extracted data into a file named extracted-data.txt
Replace the cut command at end of the script with the following command.
cut -d":" -f1,3,6 /etc/passwd > extracted-data.txt
{: codeblock}
Save the file.
Run the script.
bash csv2db.sh
{: codeblock}
Run the command below to verify that the file extracted-data.txt is created, and has the content.
cat extracted-data.txt
{: codeblock}
5.4. Transform the data into CSV format
The extracted columns are separated by the original ":" delimiter.
We need to convert this into a "," delimited file.
Add the below lines at the end of the script
# Transform phase
echo "Transforming data"
# read the extracted data and replace the colons with commas.

tr ":" "," < extracted-data.txt
{: codeblock}
Save the file.
Run the script.
bash csv2db.sh
{: codeblock}
Verify that the output contains ',' in place of ":".
Replace the tr command at end of the script with the command below.
tr ":" "," < extracted-data.txt > transformed-data.csv
{: codeblock}
Save the file.
Run the script.
bash csv2db.sh
{: codeblock}
Run the command below to verify that the file transformed-data.csv is created, and has the content.
cat transformed-data.csv
{: codeblock}
5.5. Load the data into the table 'users' in PostgreSQL
To load data from a shell script, we will use the psql client utility in a non-interactive manner.
This is done by sending the database commands through a command pipeline to psql with the help of echo command.
Step 1: Add the copy command
PostgreSQL command to copy data from a CSV file to a table is COPY.
The basic structure of the command which we will use in our script is,
COPY table_name FROM 'filename' DELIMITERS 'delimiter_character' FORMAT;
Now, add the lines below to the end of the script 'csv2db.sh'.
# Load phase
echo "Loading data"
# Send the instructions to connect to 'template1' and
# copy the file to the table 'users' through command pipeline.

echo "\c template1;\COPY users  FROM '/home/project/transformed-data.csv' DELIMITERS ',' CSV;" | psql --username=postgres --host=localhost
{: codeblock}
Save the file.
Run the script.
bash csv2db.sh
{: codeblock}
Run the command below to verify that the table users is populated with the data.
echo '\c template1; \\SELECT * from users;' | psql --username=postgres --host=localhost
{: codeblock}
Congratulations! You have created an ETL script using shell scripting.
- Problem:
Copy the data in the file 'web-server-access-log.txt.gz' to the table 'access_log' in the PostgreSQL database 'template1'.
The file is available at the location : "https://cf-courses-data.s3.us.cloud-object-storage.appdomain.cloud/IBM-DB0250EN-SkillsNetwork/labs/Bash%20Scripting/ETL%20using%20shell%20scripting/web-server-access-log.txt.gz".
The following are the columns and their data types in the file:
a. timestamp - TIMESTAMP
b. latitude - float
c. longitude - float
d. visitorid - char(37)
and two more columns: accessed_from_mobile (boolean) and browser_code (int)
The columns which we need to copy to the table are the first four coumns : timestamp, latitude, longitude and visitorid.
NOTE: The file comes with a header. So use the 'HEADER' option in the 'COPY' command.
The problem may be solved by completing the following tasks:
Task 1: Start the Postgres server.
Click here for Hint
Use the start_postgres command.
Click here for Solution
If the server is not already started, run the following command:
start_postgres
{: codeblock}
Task 2: Create the table.
Create a table named access_log to store the timestamp, latitude, longitude and visitorid.
Click here for Hint
Connect to the database template1 in Postgres and run the 'CREATE TABLE' command.
Click here for Solution
Step 1: Connect to the database:
Run the following command at the terminal to connect to Postgres
psql --username=postgres --host=localhost
{: codeblock}
Step 2: At the postgres=# prompt, run the following command to connect to the database 'template1'.
\c template1;
{: codeblock}
Step 3: Once you connect to the database, run the command to create the table called 'access_log':
CREATE TABLE access_log(timestamp TIMESTAMP, latitude float, longitude float, visitor_id char(37));
{: codeblock}
Step 4: Once you receive the confirmation message 'CREATE TABLE', quit from psql:
\q
{: codeblock}
Task 3. Create a shell script named cp-access-log.sh and add commands to complete the remaining tasks to extract and copy the data to the database.
Create a shell script to add commands to complete the rest of the tasks.
Click here for Hint
Use the File-> New File menu option to create a new file and name it according to specification. Add appropriate comments to the script.
Click here for Solution
Step 1: On the menu on the lab screen, use File->New File to create a new file.
Step 2: Give the name as cp-access-log.sh and click 'OK'.
Step 3: State the objective of the script using comments.
Copy and paste the following lines into the newly created file.
# cp-access-log.sh
# This script downloads the file 'web-server-access-log.txt.gz'
# from "https://cf-courses-data.s3.us.cloud-object-storage.appdomain.cloud/IBM-DB0250EN-SkillsNetwork/labs/Bash%20Scripting/ETL%20using%20shell%20scripting/".

# The script then extracts the .txt file using gunzip.

# The .txt file contains the timestamp, latitude, longitude
# and visitor id apart from other data.

# Transforms the text delimeter from "#" to "," and saves to a csv file.
# Loads the data from the CSV file into the table 'access_log' in PostgreSQL database.
{: codeblock}
Step 4: Save the file using the File->Save menu option.
Task 4. Download the access log file.
Add the wget command to the script to download the file.
Click here for Hint
Refer to the 'wget' command usage
Click here for Solution
Add the following line to the end of the script.
# Download the access log file

wget "https://cf-courses-data.s3.us.cloud-object-storage.appdomain.cloud/IBM-DB0250EN-SkillsNetwork/labs/Bash%20Scripting/ETL%20using%20shell%20scripting/web-server-access-log.txt.gz"
{: codeblock}
Task 5. Unzip the gzip file.
Run the gunzip command to unzip the .gz file and extract the .txt file.
Click here for Hint
Use the gunzip command with the -f option.
Click here for Solution
Copy the following lines to the end of the script.
# Unzip the file to extract the .txt file.
gunzip -f web-server-access-log.txt.gz
{: codeblock}
The -f option of gunzip is to overwrite the file if it already exists.
Task 6. Extract required fields from the file.
Extract timestamp, latitude, longitude and visitorid which are the first four fields from the file using the cut command.
The columns in the web-server-access-log.txt file is delimited by '#'.
Click here for Hint
Refer to the usage of cut command.
Click here for Solution
Step 1: Copy the following lines and add them to the end of the script.
# Extract phase

echo "Extracting data"

# Extract the columns 1 (timestamp), 2 (latitude), 3 (longitude) and
# 4 (visitorid)

cut -d"#" -f1-4 web-server-access-log.txt
{: codeblock}
Step 2: Save the file.
Step 3: Run the script.
bash cp-access-log.sh
{: codeblock}
Verify that the output contains all the four fields that we extracted.
Task 7. Redirect the extracted output into a file.
Redirect the extracted data into a file named extracted-data.txt
Click here for Hint
Use '>' for shell command output redirection.
Click here for Solution
Step 1: Replace the cut command at end of the script with the following command.
cut -d"#" -f1-4 web-server-access-log.txt > extracted-data.txt
{: codeblock}
Step 2: Save the file.
Step 3: Run the script.
bash cp-access-log.sh
{: codeblock}
Step 4: Run the command below to verify that the file extracted-data.txt is created, and has the content.
cat extracted-data.txt
{: codeblock}
Task 8. Transform the data into CSV format.
The extracted columns are separated by the original "#" delimiter.
We need to convert this into a "," delimited file.
Click here for Hint
Use 'tr' command for transformation.
Click here for Solution
Step 1: Add the lines below at the end of the script.
# Transform phase
echo "Transforming data"

# read the extracted data and replace the colons with commas.
tr "#" "," < extracted-data.txt
{: codeblock}
Step 2: Save the file.
Step 3: Run the script.
bash cp-access-log.sh
{: codeblock}
Step 4: Verify that the output contains ',' in place of "#".
Now we need to save the transformed data to a .csv file.
Step 5: Replace the tr command at end of the script with the command below.
tr "#" "," < extracted-data.txt > transformed-data.csv
{: codeblock}
Step 6: Save the file.
Step 7: Run the script.
bash cp-access-log.sh
{: codeblock}
Step 8: Run the command below to verify that the file 'transformed-data.csv' is created, and has the content.
cat transformed-data.csv
{: codeblock}
Task 9. Load the data into the table access_log in PostgreSQL
PostgreSQL command to copy data from a CSV file to a table is COPY.
The basic structure of the command is,
COPY table_name FROM 'filename' DELIMITERS 'delimiter_character' FORMAT;
The file comes with a header. So use the 'HEADER' option in the 'COPY' command.
Invoke this command from the shellscript, by sending it as input to 'psql' filter command.
Click here for Hint
To load data from a shell script, send the database commands through a command pipeline to psql command with the help of echo command.
E.g.: echo 'psql commands' | psql
Click here for Solution
Step 1: Add the copy command
Add the lines below to the end of the script 'cp-access-log.sh'.
# Load phase
echo "Loading data"

# Send the instructions to connect to 'template1' and
# copy the file to the table 'access_log' through command pipeline.

echo "\c template1;\COPY access_log  FROM '/home/project/transformed-data.csv' DELIMITERS ',' CSV HEADER;" | psql --username=postgres --host=localhost
{: codeblock}
Step 2: Save the file.
Task 10. Execute the final script.
Run the final script.
Click here for Solution
Run the following command at the terminal:
bash cp-access-log.sh
{: codeblock}
The bash script can be downloaded from here
Task 11. Verify by querying the database.
Click here for Hint
Run the 'select' statement through 'psql' with the help of command pipeline.
Click here for Solution
Run the command below at the shell prompt to verify that the table accesss_log is populated with the data.
echo '\c template1; \\SELECT * from access_log;' | psql --username=postgres --host=localhost
{: codeblock}
You should see the records displayed on screen.
Ramesh Sannareddy
Rav Ahuja
| Date (YYYY-MM-DD) | Version | Changed By | Change Description |
|---|---|---|---|
| 2022-07-27 | 0.3 | Lakshmi Holla | Updated Linux command |
| 2021-09-06 | 0.2 | Ramesh Sannareddy | Incorporated the beta feedback. |
| 2021-06-07 | 0.1 | Ramesh Sannareddy | Created initial version of the lab |
Copyright (c) 2021 IBM Corporation. All rights reserved.