This repository allows you to host your own DoH (DNS-over-HTTPS) proxy as a Cloudflare worker, with support for any 3rd party DoH provider, as well as JSON output for front-end browser use.
You can decide to use any existing DoH provider, or you can opt to host your own DoH server. If you opt to run your own DoH server; we highly recommend https://github.com/satishweb/docker-doh
You may specify which DoH provider to use by opening and editing the wrangler.toml file in any text editor.
If you are interested in how this DoH Cloudflare worker operates; we have set up a test worker which you can view at the link below. If you are unsure of how to make the DoH server work with your browser or operating system; view the instructions within the How to Use section of this guide.
This repo allows you to host your own DoH (DNS over HTTPS) router as a Cloudflare worker, with support for any 3rd party DoH provider.
It is best when utilized along-side of https://github.com/satishweb/docker-doh. Once you set up the DoH docker container, you can plug your DoH address into this repo's wrangler.toml config file.
You can either clone this repository to your local machine, or you can use the button below to deploy the Cloudflare worker directly to your Cloudflare account. (cloudflare account required)
We have provided both sets of instructions below:
To deploy this worker directly to Cloudflare without running it locally on your machine, simply click the button below. You will be asked to sign into your Cloudflare account.
To set this worker up to run locally, a few steps are required. First, clone the repository files to your local machine in a new folder. Run the command:
git clone https://github.com/aetherinox/dns-over-https-worker.git ./doh-workerThe command above will pull the files from this repository and allow you to work with them in a local environment, instead of pushing them to Cloudflare. Once the files are downloaded, you can now set up the system.
Once you have the DoH worker files downloaded locally to your machine, it's time to install the dependencies that this worker needs.
You must have npm installed. If you don't, you'll need to install it first. If you are on Windows, follow the Installation Guide here.
If you are on Linux, you can install with:
sudo apt install npmNext, open your terminal / command prompt, change directories over to the folder where you downloaded this worker and install the Node dependencies by running the commands:
cd doh-worker
npm install
Next, confirm that Wrangler is installed by running the command:
npx wrangler -vYou should receive:
 ⛅️ wrangler 3.114.0
-------------------
You may receive a message asking you to install wrangler again if you are running on an older version of the package:
Need to install the following packages:
[email protected]
Ok to proceed? (y) y

npm warn deprecated [email protected]: Please use @jridgewell/sourcemap-codec instead
npm warn deprecated [email protected]: This package has been deprecated and is no longer maintained. Please use @rollup/plugin-inject.

 ⛅️ wrangler 3.114.0
--------------------
Next, you need to sign into Cloudflare using Wrangler so that the app knows where to upload your DoH worker to:
npx wrangler loginYour operating system web browser should open. Sign into your Cloudflare, and a permission box should appear asking you to confirm that Wrangler should be able to access your Cloudflare account.

After you sign in and approve the permissions; you should see the following in your terminal:
$ npx wrangler login
Attempting to login via OAuth...
Opening a link in your default browser: https://dash.cloudflare.com/oauth2/auth?response_type=code&client_id=xxxxx
Successfully logged in.
▲ [WARNING] Processing wrangler.toml configuration:
To confirm it worked, type the command:
npx wrangler whoamiYou should see:
 ⛅️ wrangler 3.114.0
--------------------

Getting User settings...
👋 You are logged in with an OAuth Token, associated with the email [email protected].
┌─────────────────────────────────┬──────────────────────────────────┐
│ Account Name                    │ Account ID                       │
├─────────────────────────────────┼──────────────────────────────────┤
│ [email protected]'s Account         │ abcdefg123456789a1b2c3d4c5e6f7ab │
└─────────────────────────────────┴──────────────────────────────────┘
🔓 Token Permissions: If scopes are missing, you may need to logout and re-login.
Scope (Access)
You now have everything set up and can begin to either make edits to the source code within /src/index.js, or you can move on to the next step of the guide which explains how to launch a dev server, or deploy the worker to Cloudflare.
Now that you finished the above section for Installing the dependencies, we can now launch a server so that you can test the worker locally.
This worker has two different modes you can use:
- Production Mode
- Development Mode
These two modes work the same, except for the fact that development mode will output verbose console logs and tell you more about what is going on as you run the local server. The functionality will be the same.
Each of the two modes include their own settings you can modify. This means that you can have one group of settings load for development mode, and then another group of settings for production mode.
To set these settings, you need to open the local file wrangler.toml.
[env.production.vars]
    ENVIRONMENT = "production"
    URL_SERVICE_DOH = "https://security.cloudflare-dns.com"
    URL_SERVICE_JSON = "https://security.cloudflare-dns.com"
    URL_SERVICE_SUBDOMAIN = "dns-query"
    THROTTLE_DAILY_LIMIT = 2000

[env.dev.vars]
    ENVIRONMENT = "dev"
    URL_SERVICE_DOH = "https://security.cloudflare-dns.com"
    URL_SERVICE_JSON = "https://security.cloudflare-dns.com"
    URL_SERVICE_SUBDOMAIN = "dns-query"
    THROTTLE_DAILY_LIMIT = 2000
Adjust the settings as you like. You can change the DoH service you plan on using for your worker. Ensure you set these values for a valid service; otherwise DoH will not work.
The following are valid services you can use for the settings URL_SERVICE_DOH and URL_SERVICE_JSON:
| Service | Subdomain |
|---|---|
https://cloudflare-dns.com |
dns-query |
https://mozilla.cloudflare-dns.com |
dns-query |
https://doh.dns.sb |
dns-query |
https://ee-tll.doh.sb |
dns-query |
https://doh.sb |
dns-query |
https://au-syd.doh.sb |
dns-query |
https://de-fra.doh.sb |
dns-query |
https://de-dus.doh.sb |
dns-query |
https://doh.li |
dns-query |
https://doh.pub |
dns-query |
https://dot.pub |
dns-query |
https://sm2.doh.pub |
dns-query |
https://dns.sb |
dns-query |
https://dns.twnic.tw |
dns-query |
https://trr.dns.nextdns.io |
dns-query |
https://kids.dns0.eu |
dns-query |
https://open.dns0.eu |
dns-query |
https://zero.dns0.eu |
dns-query |
Once you have adjusted the wrangler.toml settings, go back in your terminal, run the command:
# run in development mode
wrangler dev -e dev

# run in production mode
wrangler dev -e production
You will see the following in console:
Your worker has access to the following bindings:
- Unsafe:
  - ratelimit: doh
- Vars:
  - ENVIRONMENT: "dev"
  - URL_SERVICE_DOH: "https://security.cloudflare-dns.com"
  - URL_SERVICE_JSON: "https://security.cloudflare-dns.com"
  - URL_SUBDOMAIN: "dns-query"
  - THROTTLE_DAILY_LIMIT: 2000
⎔ Starting local server...
[wrangler:inf] Ready on http://127.0.0.1:8080
╭──────────────────────────────────────────────────────────────────────────────────────────────────╮
│  [b] open a browser, [d] open devtools, [l] turn off local mode, [c] clear console, [x] to exit  │
╰──────────────────────────────────────────────────────────────────────────────────────────────────╯
Open your web browser and navigate to the URL provided in the console above; which is http://127.0.0.1:8080.
To run a test query on the DoH worker by putting the following URL in your web-browser. This URL will fetch all of the A records for the domain github.com/status:
https://127.0.0.1:8080/dns-query?name=github.com/status&type=AMore detailed instructions on how to use this worker are available in the section Usage below.
This section explains how to deploy your DoH Cloudflare worker; either manually, or automatically.
Once you have decided that you wish to deploy the files for this worker to Cloudflare; you can either do it manually, or by using the button provided below:
If you wish to deploy this worker manually; you must have first completed the steps above under the section Setup Locally.
When you build a wrangler worker and deploy the container manually to Cloudflare, a file with the extension .js will be created, and will display what folder wrangler was installed in. By default, this will show as
C:\Users\USERNAME\AppData\Roaming\npm\node_modules\wrangler.
You can see this by going to Cloudflare, clicking Workers & Pages, and clicking View Code to the top right.
In order to hide your user path in the code, you must do one of the following:
- Change where NPM is installed for your user path to be removed.
- Deploy using
--minify
To change the installation path, execute:
npm config --global set cache "X:\NodeJS\cache"
npm config --global set prefix "X:\NodeJS\npm"
You may need to re-install wrangler after changing the paths:
npm uninstall wrangler --save-dev
npm install wrangler --save-dev
If you do not want to reinstall wrangler, you can also keep the user path from showing in your source code by deploying your project with --minify
wrangler deploy --minifyWhen you are ready to deploy, change to the directory where the local worker files are located:
cd doh-workerRun the deploy command and push the production mode copy:
wrangler deploy -e productionYou will see a large amount of text in your terminal appear:
Total Upload: 65.15 KiB / gzip: 14.78 KiB
Your worker has access to the following bindings:
- Unsafe:
  - ratelimit: doh
- Vars:
  - URL_SERVICE_DOH: https://doh.crypto.sx
  - URL_SERVICE_JSON: https://doh.crypto.sx
  - URL_SERVICE_SUBDOMAIN: dns-query
  - THROTTLE_DAILY_LIMIT: 2000
Uploaded doh (2.57 sec)
Deployed doh triggers (0.31 sec)
  https://doh.aetherinox.workers.dev
Current Version ID: afe1c468-416e-1ff7-1ce6-42aa7490ef5c
Note
If you have multiple accounts attached to Cloudflare, you will be asked to pick which account you want to upload your worker to.
√ Select an account »
»   1. Brad
»   2. Domain.lan Organization
If you want to switch accounts, you must execute:
wrangler loginIf you look at the second to last line, it will tell you what URL you can use to view the actual worker online:
https://doh.aetherinox.workers.dev
Cloudflare also supports you adding your own custom domain name onto the worker so that you can access it using a url such as https://doh.mydomain.com.
This concludes the basics of getting your worker up. There are a few things to remember.
For users who have a Free Cloudflare account, be aware that Cloudflare does place limits on how much traffic your worker can have. The limits are generous and if you are using this Cloudflare worker for your own personal site, you should not be surpassing them.
| Feature | Limit |
|---|---|
| Request | 100,000 requests/day 1000 requests/min |
| Memory | 128MB |
| CPU Time | 10ms |
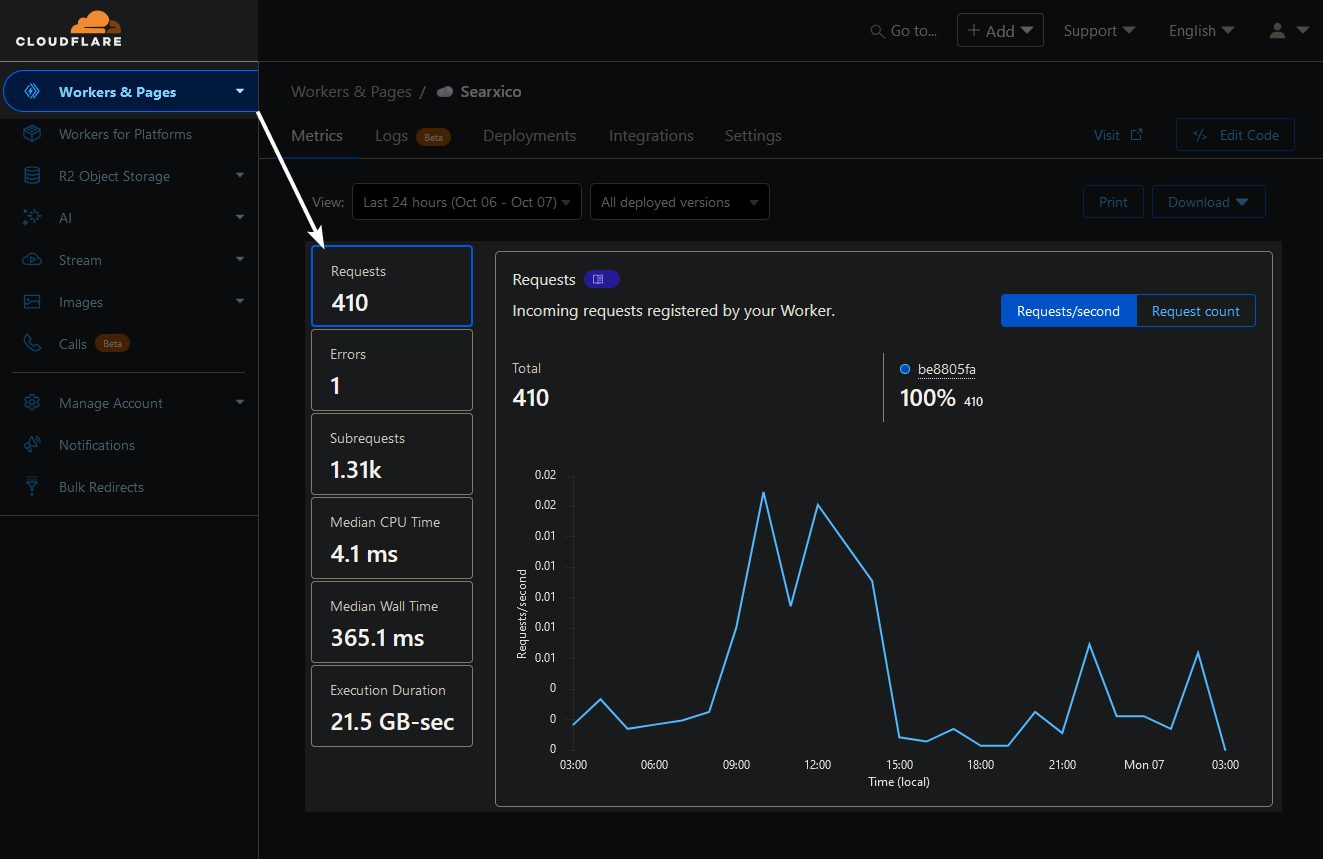
You can check your request limit by signing into Cloudflare, and on the left-side menu, clicking Worker & Pages -> Overview.

Select your worker from the Override page.
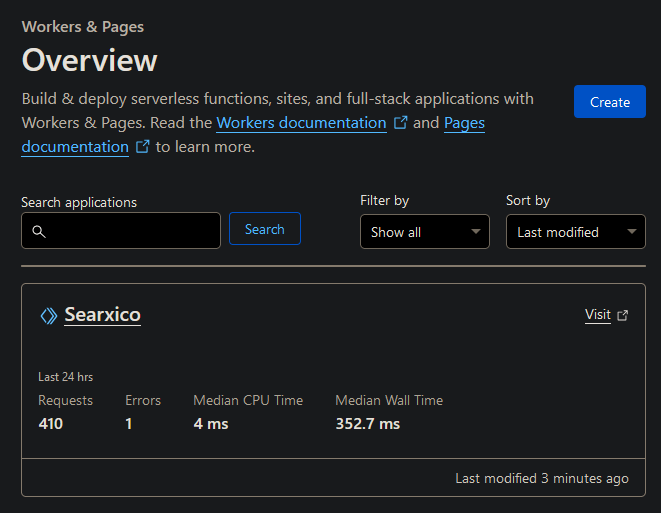
You should get a very detailed graph and hard numbers showing what your usage is for the day. You can also modify the search criteria to see how the usage has been for the month.
There are multiple ways to test if your Cloudflare DoH worker are properly resolving domains.
To test if your DoH worker is operating normally using curl, run the command:
curl https://github.com/status --doh-url https://doh.username.workers.dev/dns-queryThe response you get should be:
GitHub lives! (2025-03-08 19:13:16) (1)On other websites, you may just see:
OKTo get a verbose output, run the command:
curl -v https://github.com/status --doh-url https://doh.username.workers.dev/dns-queryBy adding -v to your curl arguments, you will get more details about the resolve status:
* Host github.com:443 was resolved.
* IPv6: (none)
* IPv4: 140.82.116.4
*   Trying 140.82.116.4:443...
* Connected to github.com (140.82.116.4) port 443
* schannel: disabled automatic use of client certificate
* ALPN: curl offers http/1.1
* ALPN: server accepted http/1.1
* using HTTP/1.x
> GET /status HTTP/1.1
> Host: github.com
> User-Agent: curl/8.9.1
> Accept: */*
>
* Request completely sent off
* schannel: remote party requests renegotiation
* schannel: renegotiating SSL/TLS connection
* schannel: SSL/TLS connection renegotiated
* schannel: remote party requests renegotiation
* schannel: renegotiating SSL/TLS connection
* schannel: SSL/TLS connection renegotiated
< HTTP/1.1 200 OK
< Server: GitHub.com
< Date: Sat, 08 Mar 2025 17:19:43 GMT
< Content-Type: text/html; charset=utf-8
< Vary: X-PJAX, X-PJAX-Container, Turbo-Visit, Turbo-Frame, Accept-Encoding, Accept, X-Requested-With
< Cache-Control: max-age=0, private, must-revalidate
< Strict-Transport-Security: max-age=31536000; includeSubdomains; preload
< X-Frame-Options: deny
< X-Content-Type-Options: nosniff
< X-XSS-Protection: 0
< Referrer-Policy: origin-when-cross-origin, strict-origin-when-cross-origin
< Accept-Ranges: bytes
< Content-Length: 46
<
GitHub lives! (2025-03-08 19:13:16) (1)
* Connection #0 to host github.com left intact
If you get the following output; then your DoH server is not working properly:
* DoH: Too small type A for github.com
* DoH: Too small type AAAA for github.com
* shutting down connection #0
curl: (6) Could not resolve hostname
You can also test using custom header with the argument -H, and the direct URL
curl -vH "accept: application/dns-json" "https://doh.username.workers.dev/dns-query?name=github.com/status&type=A"If you are testing locally; wrangler will generate an SSL certificate for your local test environment, however, the SSL certificate will not be trusted by your machine. In this situation, curl will reject the DoH url.
To bypass this, we can add the -k argument; which accepts insecure DoH providers.
curl -vkH "accept: application/dns-json" "https://127.0.0.1/dns-query?name=github.com/status&type=A"Using the website http://dnssec-or-not.com/ is a straight-forward process. Once you have your browser or device running on your DoH server; open your browser and visit the page http://dnssec-or-not.com/
In a few seconds, you should see a status report on if your DoH and DNSSEC are working properly:
Very Nice! The test indicates you are protected by DNSSEC!
This website allows you to test if your DoH server is properly working. Visit the website:
In the lower-right side, click Add DoH Server. In the dialog prompt box, enter:
- Provider Name: Cloudflare Worker
- DoH Server Url: https://doh.USERNAME.workers.dev/dns-query
Once you click the Save button, your new DoH server should appear in the list, and will provide you with the latency, and IP address for where your DoH server is hosted.
In order for dnsleaktest.org to work, your site must return status code 200. You can test this by going to your DoH website, then open your browser developer tools. Usually this is CTRL + SHIFT + I. On the right or bottom, a panel will open. Refresh your DoH server website, and you should see a status code appear along with the URL to your DoH webserver.
If your DoH website does not return status code 200, then dnsleaktest.org will return Failed next to the server name.
This section outlines how to use your new DoH server. You can either utilize the website to fetch JSON information about a particular domain, or you can plug your DoH server address into any browser or operating system, and start re-routing traffic.
Open your web-browser and navigate to the URL where your DoH server is accessible. This can either be locally by using an IP address, or if you have already deployed your worker to Cloudflare; they give you a free subdomain you can access the worker on.
If you are running this locally, your console should tell you what IP:PORT to use. If you have not deployed this worker locally, view the section Setup Locally. For local access, the URL should be something similar to:
If you are running this from a recent deployment to Cloudflare, your URL will be posted within your worker's settings page. Typically this URL is:
Once you access your DoH worker in your browser; you will need to tell the DoH worker which website / domain you want to retrieve record information about. We will use https://github.com/status for this example, and we will fetch the domain's A Records.
Modify the URL in your web-browser to look like the following, and then press enter:
- Local Deployment: https://127.0.0.1:8080/dns-query?name=github.com/status&type=A
- Cloudflare Deployment: https://doh.YOURUSERNAME.workers.dev/dns-query?name=github.com/status&type=A
You should see something similar to the following; which means that your DoH server is working:
{
  "Status": 3,
  "TC": false,
  "RD": true,
  "RA": true,
  "AD": true,
  "CD": false,
  "Question": [
    {
      "name": "github.com/status.",
      "type": 1
    }
  ],
  "Authority": [
    {
      "name": ".",
      "type": 6,
      "TTL": 3600,
      "Expires": "Sun, 09 Mar 2025 05:20:52 UTC",
      "data": "a.root-servers.net. nstld.verisign-grs.com. 2025030802 1800 900 604800 86400"
    },
    {
      "name": ".",
      "type": 46,
      "TTL": 86400,
      "Expires": "Mon, 10 Mar 2025 04:20:52 UTC",
      "data": "SOA 8 0 86400 20250321210000 20250308200000 26470 . AOO8WOMJUA0nJ7xTAOOGJZjoqYJXRHNk9kkEJlbGJ2vEYVECB8s7IEO/koKoRgO+s+jP0X+IRlJUHYk1vABiwj0I4h7yH5MXwGeObx2cZcGD7D5fK1fF4ywq5whEOVBqDop/EBquAULHprfvDE54aS9dlU4WDOKUGBS1t9yOwYCAiDqsfEYpY53e95u/OagSSDrGShZxBjST0q3OV2+nynY3/zHEP/GaMGrb9D73Ma5QyizzxEUXwZFglVhGrd7/DGSLPDBcmpLl8iO2y8E8imhqVDOEp7d/zGoEM6pVv0h3OeUKXNeb07iBOAxsQciKNgIz0TChh6Rw2pfrgx8lzQ=="
    }
  ]
}
You can also fetch other types of records such as:
AAAAAPTRMXNSSOATXTDNSKEYDSSPFCNAME
To view the records listed above, simply change &type=RECORD_TYPE_HERE. If we want to view a domain's AAAA ipv6 records, we would use the URL:
# Local deployment
https://127.0.0.1:8080/dns-query?name=github.com/status&type=AAAA

# Cloudflare deployment
https://doh.YOURUSERNAME.workers.dev/dns-query?name=github.com/status&type=AAAA
There are several browsers compatible with DNS-over-HTTPS (DoH) that you can use as DNS service provider in order to protect your DNS queries from privacy intrusions and tampering. As well as Microsoft Windows.
- Click the menu button.
- Select Settings.
- In the General menu, scroll down to access Network Settings.
- Click on the Settings button.
- Click Enable DNS-over-HTTPS. Choose suitable provider or custom from the drop-down menu.
- Press OK to apply.
- You may also type
about:preferences#generalas url to open the security options
- Click on the three-dot menu at in the top-right corner of your chrome window.
- Click Settings.
- Navigate to Privacy and security > Security.
- Enable the Use secure DNS switch.
- Select with Custom from drop-down menu.
- Type your trusted providers DoH Server Url.
- This setting may already be enabled by default.
- You may also type
chrome://settings/securityas url to open the security options
- Go to
edge://settings/privacy. - Scroll down to the + Security section.
- Make sure the Use secure DNS option is enabled.
- Select Choose a suitable provider.
- This setting may already be enabled by default.
- Click the menu button in the top-right corner of your brave window.
- Navigate to Settings Top Menu.
- On the left side of the menu, Click on Privacy and security .
- Select Security inside Privacy and security section
- Enable Use secure DNS.
- Click With Custom and Type your trusted providers DoH Server Url.
- You may also type
brave://settings/securityas url to open the security options
- Click on the Opera icon to open the browser's menu.
- Pick Settings from the menu. Pressing Alt+P (Windows) or ⌘+, (MAC) opens Settings directly.
- In Settings, type dns on top search bar.
- Make sure to enable Use DNS-over-HTTPS instead of the system`s DNS settings
- Pick a suitable DoH provider.
Apple hasn’t implemented this feature in Safari yet.
- From the Windows Settings control panel, select Network & Internet.
- On the Network & Internet page, select Ethernet.
- On the Ethernet screen, select the network interface that you want to configure for DoH.
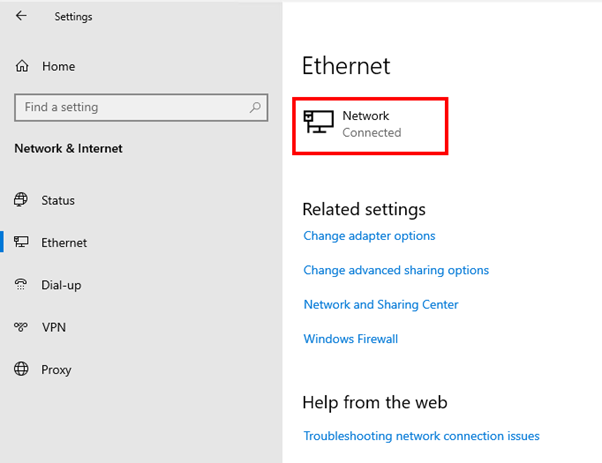
- On the Network screen, scroll down to DNS settings and select the Edit button.
- On the Edit DNS settings screen, select Manual from the automatic or manual IP settings dropdown. This setting allows you to configure the Preferred DNS and Alternate DNS servers. If the addresses of these servers are present in the list of known DoH servers, the Preferred DNS encryption dropdown will be enabled. You can choose between the following settings to set the preferred DNS encryption:
- Encrypted only (DNS over HTTPS): When this setting is chosen, all DNS query traffic will pass across HTTPS. This setting provides the best protection for DNS query traffic. However, it also means DNS resolution won't occur if the target DNS server is unable to support DoH queries.
- Encrypted preferred, unencrypted allowed: When this setting is chosen, the DNS client will attempt to use DoH and then fall back to unencrypted DNS queries if that isn't possible. This setting provides the best compatibility for DoH capable DNS servers, but you won't be provided with any notification if DNS queries are switched from DoH to plain text.
- Unencrypted only: All DNS query traffic to the specified DNS server is unencrypted. This setting configures the DNS client to use traditional plain text DNS queries.
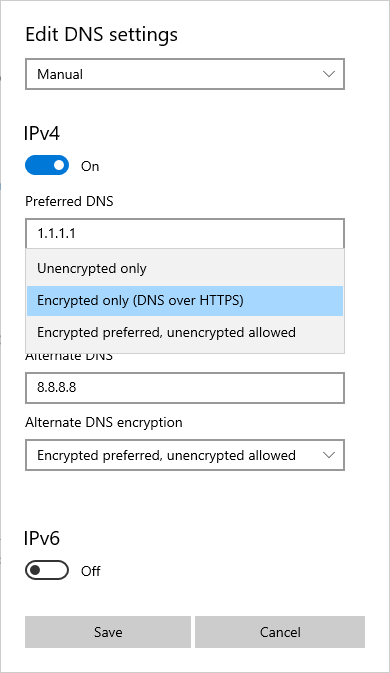
- Select Save to apply the DoH settings to the DNS client.
If you're configuring the DNS server address for a client using PowerShell using the Set-DNSClientServerAddress cmdlet, the DoH setting will depend on whether the server’s fallback setting is in the list of known DoH servers table. At present you can't configure DoH settings for the DNS client on Windows Server 2022 using Windows Admin Center or sconfig.cmd.
These are notes you should keep in mind if you plan on modifying this Cloudflare worker.
We recommend treating your wrangler.toml file as the source of truth for your Worker configuration, and to avoid making changes to your Worker via the Cloudflare dashboard if you are using Wrangler.
If you need to make changes to your Worker from the Cloudflare dashboard, the dashboard will generate a TOML snippet for you to copy into your wrangler.toml file, which will help ensure your wrangler.toml file is always up to date.
If you change your environment variables in the Cloudflare dashboard, Wrangler will override them the next time you deploy. If you want to disable this behavior, add keep_vars = true to your wrangler.toml.
If you change your routes in the dashboard, Wrangler will override them in the next deploy with the routes you have set in your wrangler.toml. To manage routes via the Cloudflare dashboard only, remove any route and routes keys from your wrangler.toml file. Then add workers_dev = false to your wrangler.toml file. For more information, refer to Deprecations.
Wrangler will not delete your secrets (encrypted environment variables) unless you run wrangler secret delete <key>.
Note
Experimental Config
Wrangler currently supports an --experimental-json-config flag, which will read your configuration from a wrangler.json file, rather than wrangler.toml. The format of this file is exactly the same as the wrangler.toml configuration file, except that the syntax is JSON rather than TOML.
This is experimental, and is not recommended for production use.
This section provides a reference for Wrangler commands.
wrangler <COMMAND> <SUBCOMMAND> [PARAMETERS] [OPTIONS]Since Cloudflare recommends installing Wrangler locally in your project(rather than globally), the way to run Wrangler will depend on your specific setup and package manager.
After you have access to wrangler globally, you can switch over from using npx wrangler to just wrangler:
wrangler <COMMAND> <SUBCOMMAND> [PARAMETERS] [OPTIONS]Full list of commands available at:
To update the version of Wrangler used in your project, run:
npm install wrangler@latest
Launches your local wrangler / cloudflare dev project in a test environment.
wrangler dev -e dev
Authorize Wrangler with your Cloudflare account using OAuth. Wrangler will attempt to automatically open your web browser to login with your Cloudflare account.
If you prefer to use API tokens for authentication, such as in headless or continuous integration environments, refer to Running Wrangler in CI/CD.
If Wrangler fails to open a browser, you can copy and paste the URL generated by wrangler login in your terminal into a browser and log in.
wrangler login [OPTIONS]
Lists all accounts associated with your Cloudflare account
wrangler whoami
Check where wrangler (and other global packages) are installed at:
npm list -g --depth=0
Deploy your Worker to Cloudflare.
wrangler deploy [<SCRIPT>] [OPTIONS]wrangler deploy --minify -e productionNote
None of the options for this command are required. Also, many can be set in your wrangler.toml file. Refer to the wrangler.toml configuration documentation for more information.
The following command will build a dry-run compiled version of your index.js file which will be placed in the dist/ folder
wrangler deploy --dry-run --outdir dist -e production
Delete your Worker and all associated Cloudflare developer platform resources.
wrangler delete [<SCRIPT>] [OPTIONS]