There are way too many old TV remotes in the garbage dump.... And way too many overpriced "powerpoint clickers" on Amazon. Its quite appalling.
All you need is $5, an RP2040 and 5 minutes to turn that old, suspiciously sticky T.V. remote into a fully functional USB Keyboard / Clicker / Thingy that you can reprogram on the fly like your favorite hackerman keyboard.


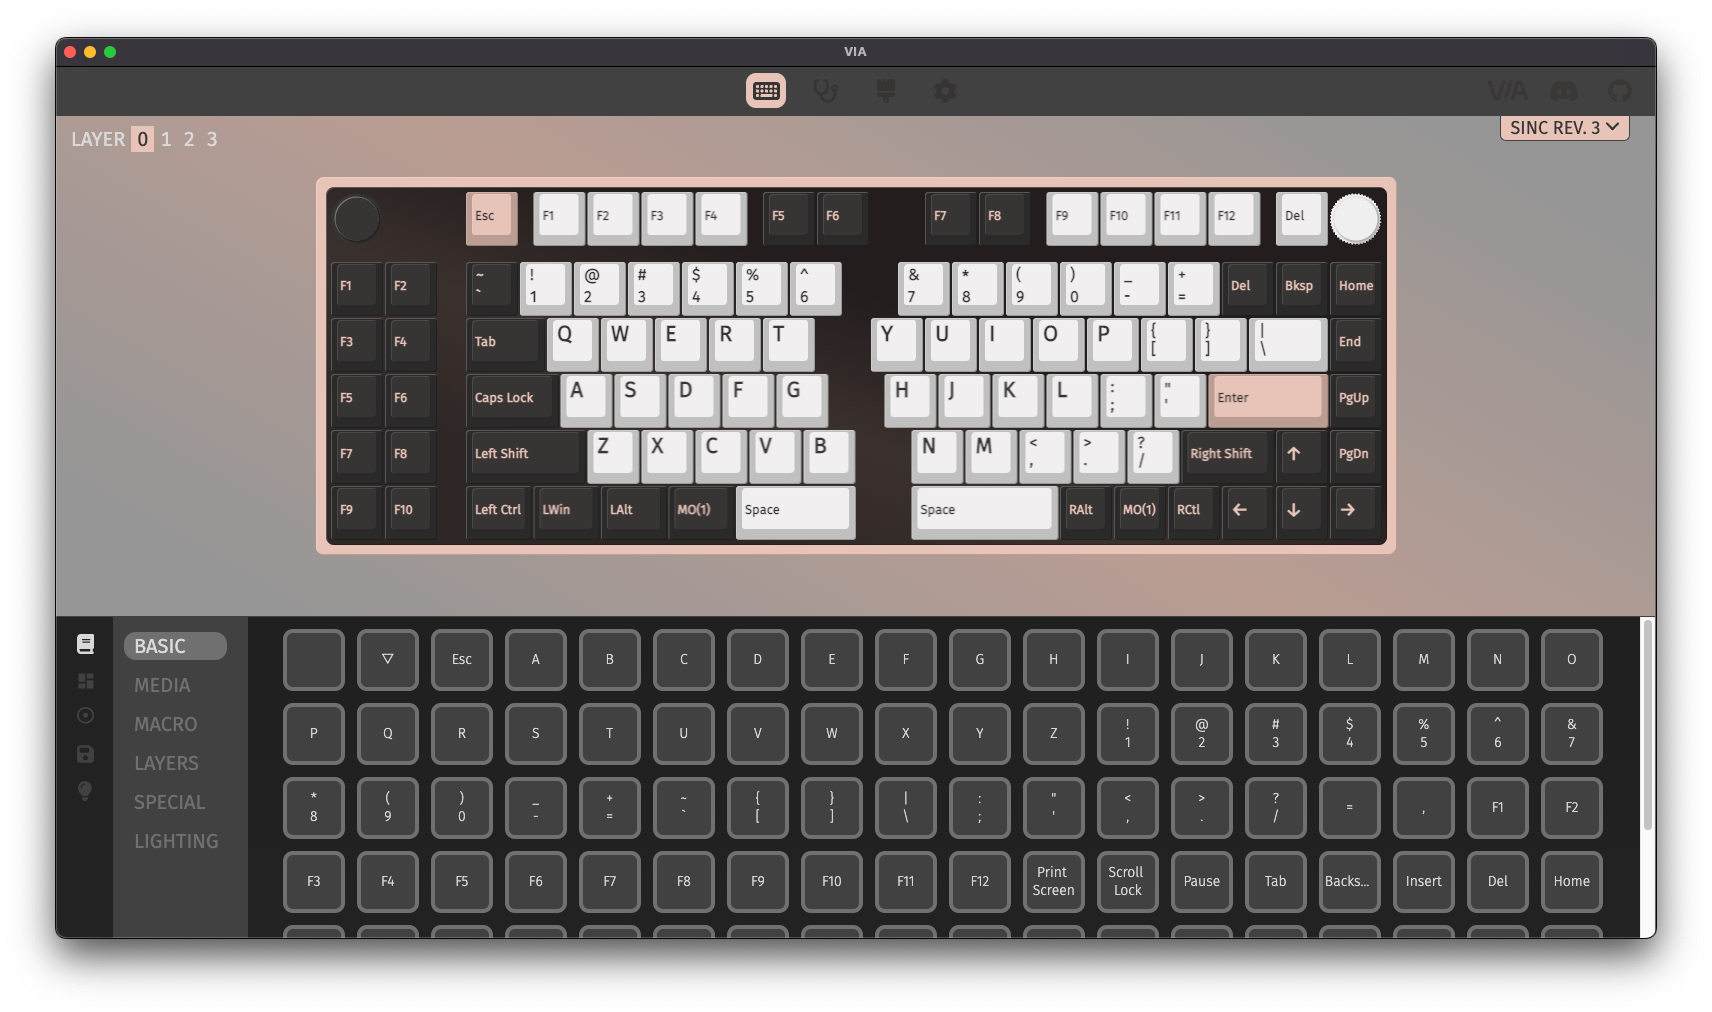
The firmware receives IR codes from a standard 38 kHz receiver and translates them to USB HID reports based on a JSON configuration stored on the device's filesystem. A browser-based config tool communicates over Web Serial to let you map buttons, learn IR codes, and arrange layouts.

| Feature | Description |
|---|---|
| Custom Keybindings UI in a browser | A browser-based editor for assigning remote buttons to keys, media controls, or custom actions. |
| Multiple Layers for one remote | One physical remote can switch between several layers, so the same buttons do different things. |
| RGB LED for layers (and vibes) 🔴🟢🔵 | Layer-aware RGB lighting that changes color per mode, giving clear visual indication of the current layer. |
| Complex Combos | Support for multi-step inputs, including modifier combinations, repeated presses, and chained actions. |
| Layouts | Visually distinct way of telling different IR remotes apart |
- USB-Capable microcontroller / dev board RP2040 board Pico, Pico W, RP2040-Zero, etc.
- IR receiver 38 kHz module (TSOPxx or equivalent).
- NeoPixel LED Single WS2812 for layer colour feedback.
The TTVKTR uses a Raspberry Pi Pico (RP2040) and an IR receiver to read the codes sent by almost any commercial IR remote and maps them to USB Human Interface Device (HID) commands like Vol + , Play/Pause, or even custom combos.

Wiring (defaults — all configurable in settings)
| RP2040 Pin | Component | Component Pin |
|---|---|---|
| GPIO 28 | IR receiver | OUT |
| GPIO 16 | NeoPixel | DIN |
Note
Web Serial is Chromium only must use a Chromium-based browser (Chrome / Edge / Brave). Firefox does not support Web Serial.
Tip
Pre-built firmware_with_fs.uf2 images are available on the Releases page — download the latest and drag it onto the board's USB mass-storage drive.
- Download the most recently leased
firmware_with_fs.uf2file. - Hold the
BOOTSEL/BOOTbutton on the RP20xx board and plug it in to your computer / press reset (if already plugged in) - Copy the
firmware_with_fs.uf2to the newly discovered USB-Drive - Navigate to The TTVKTR webapp.
- Click
Connectand select theTinyUSB Serialdevice. - Once you're connected start adding buttons to the layout, press LEARN to record an IR code and then
Applyto save your changes. - *If you used non-default wiring you can also change the pins used here.
Note
Some RGB leds use different byte orders for their colors i.e. BGR instead of RGB. Use the JSON editor on the webapp to change this setting if you notice that the color selected in the web app is different from the color on the LED.

The config UI is deployed to GitHub Pages at https://brisk4t.github.io/TossedTheTVKeptTheRemote/. You can also open web/index.html locally in any Chromium-based browser (Chrome, Edge) — Web Serial is required.
- Click Click to Connect and select the device's serial port.
- Settings load automatically from the device.
- Use the Layers tabs to switch between mapping contexts.
- Select a button in the grid, then assign a key from the dropdown or compose a custom combo.
- Click Apply to write changes back to the device.

Each layer can have one or more layouts — named grids of buttons. Enter edit mode with Edit Layout to drag buttons around, add/remove slots, or use Auto-Add to rapidly bind IR codes to keys by pressing remote buttons followed by the target keyboard key.
| Type | Description |
|---|---|
| Preset | Single keyboard or consumer HID key from the dropdown |
| Custom | Compose a sequence of keys and modifiers using the combo editor |
| Mode Switch | Advance to the next layer |

- Modifier chips (Ctrl / Shift / Alt / Win) toggled before capturing a key
- Multiple steps chained with
→(e.g.Ctrl+A → Delete → Tab) - Text steps that type a literal string character by character
I was surprised that this didn't exist already. An IR remote reader is one of the things any hobbyist tests out when they first get started.
There have been attempts like this one by wagiminator and Adafruit's pIRkey but they both need you to weave in and out of code just to paste in a string, and any complex behaviors are up to you. I wanted a way to quickly map the remote buttons to keys and combos like VIA based keyboards, AFAIK this is the only solution that removes that last bit of friction.
For the early version of this code, I pulled an XKCD 927 and built another less-code-but-not-really solution, and called it a day.

But after using it for a while and having to still move a JSON file around I started itching for something more like how VIA and ZMK work for custom mechanical keyboards.
Note
I did build a ZMK module as well but quickly realized that ZMK studio isn't mature enough for this level of customization and it would need a LOT of work to even get something like runtime RGB led config working from the UI.
To build from source, requires PlatformIO.
cd firmware
pio run -t upload              # build and upload firmware
pio run -t uploadfs            # build and upload data partition (settings.json)
For UF2 boards: pio run -e pico and pio run -e pico -t buildfs produce firmware.uf2 and littlefs.uf2 inside .pio/build/pico/. Concatenate them (cat firmware.uf2 littlefs.uf2 > firmware_with_fs.uf2) and drag the combined file onto the board's mass-storage drive.
Settings are stored as JSON on LittleFS at /settings.json. The web UI reads and writes this format over serial.
{
  "ir": {
    "modeChangeCode": "0xC40387EE",
    "modeCount": 2,
    "receivePin": 28,
    "handleRepeat": true,
    "repeatInitialDelayReports": 5
  },
  "led": {
    "pin": 16,
    "modeColors": ["0xFF0040", "0x0080FF"],
    "brightnessPercent": 10
  },
  "modes": [
    {
      "name": "Layer 1",
      "slots": [
        { "irCode": "0xC40387EE", "type": "consumer", "key": "0xCD" },
        { "irCode": "0x...",      "type": "keyboard",  "key": "0x28" },
        { "irCode": "0x...",      "type": "keyboard",  "key": "0x1D", "mods": "0x01" },
        { "irCode": "0x...",      "type": "mode_switch" },
        { "irCode": "0x...",      "type": "text",  "value": "hello world" },
        { "irCode": "0x...",      "type": "combo", "steps": [
          { "type": "keyboard", "key": "0x04", "mods": "0x01" },
          { "type": "keyboard", "key": "0x4C" }
        ]}
      ]
    }
  ],
  "layouts": [
    {
      "name": "Default Layout",
      "buttons": [
        { "irCode": "0x...", "x": 0, "y": 0 },
        { "irCode": "0x...", "x": 1, "y": 0 }
      ]
    }
  ]
}type |
Required fields | Notes |
|---|---|---|
keyboard |
key (USB HID usage ID) |
Optional mods byte (Ctrl=0x01, Shift=0x02, Alt=0x04, Win=0x08) |
consumer |
key (USB HID consumer usage ID) |
Volume, media, etc. |
mode_switch |
— | Cycles to the next layer |
text |
value (string) |
Sends each character as individual keystrokes |
combo |
steps (array) |
Each step is a keyboard/consumer/text entry |
| Limit | Value |
|---|---|
| Max layers | 5 |
| Max buttons per layer | 20 |
| Max steps per combo | 8 |
| Max text length per step | 48 characters |
No IR codes received — check receiver wiring (VCC/GND/OUT) and ensure the module is running at 3.3 V, not 5 V.
Settings not persisting — ensure the data partition was flashed (pio run -t uploadfs). The firmware falls back to defaults if settings.json is absent.
HID not recognised — verify the correct PlatformIO environment is selected for your board. RP2040 boards require TinyUSB; check platformio.ini.
Wrong LED Color — Use the JSON editor on the webapp to change the colorOrder setting of the LED. The most common ones are: RGB. BGR, GRB.
- IRremote — IR receive/decode library by the Arduino-IRremote team
- ArduinoJson — JSON serialisation library by Benoît Blanchon
- Adafruit NeoPixel — WS2812 driver library by Adafruit
- arduino-pico — RP2040 Arduino core (TinyUSB, LittleFS) by Earle F. Philhower III
- platform-raspberrypi — PlatformIO platform for RP2040 by Maxim Gerhardt
- Adafruit pIRkey — They tried but alas, not everyone wants to learn micropython.