Packed with:
- Preconfigured docker image for ROS development.
- Browser accessible X11 server to display gazebo, rviz, rqt (runs on Windows/Mac).
- Tasks definition to run catkin_make, roscore, rviz commands.
- Preconfigured code completion for C++, Python, XML (package.xml, launchfiles, URDF, SDF).
- Preconfigured simulation environments (Virtual RobotX, UUV).
|__devcontainers # contains the dockerfiles for the different ros distros
|  |__humble
|     |__Dockerfile.base # version of original dockwater without gazebo dependencies
|     |__Dockerfile      # container with additional packages for easier development
|__simulators # contains the dockerfiles for the different simulation environments
|  |__simulator-uuv           # uuv_simulator (noetic + gazebo 11)
|  |__simulator-vrx           # vrx (noetic + gazebo 11)
|  |__simulator-vrx-gazebosim # vrx (humble + gazebo garden)
|__docker-compose.yml # docker-compose file to launch the containers.
|__select-env.sh      # simple cli tool to select the simulation environment (devcontainer + simulator) and update `docker-compose.yml`
|__join.bash      # Use this to attach a bash shell to an existing container. Typical usage: ./join.bash <container_name>
|__build.sh       # Use this to build the docker images. You can also use `docker buildx bake build` to build all images.
- the dockwater repo contains some useful Dockerfiles that can be used as a base image for the other containers.
- Add a folder under simulators containing the docker image of the simulation
- Add the image to the
simulator-index.yamlfile underselect-indexand rebuildselect-index
- Run
select.shto select some prebuilt images to use for the ros container and the simulation container. - To manually build any of the images for testing,
- uncomment the relevant lines within
build.shselect-index: tool to select ros container and simulation container fromindex.yamland modify thedocker-compose.ymllaunch file.noetic-devormelodic-devetc: contains the ros environment for the development container. Contains useful tools and should contain all packages that we might require for development.uuv_simulatorsimulation imagevrxsimulation imagevrx-gazebosimsimulation image
- You will need to start the ssh-agent and add your ssh-key to allow docker to clone the required private repos.
- update
docker-compose.ymlto point to the image you built
- uncomment the relevant lines within
eval $(ssh-agent -s)
ssh-add ~/.ssh/YOUR_PRIVATE_KEY # add key which can access all above repositories
build.sh
- Select the simulation environment and the ros version using
./select-env.sh - Specify any settings or volumes you want to bind to the workspace container by changing the docker volume under workspace in
docker-compose.yml. - Run
docker-compose pull && docker-compose upto launch thexserver,simulationcontainer and the ros workspace container. Ensure yourDISPLAYenv variable is set correctly. You should be able to view the guis by visitinglocalhost:3000. - In a new shell, run
./join.bash <container_name>e.g../join.bash ros-devcontainer-workspace-1to start a shell in the container. Alternatively, use vscode to attach the container that you want to work on.
VSCode and devcontainer running on Mac:
First, you have to install VSCode and Docker for Windows/Mac:
- https://code.visualstudio.com/
- https://docs.docker.com/docker-for-mac/
- https://docs.docker.com/docker-for-windows/
After you installed required softwares:
- Install "Remote Development" extension on your VSCode.
- Clone this repository by using git command.
- Click on the quick actions status bar item (green icon) in the lower left corner of the VSCode.
- Select "Remote-Containers: Open Folder in Container..." from the command list that appears, and open the root folder of the project you just cloned.
- You need to wait a while for container to come up (only required once).
For detailed instructions, see: https://code.visualstudio.com/docs/remote/containers
Please apply following two settings, if you are using your PC behind the proxy.
- Proxy setting for the Docker server.
Click Docker Desktop task bar icon > Select preference menu item. You will see the following options:
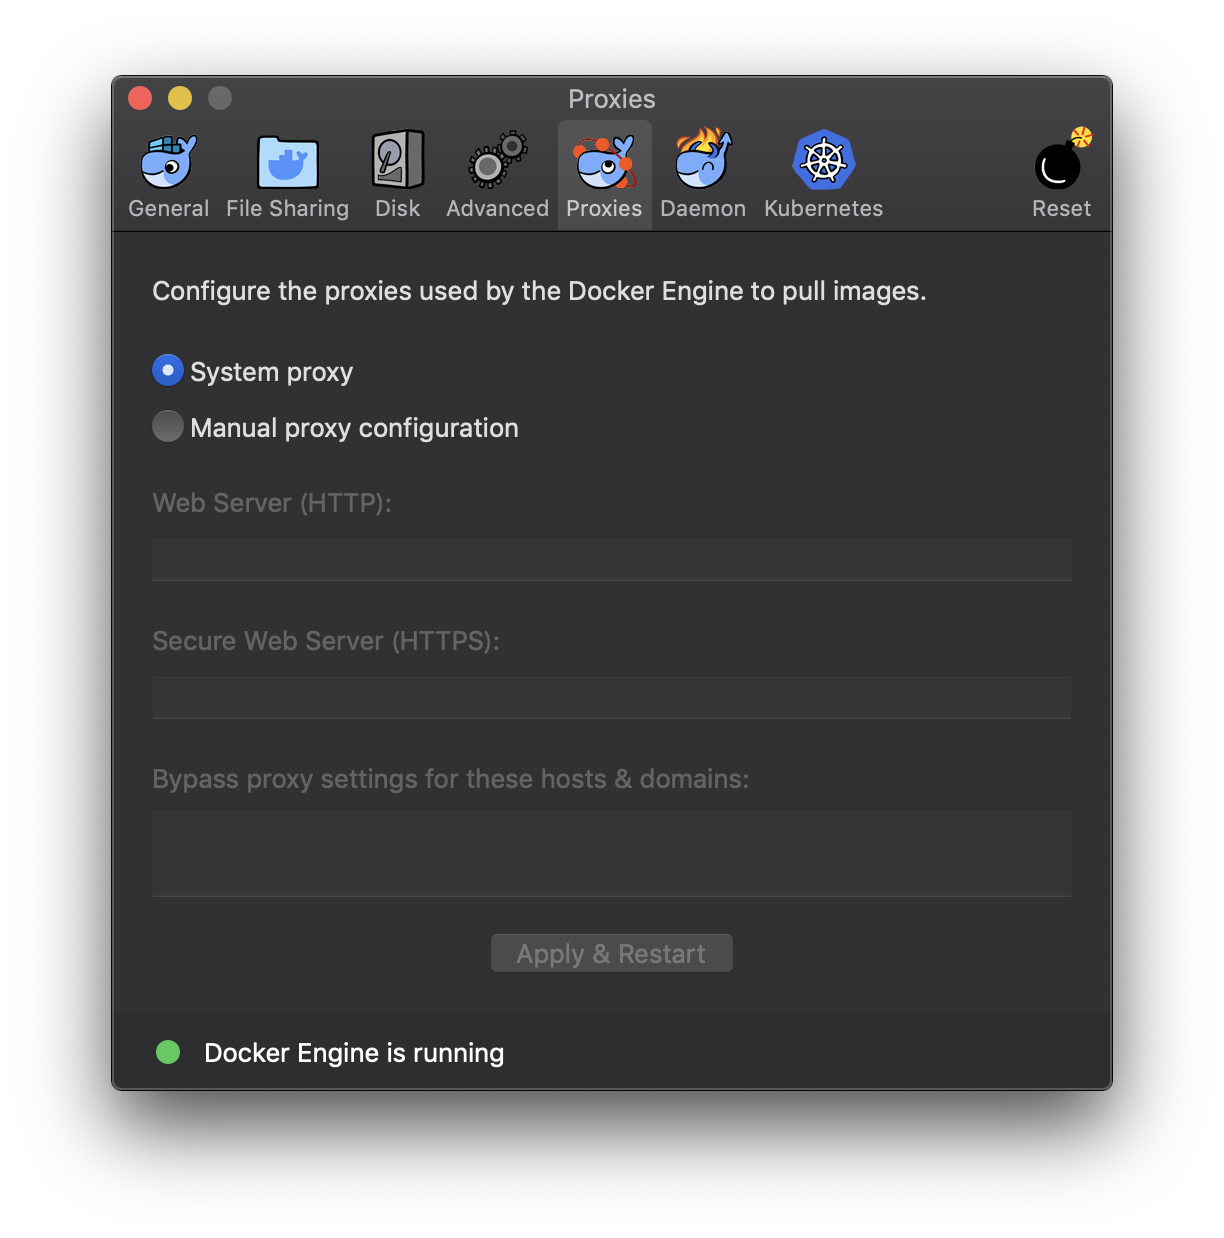
In most cases, System proxy option will work. But if you have problem downloading the docker images, please try Manual proxy configuration option.
- Proxy setting for the devcontainer.
This setting will enable you to use the apt-get or the other network commands inside the devcontainer.
First, open .env.sample file under the root folder of the cloned project.
Edit the settings according to your environment.
Save the file as name .env.
Next, open docker-compose.yml file under the root folder of the cloned project and uncomment the following lines:
  workspace:
    env_file:
- .envIf you want to reset the devcontainer. Please close vscode and enter the following command under the folder of the cloned project:
$ docker-compose downIf you want to update the environment to the most recent version. Please enter the following commands under the folder of the cloned project:
$ git pull origin master
$ docker-compose pull
Please be noticed that the docker-compose down command will reset your environment including installed .deb packages. However, if you write package.xml files correctly, you can reinstall all the depending packages by entering the following two commands:
$ rosdep update
$ rosdep install --from-paths src --ignore-src -r -y- Wait for the container to start.
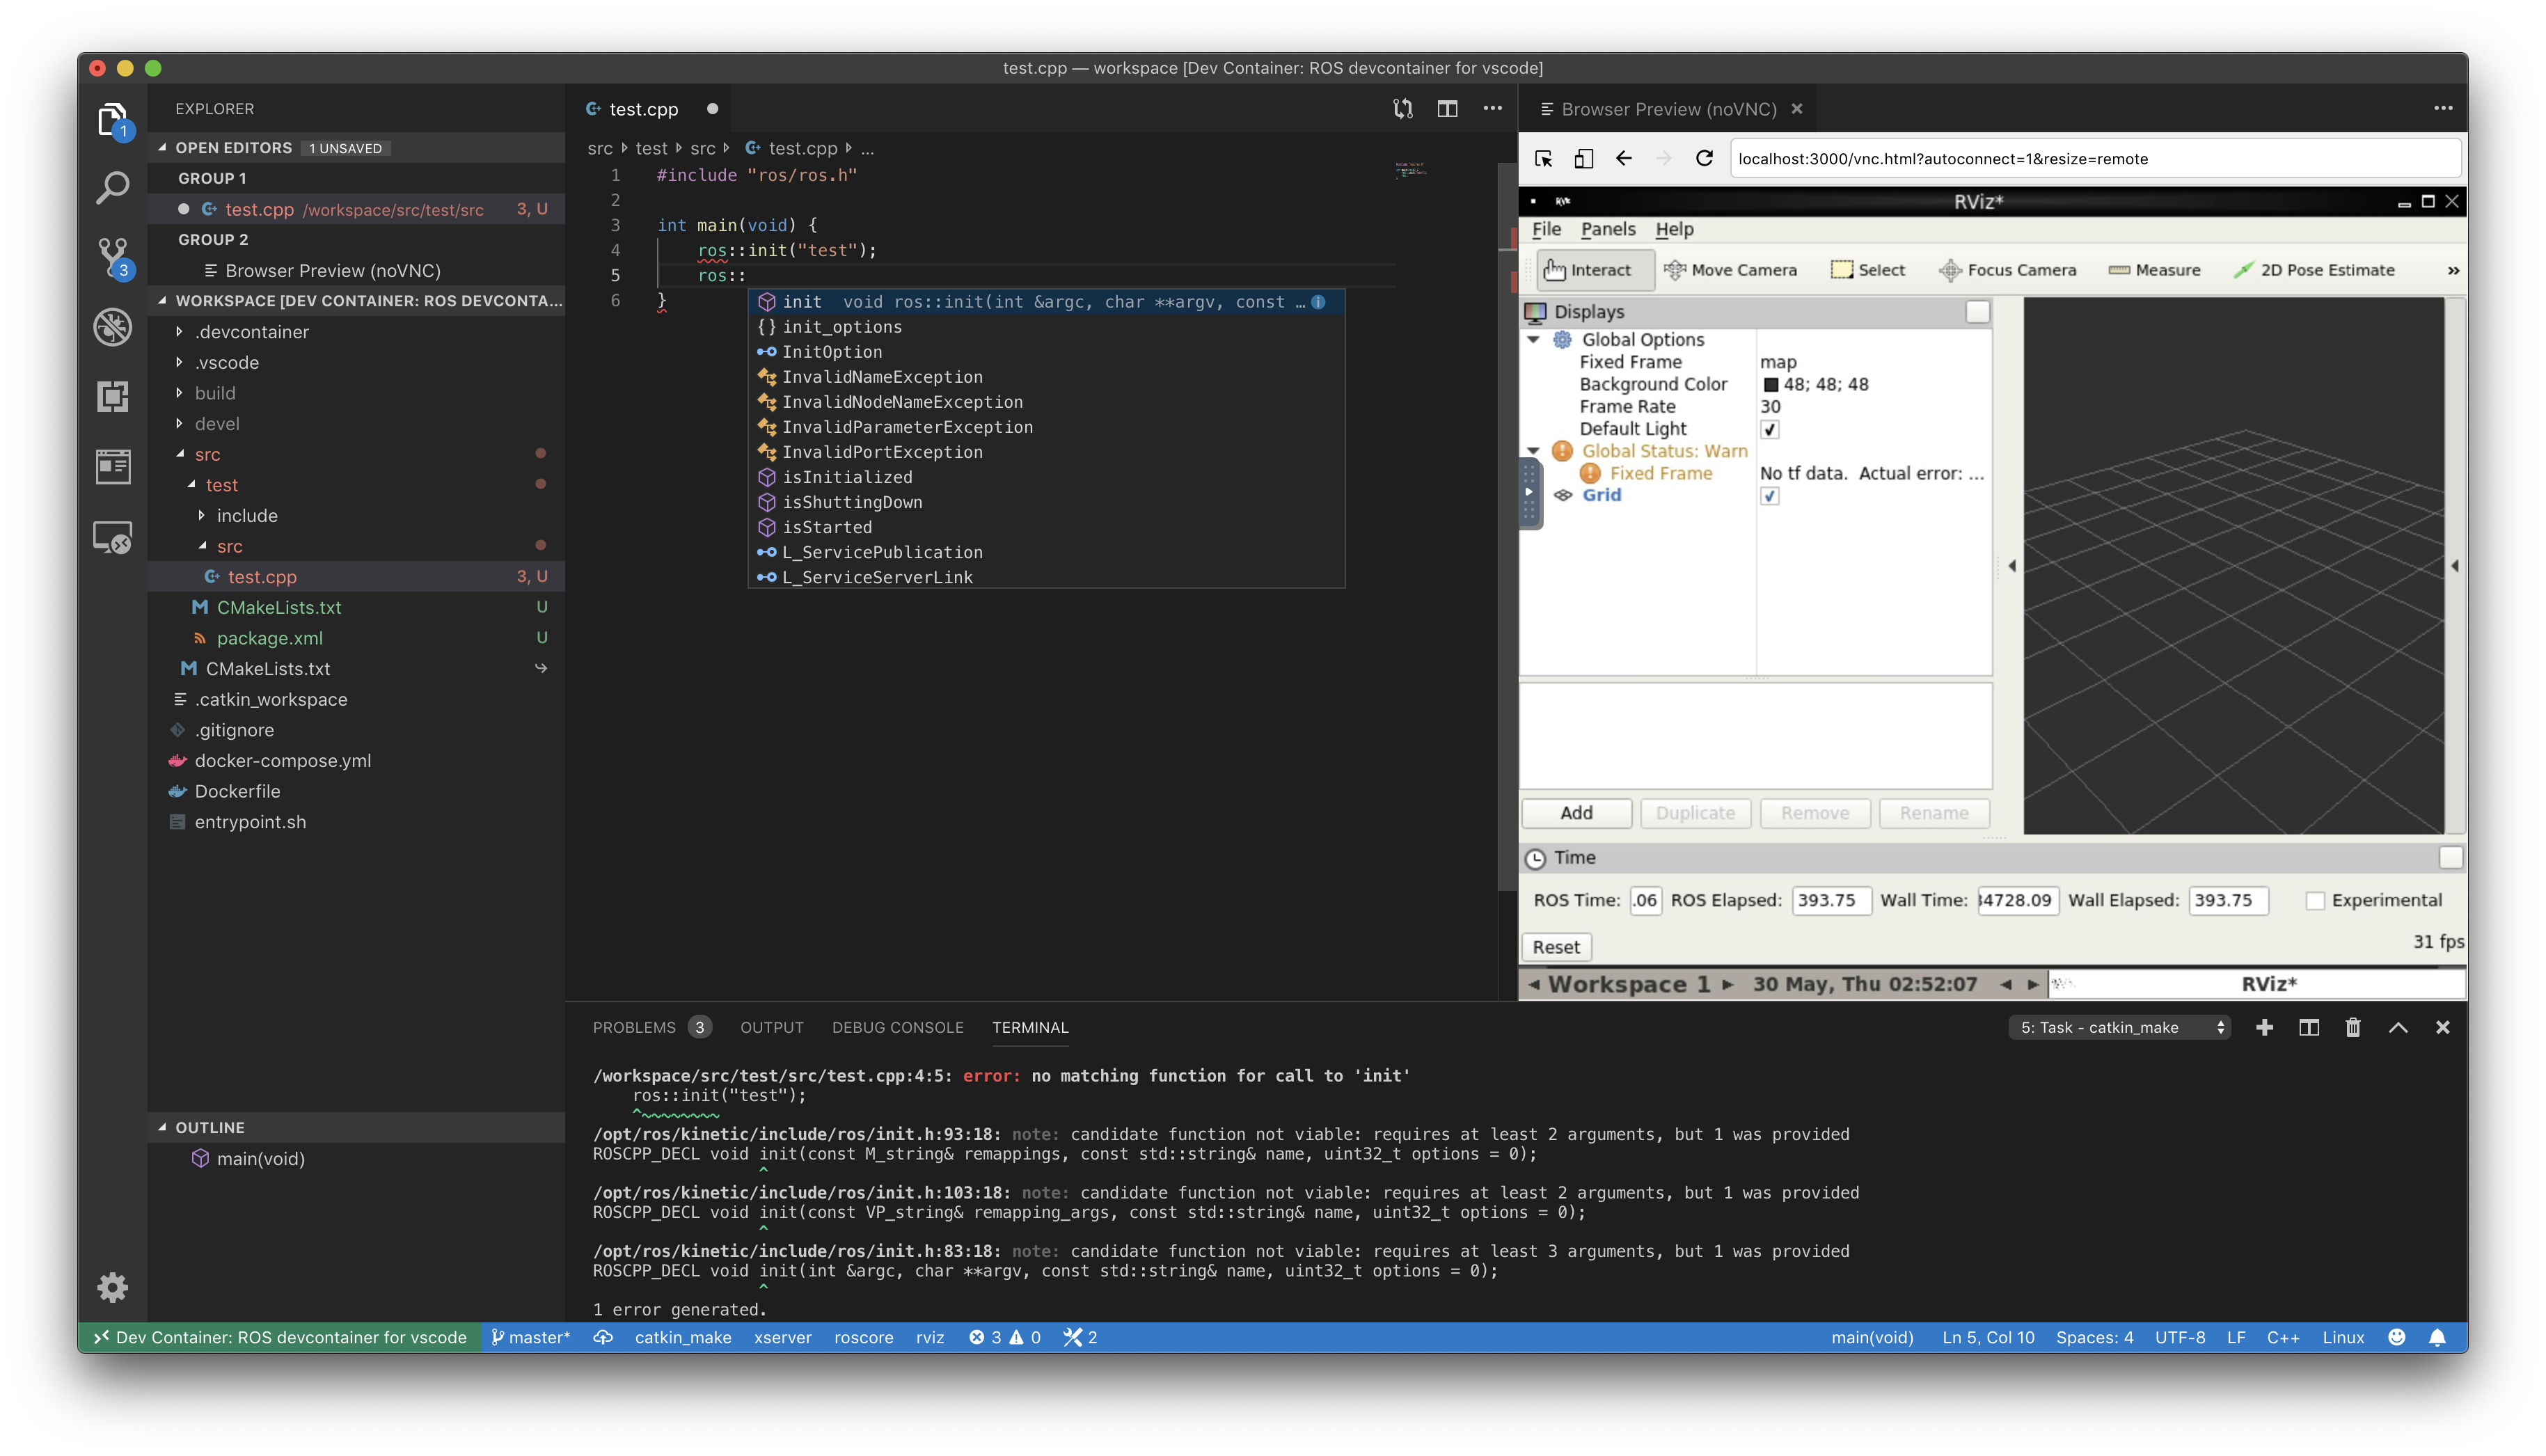
- Open http://localhost:3000/ using your favorite browser.
If you are using Docker Toolbox, open the following URL instead:
If you want browser screen to be integrated with VS Code, use Browser Preview for VS Code extension.
Yosuke Matsusaka (MID Academic Promotions, Inc.)
Code in this repository (Dockerfile, utility scripts, etc) is distributed under Apache 2.0 license.