A guide on the workflows and techniques required to create surf maps for Counter-Strike 2 in the Source 2 Engine.
This repository will include the zipped source files required to view, edit and complete the examples provided in the guide. If updated techniques or new information becomes available, please contact the contributors.
Note that this guide is not designed as a tutorial for the tools and capabailities of the Hammer editor. There are many available tutorials on how to use the tools described in this guide online, this guide is for the specific techniques required to make building and testing Surf maps in CS2.
- Introduction
- Ramps
- Map Design
- Zoning
- Lighting & Vis
- Testing & Building
- Version Control & Git
- Special Thanks & Contributors
The primary objectives of this guide are to:
- Demystify the surf mapping process: Break down complex concepts into manageable steps.
- Highlight common issues: Address known bugs and quirks specific to CS2 surf mapping.
- Share effective workflows: Offer insights into efficient mapping practices, including version control and testing methodologies.
- Foster community collaboration: Encourage knowledge sharing and collective problem-solving among mappers.
This guide encompasses the following topics:
- Ramp Construction and Design: Techniques for building functional and aesthetically pleasing ramps.
- Map Zoning and Triggers: Setting up timers, teleports, and other essential map elements.
- Lighting and Optimization: Strategies for effective lighting and performance enhancement.
- Testing and Building: Best practices for efficient map testing, compiling, and deployment.
- Version Control with Git: Managing your mapping projects using Git for collaboration and version control.
Each section is crafted to provide step-by-step instructions, accompanied by examples and visual aids where applicable.
The CS2 surf mapping community thrives on collaboration. If you have insights, techniques, or resources that could benefit fellow mappers, we encourage you to contribute to this guide. Together, we can build a robust knowledge base that supports both current and future creators.
It is strongly recommended that you read through the entire guide before beginning your first surf map project. Understanding the full scope of surf-specific mechanics, common pitfalls, and Source 2 workflows will save you hours of frustration and ensure your mapping journey starts on solid ground.
Ramp bugs are a significant challenge in CS2 surf mapping, often disrupting player momentum and leading to frustrating gameplay experiences. Unlike in Source 1, where ramp bugs typically result in players getting stuck or abruptly stopping, CS2 introduces new behaviors where velocity can be unpredictably redirected, causing players to veer off course or lose speed unexpectedly.
According to the CS2KZ rampbug fix analysis, ramp bugs in CS2 are primarily caused by tiny, invisible slopes—often no larger than 0.06 units—that form at the edges or intersections of mesh triangles. These micro-slopes are not present in the map's design but are generated upon loading the map, leading to inconsistencies across different CS2 versions. Notably, these bugs became more prevalent following the "Call to Arms" update, which significantly increased their frequency.
While a definitive fix from Valve is pending, mappers can employ several strategies to minimize the occurrence of ramp bugs:
- Use Convex Hull Collision: Applying convex hull collision physics and tying an entity to the ramp can reduce ramp bugs without causing client-side prediction errors. However, this method, while highly effective, doesn't eliminate all ramp bugs, especially those occurring at the end of ramps.
- Implement Server-Side Plugins: Plugins that intercept movement functions like TryPlayerMove and CategorizePosition can adjust player movement to avoid ramp bugs. These plugins work by detecting potential bug scenarios and slightly repositioning the player to maintain momentum. It's important to note that while effective, this approach may introduce prediction errors for players with high latency.
The following is a list of basic ramp types, these types can be combined and merged as well as used individually - e.g. a curved vertical ramp with a trapezoid end.
Note - full and inverted ramp variants can be easily created by mirroring a half ramp, so it is best to create whatever ramp you desire as a half ramp, and then duplicate as neccessary to reduce repeated work.
To Include:
- How size and steepness impacts a map (must be > 45 degrees)
- Examples of sizes of ramps on well known maps
- Recommended sizes and height / width ratios
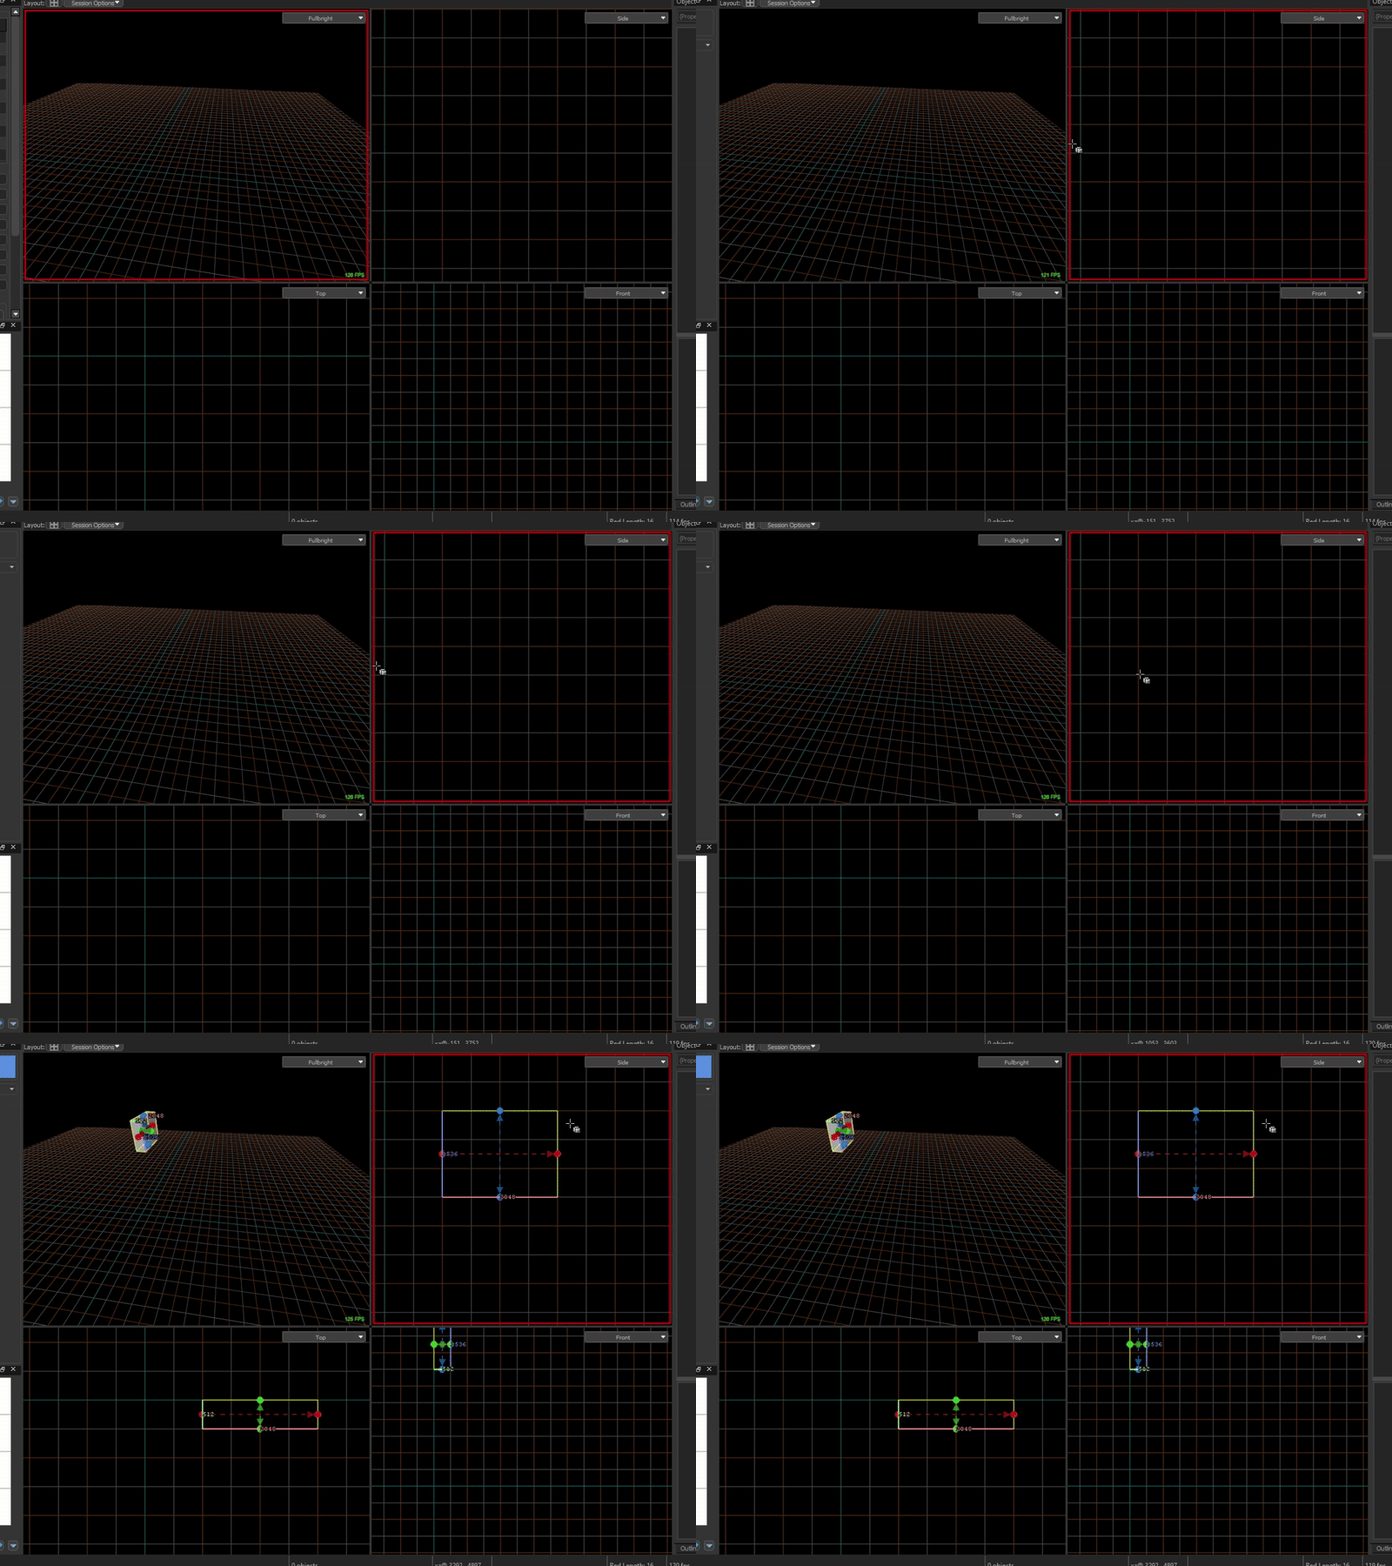
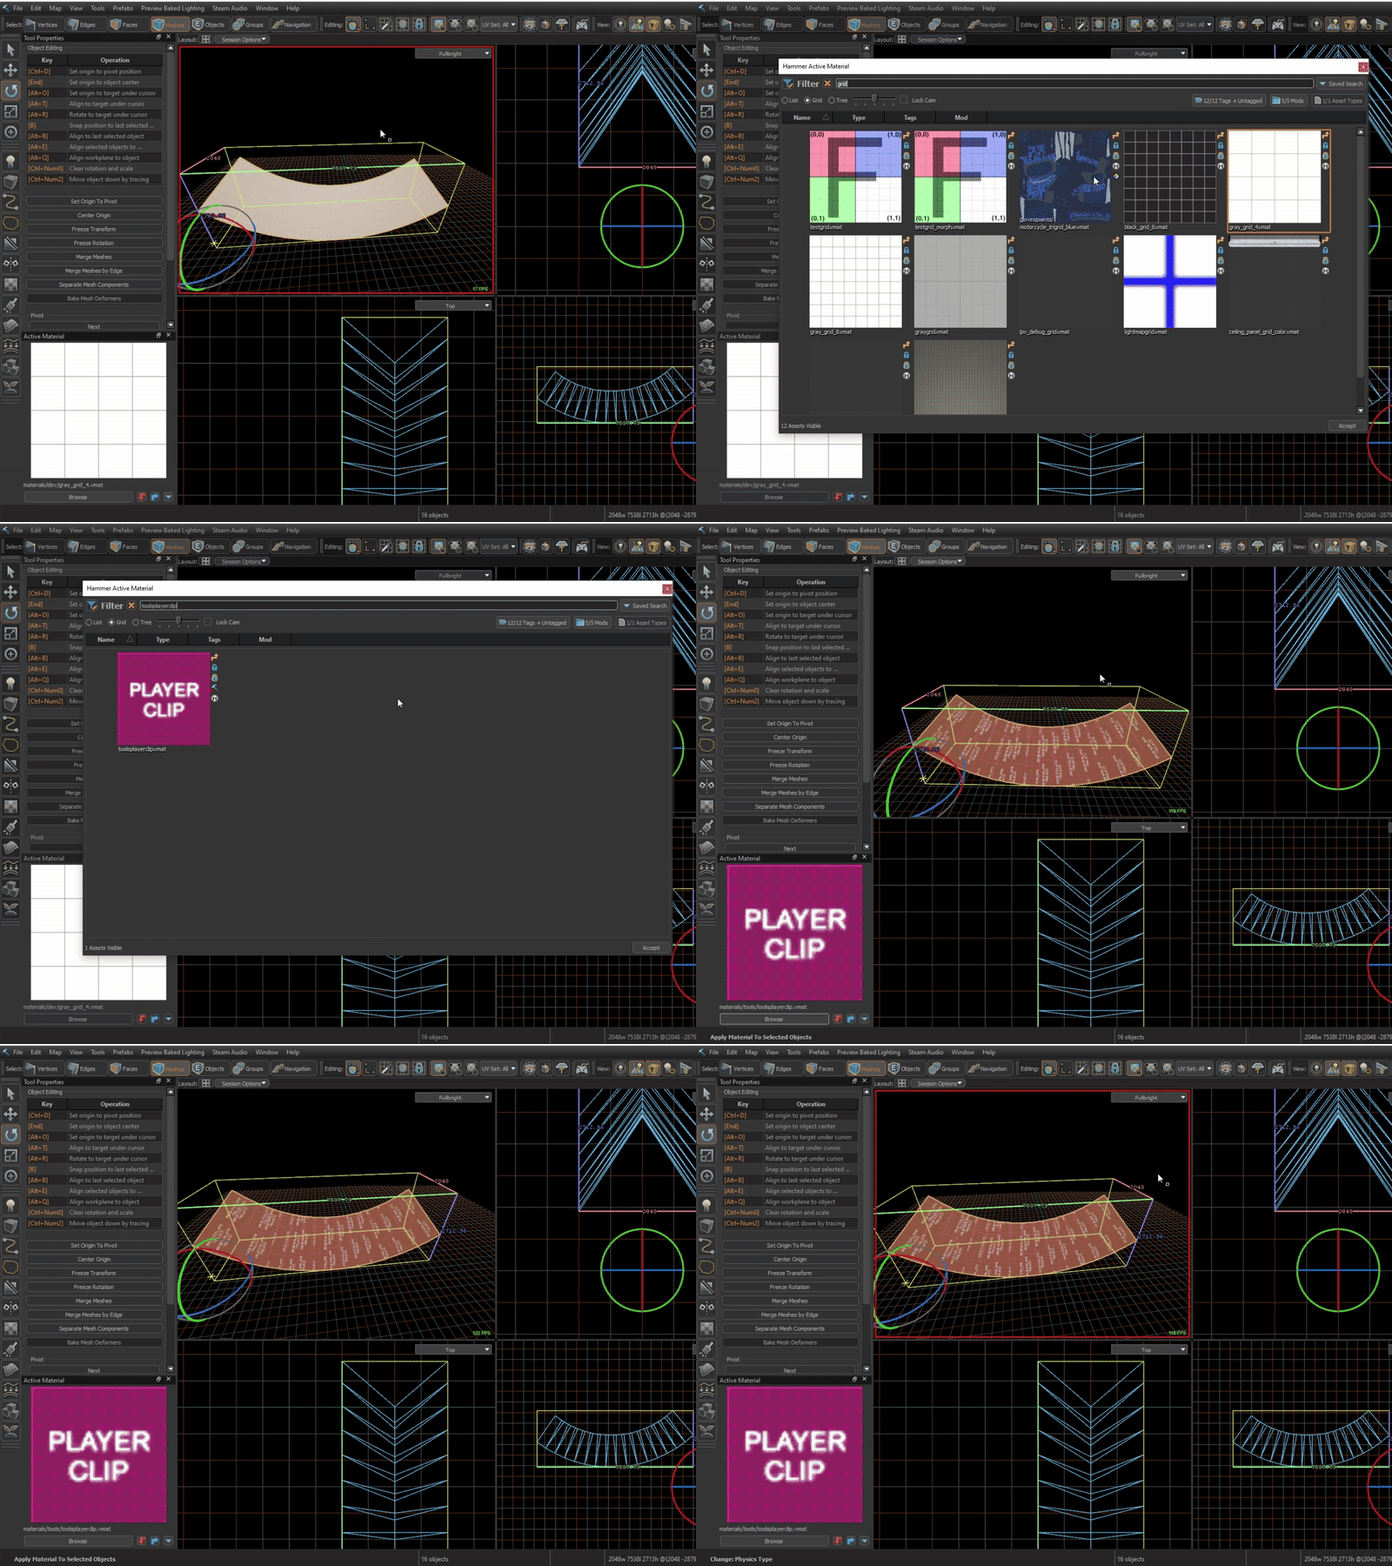
- For straight ramps, constructing ramps anti-rampbug is relatively straight forward. Create a simple ramp segment by placing a rectangular block (LShift+B)
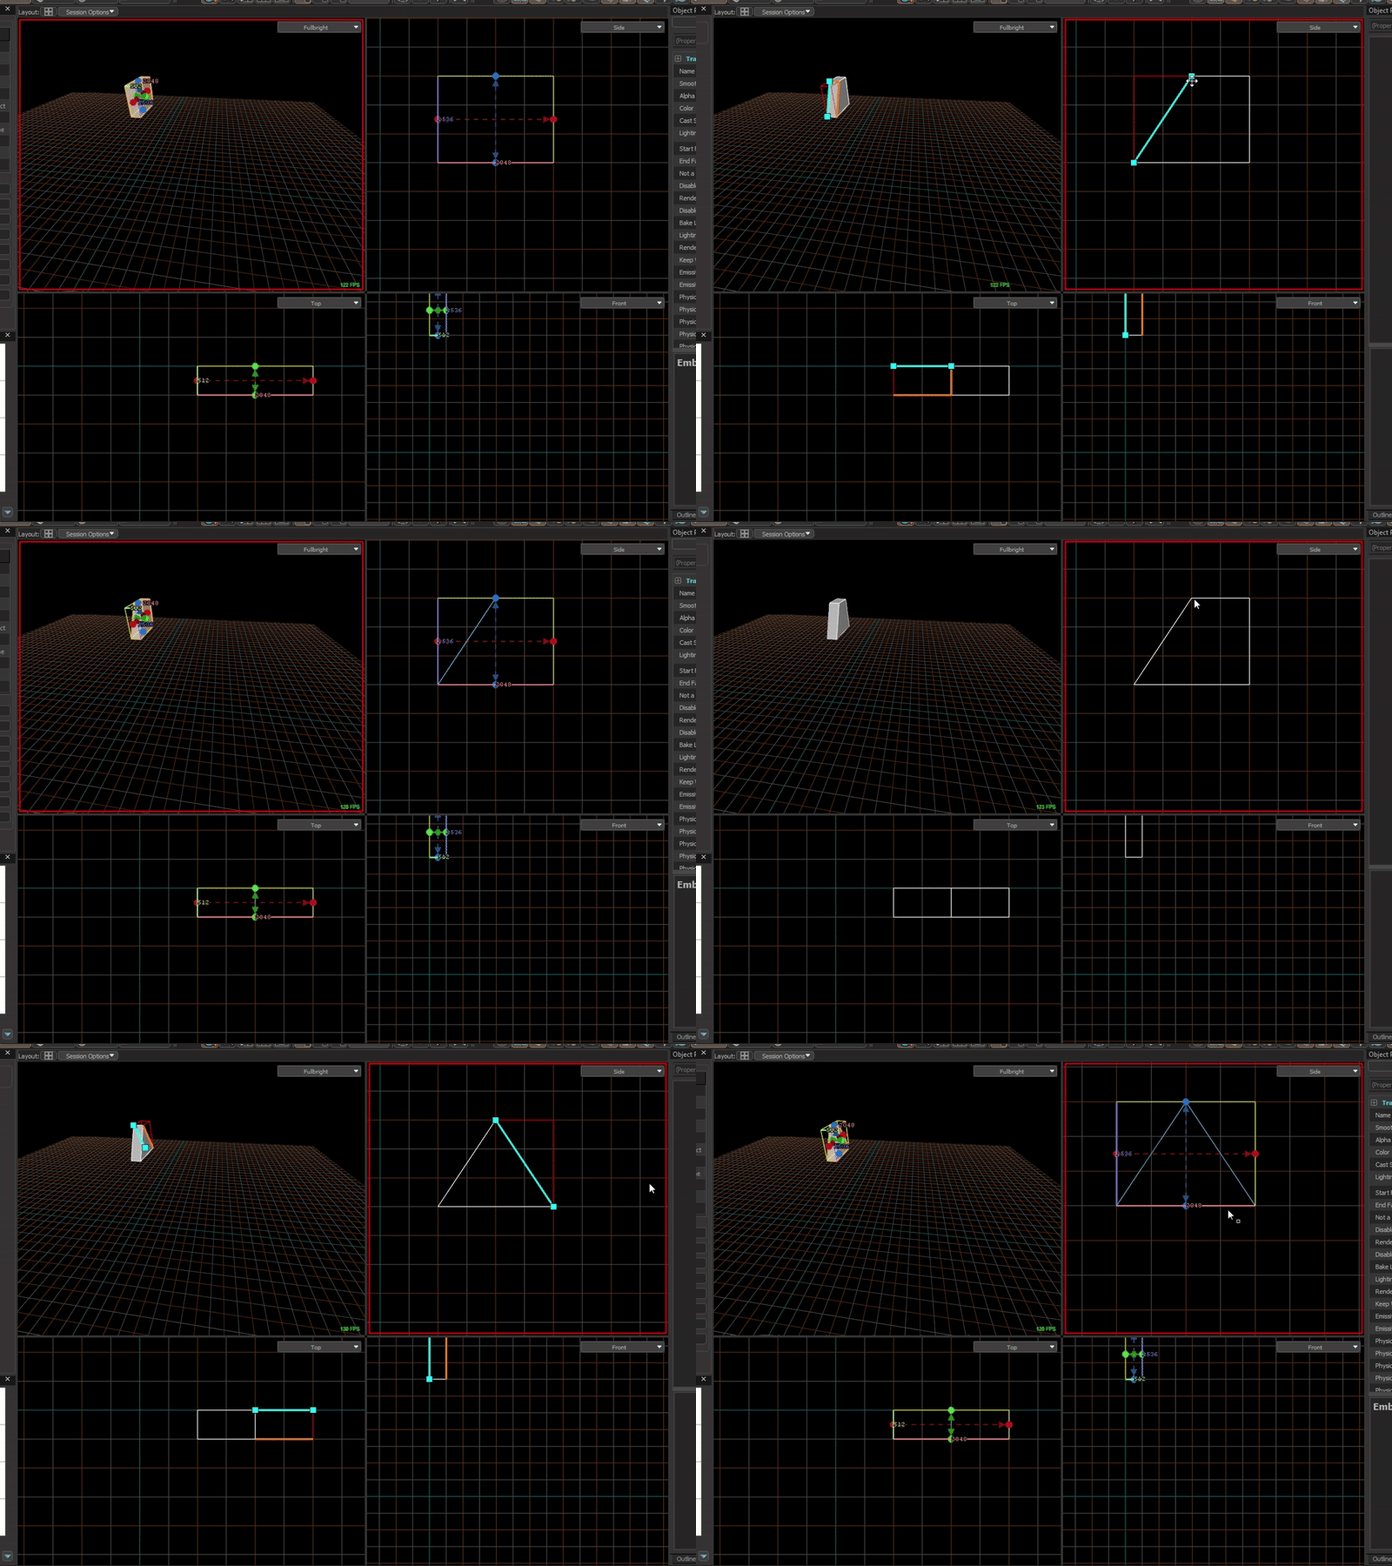
- Use the clip tool (LShift+X) to cut the block into a triangle, ensure
cap new surfacesis enabled.
- Extend the ramp to the desired length using the selection tool (LShift+S)
- Select the surfable surfaces of the ramp in
face modeand copy them (Ctrl+C) Then select the ramp inmesh modeand hide it withquickhide(H). Then paste the faces you copied withpaste special(Ctrl+LShift+V) (You don't need to alter any paste settings you can just clickok)
- Search for and find the
toolsplayerclipmaterial in thematerial browser, and apply it to the faces (LShift+T)
- Use the
thicken faces(G) tool to increase the thickness to2 units. Ensurefrom centeris disabled.
- Select the clip in
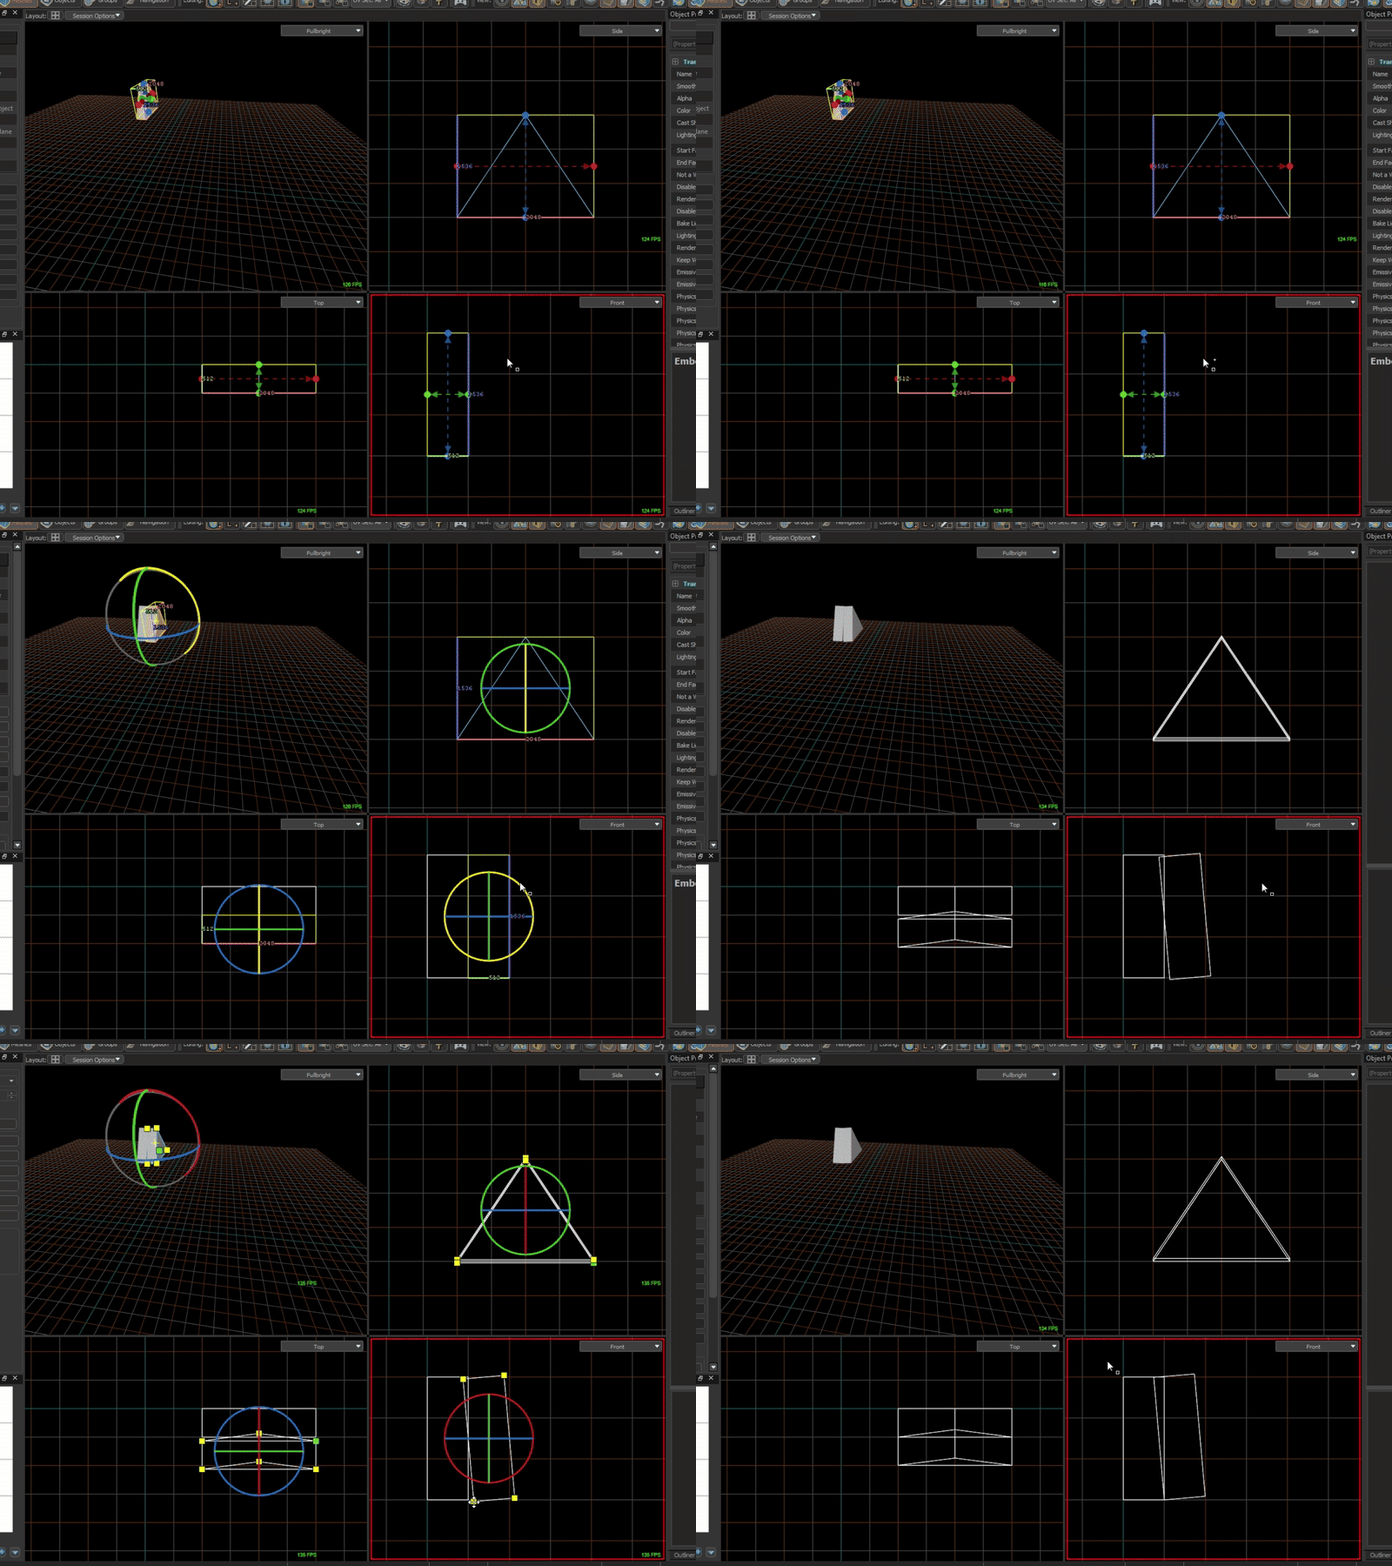
mesh modeand in theobject propertiesmenu change thephysics typefromDefaulttoMesh.
- Ensure the clip is selected in
mesh mode, unhide the ramp body (U) and hide the clip (H). Select the ramp body inmesh mode. In theobject propertiesmenu change thephysics typefromDefaulttoNone.
- Select the bottom and end cap faces of the ramp body. Use
copy(Ctrl+C) andpaste special(Ctrl+LShift+V) to duplicate the faces. Apply thetoolsplayerclipmaterial (LShift+T), and then inmesh mode, change thephysics modeof this clip fromNonetoMesh.
- Now you can unhide all the ramp components (U) and your ramp is ready to be surfed.
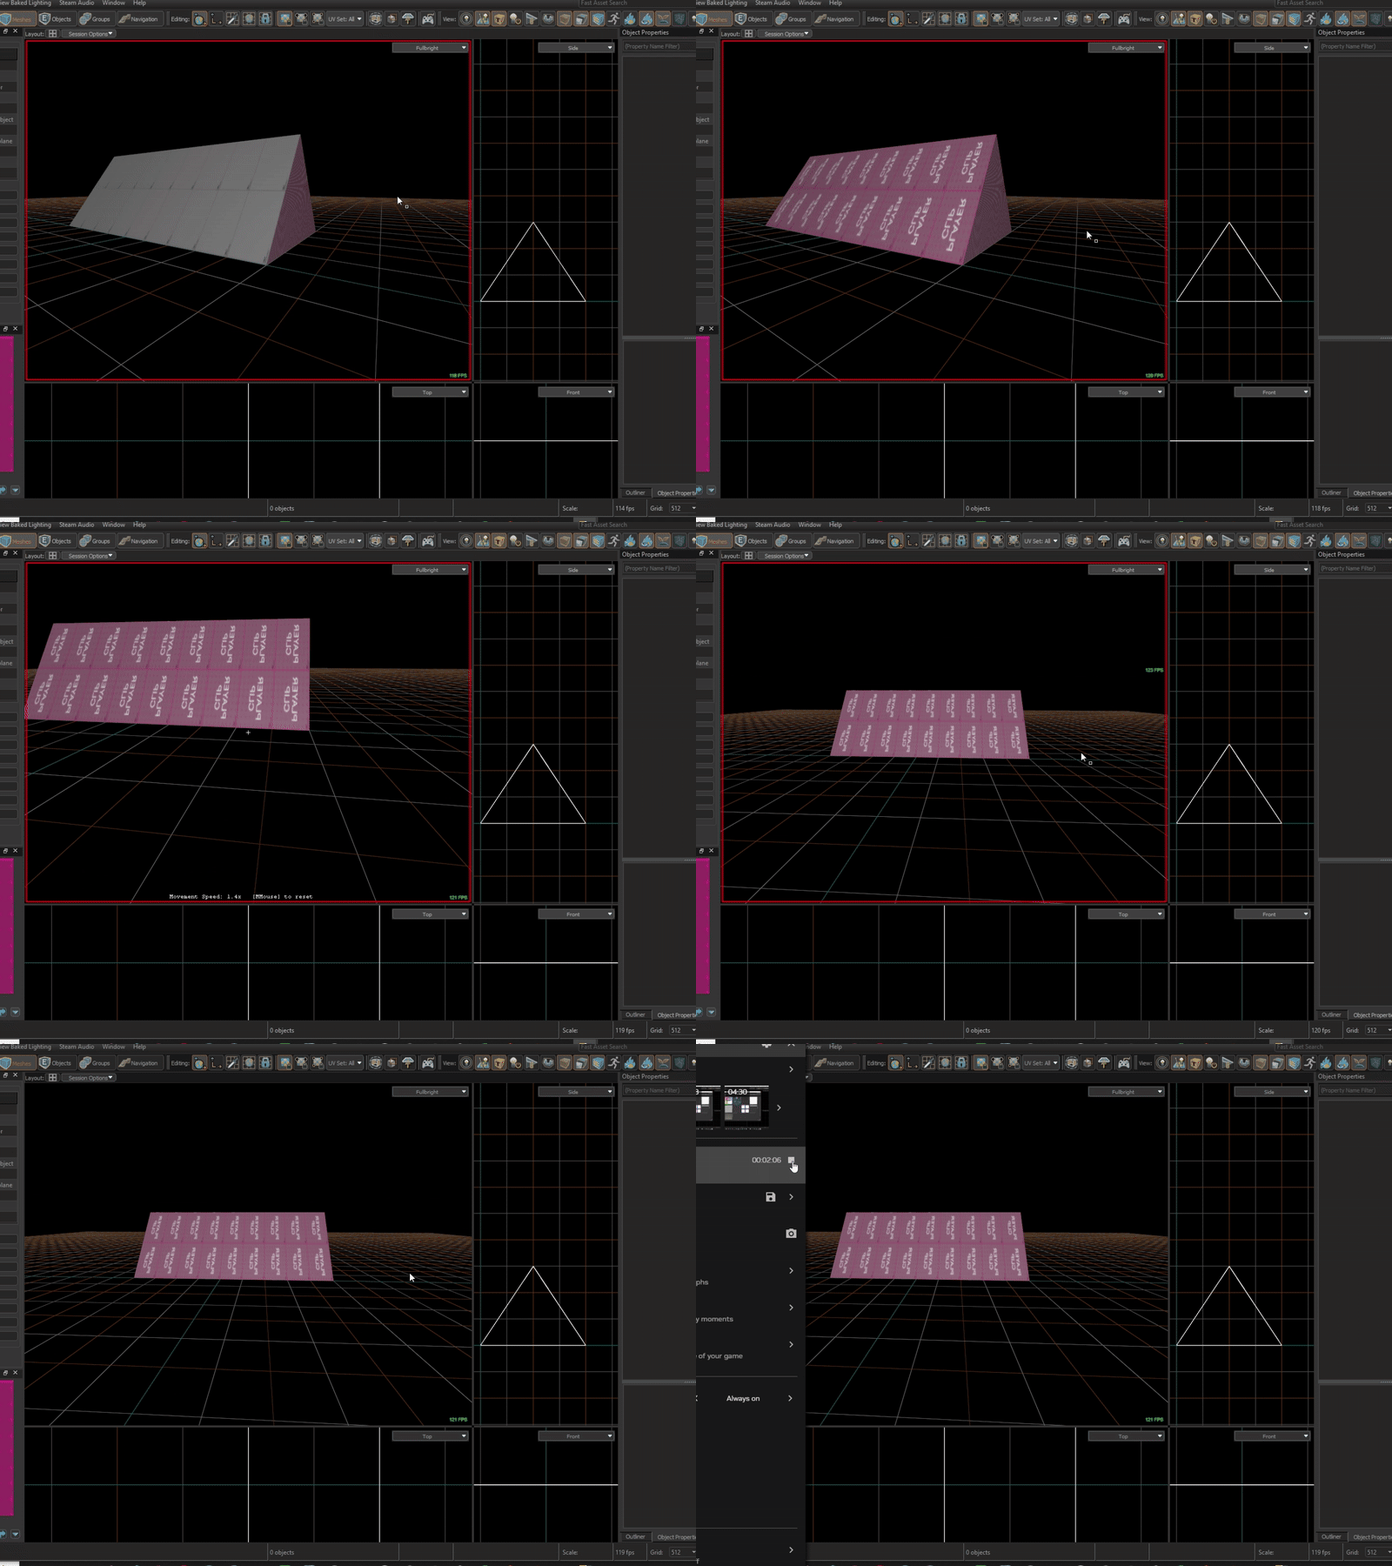
The straight ramnp is now complete and ready to be surfed on.
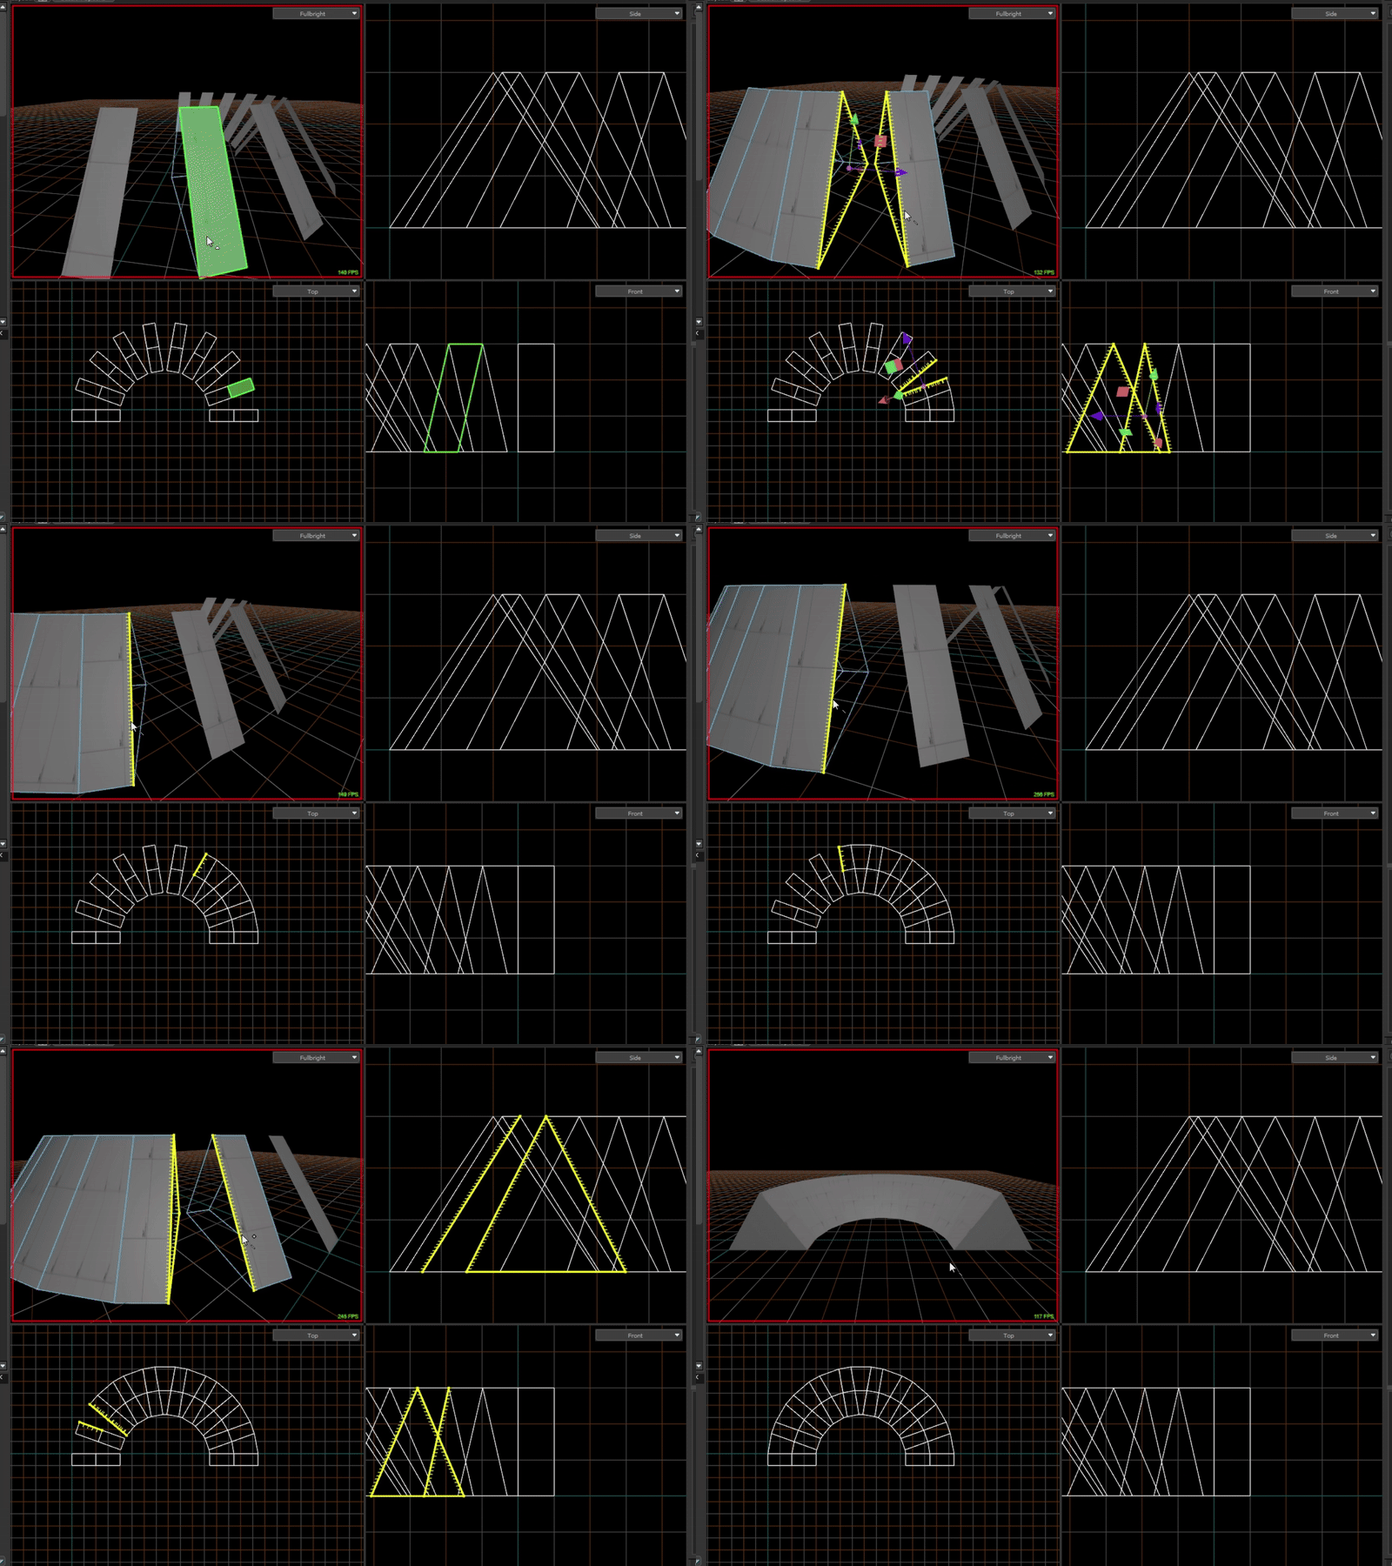
Creating a curved ramp, either vertically or horizontally curved is a little more complicated, but still easy if you follow this method closely.
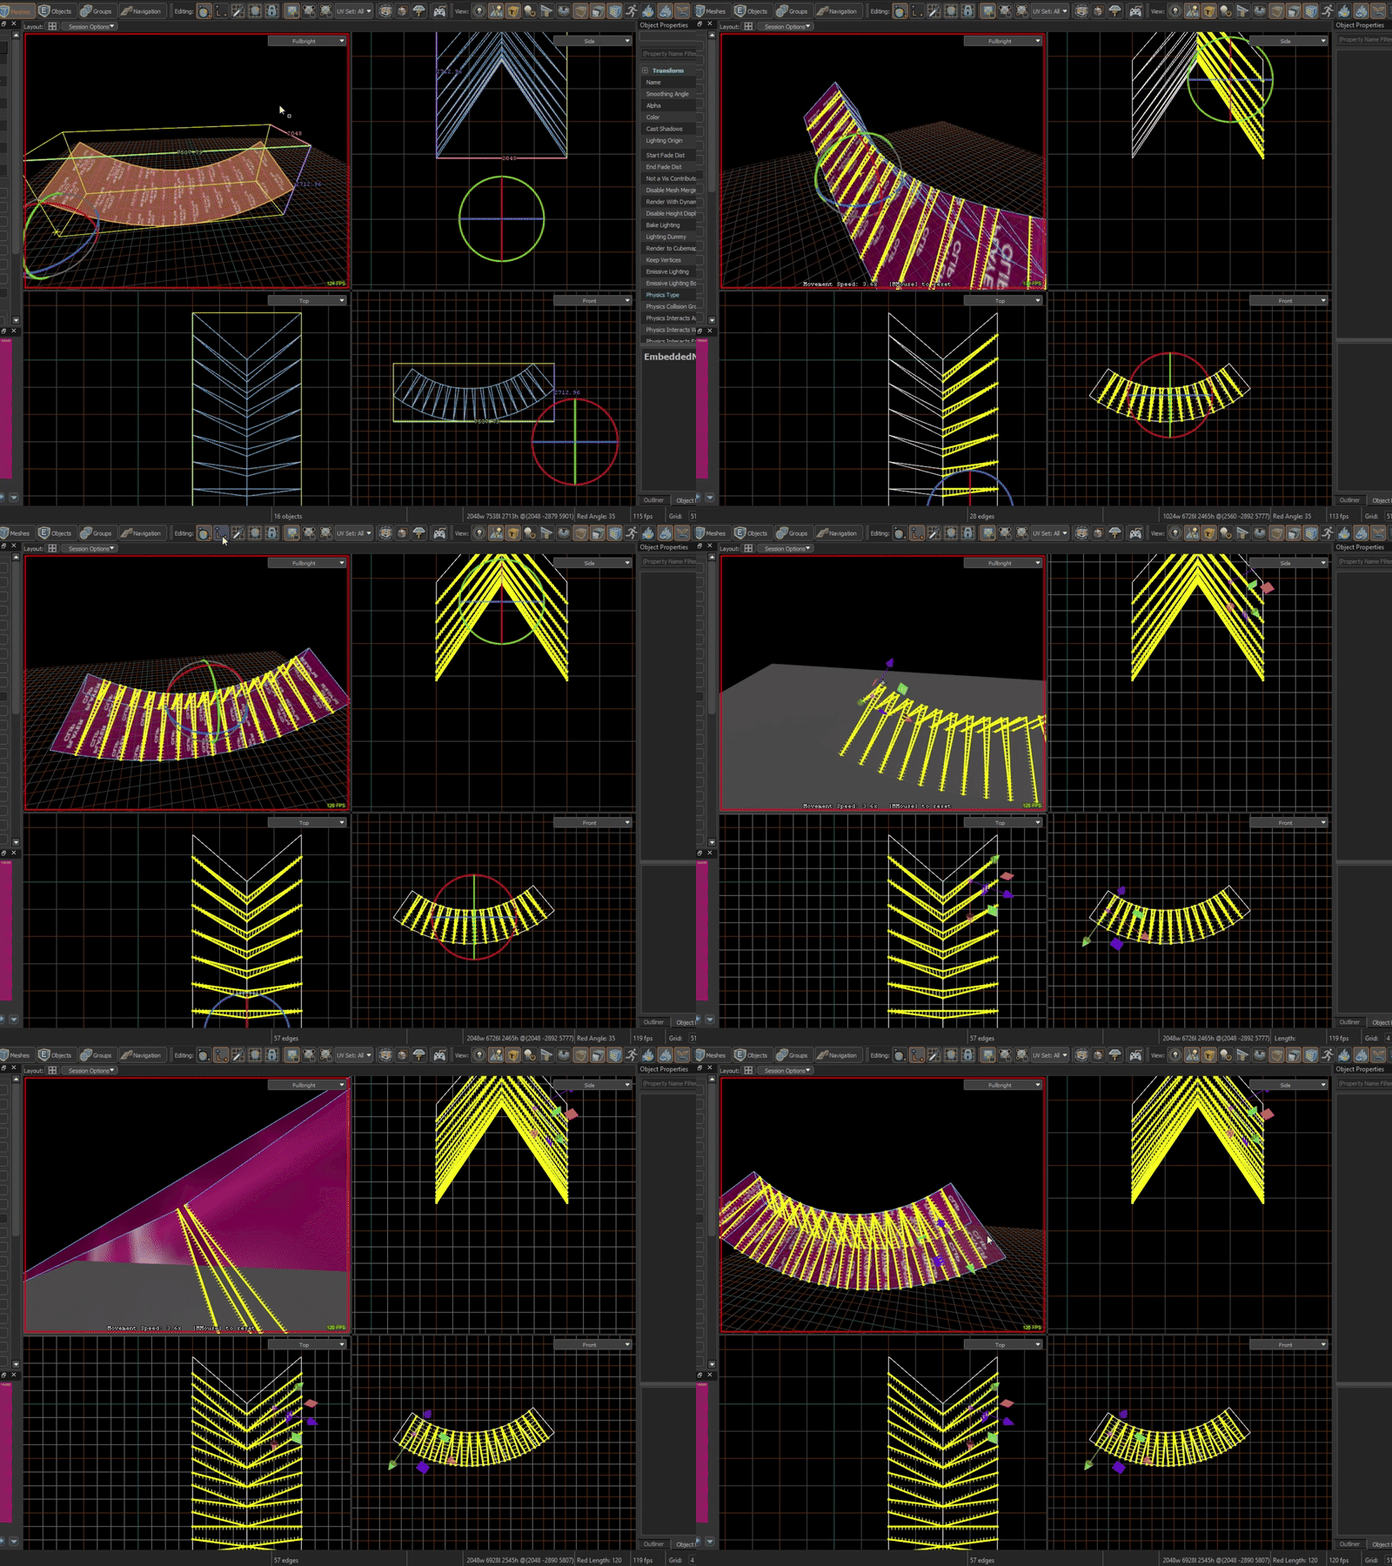
- Create and cut a single ramp segment using the straight ramp method (steps 1 & 2)
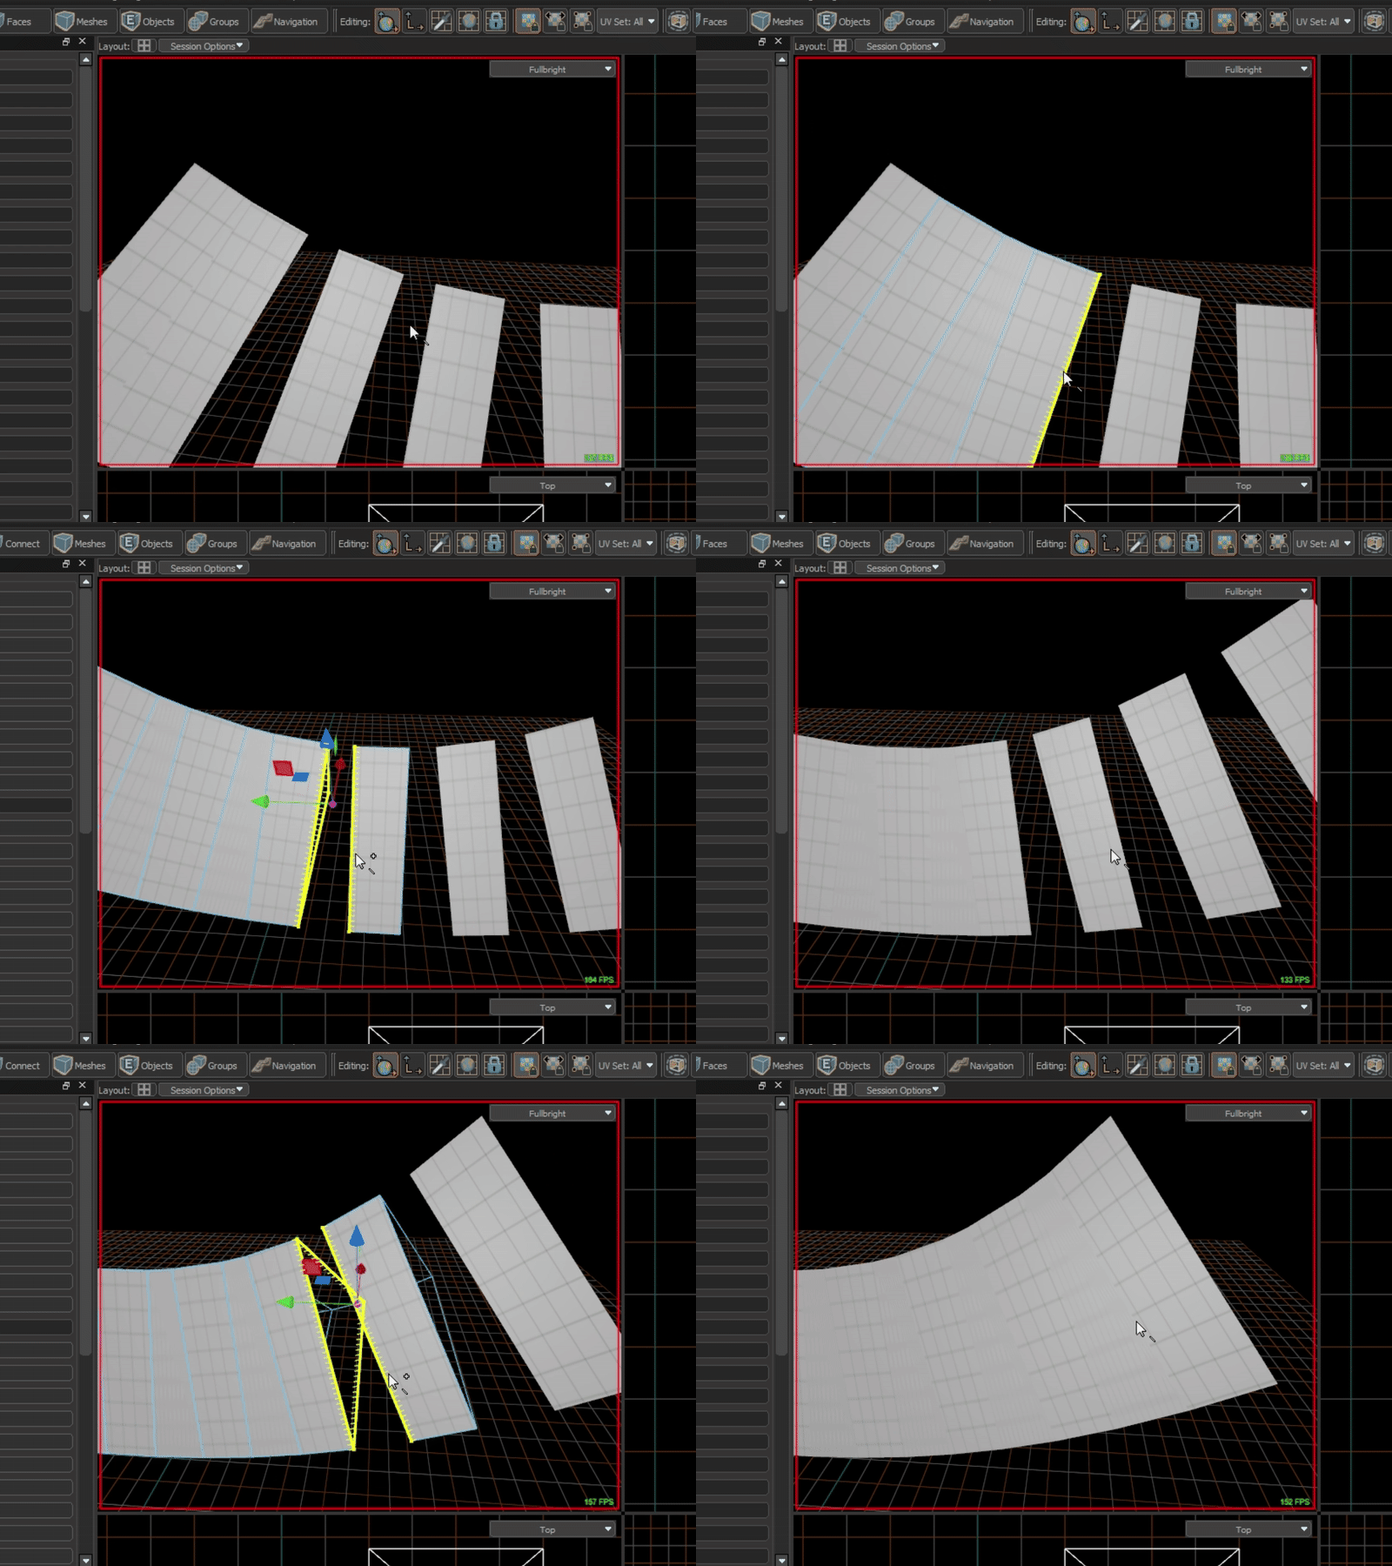
- Duplicate this segment (LShift+ArrowKey). Enter
rotation mode(R) and select the duplicated ramp segment. Center therotation pivotin the selection (Alt+Home) and rotate the segment. Select all the vertices of the rotated segment invertex mode(Double Click), and drag the bottom corner vertex to align with the original ramp segment in the2D Side View
- Repeat step 2, selecting all the ramp segments when duplicating, and all the vertices when aligning. Ensure the rotation amount is consistent between each ramp segment. (The example uses 5° per ramp segment)
- Select the surfable surfaces of the ramp in
face modeand copy them (Ctrl+C) Then select the ramp inmesh modeand hide it withquickhide(H). Then paste the faces you copied withpaste special(Ctrl+LShift+V) (You don't need to alter any paste settings you can just clickok)
- Search for and find the
toolsplayerclipmaterial in thematerial browser, and apply it to the faces (LShift+T)
- In
edge modeselect the interior edges of the ramp segments. In theEditingmenu, switch toUse selection's local space axes for gizmo. Ensure yourgrid sizeis 1 - 8 units, and use thetranslatetool to slide the edges so that the faces overlap once, and the top vertices are almost touching.
- Use the
thicken faces(G) tool to increase the thickness to2 units. Ensurefrom centeris disabled.
- Select the clips in
mesh modeand in theobject propertiesmenu change thephysics typefromDefaulttoMultiple Convex Hulls. Then select the mesh of the first ramp clip, and change itsphysics typefromMultiple Convex HullstoMesh
Note, 'the first ramp clip' is the clip at the start of the ramp, where start and end are defined by the direction the ramp will be surfed when playing the map.
Note, if your curved ramp contains both long straight section(s) and curved section(s), ensure the ramp clip(s) for the straight section(s) have Physics Type set to Mesh.
- Ensure the ramp clips are selected in
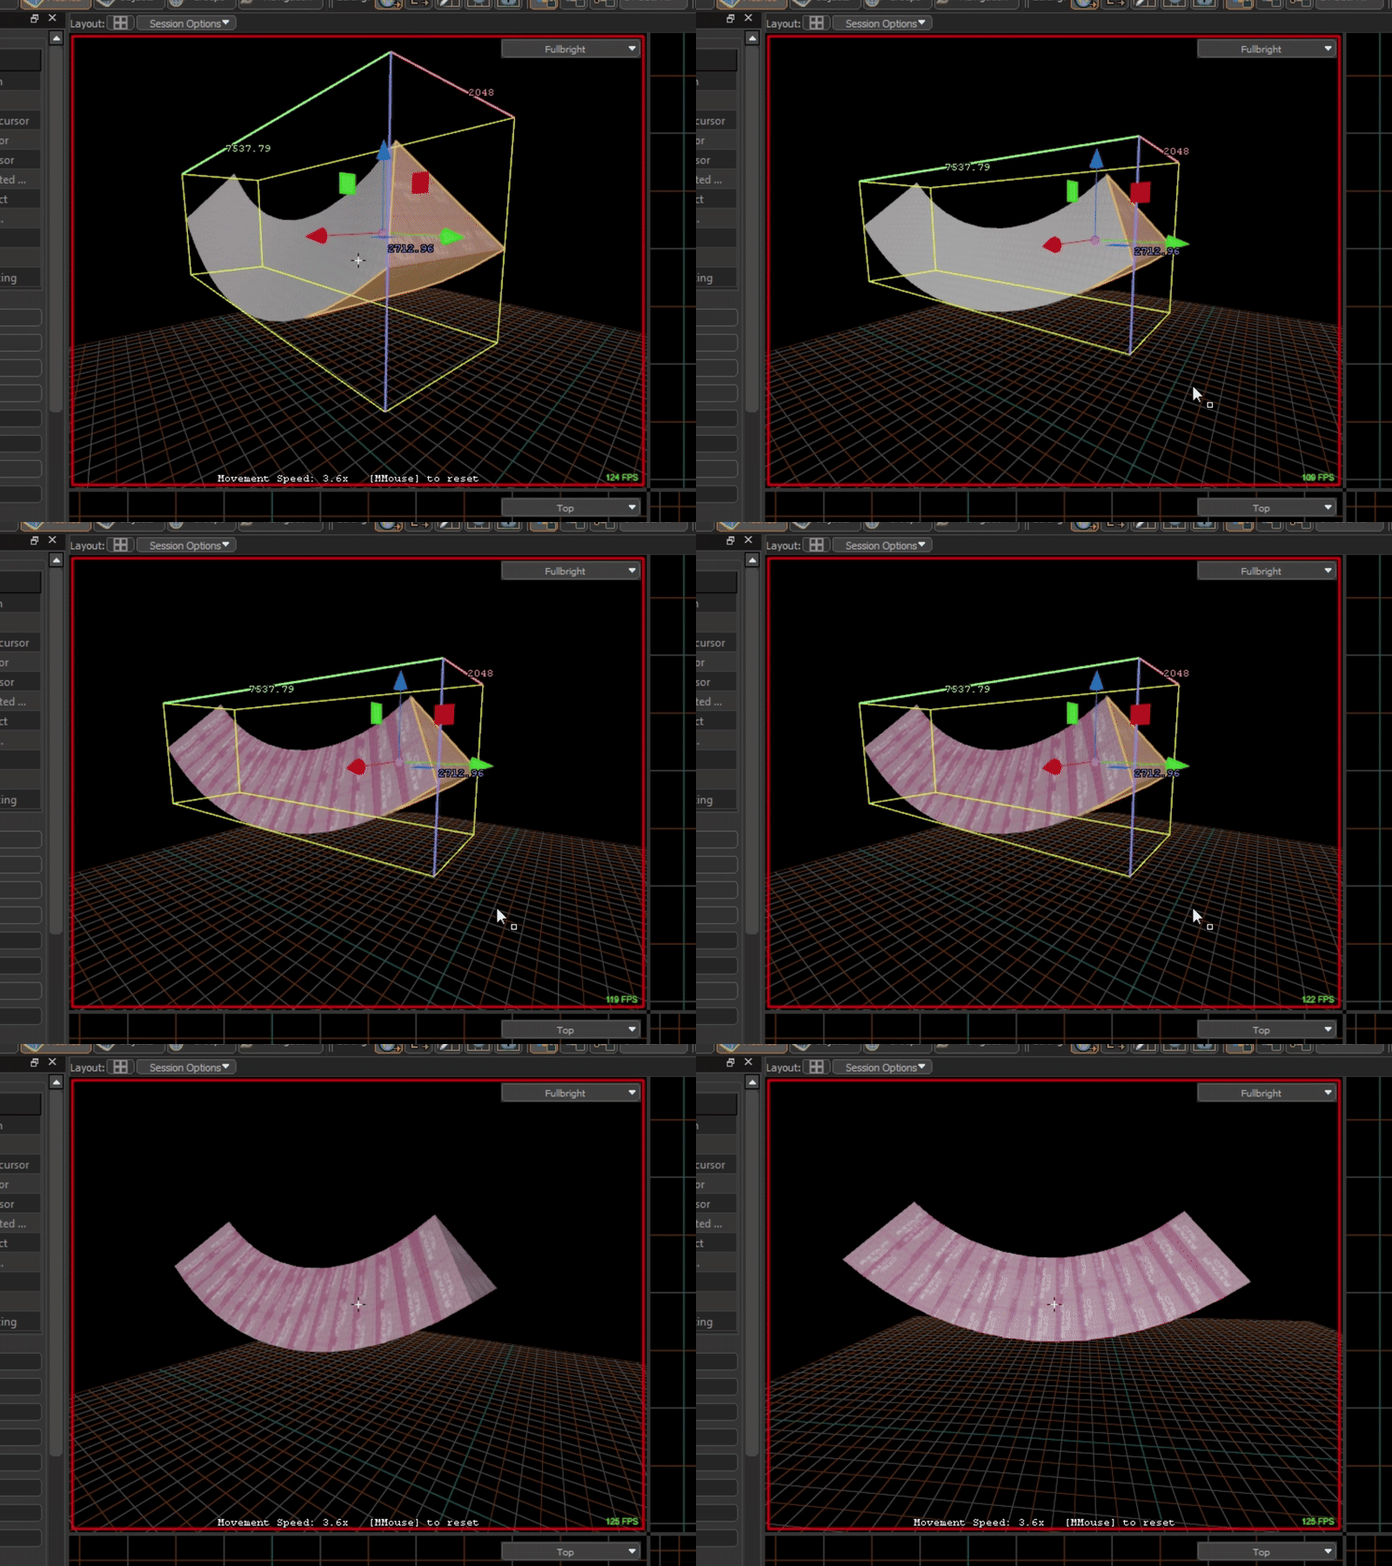
mesh mode, now unhide the ramp body (U), and hide the clip surfaces (H). Then delete every second segment (Del), and the interior facing faces of the remaining segments.
- In
edge mode, select the adjacentopen loopsof edges between the deleted interior faces (LShift+Double Click). Create aninterpolated bridgebetween theedge loops(Alt+B). Ensuretwistsis set to0andstepsis set to1. Press enter to confirm. Repeat this for all of the gaps in the ramp. If you have an even number of segments, you must then delete all the faces of the final segment and then bridge the remaining final gap.
Note, if your ramp body is made of an even number of segments, you will have to delete the faces of the end segment and bridge them like in the gif below
- Now select the ramp body in
mesh mode. In theobject propertiesmenu change thephysics typefromDefaulttoNone.
- Finally, select the bottom and end cap faces of the ramp body. Use
copy(Ctrl+C) andpaste special(Ctrl+LShift+V) to duplicate the faces. Apply thetoolsplayerclipmaterial (LShift+T), and then inmesh mode, change thephysics modeof this clip fromNonetoMesh.
You can now unhide all the components (U) and use the completed ramp. Ensure the if you move or rotate the ramp, that you select ALL components.
Incorporating consistent materials and colors for interactive surfaces, such as end platforms, ramps, and bhoppable areas, is essential for intuitive navigation. This consistency allows players to quickly recognize and interact with these elements, enhancing their overall experience. By differentiating these materials and colors from the rest of the map, you create clear visual cues that guide players seamlessly through the environment. It is of course, not strictly neccessary, or required, but in general makes it easier for players to learn the routes and limits of the map.
Utilizing tools like the face cut tool and beveling techniques enables the creation of intricate patterns and designs on curved ramp surfaces. These methods not only add aesthetic appeal but also contribute to a more immersive and engaging gameplay environment. Similar effects can be achieved by well-designed custom textures, or by modelling workflows through blender, but that is outside the scope for this guide. Many tutorials and guides for this can be found on youtube.
View here the face cut tool (C), to cut an indent into the faces of the ramp surface.
And then using local selection axis the faces can be indented and duplicated to make a window into the ramp.
Here is a list of obstacles you might wish to include into your map.
A normal spin will only allow the player to turn in one direction.
A royal spin will force the player to change the direction of their rotation part way into the spin.
A free spin will allow the player to spin in their desired direction.
A drop strafe will allow the player to strafe left and right instead of spinning (assuming there is enough room).
A window can be used as a speedcheck, or as a precision test depending on its height, distance and size. It can be made bhoppable or can be made to reset the player if they do not pass through cleanly.
Ramp strafes can be added to make maintaining units more difficult or to make the setup to jumps more precise.
Pillars (Or any other object / obstacle) can be used to force the player to strafe through the air.
To Include:
- a section on each common obstacle in a surf map and a description and build guide (and a difficulty rating or range in surf map tier)
- Spin
- Free Spin
- Royal Spin
- Drop Strafe
- Ramp Stafe
- Window
- Pillars / Columns / Airstrafe
- Headcheck
- Headsurf
- Bhop
- Slide
- Speedcheck (highjump and longjump)
To Include:
- Anti-grav
- Slow-mo
- Moving platforms
- Ladder catch
- Doors
To Include:
- Explanation on changes from Source 1 Skybox Material
- How to create Moondomes
- Stiching cubemap images
- Using raw EXR files
- Where to find skybox textures
To Include:
- Linear and staged/hybrid map start/end zones
- Linear checkpoint zones
- Staged/hybrid stage start zones
- Timer-Killer trigger zones
- Timer-Reset trigger zones
To Include:
- Telehop techniques
- Trigger teleports
- Landmark anchors for relative teleport
- Rotation and facing-direction
- Velocity Killers
- Reset Triggers
- Using sharptimer
trigger_multiples - Using
trigger_teleporttied entities - Staged/Hybrid vs Linear reset triggers
- Using sharptimer
To Include:
- Timer-Killer trigger zones
- Reset trigger techniques
- Nodraw / playerclip encapsulation
To Include:
- Lighting leak prevention best practise
- interior lighting (sealed geometry)
- Light blocking whereever possible to reduce lighting calculations
To Include:
- Reduce number of lights via:
- increased brightness
- reduced dropoff
- increased range
- increased bounce reflectivity
To Include:
- Importance of vis in map performance optimisation
- How to place vis hints
To Include:
- Config options to include
- Where to find config options (in console on a public server)
- Recommended settings
- How to set config to be packed in vpk build
To Include:
- Testing non-visual map elements (e.g. surfing), building without lighting and using
mat_fullbright 1; - Testing without lighting compression
To Include:
- Explanation of what vis is
- Explanation of why vis build skipping is possible
- Possible side effects of vis build skipping
- How to vis build skip
To Include:
- Explanation of workshop access types (private, friends only, unlisted, public)
- Explanation of workshop approval
- Explanation of CS2 server map access (can not use local files, can only use workshop links)
To Include:
- Requirements for final build (vis, lighting, compression)
- Recommendations for preview media
- Video of map being surfed
- Photos of map
- Inclusion of cfg in description
To Include:
- .gitignore requirements to avoid commiting unneccessary files
- different addon isolation techniques
- single repo single branch
- single repo multi branch
- multi repo


