Установка Ubuntu 18.04 с поддержкой графического интерфейса в WSL
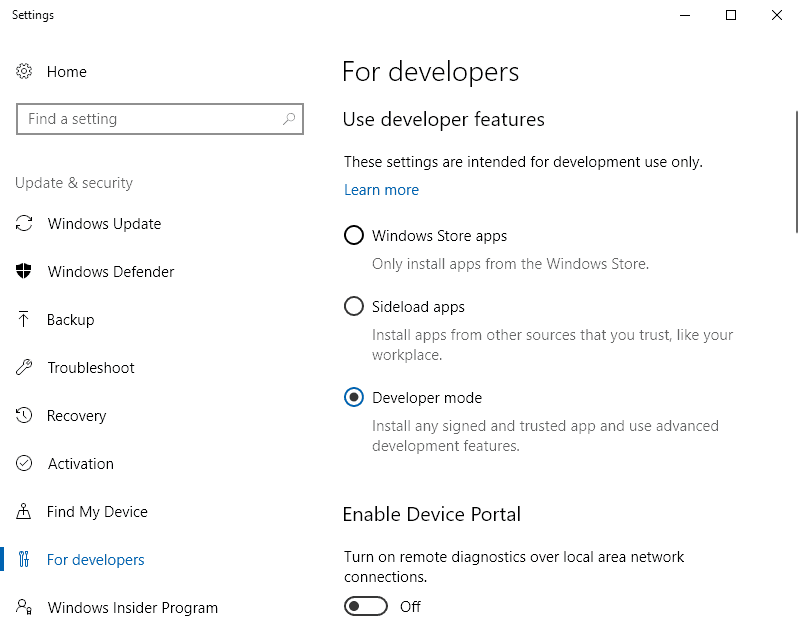
- Откройте Settings -> Update and Security -> For developers (или в Поиске наберите - Использование функций разработчика)
- Выберите Developer Mode
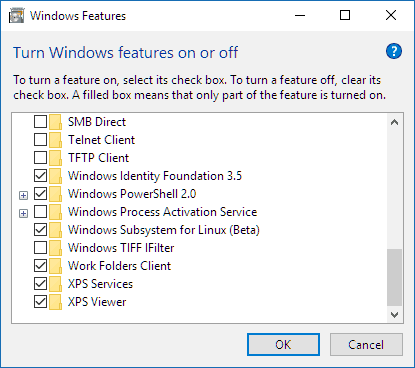
- В поиске наберите “Turn Windows features on or off” или “Включение или отключение компонентов Windows”
- Выберите Windows Subsystem for Linux или Подсистема Windows для Linux
- Нажмите Ok
- Скачайте и установите дистрибутив Ubuntu из Microsoft Store - Ubuntu 18.04
- После окончания установки и создания пользователя Unix введите в командной строке Ubuntu:
sudo apt-get update && sudo apt-get upgrade -y && sudo apt-get upgrade -y && sudo apt-get dist-upgrade -y && sudo apt-get autoremove -y
- В командной строке Ubuntu введите:
sudo apt-get install x11-apps - В командной строке Windows введите:
bash - Установите X-Server для Windows - VcXsrv
- Запустите XLaunch, выберите One large window и Display number = 0

- Запустите bash и выполните
echo "export DISPLAY=localhost:0.0" >> ~/.bashrc - В bash выполните
. ~/.bashrc - В bash выполните
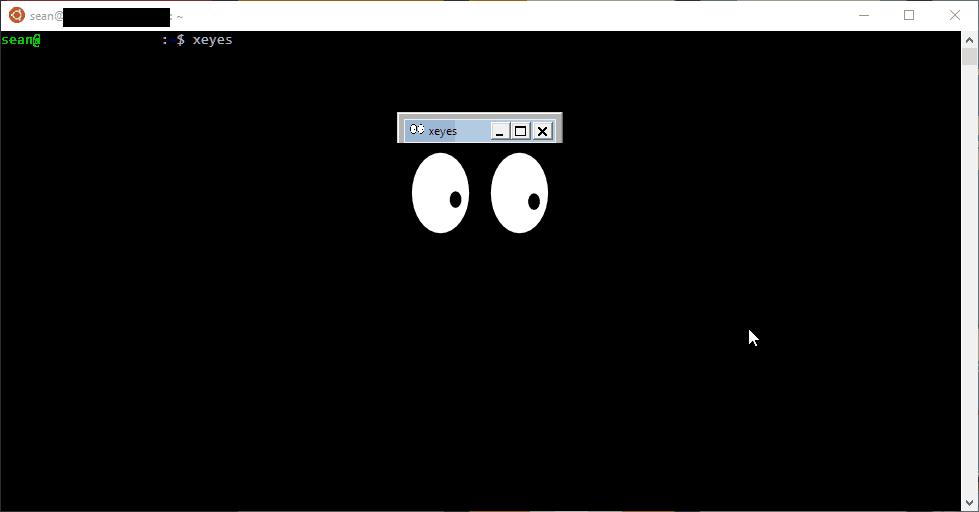
xeyes- в VcXsrv должны появиться глаза :) - В командной строке Ubuntu выполните
sudo apt-get install ubuntu-desktop - В командной строке Ubuntu выполните
sudo apt-get install unity - В командной строке Ubuntu выполните
sudo apt-get install compiz-core - В командной строке Ubuntu выполните
sudo apt-get install compizconfig-settings-manager - В командной строке Ubuntu выполните
sudo apt-get update - В командной строке Ubuntu выполните
sudo apt-get upgrade - В bash выполните
sudo ccsmи в окне запущенного VcXsrv выполните следующие настройки:
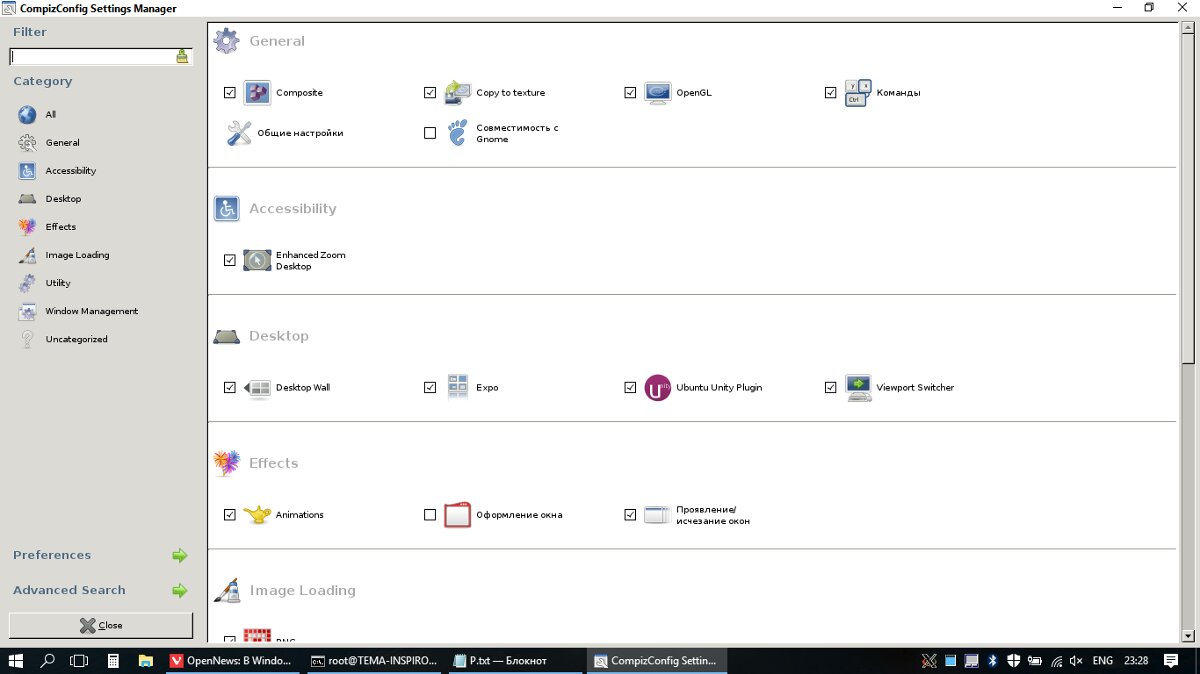
В секции General (Общие):
- Commands (Команды)
- Composite
- Copy to texture
- OpenGL
В секции Desktop (Рабочий стол):
- Ubuntu Unity Plugin
В секции Utility (Утилиты):
- Compiz Library Toolbox
В секции Window Management (Управление окнами):
- Place Windows (Переместить окно)
- Resize Window (Изменение размеров окна)
- Scale (Масштабировать)
- Snapping Windows
В секции Image Loading (Загрузка изображения):
- PNG
- Нажмите Close
- В bash выполните
sudo compizи в окне запущенного VcXsrv станет доступен графический интерфейс Ubuntu
- В Bash выполните
su - Перейти в директорию /etc/dbus-1/ и выполните команду
dir. Если в директории нет файла session.conf, его необходимо создать с помощьюnano. Содержание session.conf:
<!-- This configuration file controls the per-user-login-session message bus.
Add a session-local.conf and edit that rather than changing this
file directly. -->
<!DOCTYPE busconfig PUBLIC "-//freedesktop//DTD D-Bus Bus Configuration 1.0//EN"
"http://www.freedesktop.org/standards/dbus/1.0/busconfig.dtd">
<busconfig>
<!-- Our well-known bus type, don't change this -->
<type>session</type>
<!-- If we fork, keep the user's original umask to avoid affecting
the behavior of child processes. -->
<keep_umask/>
<listen>tcp:host=localhost,port=0</listen>
<standard_session_servicedirs />
<policy context="default">
`<!-- Allow everything to be sent -->`

`<allow send_destination="*" eavesdrop="true"/>`

`<!-- Allow everything to be received -->`

`<allow eavesdrop="true"/>`

`<!-- Allow anyone to own anything -->`

`<allow own="*"/>`
</policy>
<!-- raise the service start timeout to 40 seconds as it can timeout
on the live cd on slow machines -->
<limit name="service_start_timeout">60000</limit>
<!-- Config files are placed here that among other things,
further restrict the above policy for specific services. -->
<includedir>session.d</includedir>
<!-- This is included last so local configuration can override what's
in this standard file -->
<include ignore_missing="yes">session-local.conf</include>
<include if_selinux_enabled="yes" selinux_root_relative="yes">contexts/dbus_contexts</include>
<!-- For the session bus, override the default relatively-low limits
with essentially infinite limits, since the bus is just running
as the user anyway, using up bus resources is not something we need
to worry about. In some cases, we do set the limits lower than
"all available memory" if exceeding the limit is almost certainly a bug,
having the bus enforce a limit is nicer than a huge memory leak. But the
intent is that these limits should never be hit. -->
<!-- the memory limits are 1G instead of say 4G because they can't exceed 32-bit signed int max -->
<limit name="max_incoming_bytes">1000000000</limit>
<limit name="max_incoming_unix_fds">250000000</limit>
<limit name="max_outgoing_bytes">1000000000</limit>
<limit name="max_outgoing_unix_fds">250000000</limit>
<limit name="max_message_size">1000000000</limit>
<limit name="max_message_unix_fds">4096</limit>
<limit name="service_start_timeout">120000</limit>
<limit name="auth_timeout">240000</limit>
<limit name="max_completed_connections">100000</limit>
<limit name="max_incomplete_connections">10000</limit>
<limit name="max_connections_per_user">100000</limit>
<limit name="max_pending_service_starts">10000</limit>
<limit name="max_names_per_connection">50000</limit>
<limit name="max_match_rules_per_connection">50000</limit>
<limit name="max_replies_per_connection">50000</limit>
</busconfig>
- Выполните, не выходя из под root (your_user_name необходимо заменить на имя пользователя Ubuntu)
chown -R your_user_name:your_user_name /home/your_user_name/.cache/chown -R your_user_name:your_user_name /home/your_user_name/.config/gtk-2.0chown -R your_user_name:your_user_name /home/your_user_name/.config/dconf/userchown -R your_user_name:your_user_name /home/your_user_name/.config/unity/chown -R your_user_name:your_user_name /home/your_user_name/.config/nautilus/chown -R your_user_name:your_user_name /home/your_user_name/.local/share/chown -R your_user_name:your_user_name /home/your_user_name/.config/gtk-3.0/
-
Выйти из под root - набрать
exit(или нажать Ctrl-D) -
В Bash выполните
sudo apt-get install libxpathselect1.4v5(предварительно можно проверить наличие пакета через командуdpkg -l | grep libxpathselect)