
Weaving Intelligence into Automation.
An open-source, visual workflow platform to build complex automations with AI. No-code & Low-code friendly.
![]()
![]()
![]()
![]()
![]()
![]()
📜 Table of Contents (Click to Expand)
Ever felt stuck in a loop of repetitive digital tasks? Imagine building powerful automations as easily as drawing a flowchart. Flowork is that imagination brought to life.
Flowork is a new generation Visual Workflow Orchestration Platform designed to transform your ideas into elegant, efficient automations on a digital canvas. It's not just a tool; it's a complete ecosystem for limitless automation creativity, built for everyone from absolute beginners to expert developers.
Flowork is an open-core platform where you no longer "write" automation; you "design" it. By connecting nodes on a canvas, you can build sophisticated workflows that handle:
- 🤖 AI-powered tasks (content generation, image creation, decision making)
- 🌐 Advanced web scraping and browser automation
- 📂 File and data management
- ⏰ Complex scheduling and event-driven triggers
- ...and much more.
The platform is 100% portable and bundled with its own Python environment. No complex setup required. Just download, extract, and run.
Here are some of the powerful features that make Flowork a game-changer:
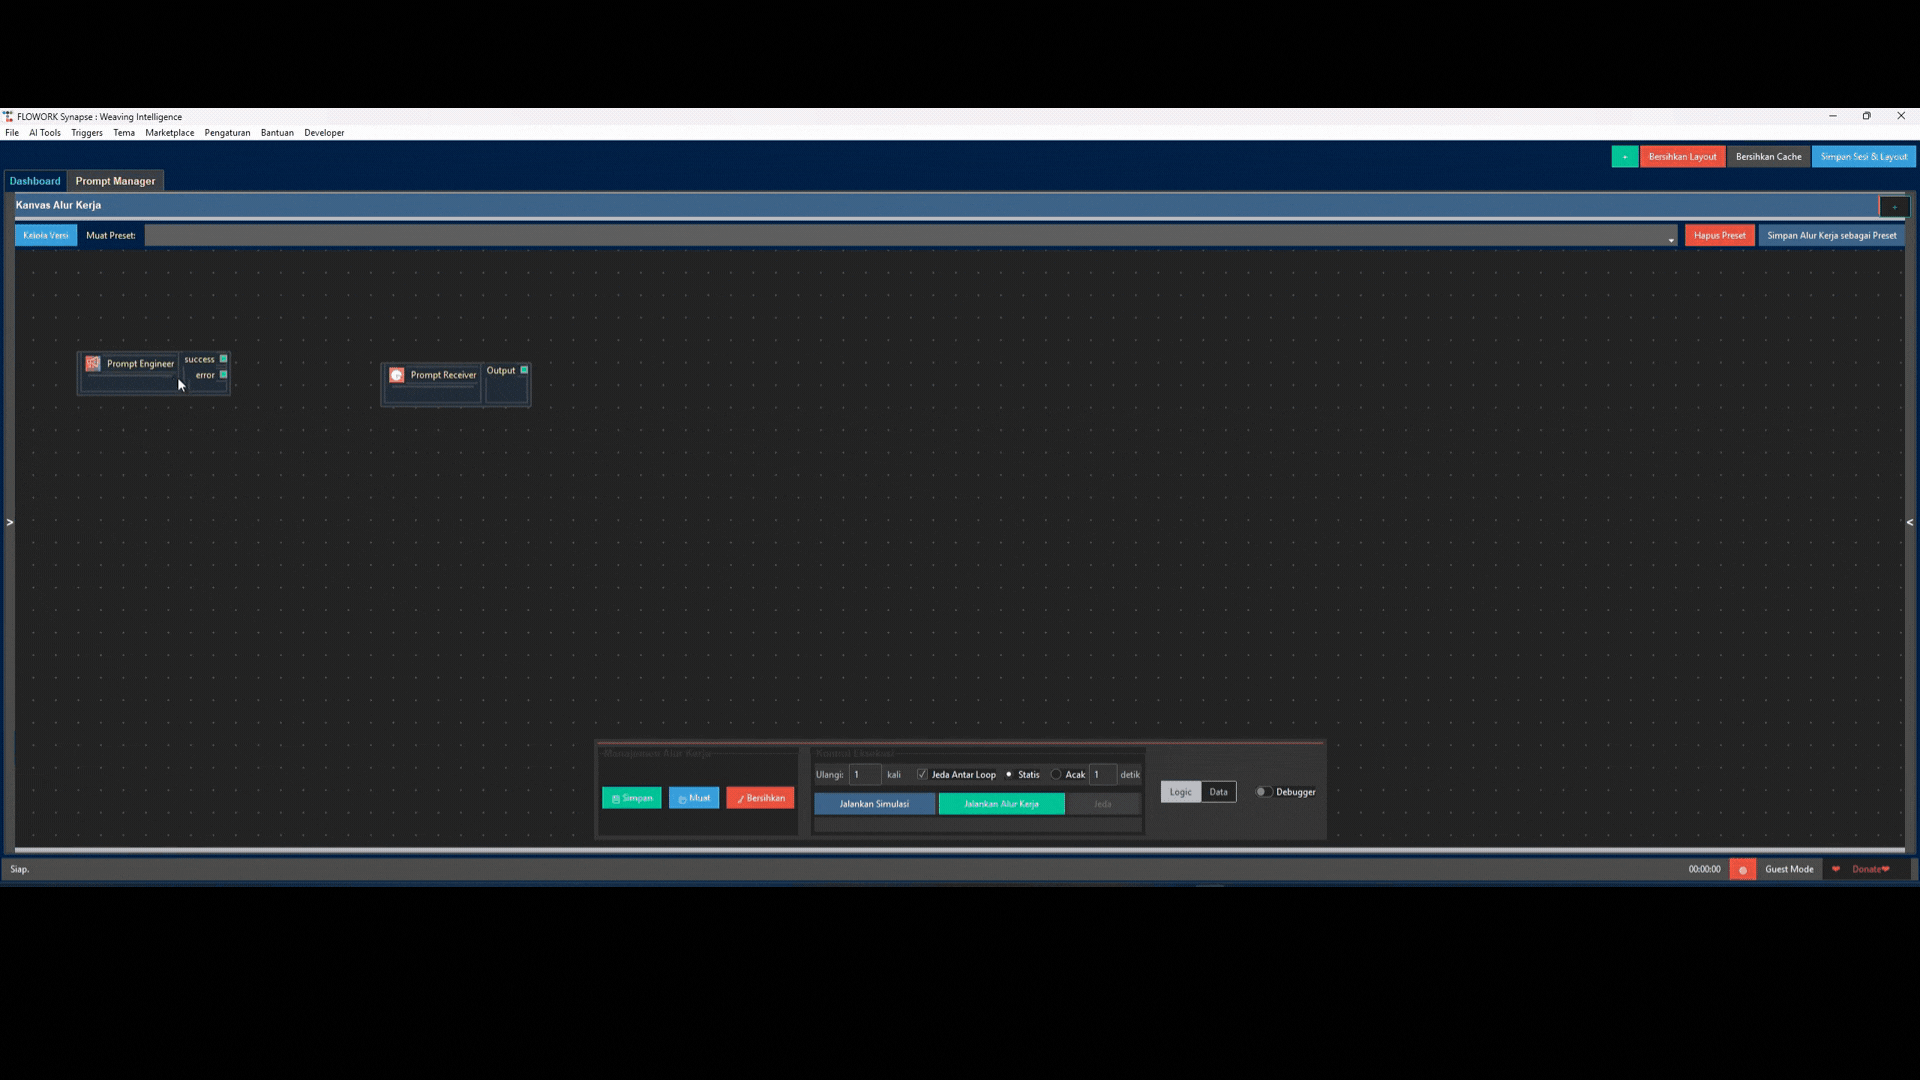
Forget complex syntax. Build logic by dragging and connecting nodes. Your workflows become easy to understand, debug, and share.
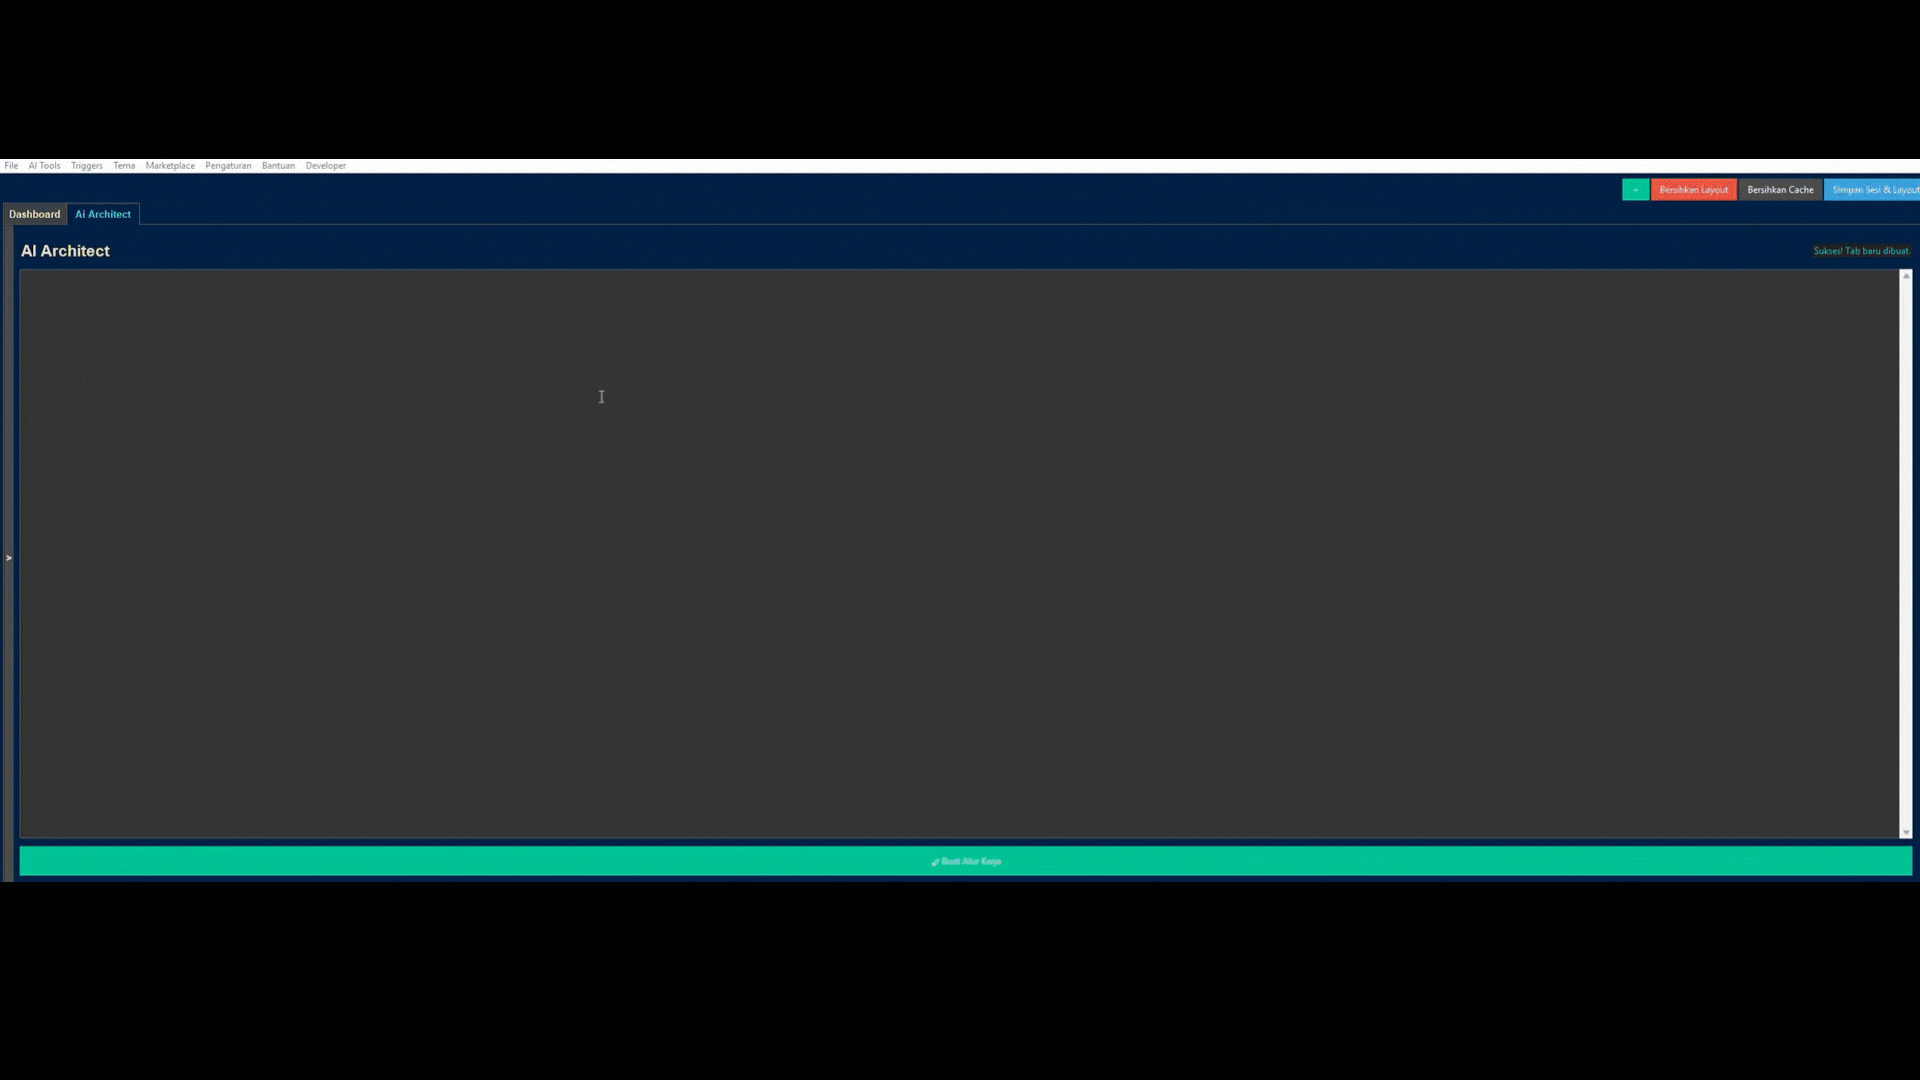
This is where the magic happens. Describe your goal in plain language (e.g., "Scrape the latest news from detik.com and save the titles to a text file"), and the AI Architect will automatically design and draw the complete workflow for you.
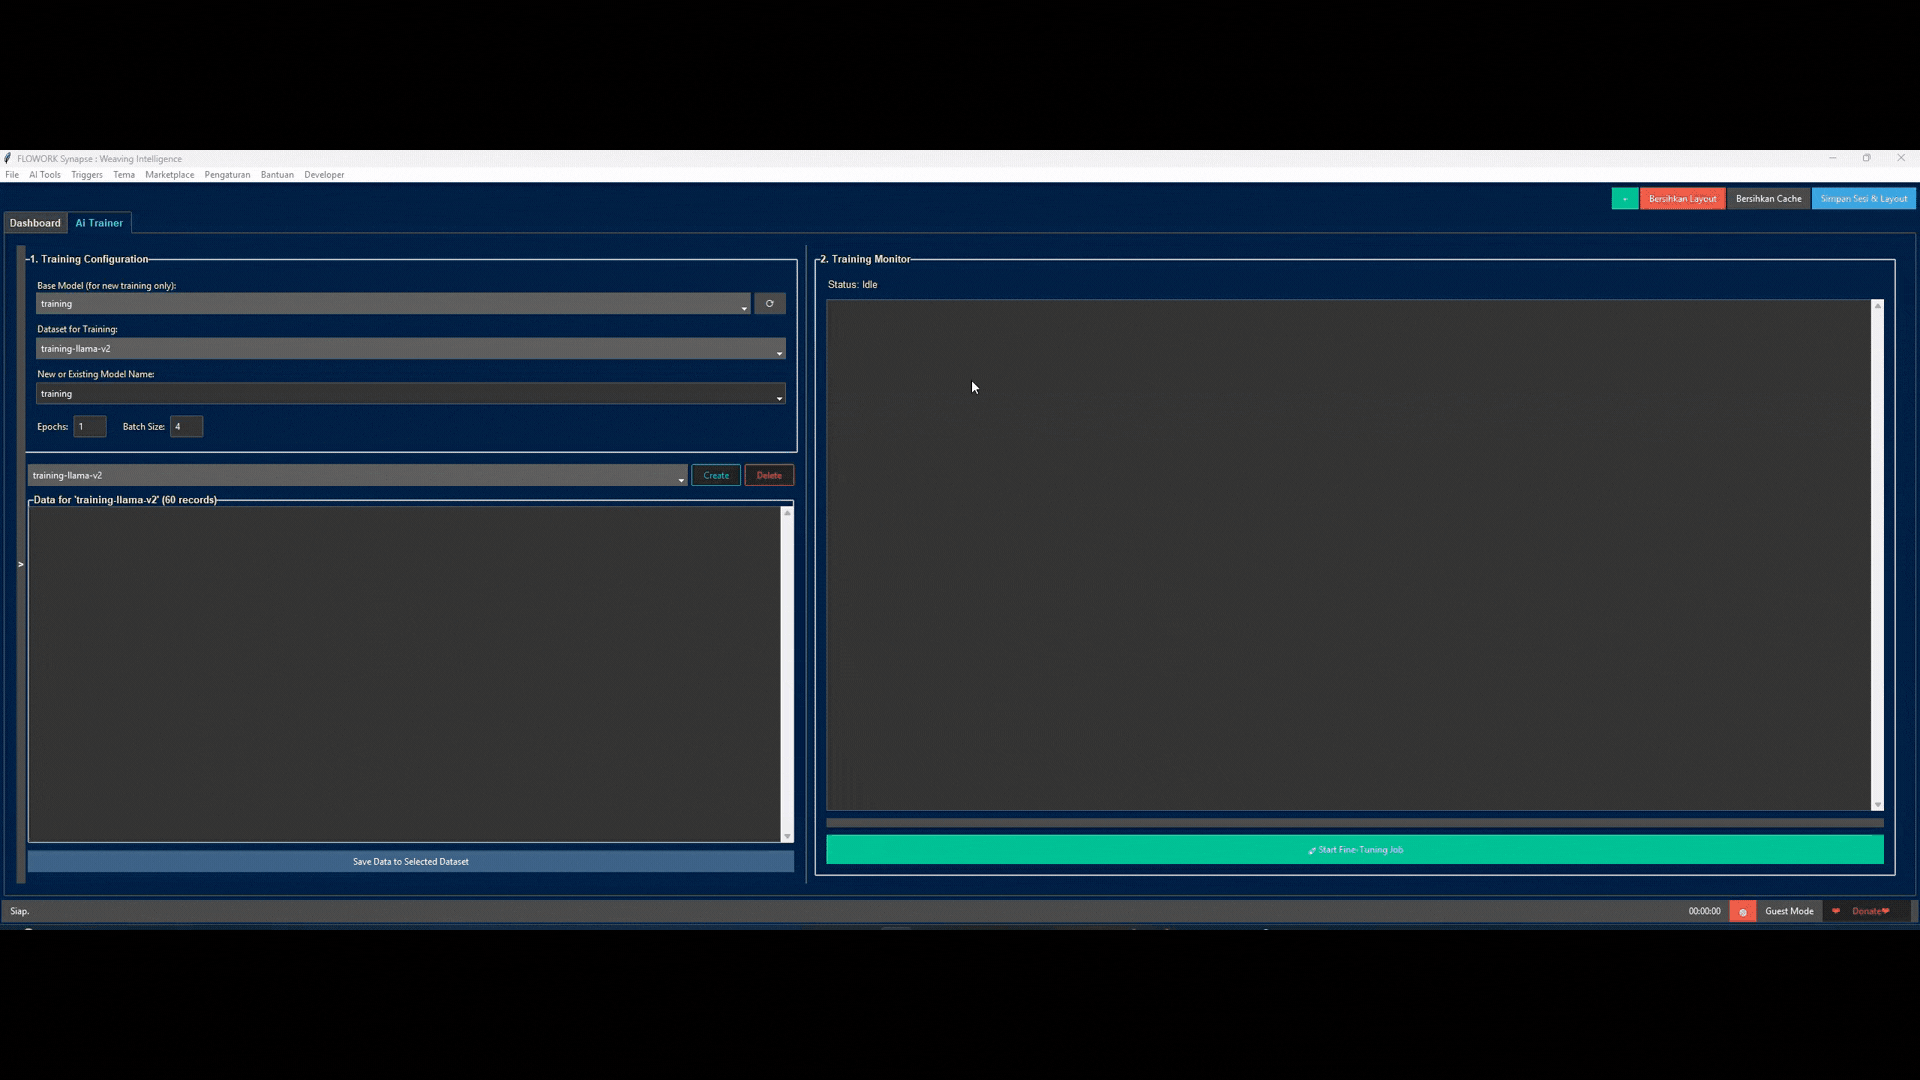
Don't just use AI, create it. Flowork empowers you to fine-tune local AI models on your own data.
- AI Trainer: Feed a base model with your data (e.g., customer service chats) to make it an expert on any topic.
- Model Factory: Convert your newly trained model into the highly efficient GGUF format to run at blazing speeds, right on your computer.
Deploy an autonomous agent to complete high-level missions. Simply give your agent:
- A Brain: Any AI model (local or cloud-based).
- Tools: Other Flowork modules (like Web Scraper, Email Sender) as its "hands".
- A Mission: A high-level objective (e.g., "Research the top 3 AI trends and email me a summary").
The Agent will then autonomously plan and execute steps, using its tools to achieve the goal.
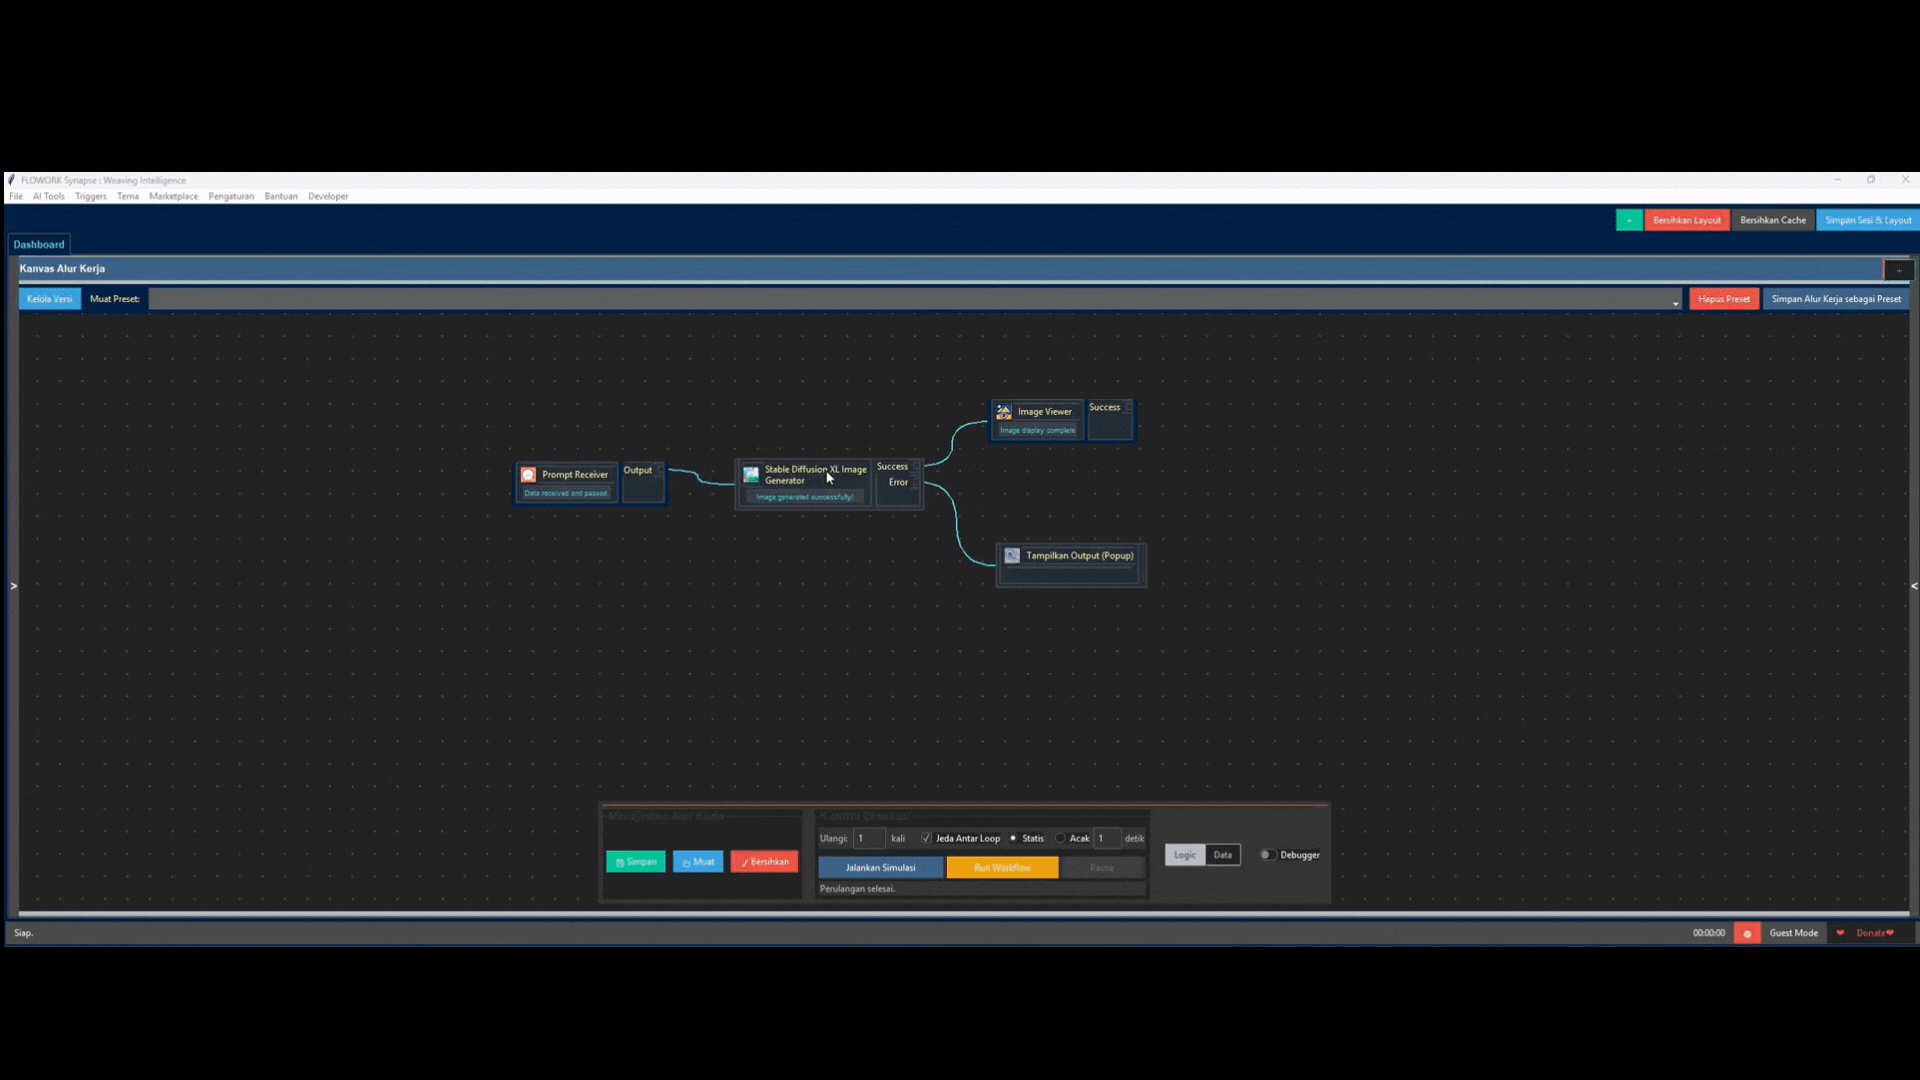
Create stunning images directly from your workflows. Just provide a text prompt, and Flowork will use a locally-run AI model like Stable Diffusion to generate high-quality images, perfect for automating content creation.
- Module Factory: Visually design the UI and logic for new modules, and Flowork generates the Python code for you.
- Event-Driven Triggers: Run workflows based on schedules (Cron), file changes, or even when specific applications (like Photoshop) are opened or closed.
- Nano-Modular Core: Modify the application's core logic visually, as some of its own services are built with Flowork itself!
Flowork is built on a few simple but powerful ideas:
- 🎨 Visual-First: Complex logic is easier to manage visually.
- 🧩 Total Modularity: Every function is an independent component, making the system stable and endlessly extensible.
- 🧠 AI as a First-Class Citizen: AI isn't an afterthought; it's woven into the core of the platform.
- 🔓 Open & Accessible: Built on an open-core model, ensuring the foundational tools are available to everyone.
Flowork is 100% portable. No installation needed.

- Download the
.exefrom the button above. - Run
FLOWORK.exe. - Automate!
The application will set up its own environment on the first run. It's that simple.
Create your first workflow in under a minute:
- Drag & Drop the Start Node: From the Logic Modules toolbox, drag
Set Variables / STARTonto the canvas. - Drag & Drop the Popup Node: Drag
Tampilkan Output (Popup)onto the canvas. - Connect Them: Click and drag from the small square on the right side of the START node to the left side of the Popup node. A green line will appear.
- Run! Click the "Run Workflow" button.
A popup will appear showing the initial data. That's it! You've just built and run your first automation.
Flowork is developed with passion. Your support and feedback are what keep it going!
| Channel | Description |
|---|---|
 |
Telegram Channel Get the latest updates, news, and release announcements. |
 |
Telegram Group Join the discussion, ask questions, and share your projects. |
 |
YouTube Channel Watch tutorials and see powerful automations built step-by-step. |
 |
Donate via PayPal If Flowork has helped you, consider supporting its development with a donation. |
Flowork consists of several types of extensible components:
| Component Type | Description | Examples |
|---|---|---|
| Module | The primary building blocks for logic and actions within a workflow. | If Condition, Web Scraper, Email Sender |
| Plugin | Adds new functionality to the Flowork UI or backend. | System Diagnostics, AI Brain Provider |
| Widget | UI components that can be added to dashboards for interaction. | Log Viewer, Prompt Sender, Toolbox |
| Trigger | Listens for events and starts workflows automatically. | Cron Trigger, File System Trigger |
| AI Provider | "Drivers" that connect Flowork to various AI models. | Google Gemini, Local GGUF Model |
We welcome contributions! The best way to start is by creating your own module.
- Module Factory (Generator): The easiest way! Open the Developer -> Open Module Factory tab inside Flowork. You can visually design the property UI and the
executelogic, and Flowork will generate all the boilerplate code for you! - Contribution Flow:
- Fork this repository.
- Create a new branch (
git checkout -b feature/awesome-new-feature). - Make your changes.
- Commit your changes (
git commit -m 'Add some awesome feature'). - Push to your branch (
git push origin feature/awesome-new-feature). - Open a Pull Request.
Ready to revolutionize your workflow?
Welcome to the official documentation for the Flowork Headless API. This document is your primary guide for programmatically interacting with, controlling, and integrating Flowork workflows.
At its core, Flowork is a powerful workflow execution engine. The graphical user interface (UI) you see is just one way to interact with this engine. This API opens a direct "door" to that engine, allowing you to automate it further, integrate it with other systems, or even build your own custom interfaces.
The development of this API is based on an API-First philosophy. This means that the core of Flowork is its backend, which can run independently (headless), and all its functionalities are exposed through a stable and documented API. The existing graphical UI is treated as just another API client; it has no special privileges or "backdoor" access. This approach ensures that Flowork can evolve into a true ecosystem, where a wide variety of applications and services can be built on top of it.
The communication flow with the Flowork API always follows this pattern:
- Client: This can be the Flowork UI itself, your Python script, an application like Postman, or a
curlcommand from the terminal. - Local API Server: The request from the Client is received by the
ApiServerServicerunning locally athttp://localhost:8989. - Kernel & Services: The API Server then forwards the command to the Kernel and relevant services (e.g.,
PresetManagerService,VariableManagerService) for execution. - Response (JSON): The result of the execution is returned to the Client in JSON format.
Let's make your first API call in just a few minutes.
Before you begin, ensure you have:
- A running Flowork project on your machine.
- All Python dependencies installed (especially
requests). - A tool for making HTTP calls. Options:
- curl: A command-line utility available on Windows, macOS, and Linux.
- Postman / Insomnia: Highly recommended GUI applications for testing more complex APIs.
The API server is part of the Flowork application itself. To run it:
-
Ensure Correct Configuration: Open the
data/settings.jsonfile and make sure thewebhook_enabledvalue istrue.{ "webhook_enabled": true, "webhook_port": 8989 } -
Run the Flowork Application: Open a terminal in your project's root directory and run:
python main.py
-
Verify the Log: Look at the log in the terminal. You should see a message indicating the API server has started successfully:
[SUCCESS] (No Logger) API server started and listening at http://0.0.0.0:8989If this message appears, our "kitchen" is open and ready to take orders!
Now, open a second terminal (leave the first one running Flowork) and execute the following curl command to request a list of all existing presets:
curl -X GET http://localhost:8989/api/v1/presetsSuccess Response: If everything works, the server will respond with a JSON array containing the names of your presets, like this:
["TEST", "run_python"]Congratulations! You have successfully communicated with the Flowork engine via its API.
IMPORTANT: Currently, the Flowork v1 API runs without authentication. The server is designed to be accessed only from the same machine (localhost) and within a trusted network.
For future versions that might be exposed to a wider network, an API Key system will be implemented. A secret key will be required for every request to ensure that only authorized applications or users can interact with the Flowork engine.
When the API Key system is active, all requests must include an Authorization header.
Example Future Request:
# EXAMPLE FOR THE FUTURE
curl -X GET http://localhost:8989/api/v1/presets \
-H "Authorization: Bearer <YOUR_FUTURE_API_KEY>"This is the main dictionary, explaining each available endpoint in detail.
This endpoint manages all saved workflows.
- Method:
GET - Endpoint:
/api/v1/presets - Description: Returns a list of names for all available presets.
- Success Response (200 OK):
[
    "TEST",
    "run_python",
    "preset_from_api"
]
- Method:
GET - Endpoint:
/api/v1/presets/{preset_name} - Description: Returns the detailed data (nodes & connections) of a specific preset.
- URL Parameters:
preset_name(string, required): The name of the preset to view.
- Success Response (200 OK):
{ "nodes": [ { "id": "c08e211c...", "name": "START", ... } ], "connections": [ { "id": "a36bd9b0...", "from": "c08e211c...", "to": "603066f3..." } ] } - Error Response:
404 Not Found: If the preset with the given name is not found.
- Method:
POST - Endpoint:
/api/v1/presets - Description: Saves a new workflow as a preset. If a preset with the same name already exists, it will be overwritten (updated).
- Request Body (JSON):
{ "name": "my_new_preset", "workflow_data": { "nodes": [...], "connections": [...] } } - Success Response (201 Created):
{ "status": "success", "message": "Preset 'my_new_preset' created/updated." } - Error Response:
400 Bad Request: Ifnameorworkflow_datais missing from the request body.
- Method:
DELETE - Endpoint:
/api/v1/presets/{preset_name} - Description: Permanently deletes a preset.
- URL Parameters:
preset_name(string, required): The name of the preset to delete.
- Success Response (200 OK):
{ "status": "success", "message": "Preset 'preset_name' deleted." } - Error Response:
404 Not Found: If the preset with the given name is not found.
This endpoint manages the vault for global and secret variables.
- Method:
GET - Endpoint:
/api/v1/variables - Description: Returns a list of all variables. The values of secret variables will be censored.
- Success Response (200 OK):
[
    {
        "name": "MY_NORMAL_VARIABLE",
        "value": "this is its value",
        "is_secret": false
    },
    {
        "name": "MY_API_KEY",
        "value": "*****",
        "is_secret": true
    }
]
- Method:
PUT - Endpoint:
/api/v1/variables/{variable_name} - Description: Creates a new variable or updates the value of an existing one. The variable name must be in
UPPERCASE_WITH_UNDERSCORESformat. - URL Parameters:
variable_name(string, required): The name of the variable to create/update.
- Request Body (JSON):
{ "value": "new_secret_value", "is_secret": true } - Success Response (200 OK):
{ "status": "success", "message": "Variable 'MY_VARIABLE' saved." } - Error Response:
400 Bad Request: If the variable name format is incorrect orvalueis missing from the body.
- Method:
DELETE - Endpoint:
/api/v1/variables/{variable_name} - Description: Deletes a variable from the system.
- URL Parameters:
variable_name(string, required): The name of the variable to delete.
- Success Response (200 OK):
{ "status": "success", "message": "Variable 'MY_VARIABLE' deleted." } - Error Response:
404 Not Found: If the variable is not found.
Endpoints for running workflows and monitoring their progress.
- Method:
POST - Endpoint:
/api/v1/workflow/execute/{preset_name} - Description: Starts the execution of a preset. Can include an initial payload.
- URL Parameters:
preset_name(string, required): The name of the preset to execute.
- Request Body (JSON, Optional):
{ "user_id": 123, "source": "external_system" } - Success Response (202 Accepted):
{ "status": "accepted", "job_id": "a1b2c3d4-e5f6-g7h8-i9j0-k1l2m3n4o5p6" } - Error Response:
404 Not Found: If the preset is not found.
- Method:
GET - Endpoint:
/api/v1/workflow/status/{job_id} - Description: Checks the status of a running or completed execution.
- URL Parameters:
job_id(string, required): The job ID received from the execution response.
- Success Response (200 OK):
{ "status": "SUCCEEDED", "preset_name": "run_python", "start_time": 1677610000.123, "end_time": 1677610005.456, "result": "Execution completed successfully." } - Error Response:
404 Not Found: If the job ID is not found.
This chapter demonstrates how to combine several API calls to achieve a larger goal.
This is the most common workflow: defining a workflow, saving it, and then running it, all without touching the UI.
Step 1: Prepare Workflow Data in JSON Format
Create a file on your computer, for example new_workflow.json, with the following content. This is a simple workflow: START -> Show Popup.
{
    "name": "Cool API Preset",
    "workflow_data": {
        "nodes": [
            {
                "id": "a1b2c3d4-e5f6-4a3b-8c7d-1e2f3a4b5c6d",
                "name": "START",
                "x": 150.0,
                "y": 150.0,
                "module_id": "set_variable_module",
                "config_values": {
                    "var_note": "This workflow was created and executed entirely via API!"
                }
            },
            {
                "id": "f6e5d4c3-b2a1-4c3d-8e7f-6a5b4c3d2e1f",
                "name": "Show Output (Popup)",
                "x": 400.0,
                "y": 150.0,
                "module_id": "debug_popup_module",
                "config_values": {}
            }
        ],
        "connections": [
            {
                "id": "c1d2e3f4-a5b6-4a3b-8c7d-9f8e7d6c5b4a",
                "from": "a1b2c3d4-e5f6-4a3b-8c7d-1e2f3a4b5c6d",
                "to": "f6e5d4c3-b2a1-4c3d-8e7f-6a5b4c3d2e1f",
                "source_port_name": null
            }
        ]
    }
}
Step 2: Save the Workflow as a New Preset
Use curl to send this JSON file to the API. The @ symbol in curl means "read content from file".
curl -X POST http://localhost:8989/api/v1/presets -H "Content-Type: application/json" -d @new_workflow.jsonA successful response will confirm the preset has been created.
Step 3: Run the Newly Created Preset Now, call the execution endpoint with the name of the preset we just created.
curl -X POST http://localhost:8989/api/v1/workflow/execute/Cool%20API%20Preset -d "{}"If the Flowork UI is running, you will see the debug pop-up appear.
A secure way to store and use API Keys or other credentials.
Step 1: Save the Secret Key
We will save a variable named MY_SECRET_KEY.
curl -X PUT http://localhost:8989/api/v1/variables/MY_SECRET_KEY -H "Content-Type: application/json" -d "{\"value\": \"abc-123-verysecret\", \"is_secret\": true}"Step 2: Verify in the Variable List
Check the list of variables. Notice how its value is censored with *****.
curl -X GET http://localhost:8989/api/v1/variablesResponse:
[
    {
        "name": "MY_SECRET_KEY",
        "value": "*****",
        "is_secret": true
    }
]Guidance for using the API efficiently and securely.
The Flowork API uses standard HTTP status codes to inform you of the outcome of a request.
200 OK: The request was successful and the server is providing data (e.g.,GET /presets).201 Created: The request was successful and a new resource has been created (e.g.,POST /presets).202 Accepted: The request has been received and is being processed in the background (e.g.,POST /workflow/execute). You will need to check its status later.400 Bad Request: Something is wrong with your request. Perhaps the JSON format is invalid or some data is missing.404 Not Found: The resource you are targeting (e.g., a preset or variable) does not exist.500 Internal Server Error: An error occurred within the Flowork engine while processing your request. Check the Flowork terminal log for details.
If an error occurs (4xx or 5xx codes), the server will always try to provide a JSON response with the format:
{
    "error": "A description of the problem that occurred here."
}- Use Postman/Insomnia: For serious development, use tools like Postman or Insomnia. They will make testing the API much easier than using
curl. - Content-Type Header: When sending data (body) in JSON format, always ensure you include the header
-H "Content-Type: application/json". - URL Encoding: If your preset or variable names contain spaces or special characters, make sure to URL encode them (e.g., a space becomes
%20).curlusually does this automatically.
This project is licensed under the MIT License.
- Awenk Audico (Lead Developer) - [email protected]
- Project Website: www.teetah.art
Made with ❤️ and thousands of lines of code in Indonesia.