Open up your pantry and you’re likely to find several wheat products. Indeed, your morning toast or cereal may rely upon this common grain. Its popularity as a food and crop makes wheat widely studied. To get large and accurate data about wheat fields worldwide, plant scientists use image detection of "wheat heads"—spikes atop the plant containing grain. These images are used to estimate the density and size of wheat heads in different varieties. Farmers can use the data to assess health and maturity when making management decisions in their fields.
However, accurate wheat head detection in outdoor field images can be visually challenging. There is often overlap of dense wheat plants, and the wind can blur the photographs. Both make it difficult to identify single heads. Additionally, appearances vary due to maturity, color, genotype, and head orientation. Finally, because wheat is grown worldwide, different varieties, planting densities, patterns, and field conditions must be considered. Models developed for wheat phenotyping need to generalize between different growing environments. Current detection methods involve one- and two-stage detectors (Yolo-V3 and Faster-RCNN), but even when trained with a large dataset, a bias to the training region remains.
About the Competition: https://www.kaggle.com/c/global-wheat-detection
About Darknet framework: http://pjreddie.com/darknet/
- Windows or Linux
- CMake >= 3.12: https://cmake.org/download/
- CUDA 10.0: https://developer.nvidia.com/cuda-toolkit-archive (on Linux do Post-installation Actions)
- OpenCV >= 2.4: use your preferred package manager (brew, apt), build from source using vcpkg or download from OpenCV official site (on Windows set system variable
OpenCV_DIR=C:\opencv\build- where are theincludeandx64folders image) - cuDNN >= 7.0 for CUDA 10.0 https://developer.nvidia.com/rdp/cudnn-archive (on Linux copy
cudnn.h,libcudnn.so... as desribed here https://docs.nvidia.com/deeplearning/sdk/cudnn-install/index.html#installlinux-tar , on Windows copycudnn.h,cudnn64_7.dll,cudnn64_7.libas desribed here https://docs.nvidia.com/deeplearning/sdk/cudnn-install/index.html#installwindows ) - GPU with CC >= 3.0: https://en.wikipedia.org/wiki/CUDA#GPUs_supported
- on Linux GCC or Clang, on Windows MSVC 2015/2017/2019 https://visualstudio.microsoft.com/thank-you-downloading-visual-studio/?sku=Community
On Linux use ./darknet instead of darknet.exe, like this:./darknet detector test ./data/obj.data ./cfg/yolov-obj.cfg ./yolov4.weights
On Linux find executable file ./darknet in the root directory, while on Windows find it in the directory \build\darknet\x64
- Yolo v4 - image:
darknet.exe detector test ./data/obj.data ./cfg/yolov-obj.cfg ./yolov4.weights -thresh 0.25 - Output coordinates of objects:
darknet.exe detector test ./data/obj.data yolov4.cfg yolov4.weights -ext_output dog.jpg - Yolo v4 - video:
darknet.exe detector demo ./data/obj.data ./cfg/yolov-obj.cfg ./yolov4.weights -ext_output test.mp4 - Yolo v4 - WebCam 0:
darknet.exe detector demo ./data/obj.data ./cfg/yolov-obj.cfg ./yolov4.weights -c 0 - Yolo v4 for net-videocam - Smart WebCam: `darknet.exe detector demo ./data/obj.data ./cfg/yolov-obj.cfg ./yolov4.weights
- Yolo v4 - save result videofile res.avi:
darknet.exe detector demo ./data/obj.data ./cfg/yolov-obj.cfg ./yolov4.weights test.mp4 -out_filename res.avi - To process a list of images
data/train.txtand save results of detection toresult.jsonfile use:darknet.exe detector test ./data/obj.data ./cfg/yolov-obj.cfg ./yolov4.weights -ext_output -dont_show -out result.json < data/train.txt - To process a list of images
data/train.txtand save results of detection toresult.txtuse:
darknet.exe detector test ./data/obj.data ./cfg/yolov-obj.cfg ./yolov4.weights -dont_show -ext_output < data/train.txt > result.txt - Pseudo-lableing - to process a list of images
data/new_train.txtand save results of detection in Yolo training format for each image as label<image_name>.txt(in this way you can increase the amount of training data) use:darknet.exe detector test ./data/obj.data ./cfg/yolov-obj.cfg ./yolov4.weights -thresh 0.25 -dont_show -save_labels < data/new_train.txt - To calculate anchors:
darknet.exe detector calc_anchors data/obj.data -num_of_clusters 9 -width 416 -height 416 - To check accuracy mAP@IoU=50:
darknet.exe detector map data/obj.data yolo-obj.cfg backup\yolo-obj_7000.weights - To check accuracy mAP@IoU=75:
darknet.exe detector map data/obj.data yolo-obj.cfg backup\yolo-obj_7000.weights -iou_thresh 0.75
-
Download for Android phone mjpeg-stream soft: IP Webcam / Smart WebCam
- Smart WebCam - preferably: https://play.google.com/store/apps/details?id=com.acontech.android.SmartWebCam2
- IP Webcam: https://play.google.com/store/apps/details?id=com.pas.webcam
-
Connect your Android phone to computer by WiFi (through a WiFi-router) or USB
-
Start Smart WebCam on your phone
-
Replace the address below, on shown in the phone application (Smart WebCam) and launch:
- Yolo v4 COCO-model:
darknet.exe detector demo ./data/obj.data ./cfg/yolov-obj.cfg ./yolov4.weights http://192.168.0.80:8080/video?dummy=param.mjpg -i 0
The CMakeLists.txt will attempt to find installed optional dependencies like
CUDA, cudnn, ZED and build against those. It will also create a shared object
library file to use darknet for code development.
Open a bash terminal inside the cloned repository and launch:
./build.shJust do make in the darknet directory. (You can try to compile and run it on Google Colab in cloud link (press «Open in Playground» button at the top-left corner) and watch the video link )
Before make, you can set such options in the Makefile: link
GPU=1to build with CUDA to accelerate by using GPU (CUDA should be in/usr/local/cuda)CUDNN=1to build with cuDNN v5-v7 to accelerate training by using GPU (cuDNN should be in/usr/local/cudnn)CUDNN_HALF=1to build for Tensor Cores (on Titan V / Tesla V100 / DGX-2 and later) speedup Detection 3x, Training 2xOPENCV=1to build with OpenCV 4.x/3.x/2.4.x - allows to detect on video files and video streams from network cameras or web-camsDEBUG=1to bould debug version of YoloOPENMP=1to build with OpenMP support to accelerate Yolo by using multi-core CPULIBSO=1to build a librarydarknet.soand binary runable fileuselibthat uses this library. Or you can try to run soLD_LIBRARY_PATH=./:$LD_LIBRARY_PATH ./uselib test.mp4How to use this SO-library from your own code - you can look at C++ example: https://github.com/AlexeyAB/darknet/blob/master/src/yolo_console_dll.cpp or use in such a way:LD_LIBRARY_PATH=./:$LD_LIBRARY_PATH ./uselib data/coco.names cfg/yolov4.cfg yolov4.weights test.mp4ZED_CAMERA=1to build a library with ZED-3D-camera support (should be ZED SDK installed), then runLD_LIBRARY_PATH=./:$LD_LIBRARY_PATH ./uselib data/coco.names cfg/yolov4.cfg yolov4.weights zed_camera
To run Darknet on Linux use examples from this article, just use ./darknet instead of darknet.exe, i.e. use this command: ./darknet detector test ./data/obj.data ./cfg/yolov-obj.cfg ./yolov4.weights
This is the recommended approach to build Darknet on Windows if you have already installed Visual Studio 2015/2017/2019, CUDA >= 10.0, cuDNN >= 7.0, and OpenCV >= 2.4.
Open a Powershell terminal inside the cloned repository and launch:
.\build.ps1-
Install or update Visual Studio to at least version 2017, making sure to have it fully patched (run again the installer if not sure to automatically update to latest version). If you need to install from scratch, download VS from here: Visual Studio Community
-
Install CUDA
-
Install vcpkg and try to install a test library to make sure everything is working, for example
vcpkg install opengl -
Open Powershell and type these commands:
PS \>                  cd vcpkg
PS Code\vcpkg> .\vcpkg install darknet[full]:x64-windows #replace with darknet[opencv-base,weights]:x64-windows for a quicker install; use --head if you want to build latest commit on master branch and not latest release- You will find darknet inside the vcpkg\installed\x64-windows\tools\darknet folder, together with all the necessary weight and cfg files
-
If you have CUDA 10.0, cuDNN 7.4 and OpenCV 3.x (with paths:
C:\opencv_3.0\opencv\build\include&C:\opencv_3.0\opencv\build\x64\vc14\lib), then openbuild\darknet\darknet.sln, set x64 and Release https://hsto.org/webt/uh/fk/-e/uhfk-eb0q-hwd9hsxhrikbokd6u.jpeg and do the: Build -> Build darknet. Also add Windows system variableCUDNNwith path to CUDNN: https://user-images.githubusercontent.com/4096485/53249764-019ef880-36ca-11e9-8ffe-d9cf47e7e462.jpg1.1. Find files
opencv_world320.dllandopencv_ffmpeg320_64.dll(oropencv_world340.dllandopencv_ffmpeg340_64.dll) inC:\opencv_3.0\opencv\build\x64\vc14\binand put it near withdarknet.exe1.2 Check that there are
binandincludefolders in theC:\Program Files\NVIDIA GPU Computing Toolkit\CUDA\v10.0if aren't, then copy them to this folder from the path where is CUDA installed1.3. To install CUDNN (speedup neural network), do the following:
-
download and install cuDNN v7.4.1 for CUDA 10.0: https://developer.nvidia.com/rdp/cudnn-archive
-
add Windows system variable
CUDNNwith path to CUDNN: https://user-images.githubusercontent.com/4096485/53249764-019ef880-36ca-11e9-8ffe-d9cf47e7e462.jpg -
copy file
cudnn64_7.dllto the folder\build\darknet\x64near withdarknet.exe
1.4. If you want to build without CUDNN then: open
\darknet.sln-> (right click on project) -> properties -> C/C++ -> Preprocessor -> Preprocessor Definitions, and remove this:CUDNN; -
-
If you have other version of CUDA (not 10.0) then open
build\darknet\darknet.vcxprojby using Notepad, find 2 places with "CUDA 10.0" and change it to your CUDA-version. Then open\darknet.sln-> (right click on project) -> properties -> CUDA C/C++ -> Device and remove there;compute_75,sm_75. Then do step 1 -
If you don't have GPU, but have OpenCV 3.0 (with paths:
C:\opencv_3.0\opencv\build\include&C:\opencv_3.0\opencv\build\x64\vc14\lib), then openbuild\darknet\darknet_no_gpu.sln, set x64 and Release, and do the: Build -> Build darknet_no_gpu -
If you have OpenCV 2.4.13 instead of 3.0 then you should change paths after
\darknet.slnis opened4.1 (right click on project) -> properties -> C/C++ -> General -> Additional Include Directories:
C:\opencv_2.4.13\opencv\build\include4.2 (right click on project) -> properties -> Linker -> General -> Additional Library Directories:
C:\opencv_2.4.13\opencv\build\x64\vc14\lib -
If you have GPU with Tensor Cores (nVidia Titan V / Tesla V100 / DGX-2 and later) speedup Detection 3x, Training 2x:
\darknet.sln-> (right click on project) -> properties -> C/C++ -> Preprocessor -> Preprocessor Definitions, and add here:CUDNN_HALF;Note: CUDA must be installed only after Visual Studio has been installed.
Also, you can to create your own darknet.sln & darknet.vcxproj, this example for CUDA 9.1 and OpenCV 3.0
Then add to your created project:
- (right click on project) -> properties -> C/C++ -> General -> Additional Include Directories, put here:
C:\opencv_3.0\opencv\build\include;..\..\3rdparty\include;%(AdditionalIncludeDirectories);$(CudaToolkitIncludeDir);$(CUDNN)\include
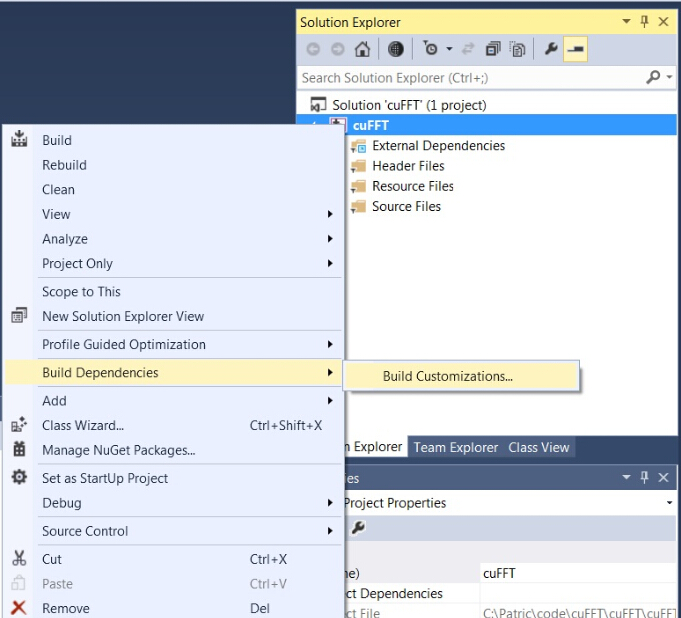
- (right click on project) -> Build dependecies -> Build Customizations -> set check on CUDA 9.1 or what version you have - for example as here: http://devblogs.nvidia.com/parallelforall/wp-content/uploads/2015/01/VS2013-R-5.jpg
- add to project:
- all
.cfiles - all
.cufiles - file
http_stream.cppfrom\srcdirectory - file
darknet.hfrom\includedirectory
- all
- (right click on project) -> properties -> Linker -> General -> Additional Library Directories, put here:
C:\opencv_3.0\opencv\build\x64\vc14\lib;$(CUDA_PATH)\lib\$(PlatformName);$(CUDNN)\lib\x64;%(AdditionalLibraryDirectories)
- (right click on project) -> properties -> Linker -> Input -> Additional dependecies, put here:
..\..\3rdparty\lib\x64\pthreadVC2.lib;cublas.lib;curand.lib;cudart.lib;cudnn.lib;%(AdditionalDependencies)
- (right click on project) -> properties -> C/C++ -> Preprocessor -> Preprocessor Definitions
OPENCV;_TIMESPEC_DEFINED;_CRT_SECURE_NO_WARNINGS;_CRT_RAND_S;WIN32;NDEBUG;_CONSOLE;_LIB;%(PreprocessorDefinitions)
-
compile to .exe (X64 & Release) and put .dll-s near with .exe: https://hsto.org/webt/uh/fk/-e/uhfk-eb0q-hwd9hsxhrikbokd6u.jpeg
-
pthreadVC2.dll, pthreadGC2.dllfrom \3rdparty\dll\x64 -
cusolver64_91.dll, curand64_91.dll, cudart64_91.dll, cublas64_91.dll- 91 for CUDA 9.1 or your version, from C:\Program Files\NVIDIA GPU Computing Toolkit\CUDA\v9.1\bin -
For OpenCV 3.2:
opencv_world320.dllandopencv_ffmpeg320_64.dllfromC:\opencv_3.0\opencv\build\x64\vc14\bin -
For OpenCV 2.4.13:
opencv_core2413.dll,opencv_highgui2413.dllandopencv_ffmpeg2413_64.dllfromC:\opencv_2.4.13\opencv\build\x64\vc14\bin
-
-
Train it first on 1 GPU for like 1000 iterations:
darknet.exe detector train ./data/obj.data ./cfg/yolov-obj.cfg yolov4.conv.137 -
Then stop and by using partially-trained model
/backup/yolov4_1000.weightsrun training with multigpu (up to 4 GPUs):darknet.exe detector train ./data/obj.data ./cfg/yolov-obj.cfg /backup/yolov4_1000.weights -gpus 0,1,2,3
If you get a Nan, then for some datasets better to decrease learning rate, for 4 GPUs set learning_rate = 0,00065 (i.e. learning_rate = 0.00261 / GPUs). In this case also increase 4x times burn_in = in your cfg-file. I.e. use burn_in = 4000 instead of 1000.
https://groups.google.com/d/msg/darknet/NbJqonJBTSY/Te5PfIpuCAAJ
Usually sufficient 2000 iterations for each class(object), but not less than number of training images and not less than 6000 iterations in total. But for a more precise definition when you should stop training, use the following manual:
- During training, you will see varying indicators of error, and you should stop when no longer decreases 0.XXXXXXX avg:
Region Avg IOU: 0.798363, Class: 0.893232, Obj: 0.700808, No Obj: 0.004567, Avg Recall: 1.000000, count: 8 Region Avg IOU: 0.800677, Class: 0.892181, Obj: 0.701590, No Obj: 0.004574, Avg Recall: 1.000000, count: 8
9002: 0.211667, 0.60730 avg, 0.001000 rate, 3.868000 seconds, 576128 images Loaded: 0.000000 seconds
- 9002 - iteration number (number of batch)
- 0.60730 avg - average loss (error) - the lower, the better
When you see that average loss 0.xxxxxx avg no longer decreases at many iterations then you should stop training. The final avgerage loss can be from 0.05 (for a small model and easy dataset) to 3.0 (for a big model and a difficult dataset).
Or if you train with flag -map then you will see mAP indicator Last accuracy [email protected] = 18.50% in the console - this indicator is better than Loss, so train while mAP increases.
- Once training is stopped, you should take some of last
.weights-files fromdarknet\build\darknet\x64\backupand choose the best of them:
For example, you stopped training after 9000 iterations, but the best result can give one of previous weights (7000, 8000, 9000). It can happen due to overfitting. Overfitting - is case when you can detect objects on images from training-dataset, but can't detect objects on any others images. You should get weights from Early Stopping Point:

To get weights from Early Stopping Point:
2.1. At first, in your file obj.data you must specify the path to the validation dataset valid = valid.txt (format of valid.txt as in train.txt), and if you haven't validation images, just copy data\train.txt to data\valid.txt.
2.2 If training is stopped after 9000 iterations, to validate some of previous weights use this commands:
(If you use another GitHub repository, then use darknet.exe detector recall... instead of darknet.exe detector map...)
darknet.exe detector map data/obj.data yolo-obj.cfg backup\yolo-obj_7000.weightsdarknet.exe detector map data/obj.data yolo-obj.cfg backup\yolo-obj_8000.weightsdarknet.exe detector map data/obj.data yolo-obj.cfg backup\yolo-obj_9000.weights
And comapre last output lines for each weights (7000, 8000, 9000):
Choose weights-file with the highest mAP (mean average precision) or IoU (intersect over union)
For example, bigger mAP gives weights yolo-obj_8000.weights - then use this weights for detection.
Or just train with -map flag:
darknet.exe detector train data/obj.data yolo-obj.cfg yolov4.conv.137 -map
So you will see mAP-chart (red-line) in the Loss-chart Window. mAP will be calculated for each 4 Epochs using valid=valid.txt file that is specified in obj.data file (1 Epoch = images_in_train_txt / batch iterations)
(to change the max x-axis value - change max_batches= parameter to 2000*classes, f.e. max_batches=6000 for 3 classes)

Example of custom object detection: darknet.exe detector test data/obj.data yolo-obj.cfg yolo-obj_8000.weights
-
IoU (intersect over union) - average instersect over union of objects and detections for a certain threshold = 0.24
-
mAP (mean average precision) - mean value of
average precisionsfor each class, whereaverage precisionis average value of 11 points on PR-curve for each possible threshold (each probability of detection) for the same class (Precision-Recall in terms of PascalVOC, where Precision=TP/(TP+FP) and Recall=TP/(TP+FN) ), page-11: http://homepages.inf.ed.ac.uk/ckiw/postscript/ijcv_voc09.pdf
mAP is default metric of precision in the PascalVOC competition, this is the same as AP50 metric in the MS COCO competition. In terms of Wiki, indicators Precision and Recall have a slightly different meaning than in the PascalVOC competition, but IoU always has the same meaning.
- on Linux
- using
build.shor - build
darknetusingcmakeor - set
LIBSO=1in theMakefileand domake
- using
- on Windows
- using
build.ps1or - build
darknetusingcmakeor - compile
build\darknet\yolo_cpp_dll.slnsolution orbuild\darknet\yolo_cpp_dll_no_gpu.slnsolution
- using
There are 2 APIs:
-
C API: https://github.com/AlexeyAB/darknet/blob/master/include/darknet.h
- Python examples using the C API::
-
C++ API: https://github.com/AlexeyAB/darknet/blob/master/include/yolo_v2_class.hpp
- C++ example that uses C++ API: https://github.com/AlexeyAB/darknet/blob/master/src/yolo_console_dll.cpp
-
To compile Yolo as C++ DLL-file
yolo_cpp_dll.dll- open the solutionbuild\darknet\yolo_cpp_dll.sln, set x64 and Release, and do the: Build -> Build yolo_cpp_dll- You should have installed CUDA 10.0
- To use cuDNN do: (right click on project) -> properties -> C/C++ -> Preprocessor -> Preprocessor Definitions, and add at the beginning of line:
CUDNN;
-
To use Yolo as DLL-file in your C++ console application - open the solution
build\darknet\yolo_console_dll.sln, set x64 and Release, and do the: Build -> Build yolo_console_dll-
you can run your console application from Windows Explorer
build\darknet\x64\yolo_console_dll.exeuse this command:yolo_console_dll.exe data/coco.names yolov4.cfg yolov4.weights test.mp4 -
after launching your console application and entering the image file name - you will see info for each object:
<obj_id> <left_x> <top_y> <width> <height> <probability> -
to use simple OpenCV-GUI you should uncomment line
//#define OPENCVinyolo_console_dll.cpp-file: link -
you can see source code of simple example for detection on the video file: link
-
yolo_cpp_dll.dll-API: link
struct bbox_t {
    unsigned int x, y, w, h;    // (x,y) - top-left corner, (w, h) - width & height of bounded box
    float prob;                    // confidence - probability that the object was found correctly
    unsigned int obj_id;        // class of object - from range [0, classes-1]
    unsigned int track_id;        // tracking id for video (0 - untracked, 1 - inf - tracked object)
    unsigned int frames_counter;// counter of frames on which the object was detected
};

class Detector {
public:
        Detector(std::string cfg_filename, std::string weight_filename, int gpu_id = 0);
        ~Detector();

        std::vector<bbox_t> detect(std::string image_filename, float thresh = 0.2, bool use_mean = false);
        std::vector<bbox_t> detect(image_t img, float thresh = 0.2, bool use_mean = false);
        static image_t load_image(std::string image_filename);
        static void free_image(image_t m);

#ifdef OPENCV
        std::vector<bbox_t> detect(cv::Mat mat, float thresh = 0.2, bool use_mean = false);
	std::shared_ptr<image_t> mat_to_image_resize(cv::Mat mat) const;
#endif
};
- AlexeyAB
- pjreddie