OpenAtom OpenHarmony(以下简称 OpenHarmony) 是由开放原子开源基金会孵化及运营的开源项目,目标是面向全场景、全连接、全智能时代,搭建一个智能终端设备操作系统的框架和平台,促进万物互联产业的繁荣发展。众所周知,神经网络(Neural Network)是AI算法的基石,Pytorch经过多年发展已然是广大开发者开发神经网络的必备工具。目前而言,OpenHarmony对Pytorch网络的部署能力有所欠缺; 为了补齐这块拼图,笔者将分享一套通过Executorh 推理工具部署Pytorch网络模型的流程方法。
ExecuTorch 是 PyTorch 官方为边缘计算场景量身打造的一款端到端推理框架,它能让你直接将 PyTorch 模型高效地部署到移动设备、嵌入式系统甚至微控制器上。下面这个流程图可以帮你一目了然地看清它在整个 PyTorch 生态系统中的位置,以及其核心的工作流程。

从图中可以看出,ExecuTorch 紧密衔接了 PyTorch 的训练生态和边缘设备的部署需求,构成了一个完整的闭环。
ExecuTorch 是 PyTorch Edge 战略的核心组成部分,专门解决 PyTorch 模型在边缘设备上的部署问题。它继承了对 PyTorch 模型的原生良好支持,允许开发者使用熟悉的 PyTorch 工具链进行模型导出和转换。
从上方的流程图可以看到,部署模型始于标准的 torch.nn.Module。ExecuTorch 依赖于 PyTorch 2.x 引入的 torch.export 方法,借此能够生成一个标准化的、不依赖 Python 的中间表示(ExportedProgram),这是模型能够高效部署到边缘设备的关键第一步。
OpenHarmony 是面向万物互联的操作系统,故其边缘设备的模型部署能力尤为重要。Executorch不仅能作为Pytorch 在边缘设备上的延伸,还能对原有的Pytorch模型进行性能优化,所以OpenHarmony与Executorch的适配是Pytorch 网络模型在OpenHarmony上运行的关键一步。
下文将接合一个实例来说明Executorch如何将一个Pytorch模型部署到OpenHarmony开发板上,选用的OpenHarmony 版本为Release 5.1.0,编译主机系统为Ubuntu 24.04 LTS版本
本文采用一个简单的2层CNN网络对MNIST数据集进行训练,并部署到OpenHarmony的嵌入式开发板(purplePi RK3566 开发板)上,大致步骤如下:
- 步骤1:python编写并训练一个pytorch的torch.nn.module的神经网络;
- 步骤2:将该网络通过executorch导出为pte文件;
- 步骤3:cpp编写基于executorch推理库的程序,实现读取pte文件并推理;
- 步骤4:使用OpenHarmony cmake工具链交叉编译executorch和编写的cpp推理程序;
- 步骤5:使用hdc工具将编译后的二进制文件传到OpenHarmony嵌入式开发板上运行;
下文对上述步骤进行详细阐释;
-
基本环境需求
-
Python 3.10 - 3.12
-
g++ version 7 or higher, clang++ version 5 or higher, or another C++17-compatible toolchain.(OpenHarmony toolchain 满足要求)
-
Linux (x86_64 or ARM64) or macOS (ARM64). Intel-based macOS systems require building PyTorch from source (see Building From Source for instructions).
- Windows is supported via WSL.
-
-
获取executorch源码,下载0.7版本;
#源码获取
git clone -b release/0.7 https://github.com/pytorch/executorch.git
#获取executorch的submodule,在executorch主目录下输入:
./install_executorch.sh --clean
git submodule sync
git submodule update --init --recursive
-
python 环境准备
创建python虚拟环境(python -m)并进入虚拟环境; 安装以下工具包:
pip install pyyaml torch torchvision executorch
-
cpp编译环境准备
-
cmake, 版本需要在3.29以上,建议3.30
-
buck2, 上网搜索源码编译
-
本文编写了一个简单的双层CNN网络,使用MNIST数据库进行训练; 此处不进行赘述,详情可见pytorch_python文件夹的top_nn.py; 以下为nn.Module的网络模块代码:
import torch
import torch.nn as nn
import torch.nn.functional as F
import torch.optim as optim

class CNN(nn.Module):
    def __init__(self): # 初始化并配置各层网络
        super(CNN, self).__init__();
        self.conv1 = nn.Conv2d(1,32,kernel_size=3,stride=1,padding=1);
        self.conv2 = nn.Conv2d(32,64,kernel_size=3,stride=1,padding=1);
        self.pool = nn.MaxPool2d(kernel_size=2,stride=2);
        self.dropout1 = nn.Dropout2d(0.25);
        self.dropout2 = nn.Dropout(0.5);
        self.fc1 = nn.Linear(64*14*14,128);
        self.fc2 = nn.Linear(128,10);

    def forward(self,x): # 搭建网络
        conv1_out = F.relu(self.conv1(x));
        # print(conv1_out.size());
        conv2_out = self.pool(F.relu(self.conv2(conv1_out)));
        # print(conv2_out.size());
        dropout1_out = self.dropout1(conv2_out);
        # print(dropout1_out.size());
        flatten_out = torch.flatten(dropout1_out,1);
        # print(flatten_out.size());
        Linear_out1 = F.relu(self.fc1(flatten_out));
        # print(Linear_out1.size());
        dropout2_out = self.dropout2(Linear_out1);
        # print(dropout2_out.size());
        Linear_out2 = self.fc2(dropout2_out);
        # print(Linear_out2.size());

return F.log_softmax(Linear_out2,dim=1);导出模型前,需要将模型设为eval()模式,同时需要告知该模型输入的tensor维度格式,即sample_inputs变量,最后采用to_edge_transform_and_lower()函数生成pte文件的二进制数据。
本实例还生成了一个input_tensor1.bin样例,以测试导出的pte文件在OpenHarmony上是否可以成功推理。
import torch
import torch.nn as nn
from torch.utils.data import DataLoader
from torchvision import datasets,transforms
from CNN_Net import CNN

from executorch.backends.xnnpack.partition.xnnpack_partitioner import XnnpackPartitioner
from executorch.exir import to_edge_transform_and_lower
from torch.export import Dim, export

import numpy as np

# 创建模型
device = torch.device('cuda' if torch.cuda.is_available() else 'cpu');
model = CNN();

# 载入参数-已经训练好的网络参数
model.load_state_dict(torch.load('./CNN_params.pth'));
model = model.eval(); #模型导出必须使用eval()模式

# 测试载入模型是否合格-最好生成一个测试用例(建议采用Bin)来测试网络
test_data_ = np.fromfile('./input_tensor1.bin',dtype=np.float32);
test_data = test_data_.reshape((1,1,28,28));
test_tensor = torch.from_numpy(test_data);
output = model(test_tensor);
predicted = output.max(1);
print(output);
print(predicted);

# 导出模型为pte模式
sample_inputs = (torch.randn(1, 1, 28, 28),);

et_program = to_edge_transform_and_lower(
    export(model, sample_inputs)
).to_executorch()

with open("CNN_TestModel.pte", "wb") as f:
f.write(et_program.buffer)cpp 源码如下,使用Executorch的Module模块读取pte文件,并使用Module.forward()进行推理;
#include <executorch/extension/module/module.h>
#include <executorch/extension/tensor/tensor.h>
#include <iostream>
#include <fstream>

using namespace ::executorch::extension;
using namespace std;


int main(int argc, char* argv[]) {
    // Load the model
    Module module("/data/local/tmp/CNN_TestModel.pte");
    cout<<"Model Load Success!"<<endl;

    // Load test Data
    float data [28*28];
    ifstream dataIn("/data/local/tmp/input_tensor1.bin", ios::in | ios::binary);
    dataIn.read((char*) &data, sizeof(data));

    auto tensor = from_blob(data, {1,1,28,28});

    cout<<"here!"<<endl;
    // Perform an inference.
    const auto result = module.forward(tensor);

    if (result.ok()) {
        // Retrieve the output data.
        const auto output = result->at(0).toTensor().const_data_ptr<float>();
        cout<<output[0]<<endl;
        cout<<output[1]<<endl;
        cout<<output[2]<<endl;
        cout<<output[3]<<endl;
        cout<<output[4]<<endl;
        cout<<output[5]<<endl;
        cout<<output[6]<<endl;
        cout<<output[7]<<endl;
        cout<<output[8]<<endl;
        cout<<output[9]<<endl;
        std::cout << "Inference Success!" << std::endl;
    }

    return 1;

}
CmakeLists.txt文件如下所示:
cmake_minimum_required(VERSION 3.29 FATAL_ERROR)
project(executorch_test CXX)

set(CMAKE_CXX_STANDARD 17)
set(CMAKE_CXX_STANDARD_REQUIRED ON)

# Set options for executorch build.
option(EXECUTORCH_ENABLE_LOGGING "" ON)
option(EXECUTORCH_BUILD_EXTENSION_DATA_LOADER "" ON)
option(EXECUTORCH_BUILD_EXTENSION_FLAT_TENSOR "" ON)
option(EXECUTORCH_BUILD_EXTENSION_MODULE "" ON)
option(EXECUTORCH_BUILD_EXTENSION_TENSOR "" ON)
option(EXECUTORCH_BUILD_KERNELS_OPTIMIZED "" OFF)
option(EXECUTORCH_BUILD_XNNPACK "" OFF)

# Add ExecuTorch subdirectory
add_subdirectory("executorch")

set(DEMO_SOURCES main.cpp)

# Create executable
add_executable(executorch_test ${DEMO_SOURCES})

# Include directories
target_include_directories(executorch_test PRIVATE ${CMAKE_CURRENT_SOURCE_DIR})

# Link libraries
link_directories("/mnt/ext1/workshop/CNN_executorch/build_ohos/executorch/kernels/portable")

target_link_libraries(
  executorch_test
  PRIVATE executorch
          extension_module_static
          extension_tensor
          portable_ops_lib
          portable_kernels
)

# Set output directory
set_target_properties(executorch_test
    PROPERTIES
    RUNTIME_OUTPUT_DIRECTORY "${CMAKE_BINARY_DIR}/bin"
)
Cmake脚本中option选项对executorch进行相关配置,该实例中使用Executorch High-API的基本配置(CPU 推理),即为:
option(EXECUTORCH_ENABLE_LOGGING "" ON) option(EXECUTORCH_BUILD_EXTENSION_DATA_LOADER "" ON) option(EXECUTORCH_BUILD_EXTENSION_FLAT_TENSOR "" ON) option(EXECUTORCH_BUILD_EXTENSION_MODULE "" ON) option(EXECUTORCH_BUILD_EXTENSION_TENSOR "" ON)
注意:因为cpuinfo和XNNPACK架构还未对OpenHarmony进行适配,所以EXECUTORCH_BUILD_KERNELS_OPTIMIZED 和 EXECUTORCH_BUILD_XNNPACK 开关需关闭,否则无法编译成功。
上文获得executorch源码需放在CmakeLists.txt路径下,以便于编译搜索executorch的相关文件。
target_link_libraries链接的库均是executorch编译生成的库
-
libexecutorch.a 包含executorch运行时最基本的runtime函数, 不包含任何计算的算子;
-
libportable_kernels.a libportable_ops_lib.a 包含executorch的基本算子(默认兼容Aten算子,pytorch的算子库函数), 是计算的核心;
-
libextension_module_static.a 封装Module类
-
libextension_tensor.a 封装tensor类
相关文件及层级结构均在executorch_cpp文件夹中,请参考。
获取OpenHarmony的SDK包,参考:OpenHarmony Release Notes,选择对应版本,在“从镜像站点获取”小节下载对应版本SDK包,NDK包含在SDK包中。
下载工具包后,给native/build-tools/cmake/bin, native/llvm/bin 下文件 +x , 否则二进制程序无法运行
**Tips1:**sdk提供的cmake工具版本是3.28,不推荐使用,executorch需cmake 版本 3.29以上,使用官方编译的cmake即可,对后续编译没有影响;
**Tips2:**在ohos.toolchain.cmake文件中找到
# 设定编译参数
set(CMAKE_C_COMPILER_EXTERNAL_TOOLCHAIN   "${TOOLCHAIN_ROOT_PATH}")
set(CMAKE_CXX_COMPILER_EXTERNAL_TOOLCHAIN "${TOOLCHAIN_ROOT_PATH}")
并将其注释,防止出现error以及warning:
# 设定参数
# set(CMAKE_C_COMPILER_EXTERNAL_TOOLCHAIN   "${TOOLCHAIN_ROOT_PATH}")
# set(CMAKE_CXX_COMPILER_EXTERNAL_TOOLCHAIN "${TOOLCHAIN_ROOT_PATH}")
Tips3: -DCMAKE_BUILD_TYPE=RELEASE 不建议添加,可能会报错,应该是OpenHarmony与Executorch的适配性问题;
相关准备工作完成后,在命令行输入:
mkdir build_ohos && cmake
-DOHOS_STL=c++_static
-DOHOS_ARCH= 'your_board_cpu_type' e.g. armeabi-v7a 或 arm64-v8a
-DOHOS_PLATFORM=OHOS
-DCMAKE_TOOLCHAIN_FILE= ' your ohos.toolchain.cmake path'
-DEXECUTORCH_OPTIMIZE_SIZE=ON
..
再输入
cmake --build . -jxx
首次编译时间大约10-15分钟左右,你可以去喝一杯茶^_^
使用hdc工具将pte文件,input_tensor1.bin输入样例以及编译完的 bin/executorch_test送到Openharmony开发板上推理,运行程序将会看到(CPU推理):
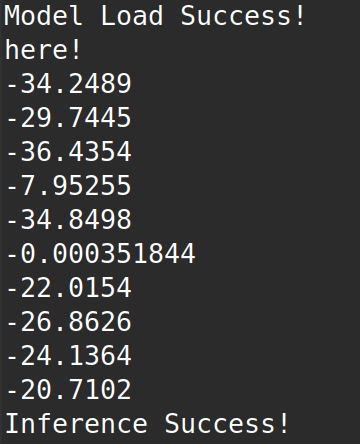
该图片是数字5, 网络输出也是索引5的数值最大(索引从0开始),推理正确!
该推理结果是没有任何精度损失的,适合作为优化模型的基准参照值。
本文主要分享了如何使用Executorch在OpenHarmony上跑通一个Pytorch网络,能实现在PC端训练调优Pytorch模型,在OpenHarmony边缘端运行推理Pytorch网络; 从而打造了Openharmony的pytorch 的框架底座,为AI应用提供支撑。现阶段只调通了CPU推理的框架,后续会在Vulkan等GPU框架下进行Pytorch网络推理的尝试。