Using Ubuntu 14.04
If you want to install EasyMinerCenter on a blank installation of Ubuntu, you can follow the steps described on this page. This help could be usefull also for re-configuration of another linux installation. The installation progress is customized for the latest release of Ubuntu 14.04 LTS
For installation of this "web triade", you can use packages from the standard repositories:
sudo apt-get update
sudo apt-get install apache2
sudo apt-get install php5
sudo apt-get install mysql-server
During the installation of mysql-server, you will be asked to input a password for the user root. Please remember it.
The web server Apache 2 is configured using files usually located in the apache2 directory, by default /etc/apache2/sites-enabled/000-default.conf and /etc/apache2/apache2.conf. You have to locate the element <Directory /var/www/> and modify its content to:
<Directory /var/www/>
  Options Indexes FollowSymLinks MultiViews
  AllowOverride All
  Order allow,deny
  Allow from all
  Require all granted
</Directory>
The application requires the modules headers and rewrite to be enabled. You can allow them using the following commands:
sudo a2enmod headers
sudo a2enmod rewrite
Finally, remember to restart the web server:
sudo service apache2 restartThe application requires some PHP extensions, that are not allowed directly after the plain installation of PHP. The presence of these extensions is checked also on the start of the Installation wizard.
The extensions curl, xsl and mysql can be installed and configured simple by using apt-get commands:
sudo apt-get install php5-curl
sudo apt-get install php5-xsl
sudo apt-get install php5-mysql
In case that the installation does not enable the required module (you will see an error in the installation wizard), you can activate them using the commands:
sudo php5enmod curl
sudo php5enmod xsl
sudo php5enmod mysql
The application also requires extension mcrypt. You can try to install it using:
sudo apt-get install php5-mcryptPossibly, you can get the error message "Unable to locate php5-mcrypt". The extension mcrypt is not located in the default Ubuntu repository, but in the repository universe. Please use these commands:
sudo add-apt-repository universe
sudo apt-get update
sudo apt-get install php5-mcrypt
sudo php5enmod mcrypt
After the installation of extensions, you have to restart the server:
sudo service apache2 restartAfter the installation of the MySQL server, you have to prepare two database users and one empty database. You can access MySQL using the command line interface. For login, you should run the command:
mysql -u root -pYou will be asked for the password for the user "root". After the login, you can use the following SQL commands:
GRANT ALL PRIVILEGES ON *.* TO 'emadmin'@'localhost' IDENTIFIED BY 'emadminpassword' WITH GRANT OPTION;
CREATE DATABASE emcenter;
GRANT ALL PRIVILEGES ON emcenter.* TO 'emcenter'@'localhost' IDENTIFIED BY 'emcenterpassword';
These commands prepare one administrator user account emadmin and one normal user account emcenter with the corresponding database.
Finally, you have to logout from the MySQL server using command:
exitThe application EasyMinerCenter can be installed in two versions:
Download the latest release from GitHub and unpack the archive into the web root directory.
For installation of the latest dev version, you can clone the thread master from the GitHub repository.
If you do not have git installed yet, you can install it using:
sudo apt-get install gitFor cloning of the repository, you should switch to the web root directory (by default: /var/www/html). In case that you have modified the path to the web root directory, please modify the following commands to the your correct path.
cd /var/www/html
git clone --recursive https://github.com/KIZI/EasyMiner-EasyMinerCenter.git
After the cloning, you have to change the access permisions:
cd EasyMiner-EasyMinerCenter
sudo chmod -R 777 log
sudo chmod -R 777 temp
and update the composer dependencies. The following commands download composer in the application folder and download all requested PHP packages:
php -r "readfile('https://getcomposer.org/installer');" | sudo php
sudo php composer.phar update
Note: If you want to run the application from another directory, you can rename the directory EasyMiner-EasyMinerCenter by your preferences.
If you want to support user logins using Facebook or Google account, you have to prepare the social networks "applications". Please follow the steps described on the page Installation wizard - Social network logins.
Open you favorite web browser and load the URL http://localhost/EasyMiner-EasyMinerCenter/install.
You should see a graphical installation wizard. This wizard will check the PHP configuration directives and saves the application parameters.
For the installation, you have to change the access permissions to the directory for user images and prepare file for the application configuration. The paths are written relatively to the application root (/var/www/html/EasyMiner-EasyMinerCenter).
sudo chmod 777 ./www/images/users
sudo touch ./app/config/config.local.neon
sudo chmod 666 ./app/config/config.local.neon
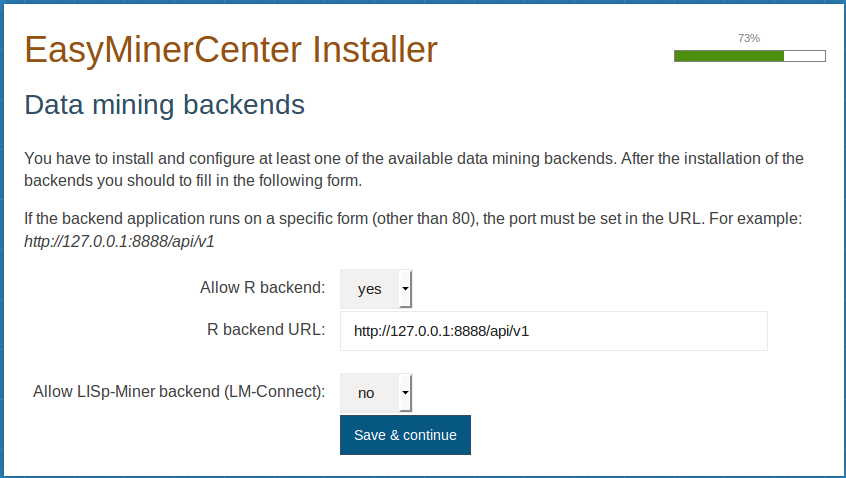
You have to use the installation wizard, each page contains a corresponding description.
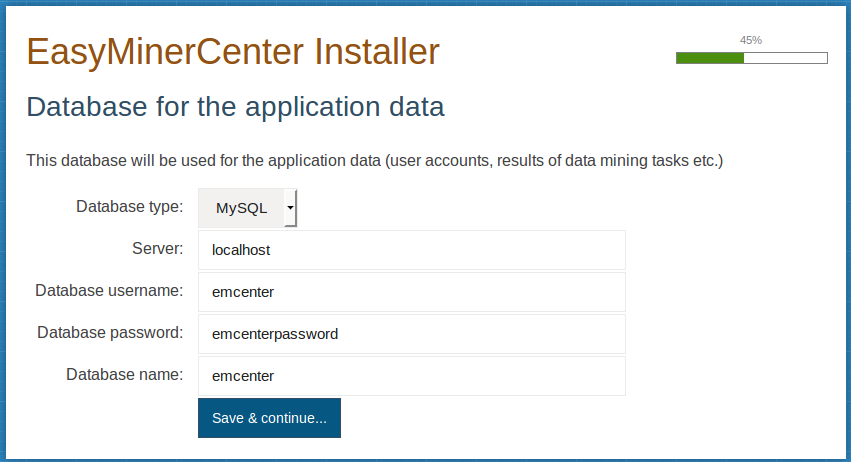
On the appropriate page, you should input the connection details to MySQL database (prepared in the previous phase of the installation).

Finally, it is suitable to modify the access permisions of the configuration file to read-only access:
sudo chmod 444 ./app/config/config.local.neon