An OpenGL app for placing calibrated cameras into 3d models.
- Model loading using Assimp
- MSAA anti-aliasing
- Frustum Culling
- Using camera calibrations for accurate previews from the camera's perspective
 View from camera flying around scene
 Preview from a Kinect placed in the room
 Displaying placed camera's frustum
- WASD for movement, Mouse for Looking around.
- Enter goes into preview mode for in GUI selected camera. While in preview mode Escape leaves Preview mode without adding to the list of placed cameras while pressing Enter adds the camera.
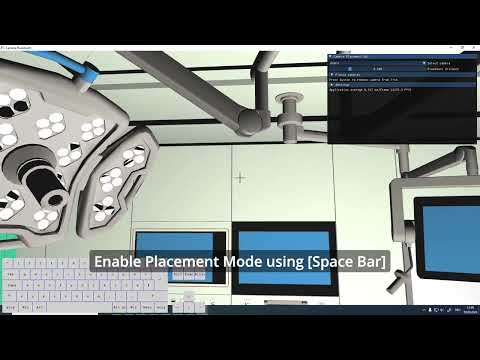
- Pressing space anytime switches to the GUI mode where settings might be changed. Pressing space again leaves the GUI mode.
- Pressing E exports the currently placed cameras into csv files
- The list of cameras can be seen in the GUI and misplaced cameras can be removed
- -cwd: Path to which all paths below are relative to
- -c or --cameras: Path to folder where camera icon, intrinics and optionally transforms (for stereo cameras) are stored
- -m or --models: Path to folder where models to be used are stored
- -o or --output: Path to folder where camera intrinics and extrinics are exported to as csv files
One folder per camera in the path given by -c (by default cameras/). Folder name corresponds to the name of the camera.
- icon.png: Icon of the camera used for gui. Ideally 1024x1024 pixels
- intrinics.csv: Calibrated intrinsics of camera with format: fx, fy, cx, cy. The app assumes that the resolution of the camera is (2 x c_x, 2 x c_y)
In order to add or modify objects used by the CameraPlacement App, you can add models in the models/default folder as Collada (.dae) files. These files can be obtained by exporting them directly from the OR-X Digital Twin file used in the https://github.com/BAL-ROCS-BUT-COOL/SyntheticDataORX repo. Make sure their size does not exceed 100MB as this decreases the speed of the App significantly and can even lead to crashes.
C++ 20 or newer vcpckg installation
The easiest way to install all dependencies on Windows is by using Visual Studio Build Tools. Download it from here (make sure to scroll down to the "All Downloads" section). Then in the Visual Studio Installer choose Desktop development with C++ and ensure that at least the following optional features are checked:
MSVC v143or higherWindows 11 SDKC++ CMake tools for WindowsTesting tools core features - Build ToolsC++ AddressSanitizer
Not all of these options may be necessary, but this matches development environments.
In the following, for all installation commands, open the console by searching for x64 Native Tools Command Prompt for VS 2022.
Most Dependencies are managed by vcpkg, which you can alternatively install manually.
Check in the command prompt if you have vcpckg installed:
where vcpckg
If it is not installed, choose a place where you want to install it on your system, then run:
git clone https://github.com/microsoft/vcpkg.git
cd vcpkg && .\bootstrap-vcpkg.bat
set "VCPKG_ROOT=C:\path\to\vcpkg"
set PATH=%VCPKG_ROOT%;%PATH%
Note that this VCPKG_ROOT will only persist for the shell session.
Consider adding it as a persisting environment variable.
For more details, see here.
Linux Compilation is currently not supported for this repo.
There are two presets available for compilation:
- x64-release
- x64-debug
Run the following commands for one of two presets in the x64 Native Tools Command Prompt for VS 2022 console:
cmake --preset [x64-release|x64-debug]
This compiles the necessary files and directories for the building of the app. This is by default done in the out/build/peset-name folder Next build the app:
cmake --build out/build/[x64-release|x64-debug]
You can then follow the instructions for executing the app.
The app was created during a stay at the Research in Orthopedic Computer Science Group (ROCS) at Balgrist Hospital Zurich. The assets are taken from paper "Creating a Digital Twin of Spinal Surgery: A Proof of Concept". This work has been supported by the OR-X - a swiss national research infrastructure for translational surgery - and associated funding by the University of Zurich and University Hospital Balgrist.
- Jan Grunder: Main Author
- Lilian Calvet: Conceptual Designer