Real-time, Fully Local Speech-to-Text with Speaker Diarization


This project is based on Whisper Streaming and lets you transcribe audio directly from your browser. WhisperLiveKit provides a complete backend solution for real-time speech transcription with a functional and simple frontend that you can customize for your own needs. Everything runs locally on your machine ✨
WhisperLiveKit consists of three main components:
- Frontend: A basic HTML & JavaScript interface that captures microphone audio and streams it to the backend via WebSockets. You can use and adapt the provided template at whisperlivekit/web/live_transcription.html for your specific use case.
- Backend (Web Server): A FastAPI-based WebSocket server that receives streamed audio data, processes it in real time, and returns transcriptions to the frontend. This is where the WebSocket logic and routing live.
- Core Backend (Library Logic): A server-agnostic core that handles audio processing, ASR, and diarization. It exposes reusable components that take in audio bytes and return transcriptions. This makes it easy to plug into any WebSocket or audio stream pipeline.
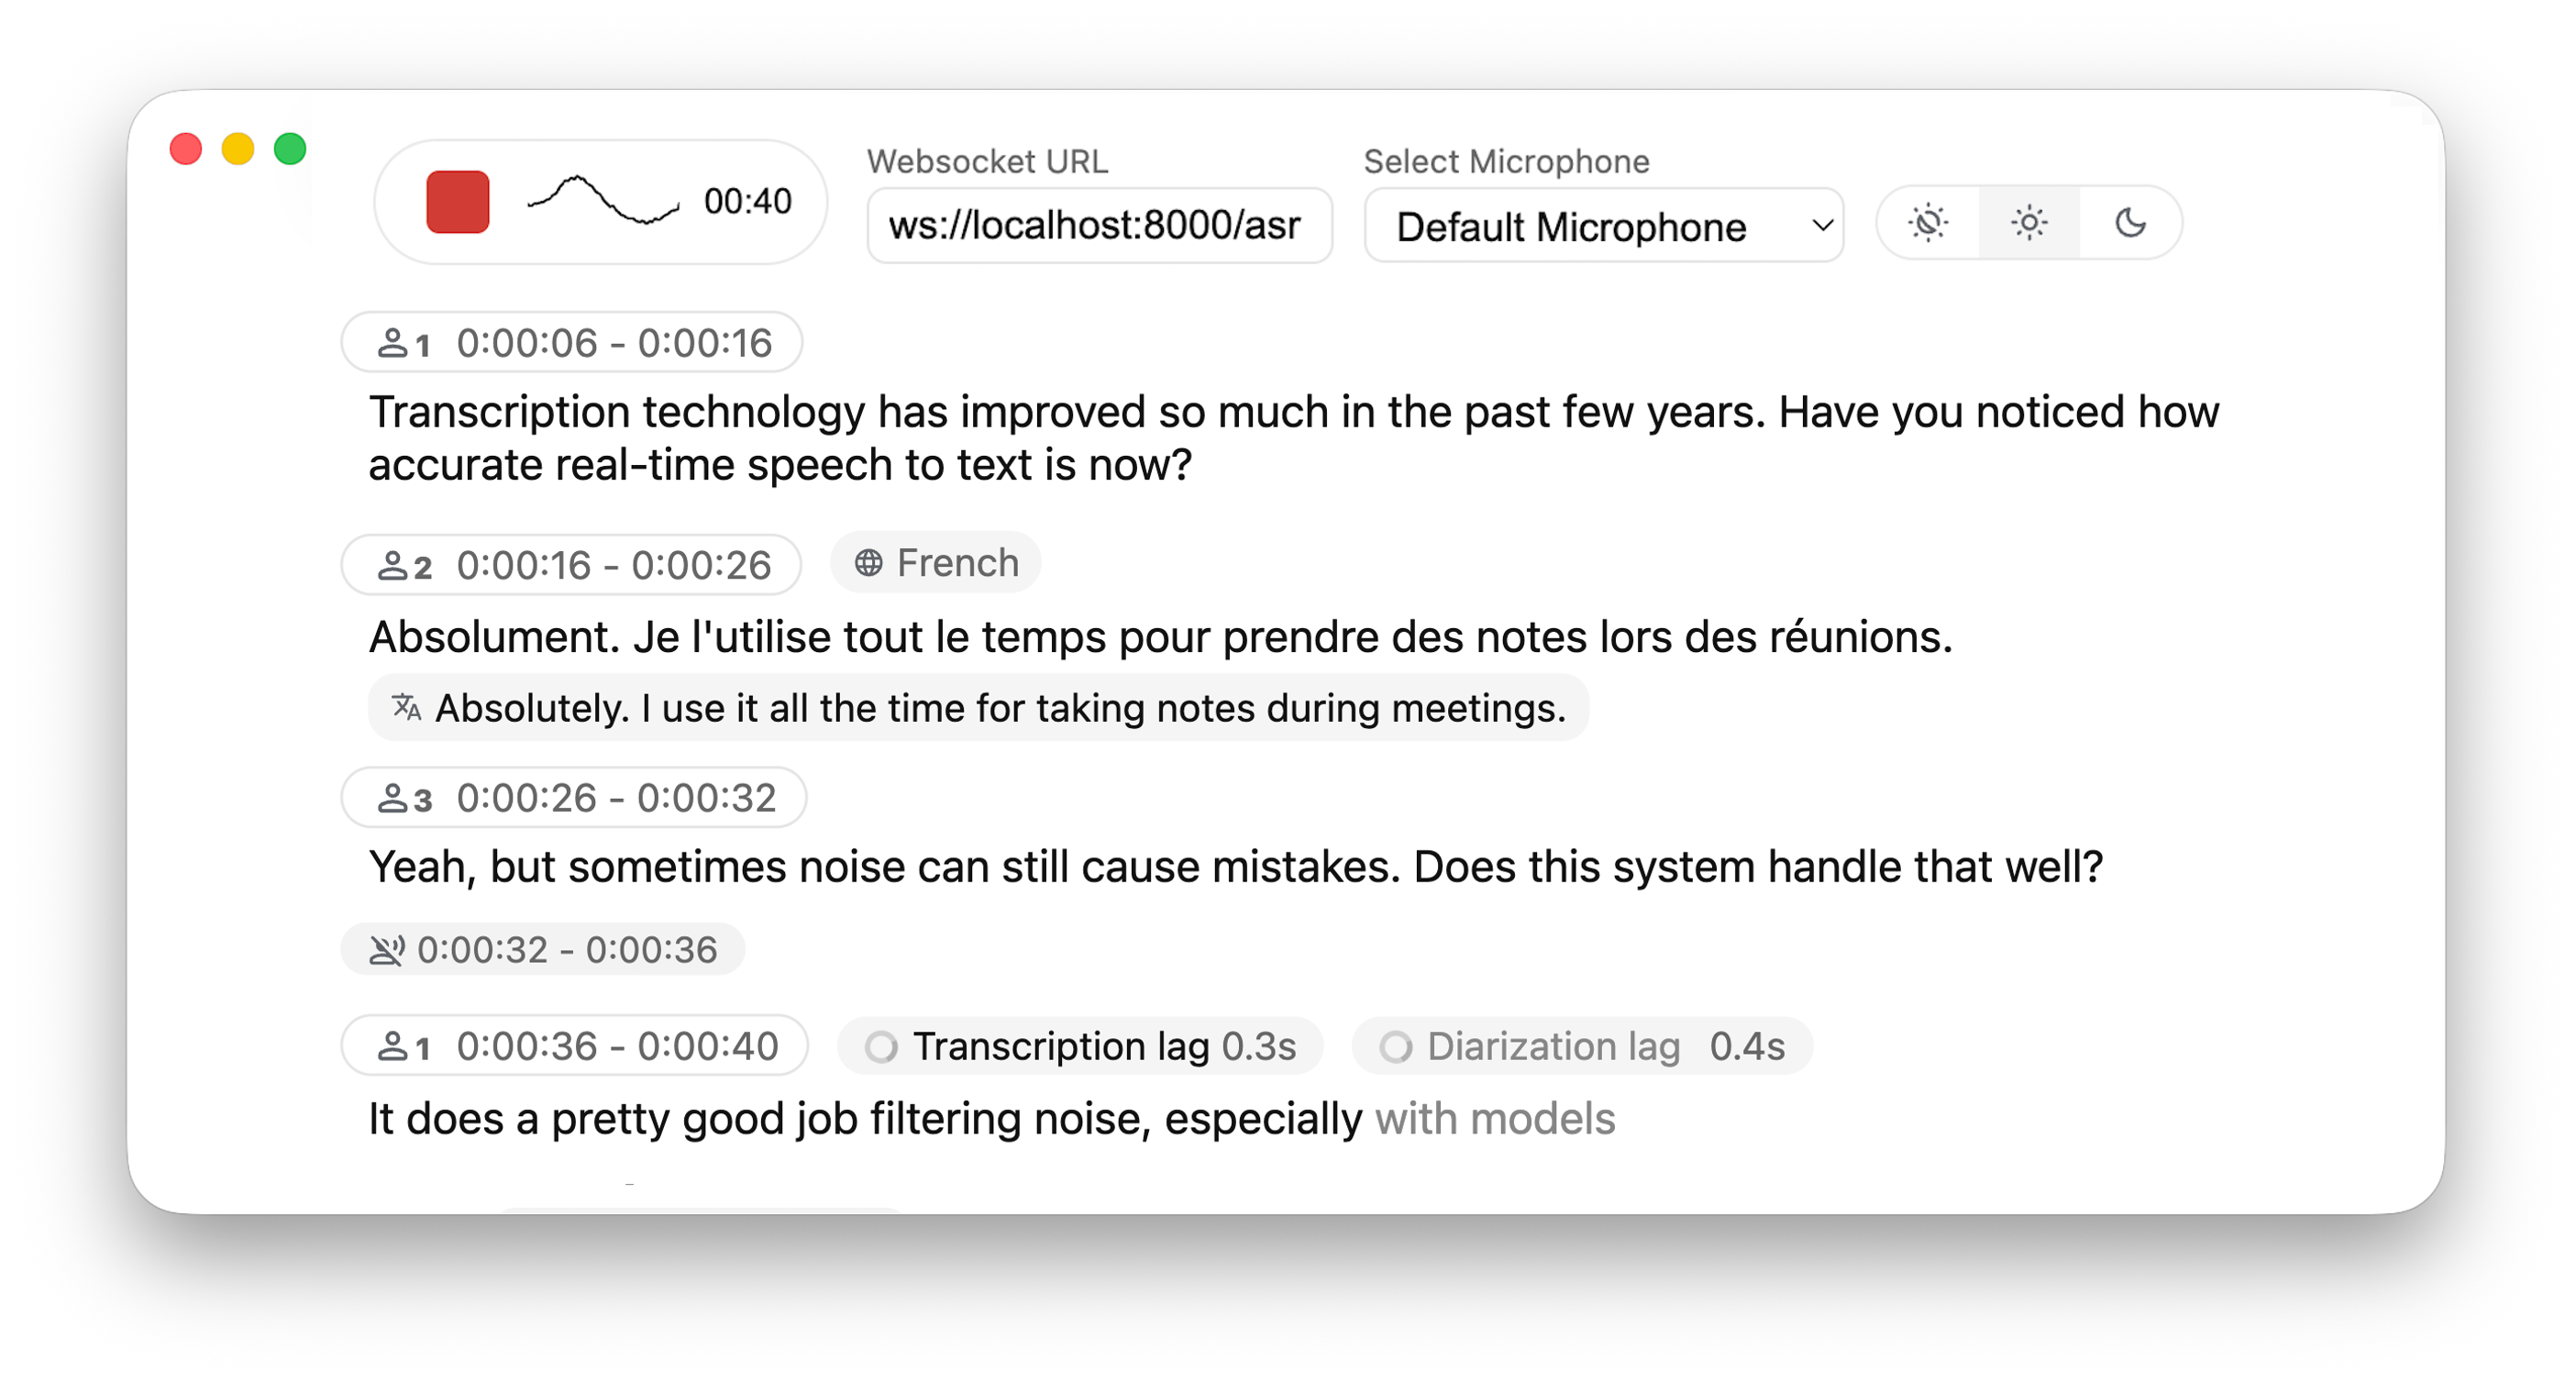
- 🎙️ Real-time Transcription - Convert speech to text instantly as you speak
- 👥 Speaker Diarization - Identify different speakers in real-time using Diart
- 🔒 Fully Local - All processing happens on your machine - no data sent to external servers
- 📱 Multi-User Support - Handle multiple users simultaneously with a single backend/server
⚙️ Core differences from Whisper Streaming
- Automatic Silence Chunking – Automatically chunks when no audio is detected to limit buffer size
- Multi-User Support – Handles multiple users simultaneously by decoupling backend and online ASR
- Confidence Validation – Immediately validate high-confidence tokens for faster inference
- MLX Whisper Backend – Optimized for Apple Silicon for faster local processing
- Buffering Preview – Displays unvalidated transcription segments
# Install the package
pip install whisperlivekit

# Start the transcription server
whisperlivekit-server --model tiny.en

# Open your browser at http://localhost:8000# You must provide a certificate and key
whisperlivekit-server -ssl-certfile public.crt --ssl-keyfile private.key
# Open your browser at https://localhost:8000That's it! Start speaking and watch your words appear on screen.
pip install whisperlivekitgit clone https://github.com/QuentinFuxa/WhisperLiveKit
cd WhisperLiveKit
pip install -e .FFmpeg is required:
# Ubuntu/Debian
sudo apt install ffmpeg

# macOS
brew install ffmpeg

# Windows
# Download from https://ffmpeg.org/download.html and add to PATH# Voice Activity Controller (prevents hallucinations)
pip install torch
# Sentence-based buffer trimming
pip install mosestokenizer wtpsplit
pip install tokenize_uk # If you work with Ukrainian text
# Speaker diarization
pip install diart
# Alternative Whisper backends (default is faster-whisper)
pip install whisperlivekit[whisper] # Original Whisper
pip install whisperlivekit[whisper-timestamped] # Improved timestamps
pip install whisperlivekit[mlx-whisper] # Apple Silicon optimization
pip install whisperlivekit[openai] # OpenAI APIFor diarization, you need access to pyannote.audio models:
- Accept user conditions for the
pyannote/segmentationmodel - Accept user conditions for the
pyannote/segmentation-3.0model - Accept user conditions for the
pyannote/embeddingmodel - Login with HuggingFace:
pip install huggingface_hub
huggingface-cli login
Start the transcription server with various options:
# Basic server with English model
whisperlivekit-server --model tiny.en

# Advanced configuration with diarization
whisperlivekit-server --host 0.0.0.0 --port 8000 --model medium --diarization --language autofrom whisperlivekit import WhisperLiveKit
from whisperlivekit.audio_processor import AudioProcessor
from fastapi import FastAPI, WebSocket
import asyncio
from fastapi.responses import HTMLResponse
# Initialize components
app = FastAPI()
kit = WhisperLiveKit(model="medium", diarization=True)
# Serve the web interface
@app.get("/")
async def get():
return HTMLResponse(kit.web_interface()) # Use the built-in web interface
# Process WebSocket connections
async def handle_websocket_results(websocket, results_generator):
async for response in results_generator:
await websocket.send_json(response)
@app.websocket("/asr")
async def websocket_endpoint(websocket: WebSocket):
audio_processor = AudioProcessor()
await websocket.accept()
results_generator = await audio_processor.create_tasks()
websocket_task = asyncio.create_task(
handle_websocket_results(websocket, results_generator)
)
try:
while True:
message = await websocket.receive_bytes()
await audio_processor.process_audio(message)
except Exception as e:
print(f"WebSocket error: {e}")
websocket_task.cancel()The package includes a simple HTML/JavaScript implementation that you can adapt for your project. You can get in in whisperlivekit/web/live_transcription.html, or using :
kit.web_interface()WhisperLiveKit offers extensive configuration options:
| Parameter | Description | Default |
|---|---|---|
--host |
Server host address | localhost |
--port |
Server port | 8000 |
--model |
Whisper model size | tiny |
--language |
Source language code or auto |
en |
--task |
transcribe or translate |
transcribe |
--backend |
Processing backend | faster-whisper |
--diarization |
Enable speaker identification | False |
--confidence-validation |
Use confidence scores for faster validation | False |
--min-chunk-size |
Minimum audio chunk size (seconds) | 1.0 |
--vac |
Use Voice Activity Controller | False |
--no-vad |
Disable Voice Activity Detection | False |
--buffer_trimming |
Buffer trimming strategy (sentence or segment) |
segment |
--warmup-file |
Audio file path for model warmup | jfk.wav |
--ssl-certfile |
Path to the SSL certificate file (for HTTPS support) | None |
--ssl-keyfile |
Path to the SSL private key file (for HTTPS support) | None |
- Audio Capture: Browser's MediaRecorder API captures audio in webm/opus format
- Streaming: Audio chunks are sent to the server via WebSocket
- Processing: Server decodes audio with FFmpeg and streams into Whisper for transcription
- Real-time Output:
- Partial transcriptions appear immediately in light gray (the 'aperçu')
- Finalized text appears in normal color
- (When enabled) Different speakers are identified and highlighted
To deploy WhisperLiveKit in production:
-
Server Setup (Backend):
# Install production ASGI server
pip install uvicorn gunicorn

# Launch with multiple workers
gunicorn -k uvicorn.workers.UvicornWorker -w 4 your_app:app
-
Frontend Integration:
- Host your customized version of the example HTML/JS in your web application
- Ensure WebSocket connection points to your server's address
-
Nginx Configuration (recommended for production):
server {
    listen 80;
    server_name your-domain.com;

    location / {
        proxy_pass http://localhost:8000;
        proxy_set_header Upgrade $http_upgrade;
        proxy_set_header Connection "upgrade";
        proxy_set_header Host $host;
    }
}
-
HTTPS Support: For secure deployments, use "wss://" instead of "ws://" in WebSocket URL
A basic Dockerfile is provided which allows re-use of Python package installation options. See below usage examples:
NOTE: For larger models, ensure that your docker runtime has enough memory available.
- Create a reusable image with only the basics and then run as a named container:
docker build -t whisperlivekit-defaults .
docker create --gpus all --name whisperlivekit -p 8000:8000 whisperlivekit-defaults
docker start -i whisperlivekitNote: If you're running on a system without NVIDIA GPU support (such as Mac with Apple Silicon or any system without CUDA capabilities), you need to remove the
--gpus allflag from thedocker createcommand. Without GPU acceleration, transcription will use CPU only, which may be significantly slower. Consider using small models for better performance on CPU-only systems.
- Customize the container options:
docker build -t whisperlivekit-defaults .
docker create --gpus all --name whisperlivekit-base -p 8000:8000 whisperlivekit-defaults --model base
docker start -i whisperlivekit-base--build-argOptions:EXTRAS="whisper-timestamped"- Add extras to the image's installation (no spaces). Remember to set necessary container options!HF_PRECACHE_DIR="./.cache/"- Pre-load a model cache for faster first-time startHF_TOKEN="./token"- Add your Hugging Face Hub access token to download gated models
- Meeting Transcription: Capture discussions in real-time
- Accessibility Tools: Help hearing-impaired users follow conversations
- Content Creation: Transcribe podcasts or videos automatically
- Customer Service: Transcribe support calls with speaker identification
Contributions are welcome! Here's how to get started:
- Fork the repository
- Create a feature branch:
git checkout -b feature/amazing-feature - Commit your changes:
git commit -m 'Add amazing feature' - Push to your branch:
git push origin feature/amazing-feature - Open a Pull Request
This project builds upon the foundational work of:
We extend our gratitude to the original authors for their contributions.
This project is licensed under the MIT License - see the LICENSE file for details.