



🤖 Companion to AstromechOS — the open control platform that makes a 1:1 astromech droid feel alive.
AstromechOS turns a full‑scale astromech into a coordinated, personality‑driven robot — 317 sounds, dozens of behaviors, dome choreography, triple‑watchdog safety. But before any of that magic runs, two Raspberry Pis have to be flashed perfectly and taught to trust each other:
- 🧠 Master — the dome Pi 4B (4 GB): Flask API, web dashboard, choreography player.
- ⚙️ Slave — the body Pi 4B (2 GB): drive motors, audio, servos, real‑time I/O.
AstromechOS Imager is the tool that gets those two brains onto their SD cards — correctly, safely, married. It writes the right image to the right Pi, bakes in a pre‑signed SSH handshake so the halves trust each other at first boot, provisions the account and network the way the official Raspberry Pi Imager does (native cloud‑init, no hacks), verifies every byte, and hard‑blocks any mismatched or unverified image before a single sector is written.
No dd gymnastics. No "wait, which card was the Master?". No bricked droid on first boot.
- 🛡️ Wrong‑image hard block — every image is mounted in memory and checked against a cryptographic role marker before the write button even lights up. Drop a Slave image into the Master slot and it's blocked cold — with a plain‑English fix, not a cryptic error.
- 🤝 Zero‑touch droid handshake — generates an
ed25519keypair and bakes it into both cards so the dome and body trust each other at first boot. Nossh-copy-id, no key shuffling, ever. - ☁️ Provisioned like the pros — user, password, Wi‑Fi and rootfs auto‑resize via native cloud‑init, the exact mechanism the official Pi Imager uses on Raspberry Pi OS Trixie. The base image is never hacked or surgically edited.
- ✅ Trust, then write — runs elevated, SHA‑256‑checks the source before flashing and read‑back‑verifies the card after, and a cancelled flash leaves a clean, usable card — not a RAW one.
- 🎚️ A UI that doesn't feel like a script — a frameless, dual‑theme Qt Quick wizard with live drive detection and per‑role progress.
A frameless, dual‑themed (dark / light) Qt Quick flow with an R2‑style cobalt accent and a one‑click sun/moon theme toggle — no restart. Screenshots show the Light theme (the default on launch), in the real wizard order.
An animated boot splash warms up the engine, then opens into the wizard.
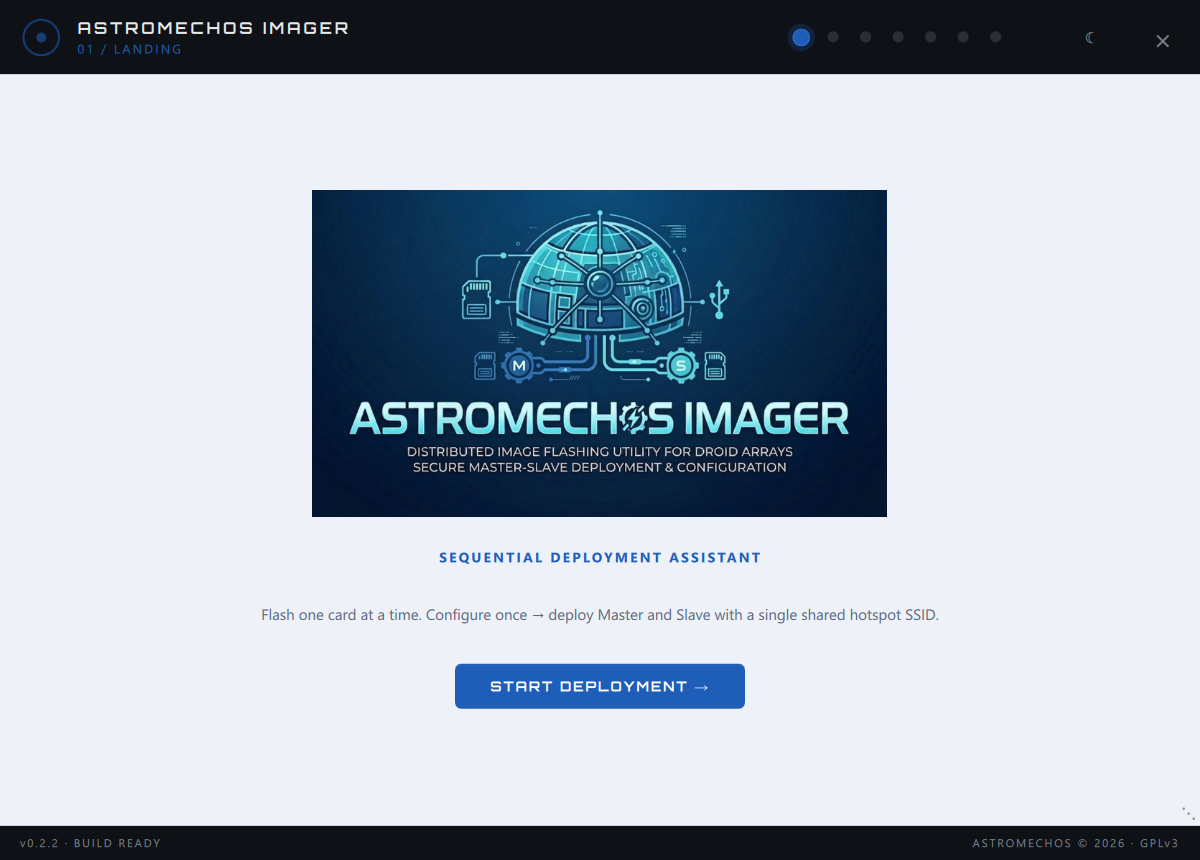
The Sequential Deployment Assistant: configure once, then flash the Master and Slave one card at a time — both stamped with the same Astromech‑XXXX rendezvous SSID (minted at launch) so the two halves find each other on first boot.
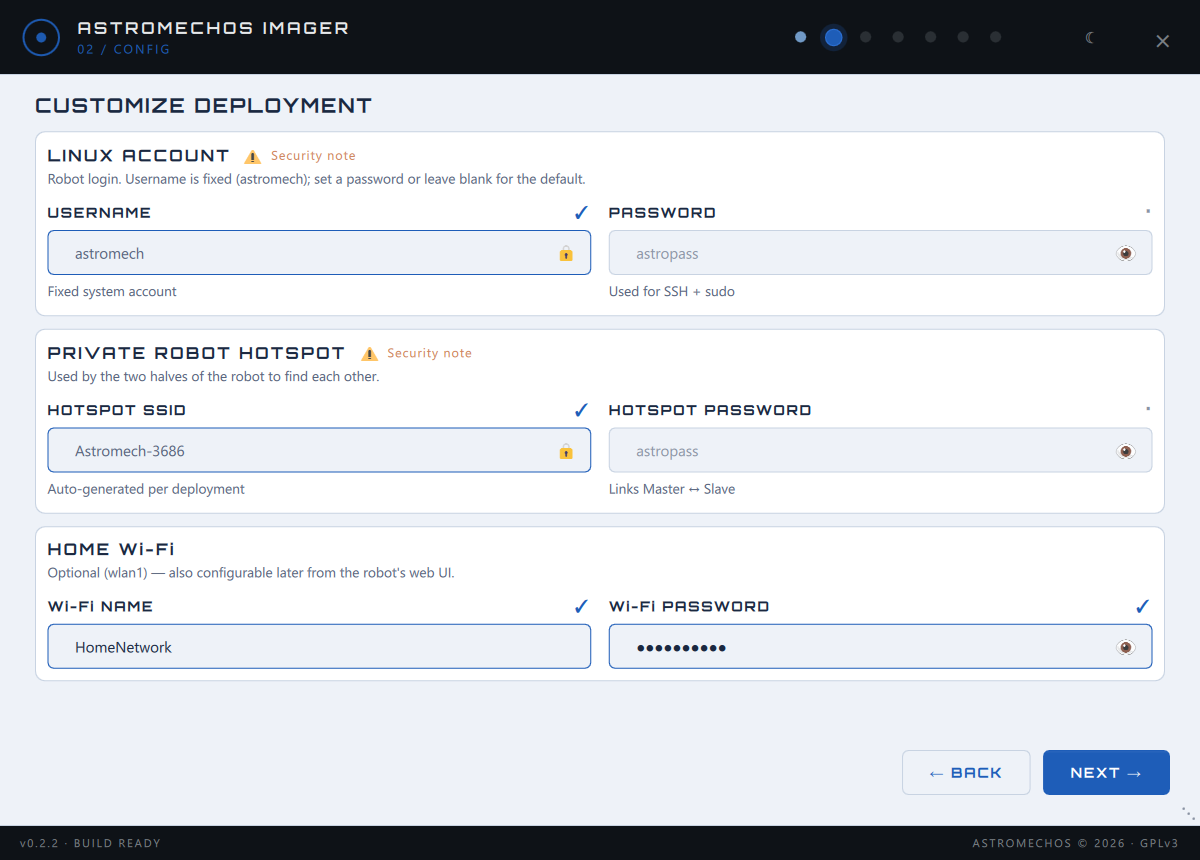
Set the robot's password, the private hotspot that links the two halves, and optional home Wi‑Fi. The login name is the fixed astromech account (shown read‑only) and the rendezvous SSID is auto‑generated — leave the rest blank for safe defaults, or make them your own.
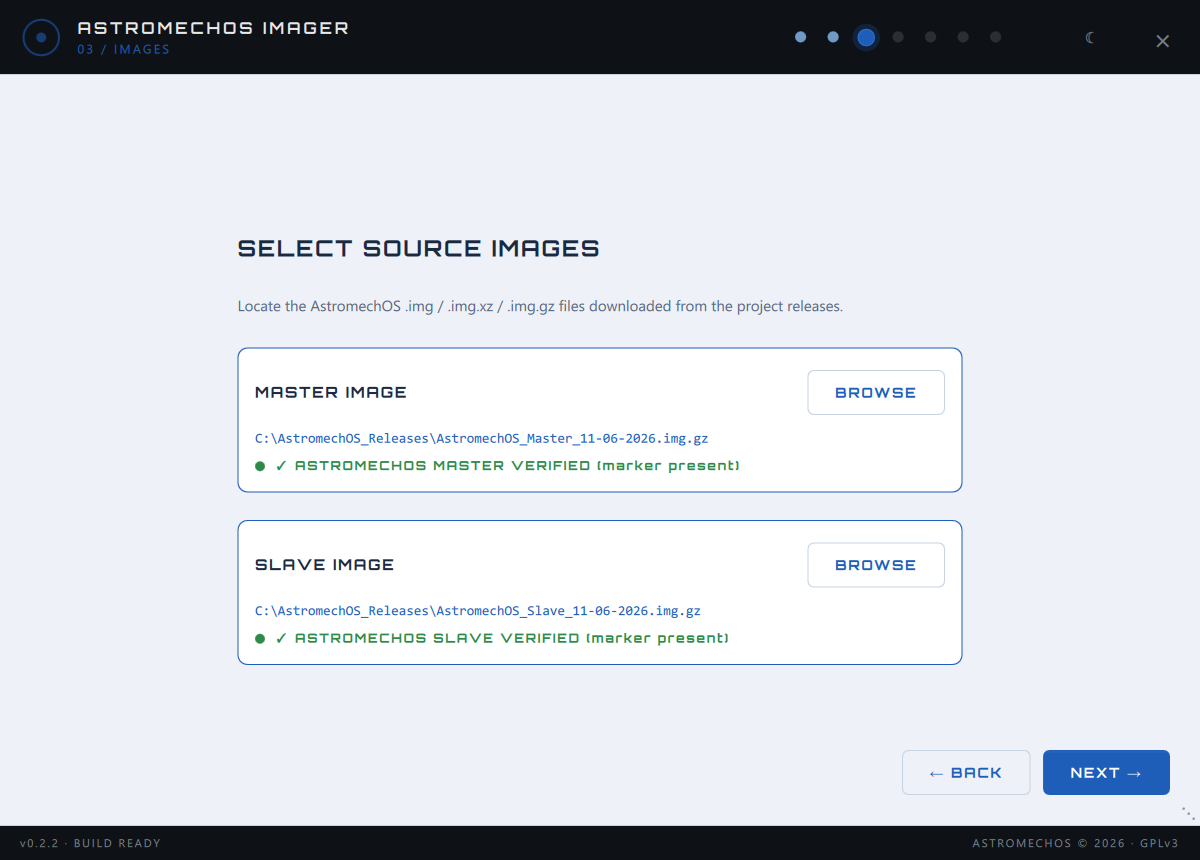
Point to your downloaded Master and Slave images. Each one is virtually mounted in memory and checked against its role marker — a green ✓ VERIFIED badge means it's the genuine article; an amber badge flags a legacy image, and a red one blocks the flash for the wrong card.
Removable drives are detected live (your system disk is hidden, for safety). Insert the card, lock it to its role — MASTER (dome) or SLAVE (body) — keep the optional SHA‑256 integrity check on, and hit ⚡ WRITE. It never fires on the first click:
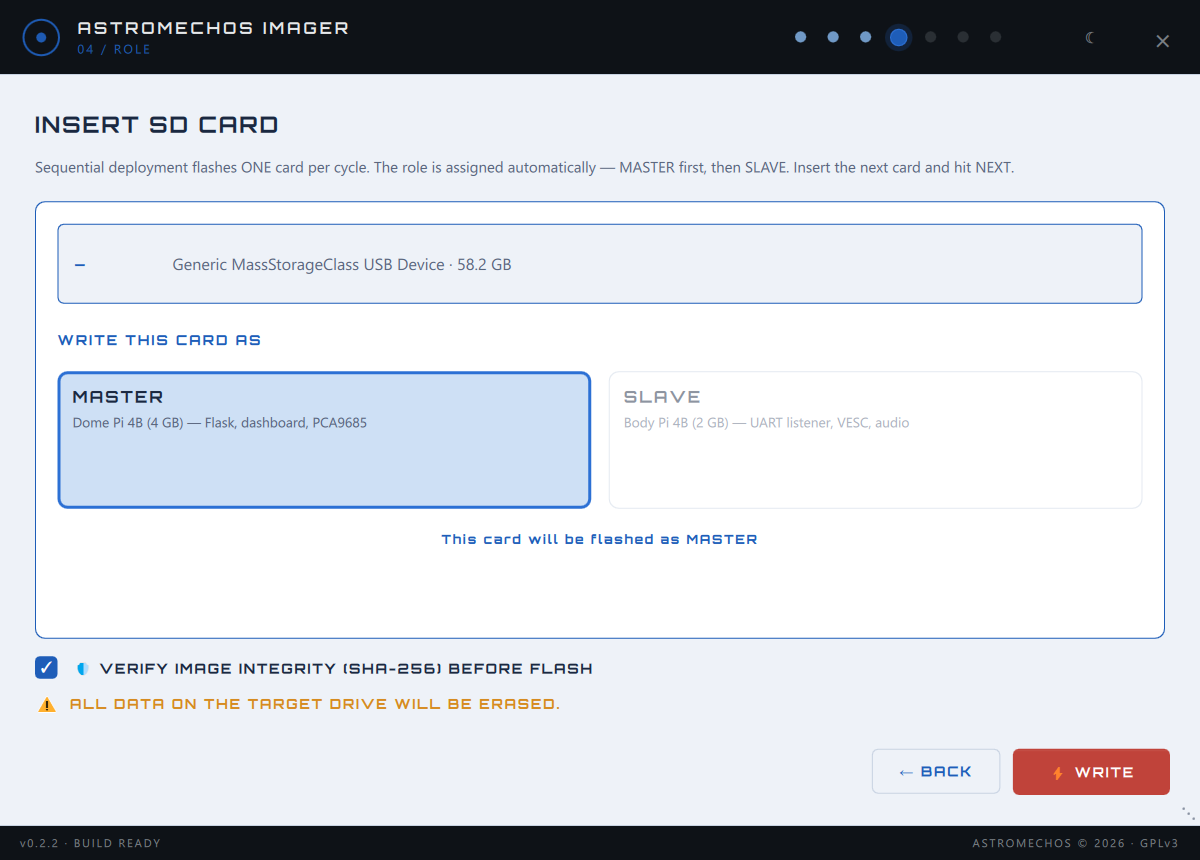
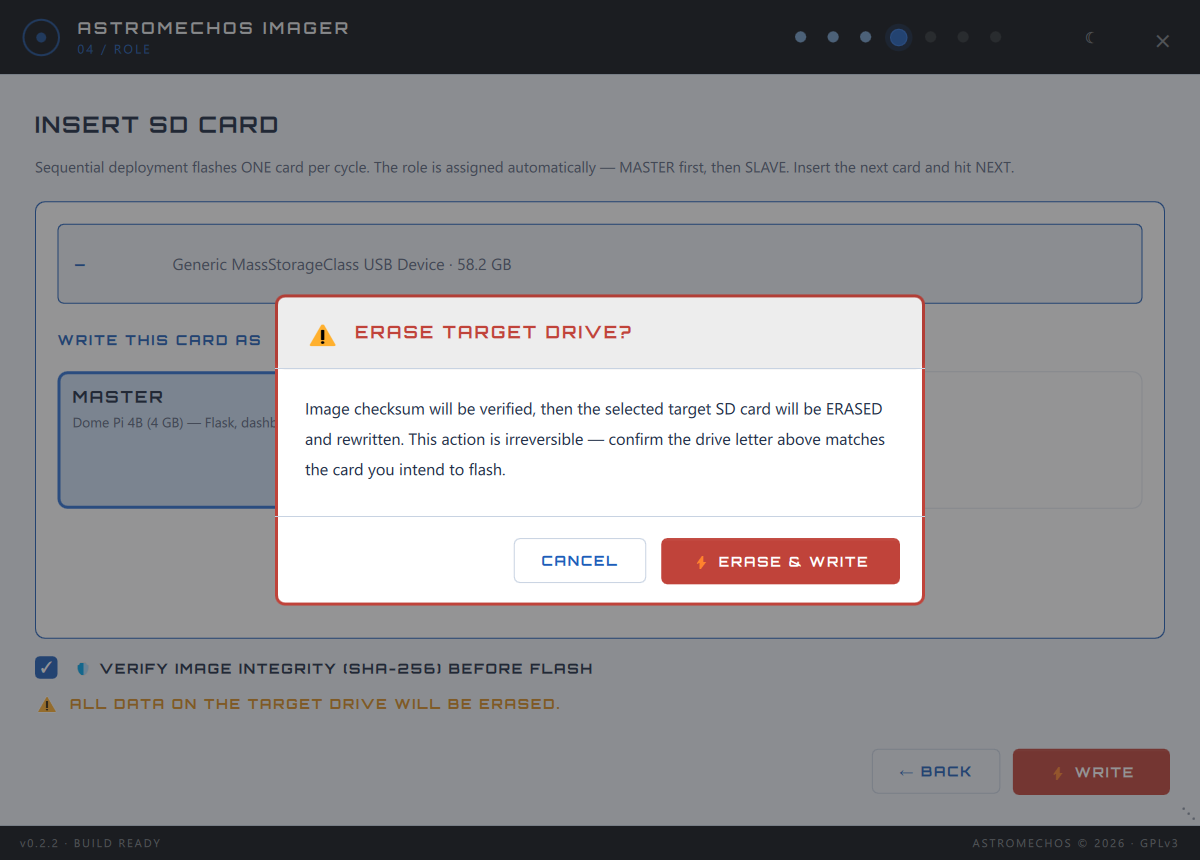
— it raises a bordered "ERASE TARGET DRIVE?" modal so you confirm the target before anything irreversible happens.
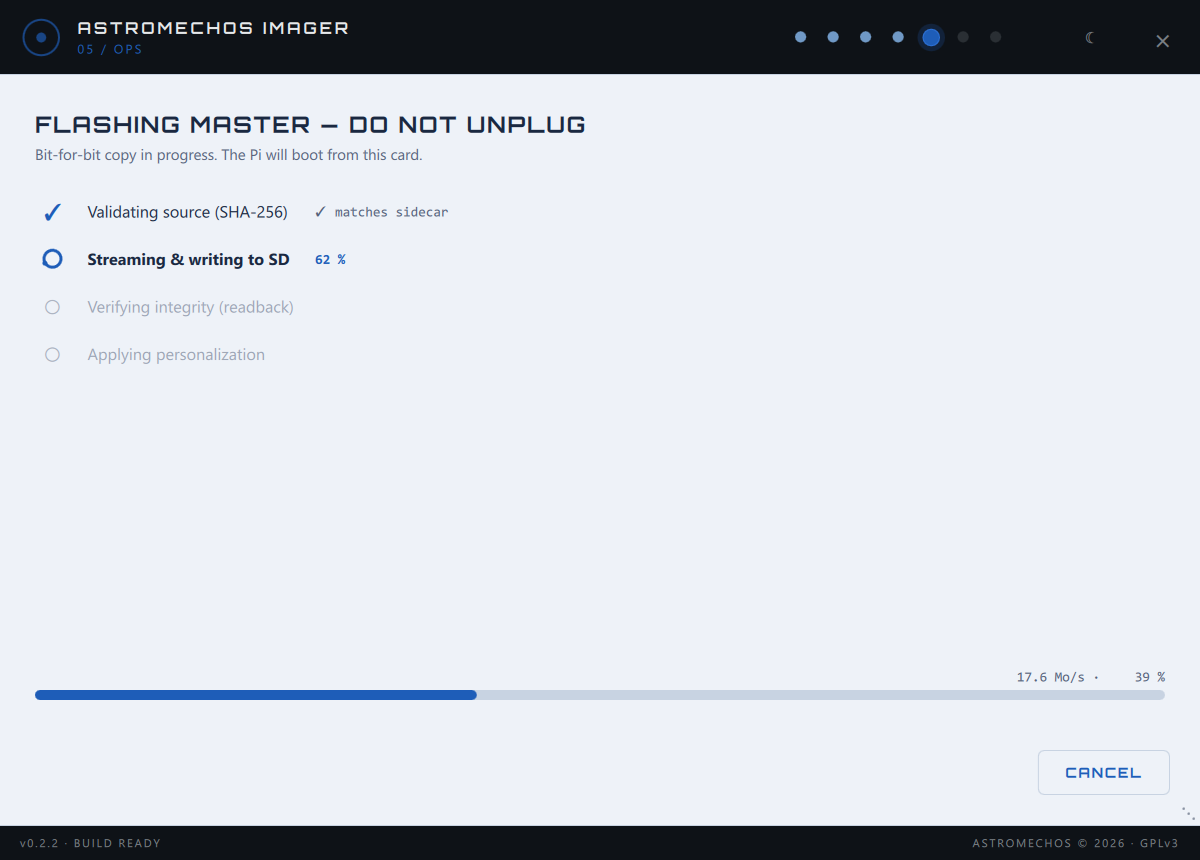
A live, staged write: source SHA‑256 check, bit‑for‑bit streaming to the card, post‑write read‑back verification, then personalization — each with real‑time throughput. Cancel here and the card is recovered to a clean, usable state rather than left RAW.
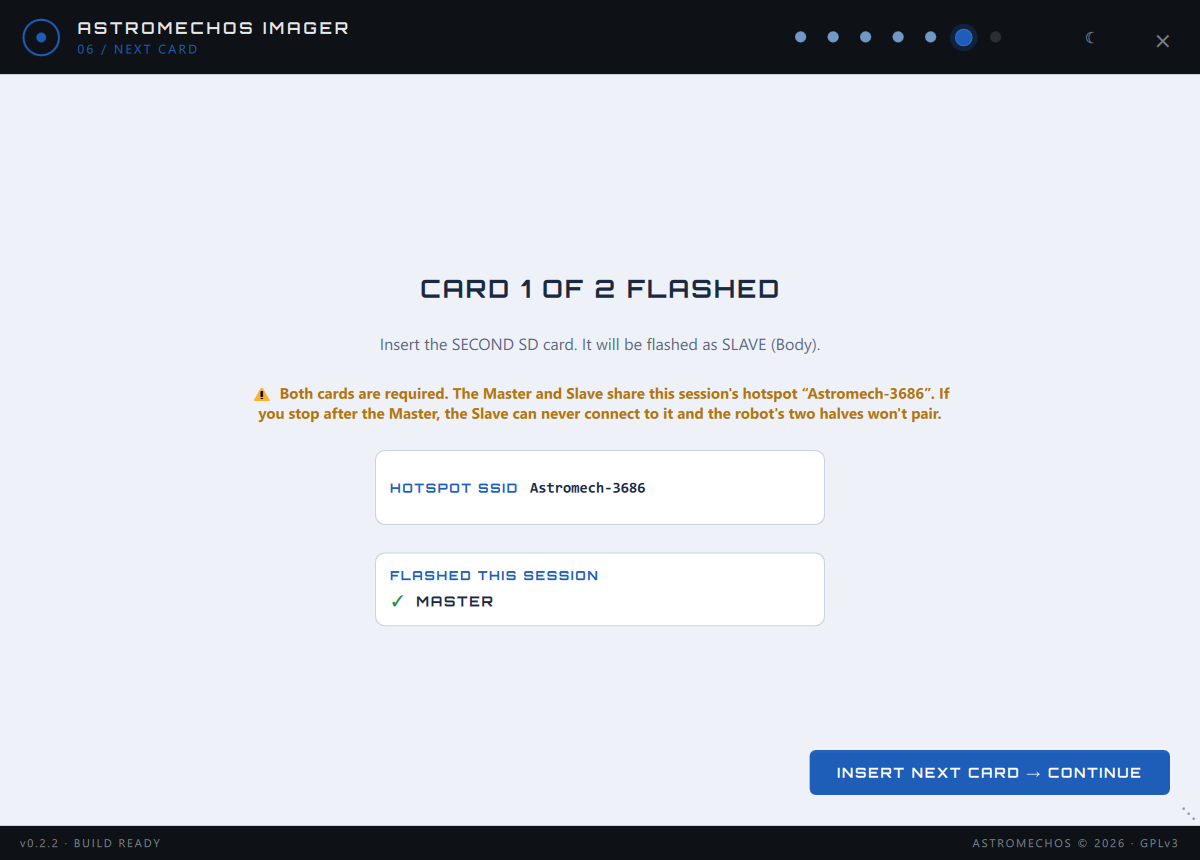
After the Master is written and verified, the assistant recaps what's flashed (and the shared hotspot SSID), then prompts you to drop in the second card — auto‑assigned to the remaining role.
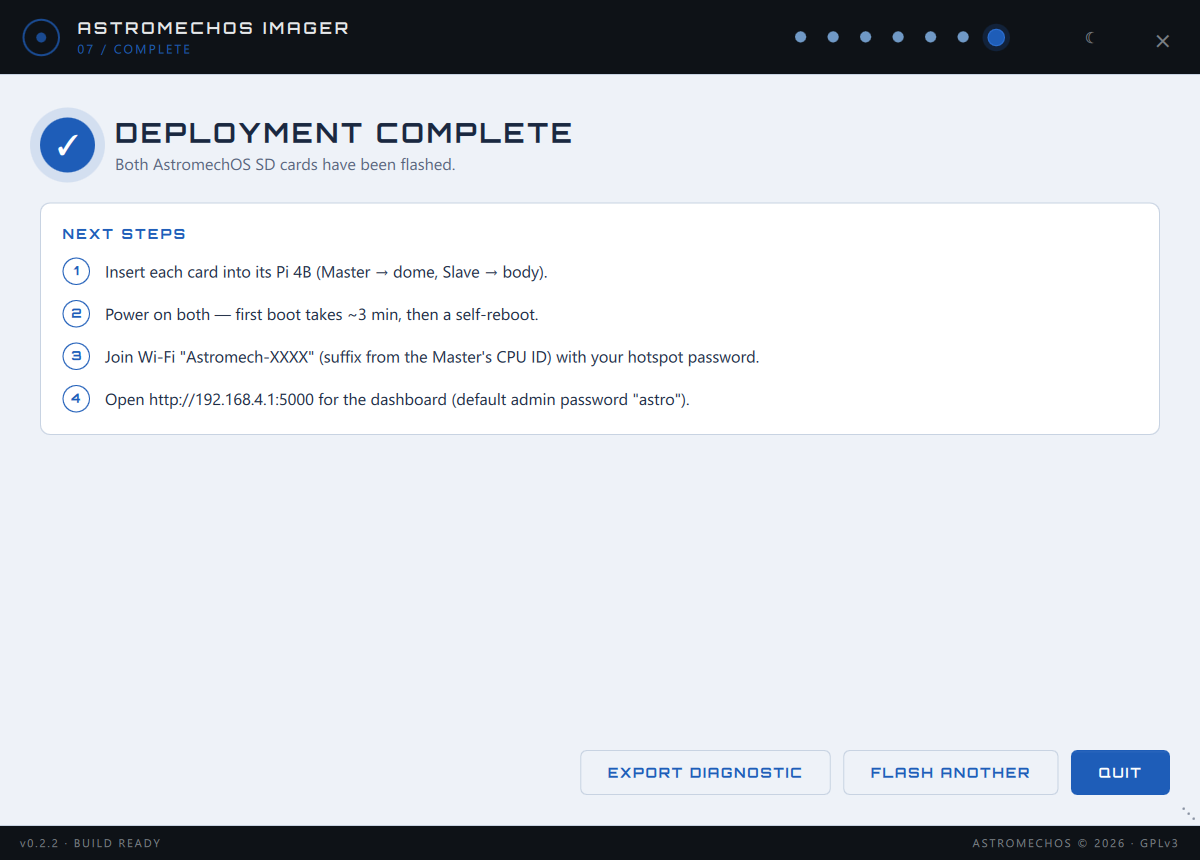
Both cards flashed, verified and personalized — with a clear next‑step recap (eject, seat each Pi, power on) and a FLASH ANOTHER shortcut for the next droid.
Four engineering pillars do the heavy lifting:
- 🤝 The Handshake — one
ed25519keypair, baked into both cards, validated before the card is finalized. The droid comes up married; you reach the body through the dome as an SSH bastion. - 🛡️ Hard‑blocked validation — images are virtually mounted in memory and checked against a strict role marker; a mismatch disables
NEXTwith a plain‑English recovery hint. - ☁️ cloud‑init provisioning — the official Raspberry Pi OS Trixie mechanism (
user-data+meta-data+ a per‑flash instance‑id) sets the password and resizes the rootfs without ever touching the base image. - ✅ Hardened Windows writes — elevated, dismount‑then‑write, userspace FAT customize without mounting the card, deferred partition table, post‑write read‑back verify, and auto‑recovery to a clean exFAT card on cancel/failure — all in pure Python.
📖 Full technical deep‑dive → ARCHITECTURE.md (mechanisms, schemas, the SSH cascade, the Windows flash path, the stack & build chain).
The installer. A signed, standalone Windows installer ships on every release:
AstromechOS_Imager-Setup-<version>.exe ~36 MB
Double‑click, accept UAC, done — Start Menu shortcut, French + English wizard, clean uninstaller.
Ready‑to‑flash base images. Pre‑built, role‑marked, shrunken AstromechOS images for both Pis live in the same Releases — download two files, no need to clone or build anything:
AstromechOS-master-<version>.img.xz   (+ .sha256)
AstromechOS-slave-<version>.img.xz    (+ .sha256)
They pass the hard‑block validator instantly and expand to fill any ≥ 8 GB card on first boot.
- It runs as Administrator. Writing raw sectors to an SD card is a privileged operation — just accept the UAC prompt at launch (the installer wires this up automatically).
⚠️ If Windows pops a "You need to format the disk" / "Format this disk?" dialog while you're flashing (or right after) — close it, and never click Format. Your card is written and verified correctly; Windows simply can't read a freshly‑written Linux card and assumes it's blank. This is a Windows limitation — the official Raspberry Pi Imager behaves exactly the same way. Just dismiss the window and carry on.
Requirements: Windows 10 / 11 (x86_64), Python 3.12 (dev only — end users get the .exe), Administrator rights at runtime (raw disk write).
# Dev install
py -3.12 -m venv .venv
.\.venv\Scripts\activate
pip install -e .[dev]
pip install pyinstaller        # for local .exe builds

# Run from source
.\.venv\Scripts\python.exe -m astromechos_imager.ui.app

# Test suite
$env:QT_QPA_PLATFORM = "offscreen"
.\.venv\Scripts\python.exe -m pytest tests/ -q
602 passing tests cover the image validator, wizard state, the flash view‑model, the cloud‑init generator, FAT32 boot‑partition I/O, ed25519 keypair generation, first‑boot bundle self‑validation, the anti‑"Format this disk?" defense stack (MBR scrub, sticky‑binding purge, mid‑flash letter watchdog), and end‑to‑end personalization on simulated drives.
- 🏗️ Architecture & internals:
ARCHITECTURE.md - 📦 Build the installer:
BUILD_INSTRUCTIONS.md(PyInstaller → Inno Setup) - 🖼️ Refresh README screenshots:
python scripts\ui_tour.pyrenders the wizard in both themes (18 PNGs) into the gitignoredscreenshots/, mirrored to theAstromechOS_Screenshotsrepo.
Huge thanks to the Raspberry Pi Imager team. This project drew heavily on their work — the userspace safe‑write model (dismount, raw‑device customization, deferred partition table), the SHA‑256 verify‑on‑readback pattern, and the cloud‑init / first‑boot provisioning flow were all a major inspiration for the Imager's Windows flash path and provisioning logic. Standing on the shoulders of giants. 🫡
GPL‑3.0‑or‑later — same as the AstromechOS parent project. Free to use, modify, and redistribute; derivatives stay open under the same terms. Raspberry Pi Imager is © Raspberry Pi Ltd, also under the Apache‑2.0 / GPL terms of its respective components.
Part of the AstromechOS droid‑build ecosystem · 🤖 Made for astromech builders, by an astromech builder.