Based on the tutorial at https://hasura.io/learn/graphql/nextjs-fullstack-serverless/
GraphQL is becoming the new way to use APIs in modern web and mobile apps.
However, learning new things always takes time and without getting your hands dirty it’s very hard to understand the nuances of a new technology.
So, we put together a powerful and concise course that will introduce you to GraphQL and integrating GraphQL into your frontend stack, in the shortest amount of time possible.
We will explore the fundamentals of GraphQL and the things that make GraphQL especially suitable for modern applications, like its realtime capabilities! The course is light on opinions so that once you grok the fundamentals you can go on to choose your favorite libraries, tools and tailor your workflow.
- GraphQL vs REST
- GraphQL queries, mutations, subscriptions
- Setting up a GraphQL client with Apollo
- Integrating GraphQL queries in your react app
- Integrating GraphQL mutations with query variables to handle form input
- Updating local state after a GraphQL mutation (form input) using Apollo cache
- Optimistic updates to local state and UI after GraphQL mutations for a slick UX
- Using subscriptions with subscription hooks
- Building a real-time feed with notifications using mutations and subscriptions
We will be building a realtime todo app using authenticated GraphQL APIs.
Try this deployed version of the app to see what we'll be building: https://learn-hasura-todo-app.netlify.com/
No, we will be simulating a scenario where we already have a GraphQL API and the basic UI of a Next.js app built. Our task in this scenario is to integrate the GraphQL APIs into our Next.js app to build a complete and working app.
If you're new to Hooks in React, we recommend going through the official docs and then coming back here!
You need to have npm/yarn & node 10+ running.
Less than 2 hours
GraphQL is a specification for how to talk to an API. It's typically used over HTTP where the key idea is to POST a "query" to an HTTP endpoint, instead of hitting different HTTP endpoints for different resources.
GraphQL is designed for developers of web/mobile apps (HTTP clients) to be able to make API calls to fetch the data they need from their backend APIs conveniently.
Let's say you have an API to fetch a user's profile and their address. In a typical REST scenario, this is what the request/response would look like:
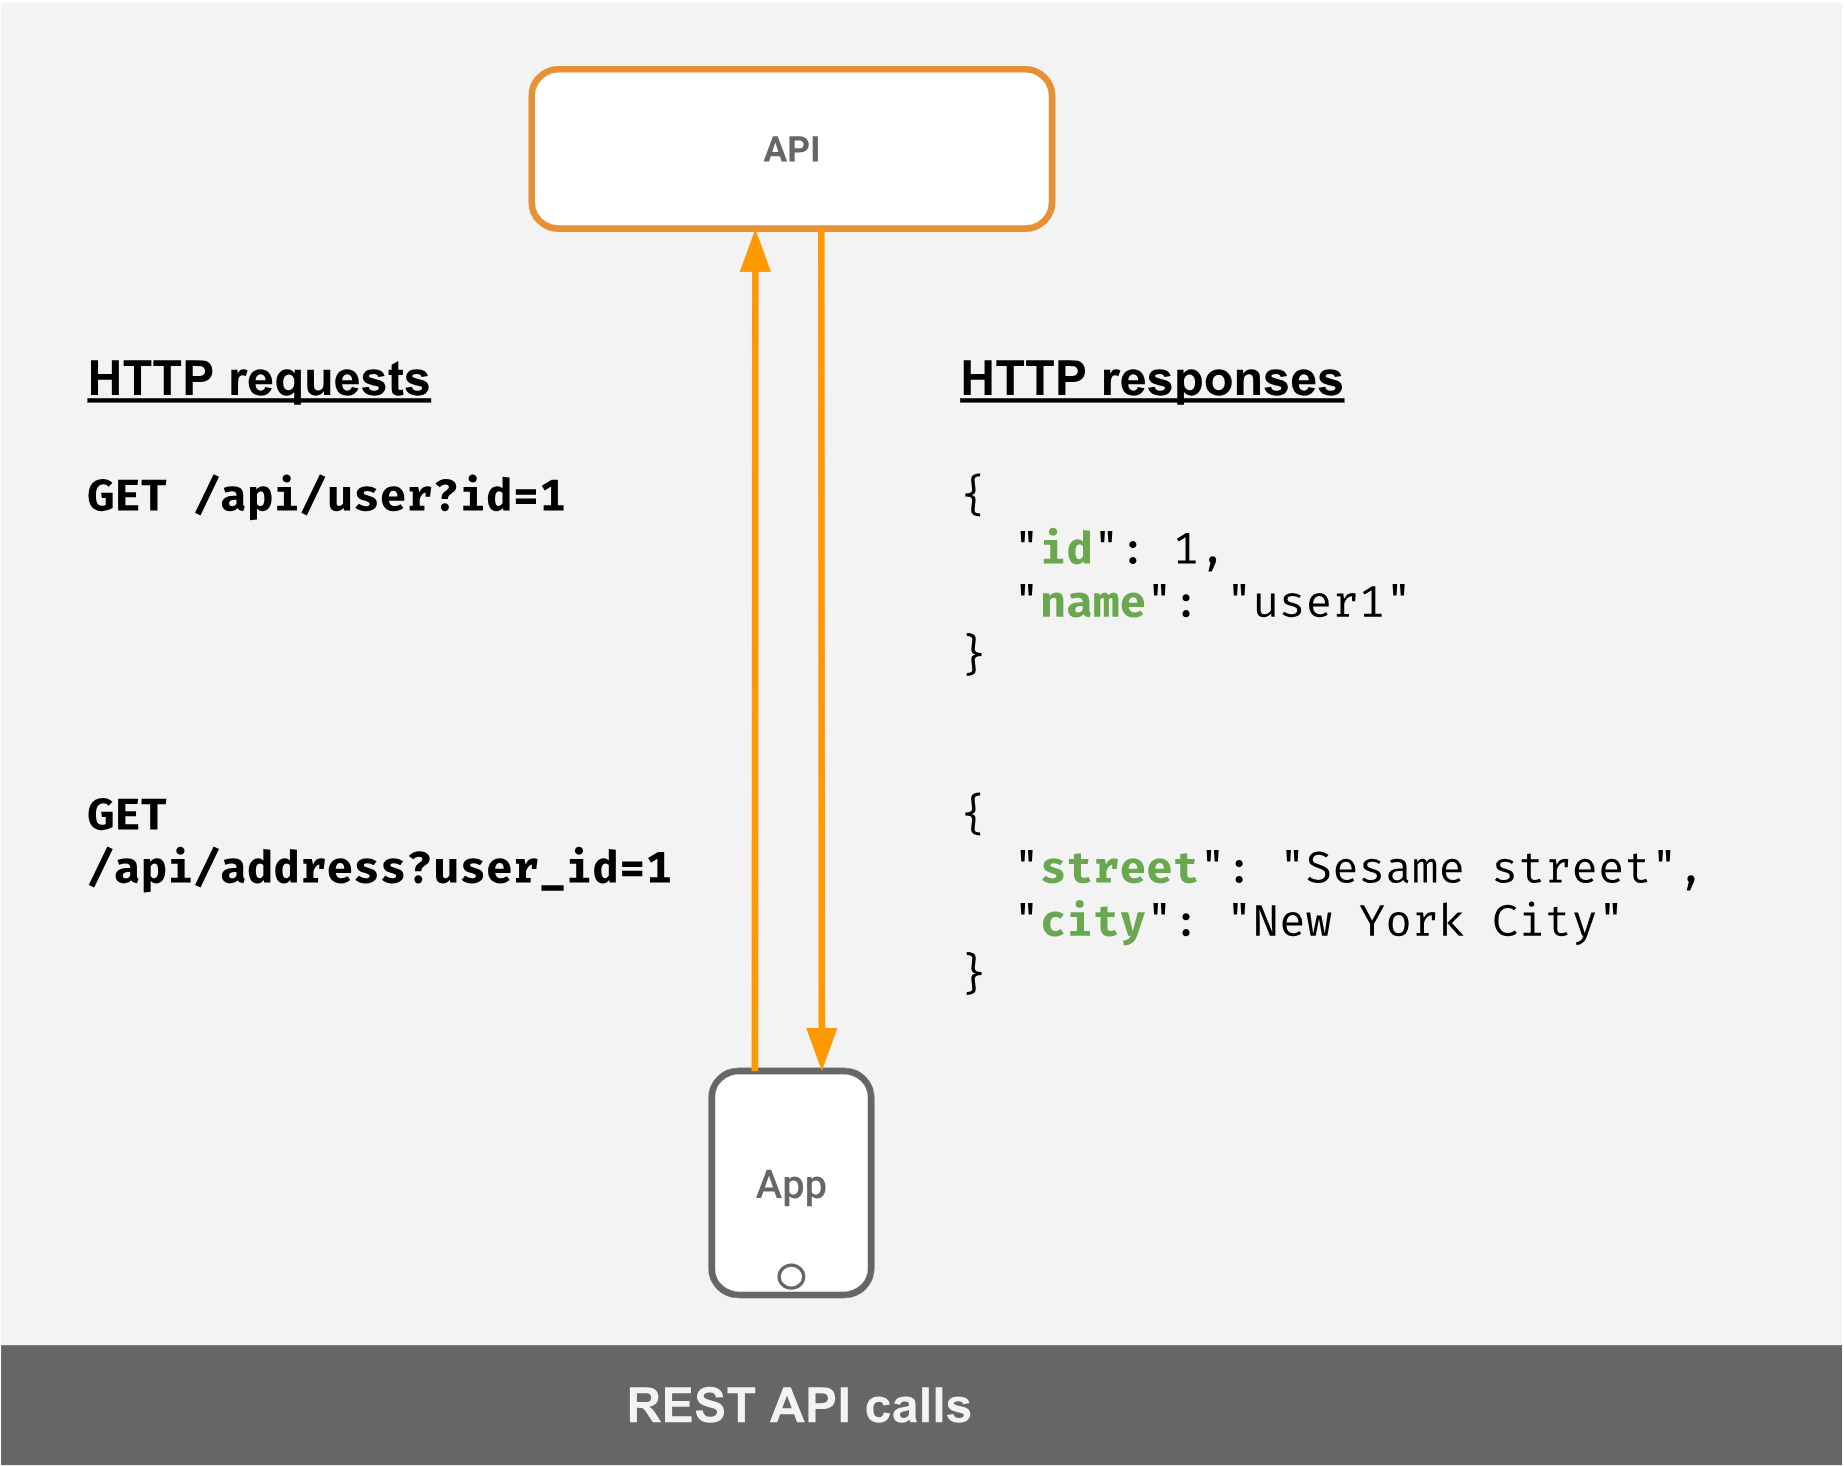
If your API server was a GraphQL server instead, this is what your API calls would look like:
You can see that the response JSON is different for different "queries" sent by the client.
Request1:         |  Response1:
query {           |  {
  user (id: 1) {  |    "user": {
    id            |       "id": 1
  }               |     }
}                 |  }
----------------------------------------
Request2:         |   Response2:
query {           |   {
  user (id: 1) {  |     "user": {
    id            |       "id": 1
    name          |       "name": "Elmo"
  }               |     }
}                 |   }
We're changing the way we think about API calls. Instead of making different API calls to different URLs to fetch data, we're making ad-hoc queries to a "single URL endpoint" that returns data based on the query.
- Instead of 'GET'ing a resource you 'POST' a query that describes what data you want.
- You think of the data your API returns as a "graph", this allows you to make queries to fetch "related" pieces of data in a single shot. In the example above, you fetch the user and the user's address (as a nested JSON object) in the same API call, as opposed to making 2 API calls.
- The "query" you send as data in the POST request has a structure and a syntax. This "language" is called GraphQL.
As you can see in the example above, GraphQL queries look very neat and easy to read! This is because the query is the "shape" of the final JSON data you desire. This is one of the key-reasons that makes GraphQL a joy to work with!
- Avoid over-fetching: You avoid fetching more data than you need because you can specify the exact fields you need.
- Prevent multiple API calls: In case you need more data, you can also avoid making multiple calls to your API. In the case above, you don't need to make 2 API calls to fetch
userandaddressseparately. - Lesser communication with API developers: Sometimes to fetch the exact data you need, especially if you need to fetch more data and want to avoid multiple API calls, you will need to ask your API developers to build a new API. With GraphQL, your work is independent of the API team! This allows you to work faster on your app.
- Self-documenting: Every GraphQL API conforms to a "schema" which is the graph data model and what kinds of queries a client can make. This allows the community to build lots of cool tools to explore & visualise your API or create IDE plugins that autocomplete your GraphQL queries and even do "codegen". We'll understand this in more detail later!
Here's a quick chart to show you the GraphQL analogs of typical REST-ish terms:
Requirement	                REST	            GraphQL
Fetching data objects	    GET	                query
Writing data	            POST	            mutation
Updating/deleting data	    PUT/PATCH/DELETE	mutation
Watching/subscribing to data	                subscription
Before going further in understanding GraphQL, it's useful to get a sense of how GraphQL is actually used in an HTTP client (typically a web/mobile app).
Check out the diagram below, to get a sense of how GraphQL is typically used in your stack:

- Note that the GraphQL query is not really JSON; it looks like the shape of the JSON you want. So when we make a 'POST' request to send our GraphQL query to the server, it is sent as a "string" by the client.
- The server gets the JSON object and extracts the query string. As per the GraphQL syntax and the graph data model (GraphQL schema), the server processes and validates the GraphQL query.
- Just like a typical API server, the GraphQL API server then makes calls to a database or other services to fetch the data that the client requested.
- The server then takes the data and returns it to the client in a JSON object.
In your day to day work, you don't actually need to worry about the underlying HTTP requests & responses.
Just like when you work with a REST API and use a HTTP client to reduce the boilerplate in making API calls and handling responses, you can choose a GraphQL client to make writing GraphQL queries, sending them and handling responses much easier.
In fact, the mechanism of how you send the GraphQL query and accept the GraphQL response has become standard. This makes working with GraphQL very easy on the client.
Here's what a typical GraphQL client setup and making a query would look like:
// Setup a GraphQL client to use the endpoint
const client = new client("https://myapi.com/graphql");
// Now, send your query as a string (Note that ` is used to create a multi-line
// string in javascript).
client.query(`
  query {
    user {
      id
      name
    }
}`);For this tutorial we've set up a GraphQL API for you. The most common way to browse a GraphQL API is to use GraphiQL. GraphiQL is a tool built by Facebook, (pronounced "graphical") that makes it easy to explore any GraphQL API.
When you connect GraphiQL to a GraphQL endpoint, it queries the server for its GraphQL schema and gives you a UI to browse and test queries, and that powers its amazing autocomplete!
Tools like GraphiQL make GraphQL APIs really easy to use and integrate APIs in your app without requiring external documentation tools.
You can access the GraphiQL for this realtime todo app tutorial here: hasura.io/learn/graphql/graphiql
When you work with a GraphQL API in a project you will almost always use a tool like GraphiQL to explore and test your GraphQL queries.
- Open GraphiQL at https://hasura.io/learn/graphql/graphiql. You'll have to login to get an auth token to query the API. In a real-world scenario your GraphQL APIs will be protected.
- You'll see a URL, and headers that contain the auth token that will be sent along with your GraphQL query.
- Now, paste this GraphQL query in the GraphiQL window:
query {
  users {
    name
  }
}- Hit ctrl + enter or cmd + enter (mac) or click on the
▶️ icon to run the GraphQL query - On the right, you should see a list of users by their names that are in the system!
Recall that there is no magic here! The hosted GraphiQL app is sending a GraphQL query string to the server at the given endpoint with the HTTP headers. The server then sends the response that you see on the right hand side.
Our todo app has users, todos and information about users that are currently online. This is what our API "schema" looks like:
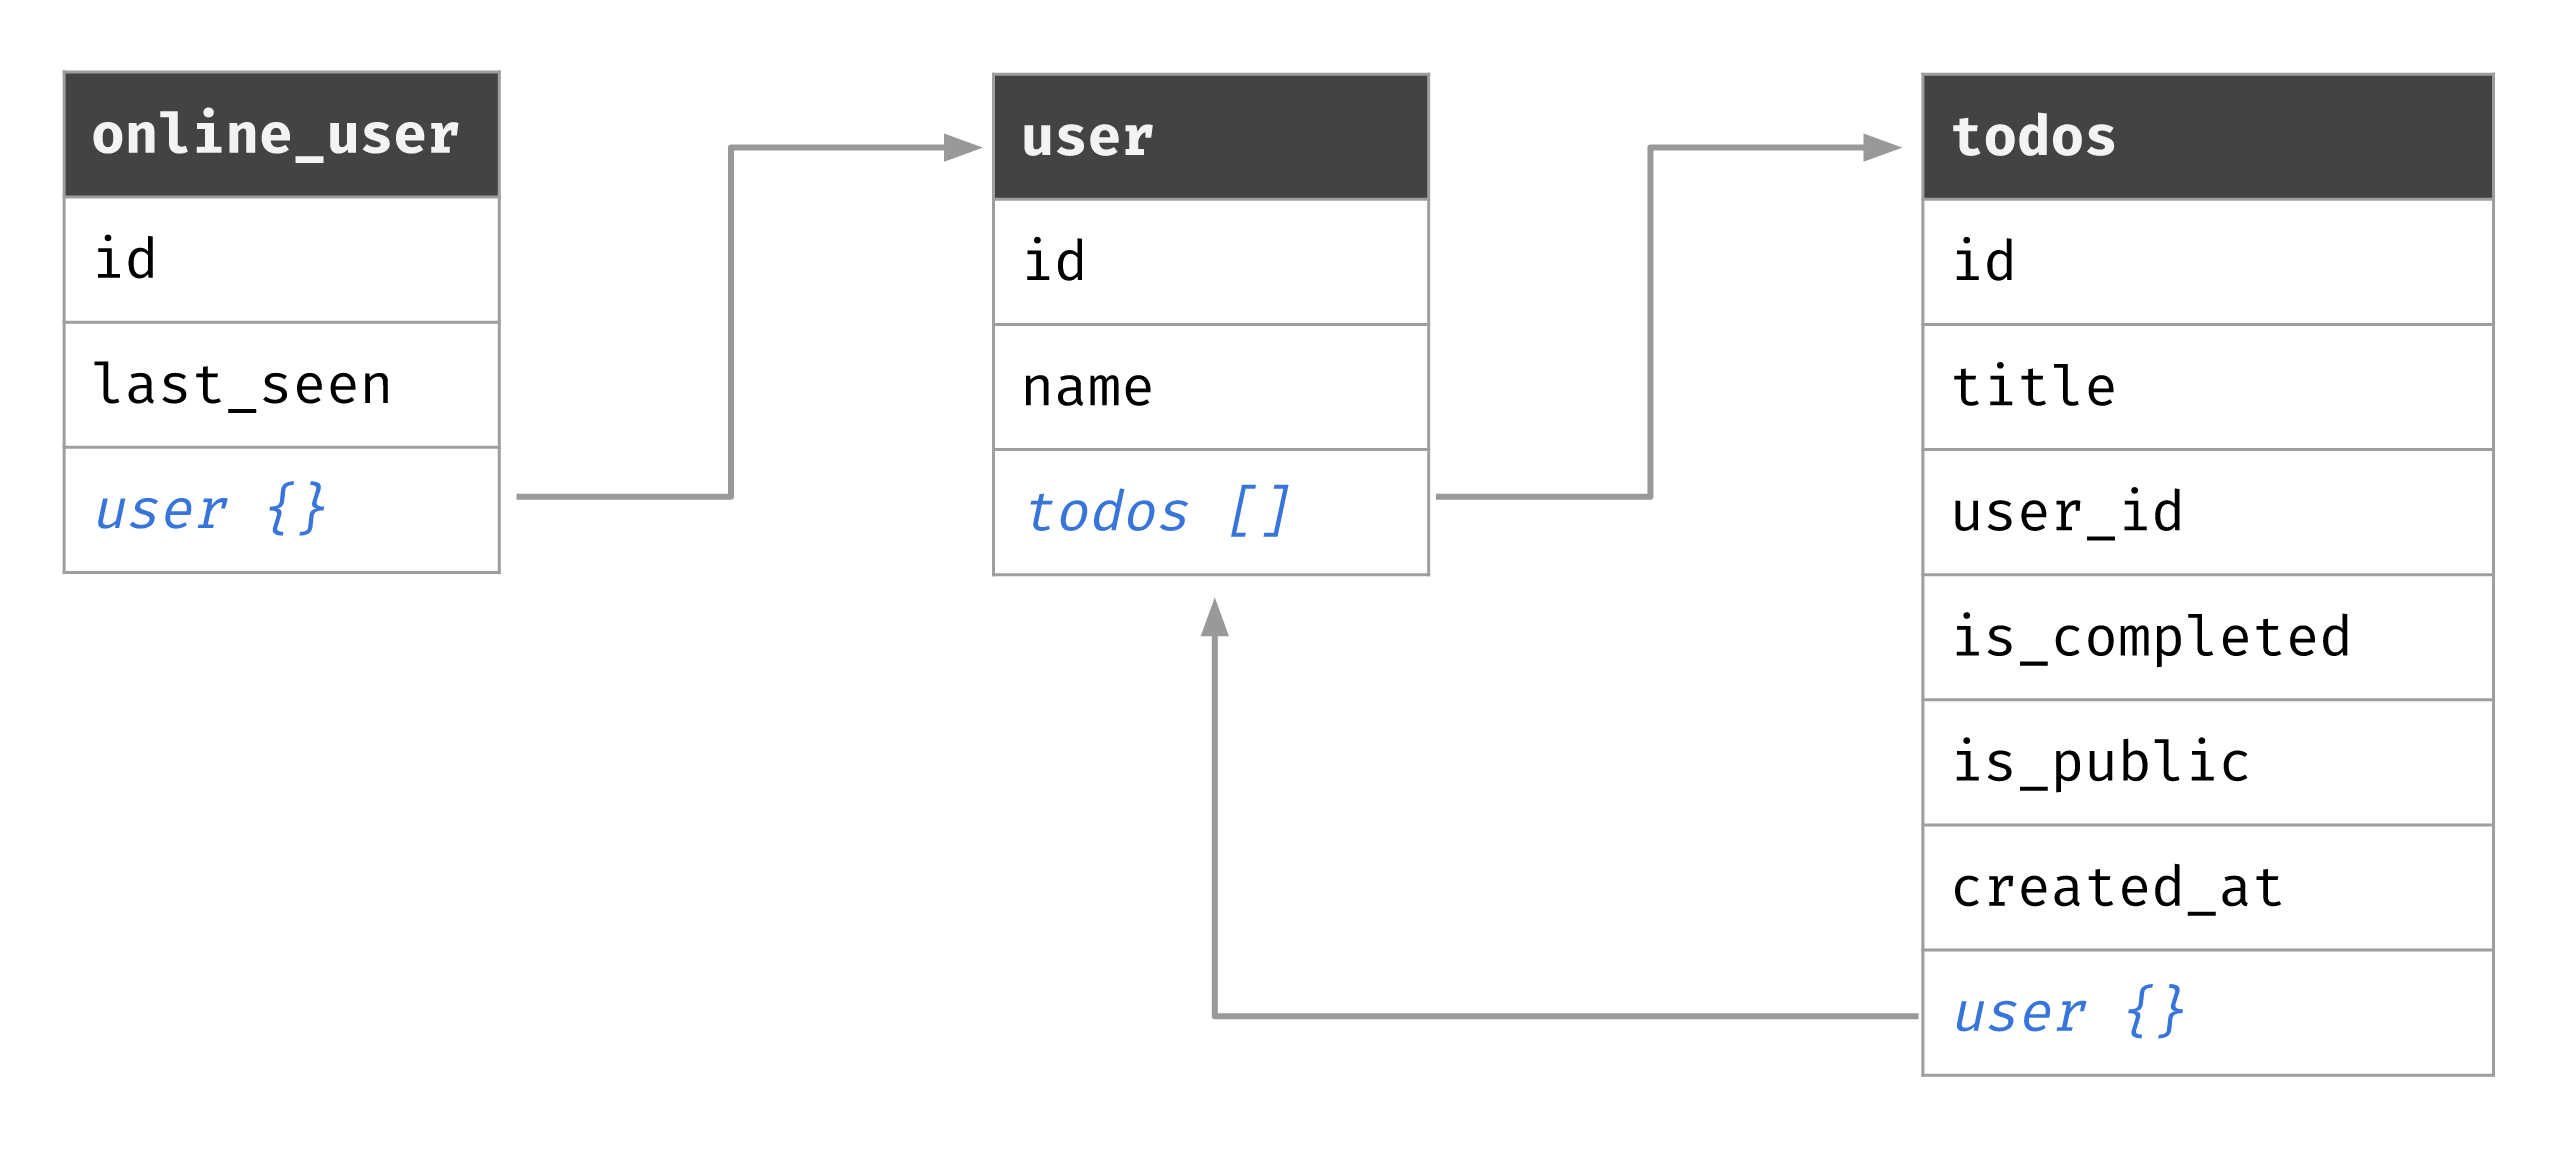
As you can see, it is a "graph" like schema where all the 3 models are linked to each other.
Let's try making queries that fetch different slices of our data from the overall "graph".
This GraphQL query will fetch all the users and their publicly visible todos:
query {
  users {
    name
    todos {
      title
    }
  }
}This GraphQL query will fetch all the currently online users and their profile information (which is just their name for now):
query {
  online_users {
    last_seen
    user {
      name
    }
  }
}In most API calls, you usually use parameters. For example, to specify what data you're fetching. If you're familiar with making GET calls, you would have used a query parameter. For example, to fetch only 10 todos you might have made this API call: GET /api/todos?limit=10.
The GraphQL query analog of this is arguments that you can attach to a "field".
This GraphQL query will fetch 10 todos and not all of them.
query {
  todos(limit: 10) {
    id
    title
  }
}
The most important bit to check here is limit: 10. GraphQL servers will provide a list of arguments that can be used in () next to specific fields. In our case, we are using Hasura for creating the GraphQL backend which provides filter, sort and pagination arguments. The GraphQL server or API that you use, might provide a different set of arguments that can be used.
query {
  users(limit: 1) {
    id
    name
    todos(order_by: { created_at: desc }, limit: 5) {
      id
      title
    }
  }
}
Notice that we are passing arguments to different fields. This GraphQL query reads as:
Fetch users (with limit 1), and their todos (ordered by descending creation time, and limited to 5).
This is great, but we still have a problem. If we want to create a query where we are fetching data with arguments that are provided dynamically, we'd have to create the entire query string again.
This is what we don't want to do:
var limit = getMaxTodosFromUserInput();
var query = "query { todos (limit: " + limit.toString() + ") {id title} }";
Thankfully, we don't ever have to do this! GraphQL variables are extra variables that you can send in a query so that the "arguments" can be provided dynamically!
This is what our GraphQL query would look like:
query($limit: Int!) {
  todos(limit: $limit) {
    id
    title
  }
}
In addition to the query above, we send a variables object:
{
   "limit": 10
}
Now instead of sending just the query to the GraphQL server, from our client we'll send both the query and the variables. The GraphQL server will use the variable in the right place in the query automatically for us!
Let's try this out in GraphiQL:
- Head to GraphiQL
- Write out this query
- Scroll to the bottom of the page, where you see a smaller panel "Query Variables"
- Add the query variable as a JSON object
- You can now make GraphQL queries
- You know how to pass arguments to your GraphQL queries
- You know how to make your arguments dynamic by using query variables
Next, let's look at writing data and not just fetching data!
These are the concepts you should know before you attack mutations (haha):
Now, let's get started with seeing how we can use GraphQL to "write" data. GraphQL mutations are types of GraphQL queries that may result in the state of your backend "mutating" or changing, just like typical 'POST', 'PUT', 'PATCH', 'DELETE' APIs.
Since we're using Hasura for our GraphQL API, we get mutations for inserts, updates or deletes that we can use in our app.
Let's try these mutations out in the context of a todo app to see what mutations look like. Mutations that you get from another GraphQL service, say if your API team has built their own, might be different.
Let's make an API call to create a todo. As you would have guessed, this will be a critical portion of our todo app. 😉
Protip: Now let's say we don't know what the name of the mutation to create a todo. GraphiQL to the rescue! Head to GraphiQL and on the right, click on the "docs" tab. Type "todo" there and you'll see a list of GraphQL queries and types that use todo. Read through their descriptions and you'll soon find that
insert_todosis what you need.
mutation {
  insert_todos(objects: [{ title: "new todo" }]) {
    returning {
      id
    }
  }
}Notice that the data of the todo that is to be inserted is sent as an argument to the insert_todos mutation. But the "fields" of the mutation specify the shape of the response that you want from the server.
Let's say we'd like to get the entire todo object once it's been created as a response:
mutation {
  insert_todos(objects: [{ title: "new todo" }]) {
    returning {
      id
      title
      is_completed
      is_public
      created_at
    }
  }
}For mutations, we would almost always have to parameterise the arguments! We would rarely, if ever, have a "hardcoded" mutation in our app. This is because the arguments of what data to capture, how to modify or delete something is usually dependent on some user action.
Now that we know how to parameterise using query variables, let's use that:
# The parameterised GraphQL mutation
mutation($todo: todos_insert_input!) {
  insert_todos(objects: [$todo]) {
    returning {
      id
    }
  }
}
# As a query variable
{
"todo": {
"title": "A new dynamic todo"
}
}We'll explore more mutations to update or delete data a little later. This is a good start to grokking mutations!
- You can make basic GraphQL mutations
- You can pass dynamic arguments/data to mutations with query variables
Next, let's look at GraphQL subscriptions
The GraphQL specification allows for something called subscriptions that are like GraphQL queries but instead of returning data in one read, you get data pushed from the server.
This is useful for your app to subscribe to "events" or "live results" from the backend, but while allowing you to control the "shape" of the event from your app.
GraphQL subscriptions are a critical component of adding realtime or reactive features to your apps easily. GraphQL clients and servers that support subscriptions are great because they allow you to build great experiences without having to deal with websocket code!
Step 1: Head to https://hasura.io/learn/graphql/graphiql
Step 2: Write this GraphQL query in the textarea:
subscription {
  online_users {
    id
    last_seen
    user {
      name
    }
  }
}
Step 3: Click on the play button.
Every time the set of online users change, you'll see the latest set on the response window on the right.
GraphQL queries and mutations are strings sent to a POST endpoint. What is a GraphQL subscription? That can't happen over a POST endpoint, because a simple HTTP endpoint would just return the response and the connection would close.
A GraphQL subscription is a subscription query string sent to a websocket endpoint. And whenever data changes on the backend, new data is pushed over websockets from the server to the client.
- You know how to make GraphQL subscriptions
Now that you're comfortable with the basics of using GraphQL, let's start integrating GraphQL APIs with an app!
The first step in the tutorial is to setup the backend with Hasura and create the necessary data models.
Let's start by deploying Hasura.
The fastest way to try Hasura out is via Heroku.
Click here to deploy GraphQL Engine on Heroku with the free Postgres add-on
This will deploy Hasura GraphQL Engine on Heroku. A PostgreSQL database will be automatically provisioned along with Hasura. If you don’t have an account on Heroku, you would be required to sign up. Note: It is free to signup and no credit-card is required.
Type in the app name (e.g. explore-hasura-apollo-nextjs for this guide), select the region of choice and click on Deploy app button.
Once the app has been deployed, you can visit it at https://explore-hasura-apollo-nextjs.herokuapp.com/console - where explore-hasura-apollo-nextjs is replaced with the app name you provided in the step above.
Let's get started by creating the tables and relationships for the Realtime todo app.
Download the hasura project with migrations from here
First, let's make sure that we have installed our dependencies for this project:
$ npm installConfigure the endpoint to point to the heroku app URL. Open the hasura/config.yaml file and set the endpoint value:
endpoint: https://explore-hasura-apollo-nextjs.herokuapp.comNow let's apply the migrations:
$ cd hasura/
$ npx hasura migrate apply
This will create the tables and relationships for the slack app.
Great! Now navigate to the heroku app - https://explore-hasura-apollo-nextjs.herokuapp.com for my example - to access the Hasura console.
- Navigate to the Auth0 Dashboard
- Signup / Login to the account
- Create a new tenant.
- Click on the
Applicationsmenu option on the left and then click the+ Create Applicationbutton. - In the Create Application window, set a name for your application and select
Single Page Web Applications. (Assuming the frontend app will be an SPA built on react/vue etc) - In the
settingsof the application, we will add appropriate (e.g: http://localhost:3000/callback) URLs asAllowed Callback URLsandAllowed Web Origins. We can also add domain specific URLs as well for the app to work. (e.g: https://myapp.com/callback).
This would be the URL of the frontend app which you will deploy later. You can ignore this, for now. You can always come back later and add the necessary URLs.
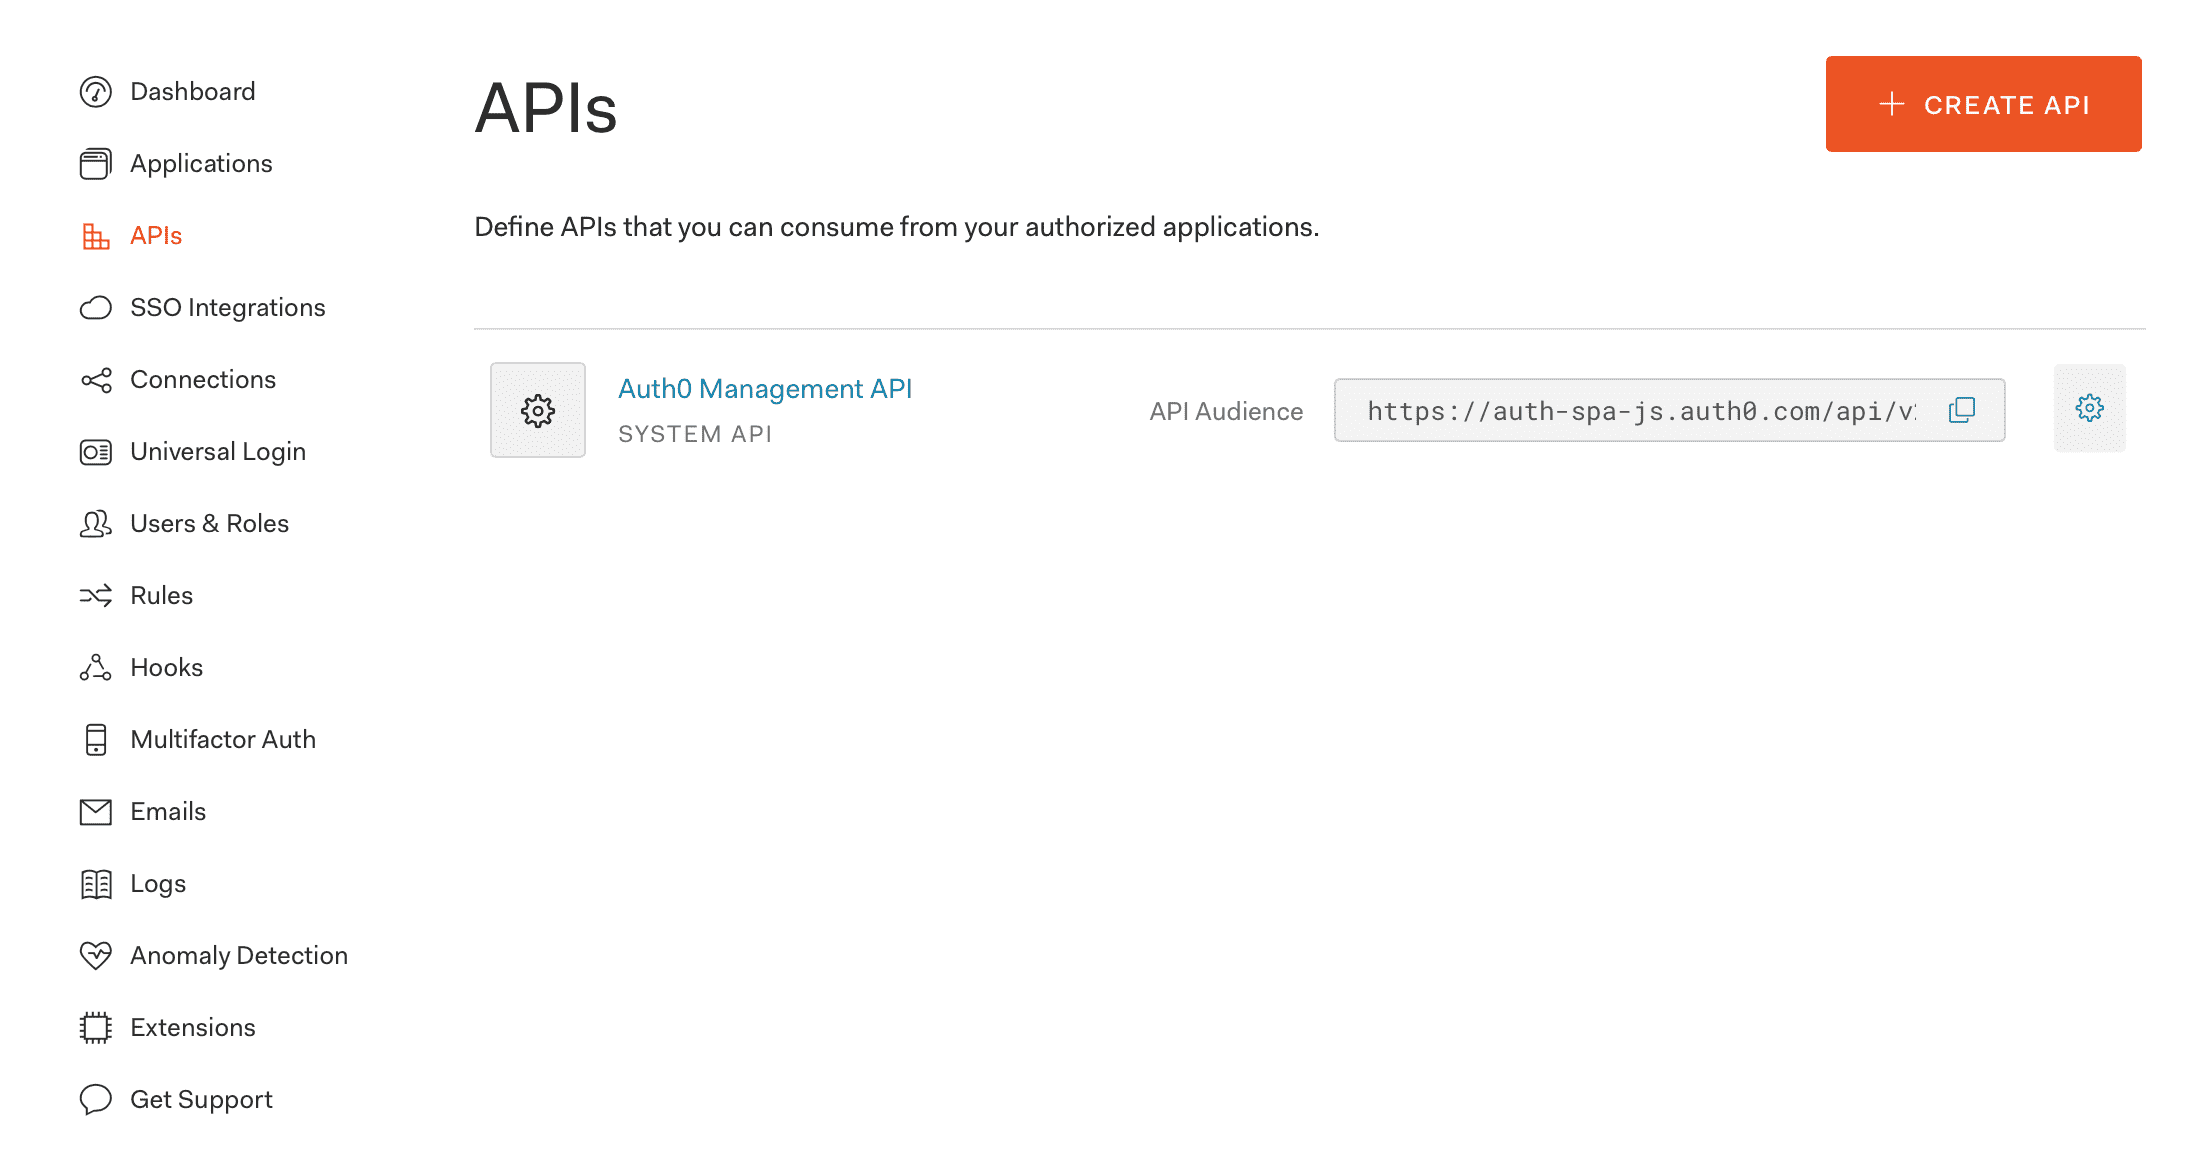
We need to create an API on Auth0 so that we can make the accessToken a valid JWT.
Now in the pop-up that appears, give the name of the API and the identifier. We can technically give any value.
Let's say the name is hasura and the identifier is https://hasura.io/learn.
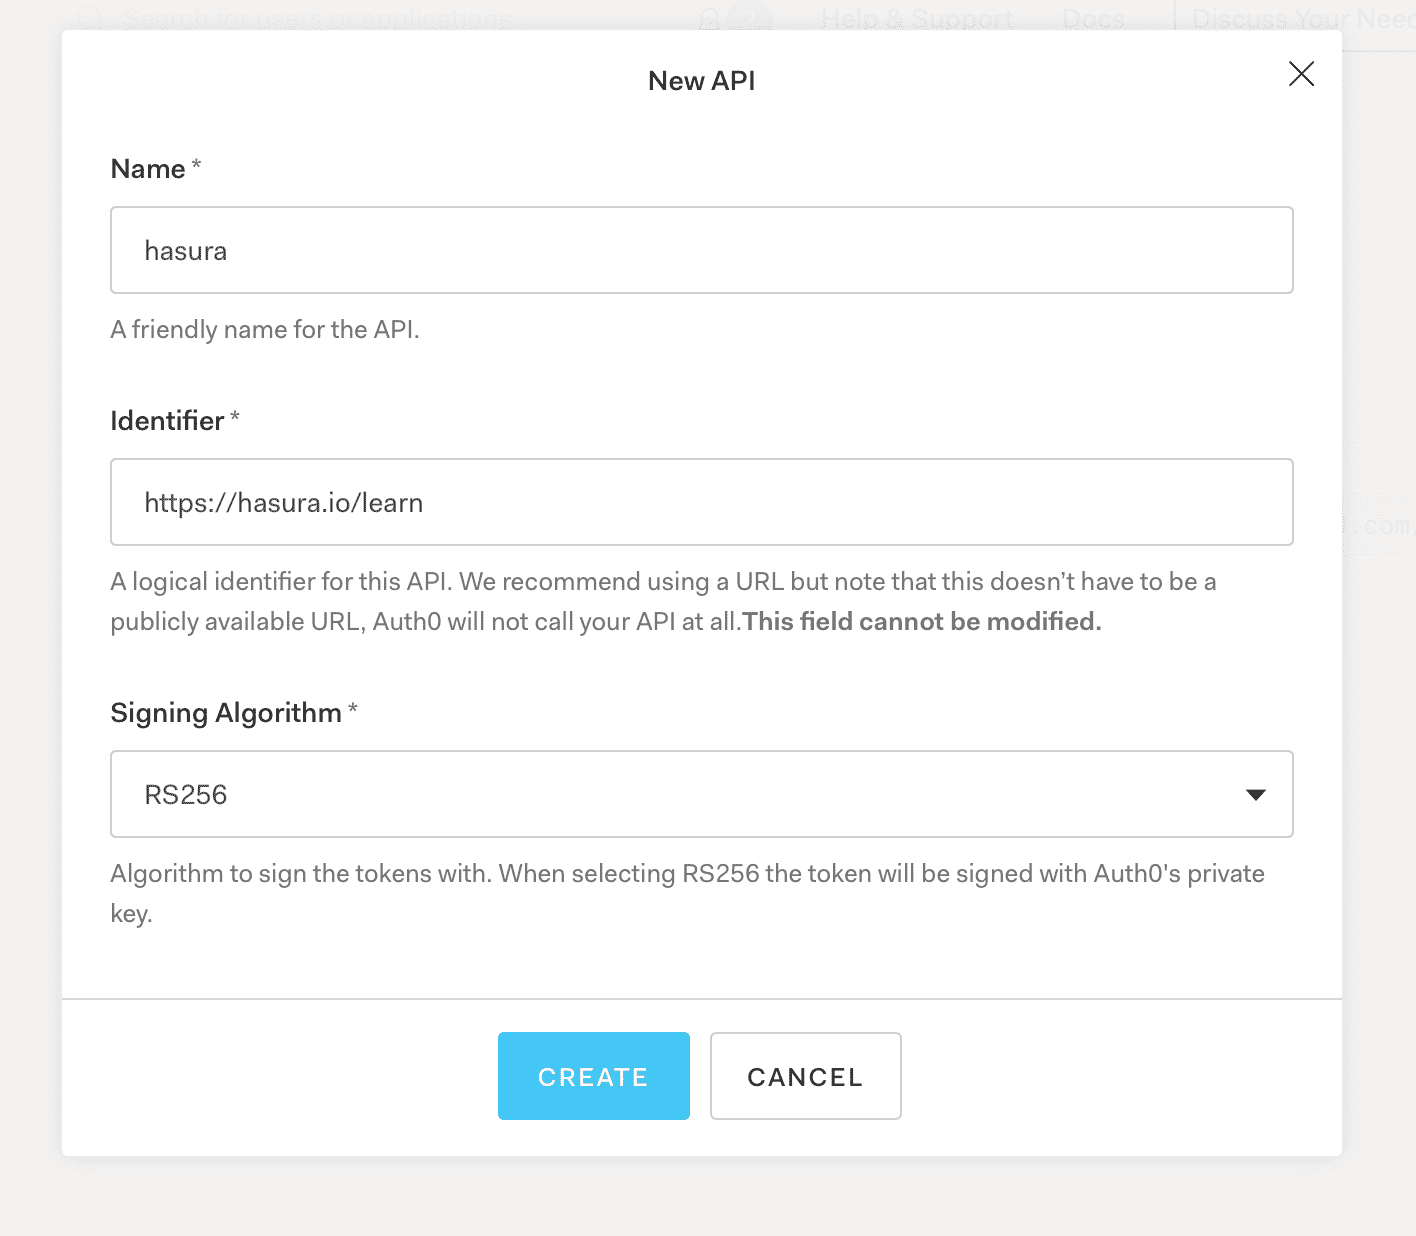
We can let the signing algorithm to be as it is. (RS256)
Click on Create once you are done.
Custom claims inside the JWT are used to tell Hasura about the role of the caller, so that Hasura may enforce the necessary authorization rules to decide what the caller can and cannot do. In the Auth0 dashboard, navigate to Rules.
Add the following rule to add our custom JWT claims under hasura-jwt-claim:
function (user, context, callback) {
  const namespace = "https://hasura.io/jwt/claims";

  context.accessToken[namespace] =
    {
      'x-hasura-default-role': 'user',
      // do some custom logic to decide allowed roles
      'x-hasura-allowed-roles': ['user'],
      'x-hasura-user-id': user.user_id
    };
  callback(null, user, context);
}In this part, you will learn how to connect Hasura with the Auth0 application that you just created in the previous step.
We need to configure Hasura to use the Auth0 public keys. An easier way to generate the config for JWT is:
- Click on the following link - https://hasura.io/jwt-config
- For
Select ProviderchooseAuth0 - Enter
Auth0 Domain Name(e.g.demo-explore-hasura-apollo-nextjs.us.auth0.com) - Click
Generate Config
The generated configuration can be used as the value for environment variable HASURA_GRAPHQL_JWT_SECRET.
Since we have deployed Hasura GraphQL Engine on Heroku, let's head to Heroku dashboard to configure the admin secret and JWT secret.
Open the "Settings" page for your Heroku app, add a new Config Var called HASURA_GRAPHQL_JWT_SECRET, and copy and paste the generate JWT configuration into the value box.
Next, create a new Config Var called HASURA_GRAPHQL_ADMIN_SECRET and enter a secret key to protect the GraphQL endpoint. (Imagine this as the password to your GraphQL server).
Great! Now your Hasura GraphQL Engine is secured using Auth0.
Auth0 has rules that can be set up to be called on every login request. We need to set up a rule in Auth0 which allows the users of Auth0 to be in sync with the users in our database. The following code snippet allows us to do the same. Again using the Rules feature, create a new blank rule upsert-user and paste in the following code snippet:
function (user, context, callback) {
  const userId = user.user_id;
  const nickname = user.nickname;

  // Modify with your Hasura admin secret and URL to the application
  const admin_secret = "demo";
  const url = "https://explore-hasura-apollo-nextjs.herokuapp.com/v1/graphql";

  // Define your GraphQL mutation and query variables object
  const query = `mutation($userId: String!, $nickname: String) {
    insert_users(objects: [{
      id: $userId, name: $nickname
    }], on_conflict: {constraint: users_pkey, update_columns: [last_seen, name]}
    ) {
      affected_rows
    }
  }`;
  const variables = { "userId": userId, "nickname": nickname };

  request.post({
      url: url,
      headers: {'content-type' : 'application/json', 'x-hasura-admin-secret': admin_secret},
      body: JSON.stringify({
        query: query,
        variables: variables
      })
  }, function(error, response, body){
       console.log(body);
       callback(null, user, context);
  });
}
Note: Modify x-hasura-admin-secret and url parameters appropriately according to your app. Here we are making a simple request to make a mutation into users table.
That’s it! This rule will now be triggered on every successful signup or login, and we insert or update the user data into our database using a Hasura GraphQL mutation.
The above request performs a mutation on the users table with the id and name values.
For this tutorial, the GraphQL backend and the basic app UI is already ready. Our task will be to convert the "static" UI into a working realtime app in Next.js
- Download the boilerplate from https://hasura.io/learn/graphql/nextjs-fullstack-serverless/boilerplate.zip
- Unzip and make sure you're in the app-boilerplate directory
- Install dependencies and run the "static" app
yarn installORnpm installyarn devORnpm run dev
Copy the .env.example to .env and configure the values for Auth0.
The AUTH0_CLIENT_ID, AUTH0_DOMAIN, AUTH0_CLIENT_SECRET are available in your Auth0 application settings and SESSION_COOKIE_SECRET can be any random string of at least 32 characters and it is used to encrypt the cookie.
DOMAIN=http://localhost:3000
# Auth0 API
AUTH0_AUDIENCE=
# Auth0 Application
AUTH0_CLIENT_ID=
AUTH0_DOMAIN=
AUTH0_CLIENT_SECRET=
REDIRECT_URI=http://localhost:3000/api/callback
POST_LOGOUT_REDIRECT_URI=http://localhost:3000/
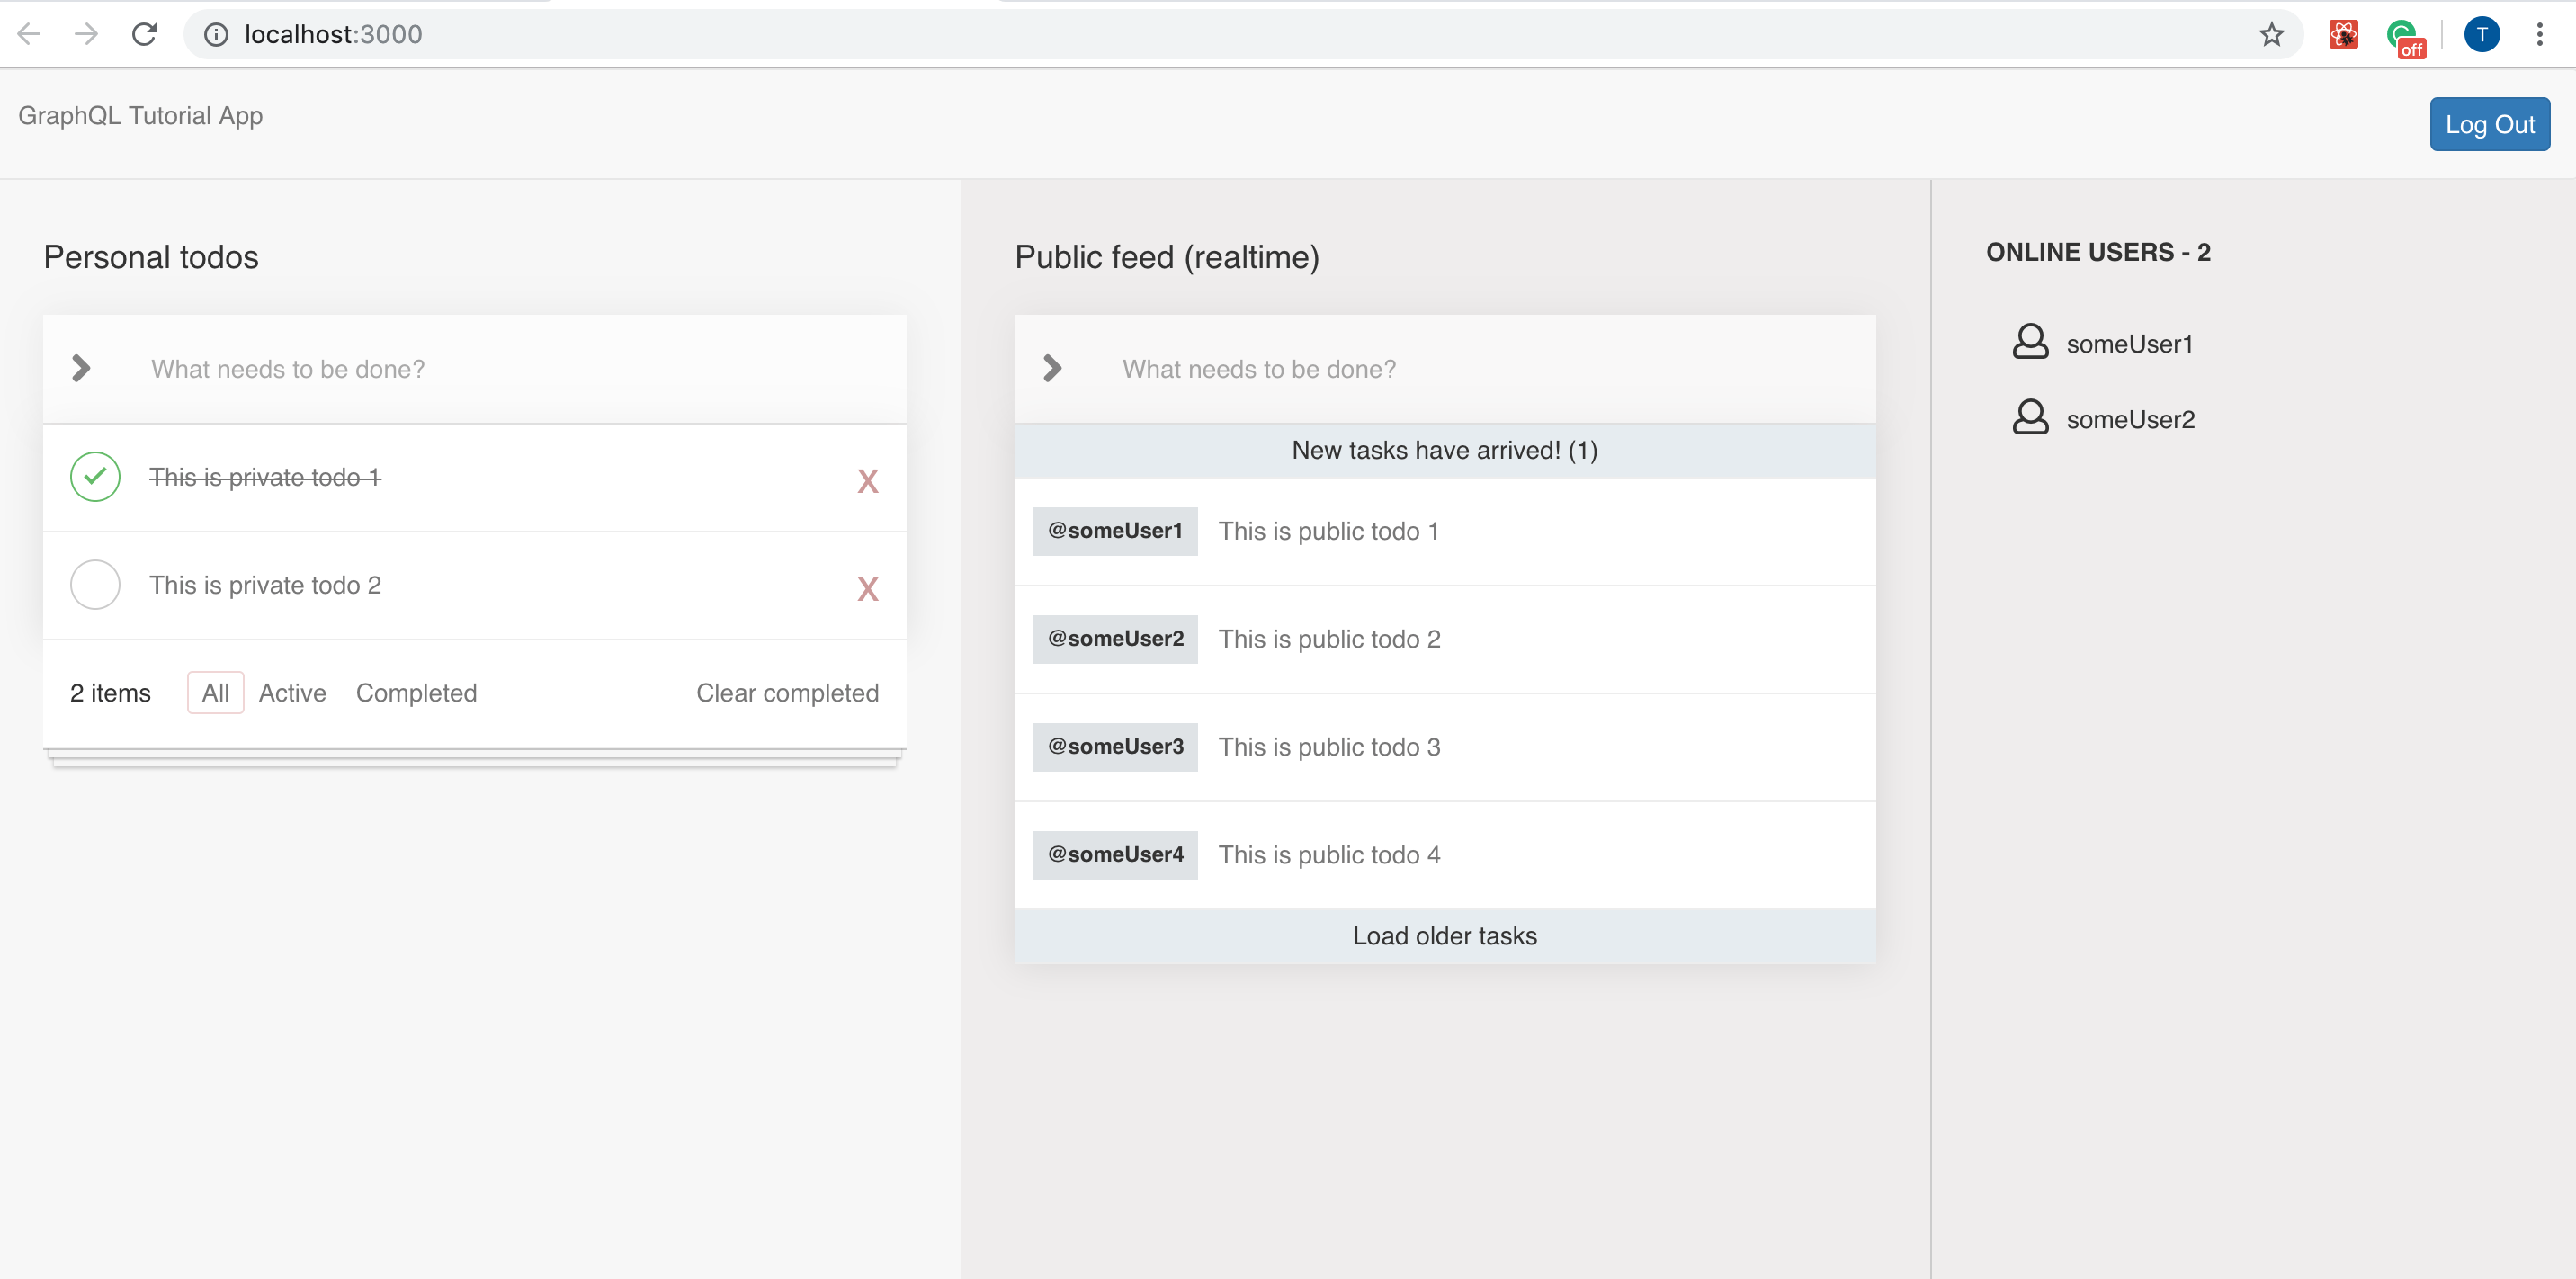
SESSION_COOKIE_SECRET=BXyv4qDtBKYxJtLopfY7nj75sJg3p2KaThis is what you should see after the steps above:
Apollo gives a neat abstraction layer and an interface to your GraphQL server. You don't need to worry about constructing your queries with request body, headers and options, that you might have done with axios or fetch say. You can directly write queries and mutations in GraphQL and they will automatically be sent to your server via your apollo client instance.
Let's get started by installing apollo client & peer graphql dependencies:
# Make sure you are in the app-boilerplate directory
$ npm i apollo-boost @apollo/react-hooks graphql apollo-link-ws subscriptions-transport-wsNow let's look at creating the Apollo Client Instance for the app. apollo-boost would have installed various dependencies that are used here.
Open lib/apolloClient.js and write the following code:
import fetch from "isomorphic-unfetch";
import { ApolloClient } from "apollo-client";
import { InMemoryCache } from "apollo-cache-inmemory";
import { HttpLink } from "apollo-link-http";
import { onError } from "apollo-link-error";
import { WebSocketLink } from "apollo-link-ws";
import { SubscriptionClient } from "subscriptions-transport-ws";
import auth0 from "./auth0";
let accessToken = null;
const requestAccessToken = async () => {
  if (accessToken) return;
  const res = await fetch(`${process.env.APP_HOST}/api/session`);
  if (res.ok) {
    const json = await res.json();
    accessToken = json.accessToken;
  } else {
    accessToken = "public";
  }
};
// remove cached token on 401 from the server
const resetTokenLink = onError(({ networkError }) => {
  if (
    networkError &&
    networkError.name === "ServerError" &&
    networkError.statusCode === 401
  ) {
    accessToken = null;
  }
});
const createHttpLink = (headers) => {
  const httpLink = new HttpLink({
    uri: "https://explore-hasura-apollo-nextjs.herokuapp.com/v1/graphql",
    credentials: "include",
    headers, // auth token is fetched on the server side
    fetch,
  });
  return httpLink;
};
const createWSLink = () => {
  return new WebSocketLink(
    new SubscriptionClient(
      "wss://explore-hasura-apollo-nextjs.herokuapp.com/v1/graphql",
      {
        lazy: true,
        reconnect: true,
        connectionParams: async () => {
          await requestAccessToken(); // happens on the client
          return {
            headers: {
              authorization: accessToken ? `Bearer ${accessToken}` : "",
            },
          };
        },
      }
    )
  );
};
export default function createApolloClient(initialState, headers) {
  const ssrMode = typeof window === "undefined";
  let link;
  if (ssrMode) {
    link = createHttpLink(headers); // executed on server
  } else {
    link = createWSLink(); // executed on client
  }
  return new ApolloClient({
    ssrMode,
    link,
    cache: new InMemoryCache().restore(initialState),
  });
}
Let's try to understand what is happening here.
We are creating an HttpLink to connect ApolloClient with the GraphQL server. As you know already, our GraphQL server is running on Heroku. So don't forget to change the uri to match your Hasura instance in Heroku.
At the end, we instantiate ApolloClient by passing in our HttpLink and a new instance of InMemoryCache (recommended caching solution). We are wrapping all of this in a function which will return the client. We are also determining the ssrMode and passing it to Apollo.
We are creating WebSocketLink to be used on the client side. The Authorization headers will be generated by making a request to Auth0 API from the client.
Next let's create the HOC withApollo that we will use inside our Next.js page to wrap our page component.
Open lib/withApollo.js and add the following code:
import React from "react";
import App from "next/app";
import Head from "next/head";
import { ApolloProvider } from "@apollo/react-hooks";
import createApolloClient from "./apolloClient";
import auth0 from "./auth0";
// On the client, we store the Apollo Client in the following variable.
// This prevents the client from reinitializing between page transitions.
let globalApolloClient = null;
/**
 * Installs the Apollo Client on NextPageContext
 * or NextAppContext. Useful if you want to use apolloClient
 * inside getStaticProps, getStaticPaths or getServerSideProps
 * @param {NextPageContext | NextAppContext} ctx
 */
export const initOnContext = (ctx) => {
  const inAppContext = Boolean(ctx.ctx);
  // We consider installing `withApollo({ ssr: true })` on global App level
  // as antipattern since it disables project wide Automatic Static Optimization.
  if (process.env.NODE_ENV === "development") {
    if (inAppContext) {
      console.warn(
        "Warning: You have opted-out of Automatic Static Optimization due to `withApollo` in `pages/_app`.\n" +
          "Read more: https://err.sh/next.js/opt-out-auto-static-optimization\n"
      );
    }
  }
  // Initialize ApolloClient if not already done
  const apolloClient =
    ctx.apolloClient ||
    initApolloClient(ctx.apolloState || {}, inAppContext ? ctx.ctx : ctx);
  // We send the Apollo Client as a prop to the component to avoid calling initApollo() twice in the server.
  // Otherwise, the component would have to call initApollo() again but this
  // time without the context. Once that happens, the following code will make sure we send
  // the prop as `null` to the browser.
  apolloClient.toJSON = () => null;
  // Add apolloClient to NextPageContext & NextAppContext.
  // This allows us to consume the apolloClient inside our
  // custom `getInitialProps({ apolloClient })`.
  ctx.apolloClient = apolloClient;
  if (inAppContext) {
    ctx.ctx.apolloClient = apolloClient;
  }
  return ctx;
};
async function getHeaders(ctx) {
  if (typeof window !== "undefined") return null;
  if (typeof ctx.req === "undefined") return null;
  const s = await auth0.getSession(ctx.req);
  if (s && s.accessToken == null) return null;
  return {
    authorization: `Bearer ${s ? s.accessToken : ""}`,
  };
}
/**
 * Always creates a new apollo client on the server
 * Creates or reuses apollo client in the browser.
 * @param  {NormalizedCacheObject} initialState
 * @param  {NextPageContext} ctx
 */
const initApolloClient = (initialState, headers) => {
  // Make sure to create a new client for every server-side request so that data
  // isn't shared between connections (which would be bad)
  if (typeof window === "undefined") {
    return createApolloClient(initialState, headers);
  }
  // Reuse client on the client-side
  if (!globalApolloClient) {
    globalApolloClient = createApolloClient(initialState, headers);
  }
  return globalApolloClient;
};
/**
 * Creates a withApollo HOC
 * that provides the apolloContext
 * to a next.js Page or AppTree.
 * @param  {Object} withApolloOptions
 * @param  {Boolean} [withApolloOptions.ssr=false]
 * @returns {(PageComponent: ReactNode) => ReactNode}
 */
export const withApollo = ({ ssr = true } = {}) => (PageComponent) => {
  const WithApollo = ({ apolloClient, apolloState, ...pageProps }) => {
    let client;
    if (apolloClient) {
      // Happens on: getDataFromTree & next.js ssr
      client = apolloClient;
    } else {
      // Happens on: next.js csr
      // client = initApolloClient(apolloState, undefined);
      client = initApolloClient(apolloState, {});
    }
    return (
      <ApolloProvider client={client}>
        <PageComponent {...pageProps} />
      </ApolloProvider>
    );
  };
  // Set the correct displayName in development
  if (process.env.NODE_ENV !== "production") {
    const displayName =
      PageComponent.displayName || PageComponent.name || "Component";
    WithApollo.displayName = `withApollo(${displayName})`;
  }
  if (ssr || PageComponent.getInitialProps) {
    WithApollo.getInitialProps = async (ctx) => {
      const { AppTree } = ctx;
      // Initialize ApolloClient, add it to the ctx object so
      // we can use it in `PageComponent.getInitialProp`.
      const apolloClient = (ctx.apolloClient = initApolloClient(
        null,
        await getHeaders(ctx)
      ));
      // Run wrapped getInitialProps methods
      let pageProps = {};
      if (PageComponent.getInitialProps) {
        pageProps = await PageComponent.getInitialProps(ctx);
      }
      // Only on the server:
      if (typeof window === "undefined") {
        // When redirecting, the response is finished.
        // No point in continuing to render
        if (ctx.res && ctx.res.finished) {
          return pageProps;
        }
        // Only if ssr is enabled
        if (ssr) {
          try {
            // Run all GraphQL queries
            const { getDataFromTree } = await import("@apollo/react-ssr");
            await getDataFromTree(
              <AppTree
                pageProps={{
                  ...pageProps,
                  apolloClient,
                }}
              />
            );
          } catch (error) {
            // Prevent Apollo Client GraphQL errors from crashing SSR.
            // Handle them in components via the data.error prop:
            // https://www.apollographql.com/docs/react/api/react-apollo.html#graphql-query-data-error
            console.error("Error while running `getDataFromTree`", error);
          }
          // getDataFromTree does not call componentWillUnmount
          // head side effect therefore need to be cleared manually
          Head.rewind();
        }
      }
      // Extract query data from the Apollo store
      const apolloState = apolloClient.cache.extract();
      return {
        ...pageProps,
        apolloState,
      };
    };
  }
  return WithApollo;
};
Note the usage of getHeaders where we are making a request to Auth0 to retrieve the accessToken.
We are going to make use of this HOC inside our root page.
Open pages/index.js and update the export by adding withApollo:
...
import { useFetchUser } from "../lib/user";
import { withApollo } from "../lib/withApollo";

...
export default withApollo()(IndexPage);
That's it. Our Next.js app is now configured with Apollo Client to talk to Hasura APIs.
Let's integrate a GraphQL query to show the user their personal task list. We will learn the following concepts:
- Fetching data with queries
- Using the
useQueryhook - Handle loading/error state
Let's get started!
The first graphql query you will write will be to fetch personal todos. You will need to load the todo data from the database which belongs to the logged in user. Let's define a graphql query to fetch the required data.
query getMyTodos {
  todos(where: { is_public: { _eq: false } }, order_by: { created_at: desc }) {
    id
    title
    created_at
    is_completed
  }
}
Try this query in Hasura Console against the application database to see what the response looks like.
Note: You need to pass the Authorization: Bearer header before querying to get the results.
This query is the actual graphql query that we will be using in our Next.js app and hence test this out to make sure it works as expected.
Let's now integrate this graphql query into our app.
In this section, we will implement GraphQL Queries and integrate with the react UI. With Apollo Client, you can send queries in 2 different ways.
- Using the
querymethod directly and then process the response. - New
useQueryReact hook with React. (Recommended)
The recommended method is to use the useQuery React hook, where you will just pass your GraphQL query and useQuery React hook will fetch the data automatically.
Great! Now let's define the graphql query to be used:
Open components/Todo/TodoPrivateList.js and add the following code:
import React, { useState, Fragment } from "react";
+ import gql from 'graphql-tag';

import TodoItem from "./TodoItem";
import TodoFilters from "./TodoFilters";
+ const GET_MY_TODOS = gql`
+  query getMyTodos {
+    todos(where: { is_public: { _eq: false} }, order_by: { created_at: desc }) {
+      id
+      title
+      created_at
+      is_completed
+  }
+ }`;
We have now written the graphql query as a javascript constant using the gql parser function. This function is used to parse the plain string as a graphql query.
The query fetches todos with a simple condition; is_public must be false. We sort the todos descending by its created_at time according to the schema. We specify which fields we need for the todos node.
The query is now ready, let's integrate it with our react code:
import { useQuery } from "@apollo/react-hooks";useQuery React hook is being imported from @apollo/react-hooks
const TodoPrivateListQuery = () => {
  const { loading, error, data } = useQuery(GET_MY_TODOS);

  if (loading) {
    return <div>Loading...</div>;
  }
  if (error) {
    console.error(error);
    return <div>Error!</div>;
  }
  return <TodoPrivateList todos={data.todos} />;
};
Remember that we wrapped our App component with <ApolloProvider> and passed client as a prop. useQuery React hook is using the same client.
We are importing the useQuery React hook from @apollo/react-hooks and the graphql query we defined above to fetch the todo data.
Let's remove the mock todos data which was used to populate sample data:
const TodoPrivateList = props => {
  const [state, setState] = useState({
    filter: "all",
    clearInProgress: false,
-    todos: [
-      {
-        id: "1",
-        title: "This is private todo 1",
-        is_completed: true,
-        is_public: false
-      },
-      {
-        id: "2",
-        title: "This is private todo 2",
-        is_completed: false,
-        is_public: false
-      }
-    ]
  });
  const filterResults = filter => {
    setState({
      ...state,
      filter: filter
    });
  };
  const clearCompleted = () => {};
-    let filteredTodos = state.todos;
+    const {todos} = props;
+
+    let filteredTodos = todos;
    if (state.filter === "active") {
-     filteredTodos = state.todos.filter(todo => todo.is_completed !== true);
+     filteredTodos = todos.filter(todo => todo.is_completed !== true);
    } else if (state.filter === "completed") {
-     filteredTodos = state.todos.filter(todo => todo.is_completed === true);
+     filteredTodos = todos.filter(todo => todo.is_completed === true);
    }
    const todoList = [];
    filteredTodos.forEach((todo, index) => {
      todoList.push(<TodoItem key={index} index={index} todo={todo} />);
    });
    return (
      ...
    );

};
Finally, update the exports:
 export default TodoPrivateList;
+ export default TodoPrivateListQuery;
+ export {GET_MY_TODOS};
Woot! You have written your first GraphQL integration with React. Easy isn't it?
When you use the useQuery React hook, Apollo returns the data along with other properties. Most important ones are:
-
loading: A boolean that indicates whether the request is in flight. If loading is true, then the request hasn't finished. Typically this information can be used to display a loading spinner. -
error: A runtime error with graphQLErrors and networkError properties. Contains information about what went wrong with your query. -
data: An object containing the result of your GraphQL query. This will contain our actual data from the server. In our case, it will be the todo data.
You can read more about other properties that result object contains here
Using the data property, we are parsing the results from the server. In our query, data property has an array todos which can be mapped over to render each TodoItem.
If you noted, there has been some client side filtering to the todos that are displayed.
As we saw in the previous step, Apollo returned a result object with properties . Among them loading and error are common ones that you will need to handle in your app.
Now let's go back to the useQuery React hook that you wrote in the previous step:
const TodoPrivateListQuery = () => {
  const { loading, error, data } = useQuery(GET_MY_TODOS);
  if (loading) {
    return <div>Loading...</div>;
  }
  if (error) {
    console.error(error);
    return <div>Error!</div>;
  }
  return <TodoPrivateList todos={data.todos} />;
};When this component mounts, the GraphQL query sent in the background may not have been completed. But we need to handle that temporary state of no data and hence we return some useful text during loading state. In this loading state, typically you can do fancy things like displaying a loading spinner.
Now, the query could also end up in an error state due to various reasons. Sometimes the graphql query could be wrong, or the server isn't responding. Whatever may be the reason, the user facing UI should show something to convey that an error has occurred. In this error state, typically you can send these error messages to third-party services to track what went wrong.
All said and done, these are two important states that need to be handled inside your component. What you have written above is basic, but sufficient for this tutorial.
Now, let's add the ability for our users to create new todos and add them to their task list.
We will learn the following concepts:
- Creating a GraphQL mutation
- Using the
useMutationReact hook - Capturing loading/finished/error states
Let's get started!
In this part of the tutorial, you will learn how to create new todos by using GraphQL Mutations.
Let's define a graphql mutation to perform insert into todos:
mutation($todo: String!, $isPublic: Boolean!) {
  insert_todos(objects: { title: $todo, is_public: $isPublic }) {
    affected_rows
    returning {
      id
      title
      created_at
      is_completed
    }
  }
}
You will also need to pass in the values for the variables.
Try this mutation in GraphiQL against the application database to see what the response looks like.
NOTE: I had to temporarily make the user_id column nullable for this example to work.
Let's now integrate this graphql mutation into our app.
GraphQL has a first-class way to factor dynamic values out of the query, and pass them as a separate dictionary. These values are called variables. In our case, we are defining the object to be inserted as a mutation.
So let's define the graphql mutation to be used.
Open components/Todo/TodoInput.js and add the following code:
import gql from "graphql-tag";

export const ADD_TODO = gql`
  mutation($todo: String!, $isPublic: Boolean!) {
    insert_todos(objects: { title: $todo, is_public: $isPublic }) {
      affected_rows
      returning {
        id
        title
        created_at
        is_completed
      }
    }
  }
`;The mutation inserts into todos table with the $objects variable being passed as one todo type.
Awesome! We have defined our first graphql mutation.
Now let's do the integration part. Open components/Todo/TodoInput.js and add the following code below the other imports:
import { useMutation } from "@apollo/react-hooks";We are importing the useMutation React hook from @apollo/react-hooks and the graphql query we defined above to fetch the todo data.
Now, we will use the useMutation React hook passing our graphql mutation constant that we imported. Add the following code:
const [addTodo] = useMutation(ADD_TODO);In the useMutation React hook defined above, the first argument of the result tuple is the mutate function; (addTodo) in this case. Read more about the mutate function here
The mutate function optionally takes variables, optimisticResponse, refetchQueries, and update; You are going to make use of the update function later.
We need to handle the change event so that when the user types something on the input box, we update the state.
We are going to make use of useState hook for this:
import React, { useState } from "react";We will initialise the state and add an onChange handler to update the state. Next, let's handle the form submit to invoke the mutation:
const TodoInput = ({ isPublic = false }) => {
  let input;
  const [todoInput, setTodoInput] = useState("");
  const [addTodo] = useMutation(ADD_TODO); // The first argument - addTodo - is the mutate function itself

  return (
    <form
      className="formInput"
      onSubmit={(e) => {
        e.preventDefault();
        addTodo({ variables: { todo: todoInput, isPublic } });
      }}
    >
      <input
        className="input"
        placeholder="What needs to be done?"
        value={todoInput}
        onChange={(e) => setTodoInput(e.target.value)}
        ref={(n) => (input = n)}
      />
      <i className="inputMarker fa fa-angle-right" />
    </form>
  );
};
We are passing the mutate function (addTodo) to our form submit handler. The mutate function's first argument would be the mutation query's options, such as variables etc. We are now passing the variables required for the mutation.
The mutation has been integrated and the new todos will be inserted into the database. But the UI doesn't know that a new todo has been added. We need a way to tell Apollo Client to update the query for the list of todos.
The update function comes in handy to update the cache for this mutation. It comes with utility functions such as readQuery and writeQuery that helps in reading from and writing to the cache.
Let's implement update for the above mutation.
We need to fetch the current list of todos from the cache. So let's import the query that we used in the previous steps.
We pass the update function as an option to useMutation.
Let's define the updateCache function to read and write to cache.
To see these changes in context, please refer to app-boilerplate/components/Todo/TodoInput.js
Let's dissect what's happening in this code snippet.
Our goals were simple:
- Make a mutation to insert the new todo in the database.
- Once the mutation is done, we need to update the cache to update the UI.
The update function is used to update the cache after a mutation occurs. It receives the result of the mutation (data) and the current cache (store) as arguments. You will then use these arguments to manage your cache so that the UI will be up to date.
Unlike client.query, readQuery will never make a request to your GraphQL server. It will always read from the cache. So we make a read request to the cache to get the current list of todos.
We have already done the mutation to the graphql server using the mutate function. Our goal was to update the UI. This is where writeQuery comes to the rescue. writeQuery will allow you to change data in your local cache, but it is important to remember that they will not change any data on your server (exactly what we need).
Any subscriber to the Apollo Client store will instantly see this update and render new UI accordingly.
We concatenate our new todo from our mutation with the list of existing todos and write the query back to the cache with cache.writeQuery
Now, the TodoPrivateList component using the useQuery React hook will get the updated todo list as it is automatically subscribed to the store.
Great! That was actually easy :)
Let's wrap this by adding a function to clear the input value once the mutation is successful:
const [addTodo] = useMutation(ADD_TODO, {
  update: updateCache,
  onCompleted: resetInput,
});
We pass a function called resetInput to the onCompleted option which will be called once the mutation is completed. The function definition looks like this:
const resetInput = () => {
  setTodoInput("");
};We can notice that there is a lag when users create a todo. We can also create UIs where the UI updates optimistically, assuming that the mutation will be successful.
To enable toggling between completed states, and to delete todos let's use optimistic updates when we run mutations!
We will learn the following concepts:
- Creating a GraphQL mutation
- Using the
useMutationReact hook - Integrating Optimistic UI Updates
- Capturing loading/finished/error states
Let's get started!
In this part of the tutorial, you will learn how to mark an existing todo as completed by using GraphQL Mutations.
Let's define a graphql query to do a mutation into todos:
mutation toggleTodo($id: Int!, $isCompleted: Boolean!) {
  update_todos(
    where: { id: { _eq: $id } }
    _set: { is_completed: $isCompleted }
  ) {
    affected_rows
  }
}
You will also need to pass in the values for the variables.
Try this mutation in GraphiQL against the application database to see what the response looks like.
Let's now integrate this graphql mutation into our app.
Now let's do the integration part. Open components/Todo/TodoItem.js and add the following code below the other imports:
import gql from "graphql-tag";Let's define the graphql mutation to update the completed status of the todo:
const TOGGLE_TODO = gql`
  mutation toggleTodo($id: Int!, $isCompleted: Boolean!) {
    update_todos(
      where: { id: { _eq: $id } }
      _set: { is_completed: $isCompleted }
    ) {
      affected_rows
    }
  }
`;We need to use useMutation React hook to make the mutation:
import { useMutation } from "@apollo/react-hooks";We already have the onChange handler toggleTodo for the input. Let's update the function to make a use of toggleTodoMutation mutate function.
const [toggleTodoMutation] = useMutation(TOGGLE_TODO);
const toggleTodo = () => {
  toggleTodoMutation({
    variables: { id: todo.id, isCompleted: !todo.is_completed },
    optimisticResponse: true,
  });
};
The above code will just make a mutation, updating the todo's is_completed property in the database. To update the cache, we will be using the update function again to modify the cache. We need to fetch the current list of todos from the cache before modifying it. So let's import the query:
import { GET_MY_TODOS } from "./TodoPrivateList";Now let's add the code for update function:
const [toggleTodoMutation] = useMutation(TOGGLE_TODO);
const toggleTodo = () => {
  toggleTodoMutation({
    variables: { id: todo.id, isCompleted: !todo.is_completed },
    optimisticResponse: true,
    update: (cache) => {
      const existingTodos = cache.readQuery({ query: GET_MY_TODOS });
      const newTodos = existingTodos.todos.map((t) => {
        if (t.id === todo.id) {
          return { ...t, is_completed: !t.is_completed };
        } else {
          return t;
        }
      });
      cache.writeQuery({
        query: GET_MY_TODOS,
        data: { todos: newTodos },
      });
    },
  });
};
We are fetching the existing todos from the cache using cache.readQuery and updating the is_completed value for the todo that has been updated.
Finally we are writing the updated todo list to the cache using cache.writeQuery.
In this part of the tutorial, you will learn how to remove existing todos by using GraphQL Mutations.
Let's define a graphql query to do a mutation into todos:
mutation removeTodo($id: Int!) {
  delete_todos(where: { id: { _eq: $id } }) {
    affected_rows
  }
}
Try this mutation in GraphiQL against the application database to see what the response looks like. You will also need to pass in the values for the variables.
Let's now integrate this graphql mutation into our app.
Now let's do the integration part. Open components/Todo/TodoItem.js and add the following code to define the delete mutation:
const REMOVE_TODO = gql`
  mutation removeTodo($id: Int!) {
    delete_todos(where: { id: { _eq: $id } }) {
      affected_rows
    }
  }
`;
const [removeTodoMutation] = useMutation(REMOVE_TODO);
We have a function defined to handle the button click to remove a todo. Let's update the function to use removeTodoMutation mutate function:
const removeTodo = (e) => {
  e.preventDefault();
  e.stopPropagation();
  removeTodoMutation({
    variables: { id: todo.id },
    optimisticResponse: true,
    update: (cache) => {
      const existingTodos = cache.readQuery({ query: GET_MY_TODOS });
      const newTodos = existingTodos.todos.filter((t) => t.id !== todo.id);
      cache.writeQuery({
        query: GET_MY_TODOS,
        data: { todos: newTodos },
      });
    },
  });
};In this part of the tutorial, you will learn how to bulk delete all the existing completed todos by using GraphQL Mutations.
Let's define a graphql query to do a mutation into todos:
mutation clearCompleted {
  delete_todos(
    where: { is_completed: { _eq: true }, is_public: { _eq: false } }
  ) {
    affected_rows
  }
}
You will also need to pass in the values for the variables.
Try this mutation in GraphiQL against the application database to see what the response looks like.
Let's now integrate this graphql mutation into our app.
Open components /Todo/TodoPrivateList.js and import useMutation React hook and add the bulk delete mutation:
import { useQuery, useMutation } from "@apollo/react-hooks";

// Remove all the todos that are completed
export const CLEAR_COMPLETED = gql`
  mutation clearCompleted {
    delete_todos(
      where: { is_completed: { _eq: true }, is_public: { _eq: false } }
    ) {
      affected_rows
    }
  }
`;
Use the useMutation React hook and update the clearCompleted function as below:
const [clearCompletedTodos] = useMutation(CLEAR_COMPLETED);
const clearCompleted = () => {
  clearCompletedTodos({
    optimisticResponse: true,
    update: (cache, { data }) => {
      const existingTodos = cache.readQuery({ query: GET_MY_TODOS });
      const newTodos = existingTodos.todos.filter((t) => !t.is_completed);
      cache.writeQuery({ query: GET_MY_TODOS, data: { todos: newTodos } });
    },
  });
};
That's a wrap of the basic todo app.
We cruised through our GraphQL queries and mutations. We queried for todos, added a new todo, updated an existing todo, removed an existing todo.
Now let's get to the exciting part.
We have a section of UI which displays the list of online users. So far we have made queries to fetch data and display them on the UI. But typically online users data is dynamic.
We can make use of GraphQL Subscription API to get realtime data from the graphql server to efficiently handle this.
But but but...
We need to tell the server that the user who is logged in is online. We have to poll our server to do a mutation which updates the last_seen timestamp value of the user.
We have to make this change to see yourself online first. Remember that you are already logged in, registered your data in the server, but not updated your last_seen value.?
The goal is to update every few seconds from the client that you are online. Ideally you should do this after you have successfully authenticated with Auth0. So let's update some code to handle this.
Open components/OnlineUsers/OnlineUsersWrapper.js and add the following imports:
import React, { useEffect, useState } from "react";
import { useMutation } from "@apollo/react-hooks";
import gql from "graphql-tag";
In useEffect, we will create a setInterval to update the last_seen of the user every 30 seconds.
Now let's write the definition of the updateLastSeen.
The easiest way to bring live data to your UI is using the useSubscription React hook from Apollo React-Hooks. This lets you render the stream of data from your service directly within your render function of your component!
One thing to note, subscriptions are just listeners, they don’t request any data when first connected, but only open up a connection to get new data.
So let's define the graphql subscription to be used.
Open components/OnlineUsers/OnlineUsersWrapper.js and make sure your imports are updated to contain:
import React, { useEffect, Fragment, useState } from "react";
import { useMutation, useSubscription } from "@apollo/react-hooks";
We are importing the useSubscription React hook from @apollo/react-hooks and the graphql subscription query we defined above to fetch the online user data.
Now, we will use the useSubscription React hook passing the subscription query:
const { loading, error, data } = useSubscription(
  gql`
    subscription getOnlineUsers {
      online_users(order_by: { user: { name: asc } }) {
        id
        user {
          name
        }
      }
    }
  `
);

if (loading) {
  return <span>Loading...</span>;
}
if (error) {
  console.error(error);
  return <span>Error!</span>;
}
if (data) {
  onlineUsersList = data.online_users.map((u) => (
    <OnlineUser key={u.id} user={u.user} />
  ));
}

return (
  <div className="onlineUsersWrapper">
    <Fragment>
      <div className="sliderHeader">
        Online users - {onlineUsersList.length}
      </div>
      {onlineUsersList}
    </Fragment>
  </div>
);
Please see app-boilerplate/components/OnlineUsers/OnlineUsersWrapper.js for how this was implemented, and for how we removed the mock placeholder state and content.
We are using the useSubscription React hook which returns properties (similar to useQuery and useMutation React hooks). The data property gives the result of the realtime data for the query we have made.
Refresh your app and see yourself online! Don't be surprised; There could be other users online as well.
Awesome! You have completed basic implementations of a GraphQL Query, Mutation and Subscriptions. Easy isn't it?
In this section, you will:
- Make a realtime feed that captures public todos added by other people
- Complete the functionality for the rest of the app
Let's define the graphql query to be used:
Open components /Todo/TodoPublicList.js and add the following imports:
import gql from "graphql-tag";Now let's define the subscription query to get notified about new public todos:
// Run a subscription to get the latest public todo
const NOTIFY_NEW_PUBLIC_TODOS = gql`
  subscription notifyNewPublicTodos {
    todos(
      where: { is_public: { _eq: true } }
      limit: 1
      order_by: { created_at: desc }
    ) {
      id
      created_at
    }
  }
`;
Also lets add a functional component which uses this subscription query. Import useSubscription from @apollo/react-hooks to get started and then add:
const TodoPublicListSubscription = () => {
  const { loading, error, data } = useSubscription(NOTIFY_NEW_PUBLIC_TODOS);
  if (loading) {
    return <span>Loading...</span>;
  }
  if (error) {
    return <span>Error</span>;
  }
  return {};
};The query fetches todos with a simple condition; is_public must be true. We also limit the number of todos to 1, since we would just like to get notified whenever a new todo comes in. We sort the todos by its latest created_at time according to the schema. We specify which fields we need for the todos node.
Right now we don't return anything when new data comes in. We already have the TodoPublicList component which renders the list of public todos. So let's return that component:
return (<TodoPublicList latestTodo={data.todos.length ? data.todos[0] : null} />We would like to now return the new TodoPublicListSubscription component which has the useSubscription React hook integrated:
export default TodoPublicListSubscription;Once a new todo is entered in a public list, it needs to appear in the UI. Instead of automatically displaying the todo in the UI, we use a Feed like Notification banner which appears whenever a new todo is received.
Remember that previously we updated the cache using the cache API and the UI got updated automatically, because updating the cache triggered a re-render for those components that were subscribed to this store.
We are not going to use that approach here since we don't want public list UI to be automatically updated.
In the TodoPublicListSubscription component of the previous step, we only get the latest todo and not the existing list. We will now write a simple query to fetch the list of existing public todos.
Start off by importing useEffect from react and useApolloClient from @apollo/react-hooks:
import React, { Fragment, useState, useEffect } from "react";
import { useSubscription, useApolloClient } from "@apollo/react-hooks";
Now that we have access to the client, let's update the TodoPublicList component.
Let's populate initial state by fetching the existing list of todos in useEffect.
Update the loadOlder method.
We are defining a query to fetch older public todos and making a client.query call to get the data from the database. Once we get the data, we update the todos state to re-render the UI with the available list of public todos.
Try adding a new todo in the public feed and notice that it will not show up on the UI. Now refresh the page to see the added todo.
This happens because we haven't yet implemented a way to show the newly added todo to the feed.
Let's handle that in useEffect for on update.
Now try adding a new todo to the public feed and you will see the notification appearing saying that a new task has arrived.
Great! We still have one functionality left. When a new task arrives on the public feed and when the user clicks on the New tasks section, we should make a query to re-fetch the todos that are not present on our current public feed.
Update loadNew() method.
When deploying this example to Vercel you'll want to update the vercel.json configuration file:
{
  "build": {
    "env": {
      "DOMAIN": "",
      "AUTH0_DOMAIN": "@ehan-auth0-domain",
      "AUTH0_AUDIENCE": "@ehan-auth0-audience",
      "AUTH0_CLIENT_ID": "@ehan-auth0-client-id",
      "AUTH0_CLIENT_SECRET": "@ehan-auth0-client-secret",
      "REDIRECT_URI": "@ehan-redirect-uri",
      "POST_LOGOUT_REDIRECT_URI": "@ehan-post-logout-redirect-uri",
      "SESSION_COOKIE_SECRET": "@ehan-session-cookie-secret"
    }
  }
}
Some of these values are settings and can just be added to your repository if you want. Others are actual secrets and need to be created as such using the Vercel CLI.
Pages that use Server-Side Rendering and API routes will automatically become isolated Serverless Functions. This allows page rendering and API requests to scale infinitely.
Refer to Vercel CLI documentation for more options on configuring custom domains.