![]()
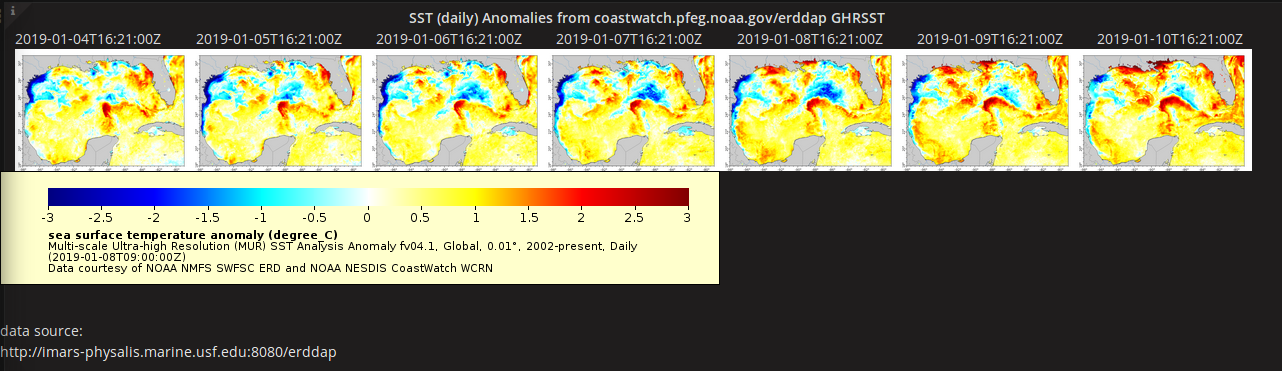
This grafana plugin connects to an ERDDAP server display gridded timeseries data in a dashboard panel.
deps:
# mage
sudo apt install golang-go
go install github.com/magefile/mage@latets

# docker & docker compose
# ...

# npm
npm install# Build plugin in development mode and run in watch mode
npm run dev
# Spin up a Grafana instance and run the plugin inside it (using Docker)
npm run server
# The plugin is now available at `http://localhost:3000`.npm version <major|minor|patch>
#npm run build ???
git push origin main --follow-tagsThen go to https://grafana.com/orgs/imars/plugins and submit information from the release.
# Build plugin in production mode
npm run build

# Run the tests (using Jest)
# Runs the tests and watches for changes, requires git init first
npm run test

# Exits after running all the tests
npm run test:ci

# === Run the E2E tests (using Cypress)
# Spins up a Grafana instance first that we tests against
npm run server
# Starts the tests
npm run e2e

# === Run the linter
npm run lint

# or

npm run lint:fixContributions are welcome! Please start by opening an issue to discuss your idea.
When distributing a Grafana plugin either within the community or privately the plugin must be signed so the Grafana application can verify its authenticity. This can be done with the @grafana/sign-plugin package.
Note: It's not necessary to sign a plugin during development. The docker development environment that is scaffolded with @grafana/create-plugin caters for running the plugin without a signature.
Before signing a plugin please read the Grafana plugin publishing and signing criteria documentation carefully.
@grafana/create-plugin has added the necessary commands and workflows to make signing and distributing a plugin via the grafana plugins catalog as straightforward as possible.
Before signing a plugin for the first time please consult the Grafana plugin signature levels documentation to understand the differences between the types of signature level.
- Create a Grafana Cloud account.
- Make sure that the first part of the plugin ID matches the slug of your Grafana Cloud account.
- You can find the plugin ID in the
plugin.jsonfile inside your plugin directory. For example, if your account slug isacmecorp, you need to prefix the plugin ID withacmecorp-.
- You can find the plugin ID in the
- Create a Grafana Cloud API key with the
PluginPublisherrole. - Keep a record of this API key as it will be required for signing a plugin
The plugin is using the github actions supplied with @grafana/create-plugin so signing a plugin is included out of the box. The release workflow at github/workflows/release.yml prepares everything to make submitting your plugin to Grafana easy.
A secret "GRAFANA_API_KEY" is included in the repo settings to enable signing.
To trigger the workflow we need to push a version tag to github. This can be achieved with the following steps:
- Run
npm version <major|minor|patch> - Run
git push origin main --follow-tags - create the release in the GitHub GUI
Below you can find source code for existing app plugins and other related documentation.