Quest Tracker is a comprehensive tool for managing quests, rumors, and events in a tabletop RPG setting. It integrates seamlessly with Roll20 to provide detailed tracking and visualization of game elements, making it ideal for GMs and players who want to streamline their campaigns.
-
Quest Management:
- Create, edit, and remove quests.
- Track quest statuses (e.g., "Started", "Completed", "Failed").
- Group quests into logical categories.
-
Rumor Handling:
- Add and manage rumors by location or quest.
- Generate rumors dynamically.
- Associate rumors with quest progression.
-
Event Scheduling:
- Schedule events with repeatable options.
- Adjust events based on in-game calendars.
-
Weather and Climate Integration:
- Dynamic weather generation based on in-game conditions.
- Detailed descriptions of current weather conditions.
-
Calender Integration:
- Track Leap years
- Different Calander types, e.g. Harpto, Gregorian etc.
-
Visual Quest Tree:
- Display quests and relationships as a tree diagram.
- Automatically handle mutually exclusive relationships.
-
Installation: Install CalanderData first, once you see this in the log: "CalenderData initialized in state.CalenderData.CALENDARS & state.CalenderData.WEATHER" you know QuestTracker is ready to be installed it and load into the game it will initialise.
-
Usage:
- Access all features through an intuitive graphical user interface. simply type !qt into chat.
- Navigate through menus to manage quests, rumors, and events seamlessly.
The rumours module provides a flexible framework for dynamically integrating narrative elements into your campaign. It connects directly to quests, locations, and events, allowing for automated storytelling and background interactions.
Rumours are structured hierarchically by quest, status, and location. Example structure:
{
  "quest_1": {
    "unknown": {},
    "discovered": {
      "everywhere": {
        "rumour_1": "This is a rumour text"
      },
      "general_store": {
        "rumour_2": "Wonderings of goings on",
        "rumour_4": "Gossip"
      }
    }
  },
  "quest_2": {
    "unknown": {
      "the_boathouse": {
        "rumour_3": "Dave is skimming from the books"
      }
    }
  }
}
- quest: The ID of the associated quest.
- status: The state of the rumour (e.g., unknown, discovered).
- location: The in-game location where the rumour is tied.
- rumour_id: Unique identifier for the specific rumour.
- description: The text of the rumour.
Rumours are stored in handout files within Roll20.
These files can be imported using Configuration > Refresh/Import JSON data from the module's graphical interface.
The JSON data structure must follow the hierarchical format described above.
Rumours tied to specific locations are triggered when players interact with those areas.
Rumours are managed directly through the graphical interface, providing an intuitive way to organize and modify them:
Navigate to the "Show All Rumours" panel to view rumours linked to a specific quest. Select the relevant quest and choose the status (unknown, discovered, etc.) to which you want to add or edit rumours.
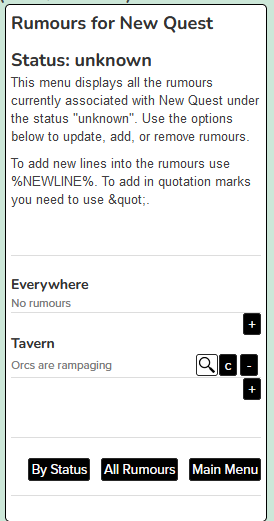
Under each location, buttons allow for streamlined rumour management:
- "+" Add a Rumour: Add a new rumour to the specified location and status.
- "c" Change: Edit the existing rumour text.
- "-" Remove: Delete the rumour from the selected location.
- Hover over the magnifying glass icon to see the full rumour text. The displayed text will truncate if it exceeds the visible area.
- Use %NEWLINE% to insert line breaks within rumour text.
- Use " to include quotation marks in rumour descriptions.
Navigate to "All Rumours > Rumour Locations" to manage locations associated with rumours.
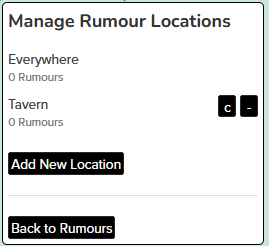
Buttons provide streamlined location management:
- "+" Add a Location: Create a new location to associate with rumours.
- "c" Change: Edit the name or properties of an existing location.
- "-" Remove: Delete a location, with a confirmation prompt to ensure that all rumours under the location are not removed unintentionally.
Different quest statuses trigger distinct sets of rumours.
Example: A quest in the discovered status may have rumours tied to general_store, while the same quest in the completed status has no active rumours.
The same quest and status can yield different rumours depending on the location.
Example: In everywhere, a rumour might say "A strange light in the forest," while in general_store, it could suggest "A missing person was last seen here."
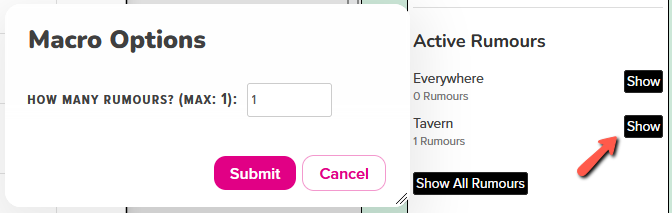
This is stright-forward; simply choose the location the players are in, and select how many (random) rumours will be shown in chat. 'Eeverywhere' is a global location and rumours will be chosen from either the selected location OR everywhere.

Ensure rumour_id fields are unique to prevent overwrites. Validate linked quest and location IDs to maintain data integrity.
The QUEST Module is a core component of the Quest Tracker system for Roll20. It provides robust quest management features, allowing game masters to dynamically control quest progression, relationships, and status changes, all integrated seamlessly into sandbox-style RPG campaigns.
- Create, update, and delete quests using an intuitive graphical interface.
- Track quest statuses:
- Unknown: The Quest is unknown at this point. it is worth noting rumours can exists for quests within this state.
- Discovered: The quest has been discovered but not necessarily active or accepted.
- Started: The quest is currently in progress, and has been accepted
- Ongoing: The quest is currently ongoing.
- Completed: The quest has been completed.
- Completed by Someone Else: Another band of adventurers perhaps?
- Failed: The quest was not completed as intended.
- Time ran out: The arbitary time has run out on the quest
- Ignored: The clues have not been followed or the PCs have clearly ignored this quest
As you can see whilst these statuses are at this time hard coded ine, there is a lot of room to wiggle in how you define a quest's status. Depending on feedback I may allow these statuses to be user specific, although it is a fair amount of work.
- Define quest prerequisites to unlock quests based on player actions or story progression.
- Establish mutually exclusive relationships between quests to enforce narrative constraints.
- Auto-advance quests based on time-sensitive conditions.
None of these quest relasionships rules are rigidly enforced within the code; but will allow you as the DM to follow a basic story logic, as well as offer a more visual way for the players to understand what is happening if they try to support one faction over another.
Quests are stored in a hierarchical JSON format, supporting complex relationships. Example:
"quest_1": {
    "name": "Primary Quest",
    "description": "This is a Primary Quest",
    "relationships": {
      "logic": "AND",
      "conditions": [
        "quest_4",
        {
          "logic": "OR",
          "conditions": [
            "quest_2",
            "quest_3"
          ]
        },
        {
          "logic": "OR",
          "conditions": [
            "quest_7",
            "quest_9"
          ]
        }
      ],
      "mutually_exclusive": []
    },
    "hidden": false,
    "autoadvance": {
      "unknown": "1970-01-01"
    },
    "group": "6",
    "level": 3
  },
  "quest_8": {
    "name": "Secondary Quest",
    "description": "There are more quests here?",
    "relationships": {
      "logic": "AND",
      "conditions": [
        "quest_12"
      ]
    },
    "hidden": false,
    "autoadvance": {},
    "level": 1,
    "group": "6"
  },
  "quest_11": {
    "name": "Another Quest?",
    "description": "Clearly this game has a lot of quests.",
    "relationships": {
      "logic": "AND",
      "conditions": [
        "quest_4"
      ],
      "mutually_exclusive": [
        "quest_12"
      ]
    },
    "hidden": false,
    "autoadvance": {},
    "group": "6",
    "level": 2
}- Name: The name of the quest, defaults to 'New Quest' and it is does not need to be unique.
- Description: A short description of the quest; it will be the tooltip on the Quest Tree page.
- Status: The status of the quest, this is stored in a rollable table as a 'weight'.
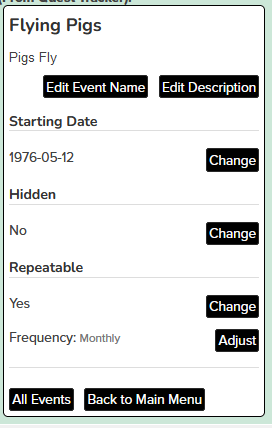
- Hidden: This quest is completely hidden from the Players when displayed on the page, the relasionships of this quest are also hidden. If you do not use the Quest Tree page there no difference betwene a hidden quest or a visible one (e.g. rumours from hidden quests are still shown), by default quests start out as hidden.
- Quest Group: This is to help you organise your quests better, relasionships can only be formed by quests within their own quest group.
- AutoAdvance: Simply add a Date (YYYY-MM-DD) into one of the status fields and when that date occurs the quest will autoadvance to that specific status; it will then clear this field. There are no checks to make sure things go in the correct order it is up to you to maintain your own quests.
- Icon: (potentially a future UI implimentation) This is actually a hidden field as I have currently not built a UI for it, but on the rollable table you can upload an icon for the quest which will appear as a token on the Quest Tree Page. This is important as it will allow you to use tokenmod commands to trigger a quest change in state using the questID in the GM Notes field of said token.
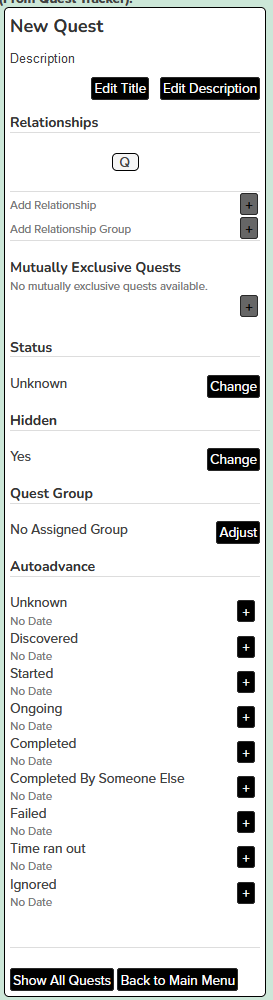
- If the + buttons are shaded grey and cannot be selected it means there are no valid quests to add, quests need to be in the same quest group and not already be selected in a relasionship
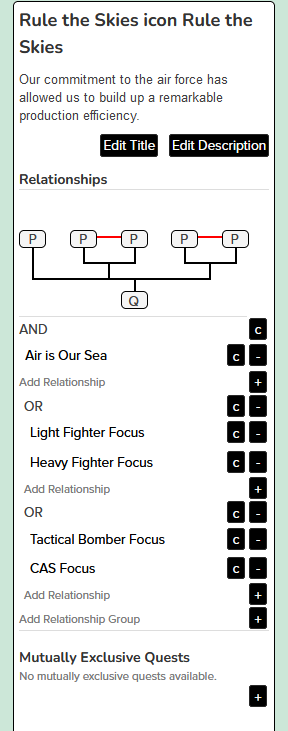
- Quest Relationships work on a AND and OR functionality and you can put them within relasionship groups in order to visualise the prerequisities; as you can see in the more complex quest tree; five quests are its prerequisites (under AND) but 4 of them are separated into two groups of OR functionality, the grouped quests are also mutually exclusive with each other (note the red line).
- The Quest diagram is generated automatically and only works on a quest by quest basis (so no futher back); if you come across any failures within rendering please make sure you raise this as an issue. note: before you do this drag the chat window wider, as most issues are resolved with this.
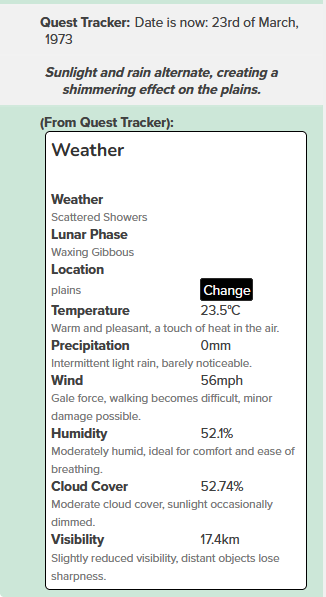
The Weather Module is designed to simulate dynamic weather conditions, taking into account environmental trends, forced modifiers, and randomness. This module supports graphical visualizations for key weather parameters and provides an intuitive interface for adjusting and interpreting weather trends.
Weather is determined by six key values; each value is rated on a scale of 0 to 100, with 50 representing the average condition. A random number is generated daily to define the weather, following a restricted bell curve distribution centered at 50 (see Bell Curve Graph).
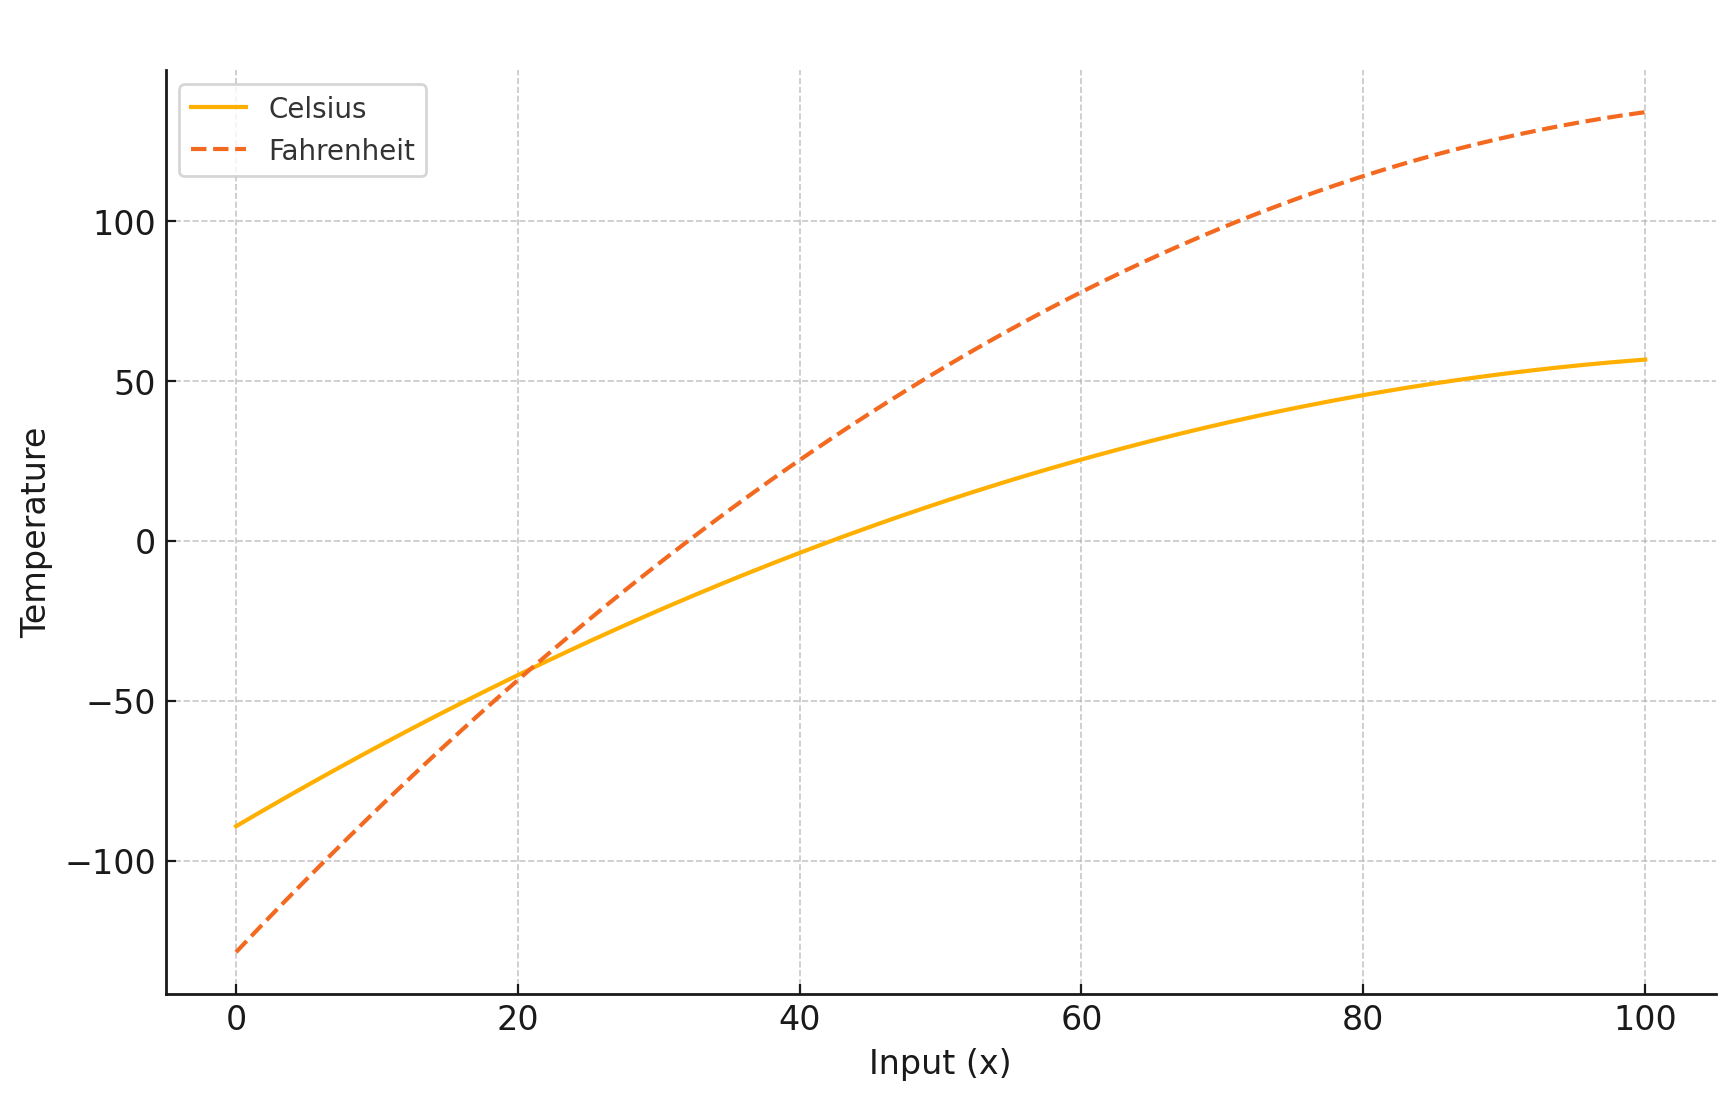 Temperature Distribution Temperature Distribution |
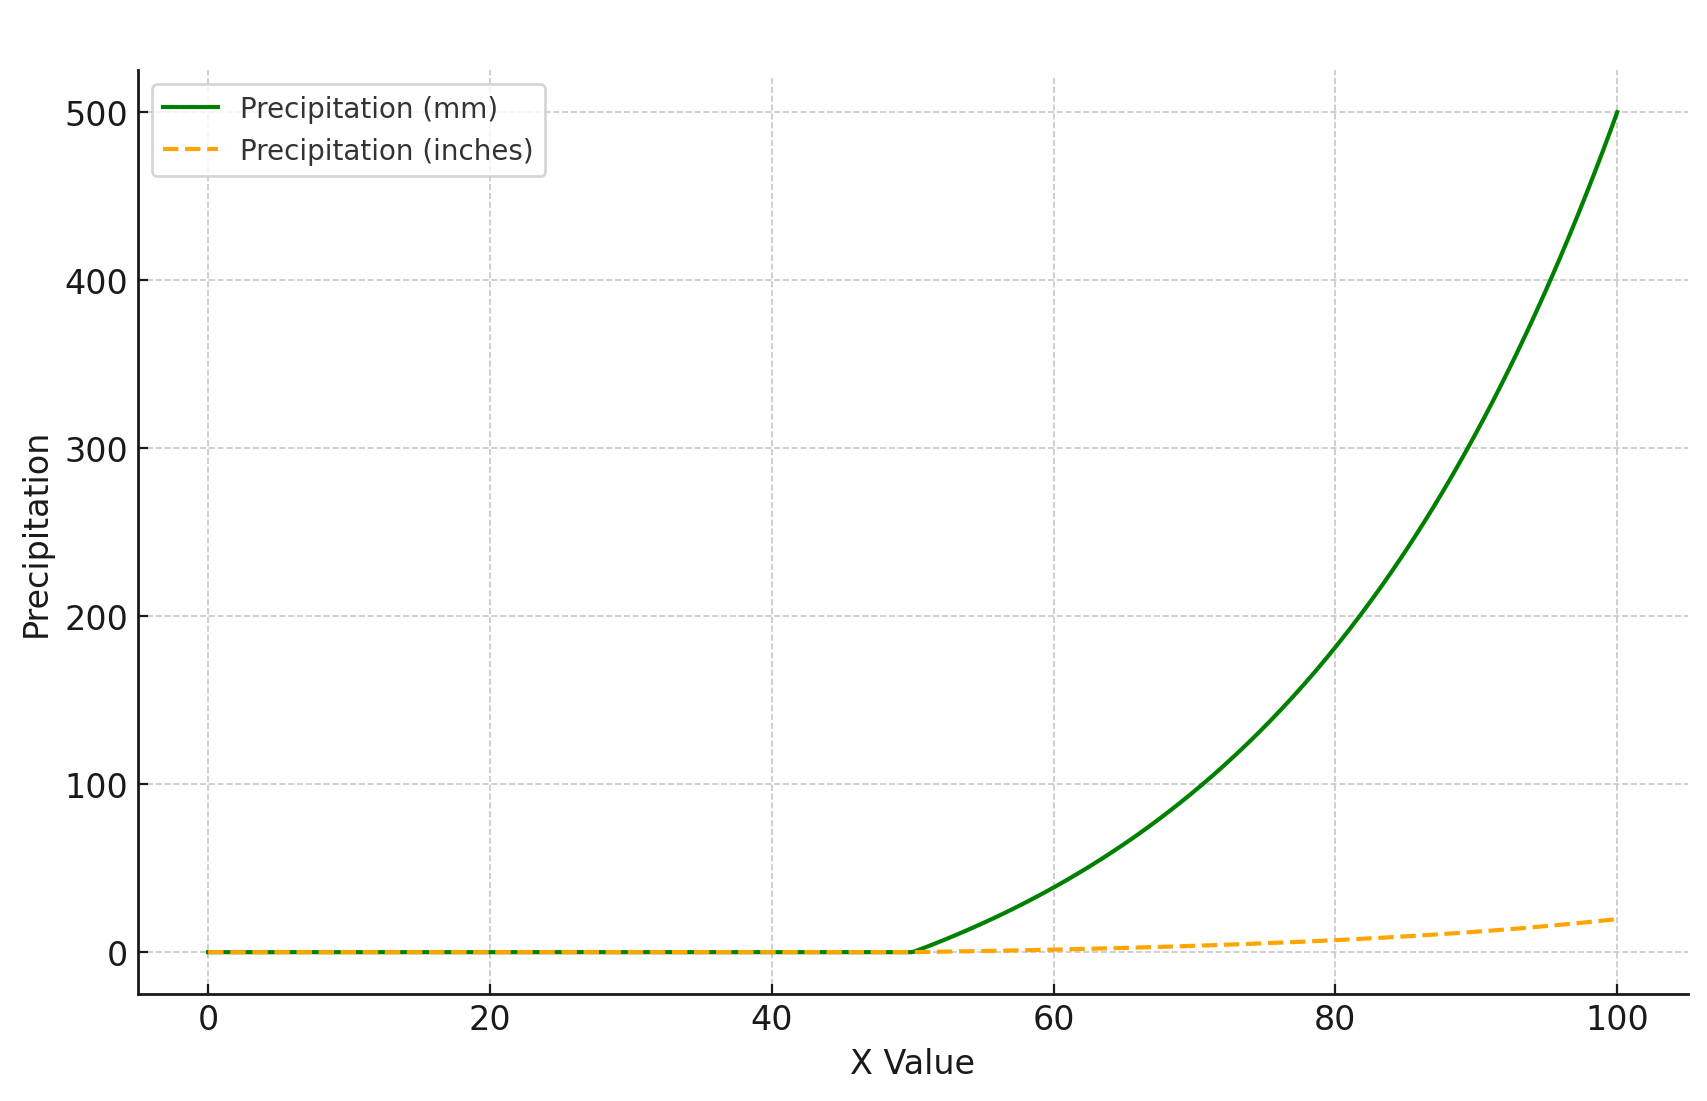 Precipitation Distribution Precipitation Distribution |
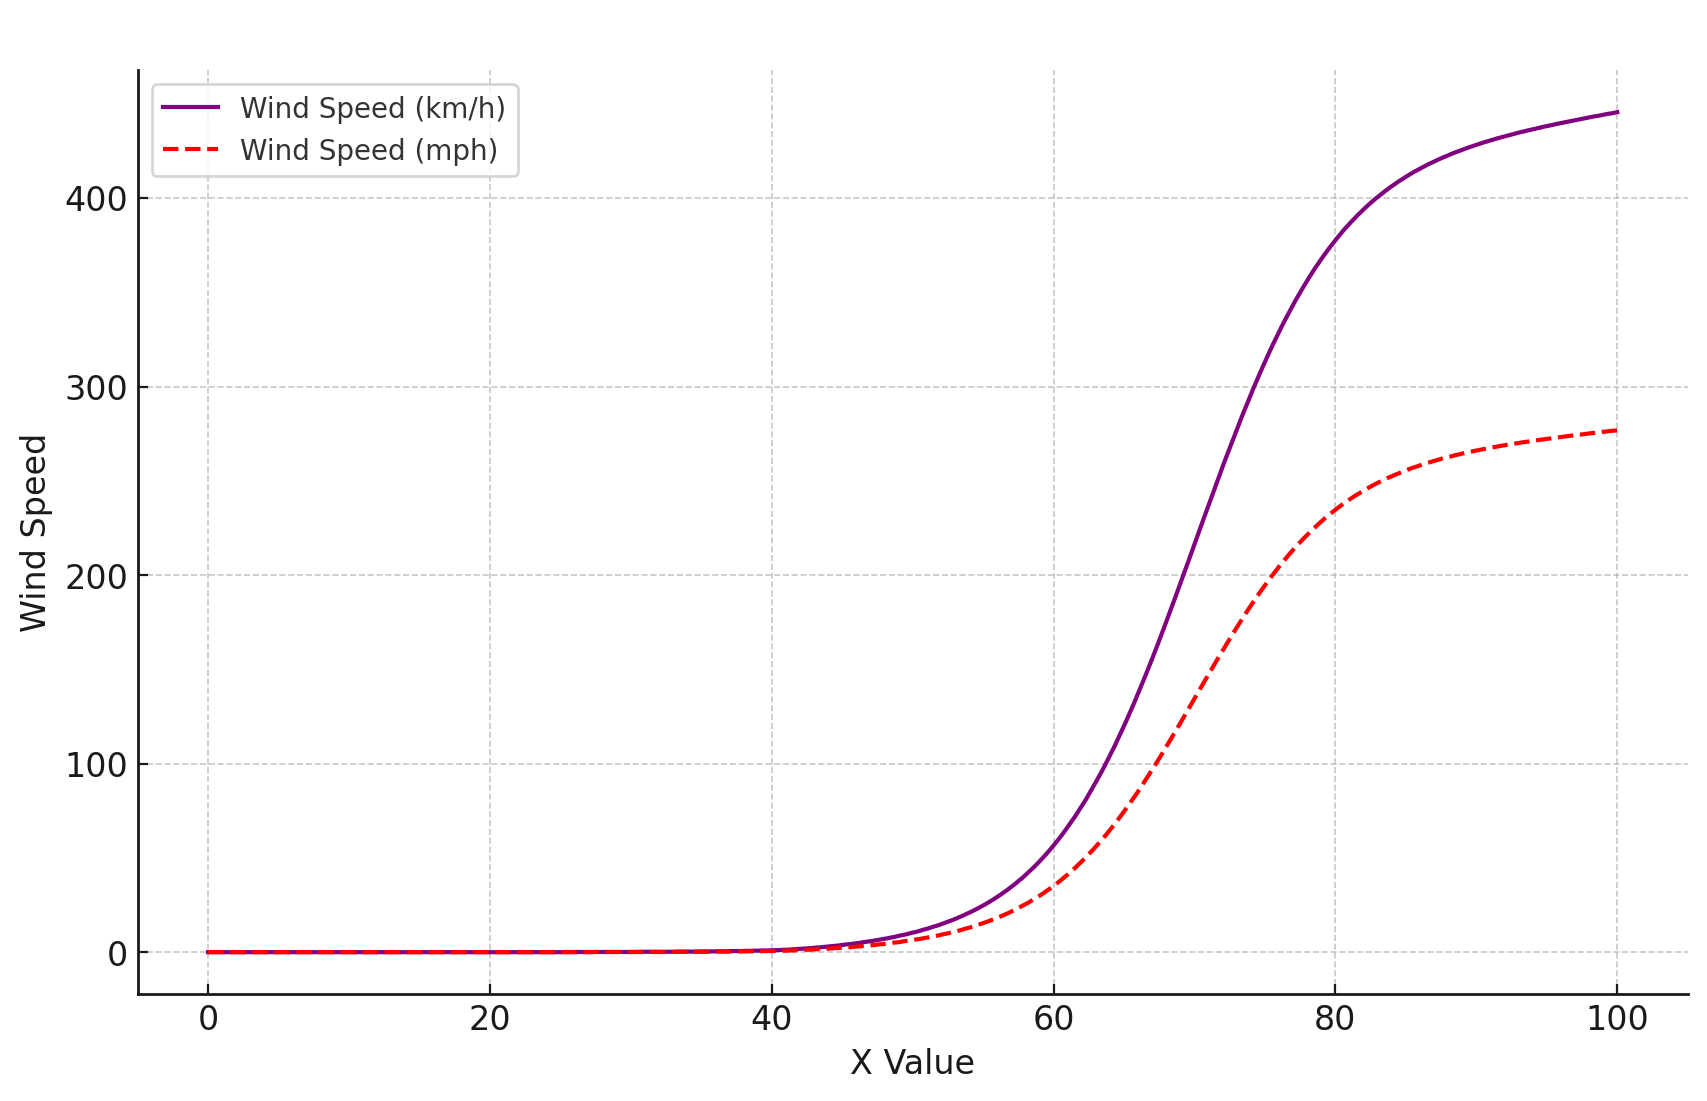 Wind Speed Distribution Wind Speed Distribution |
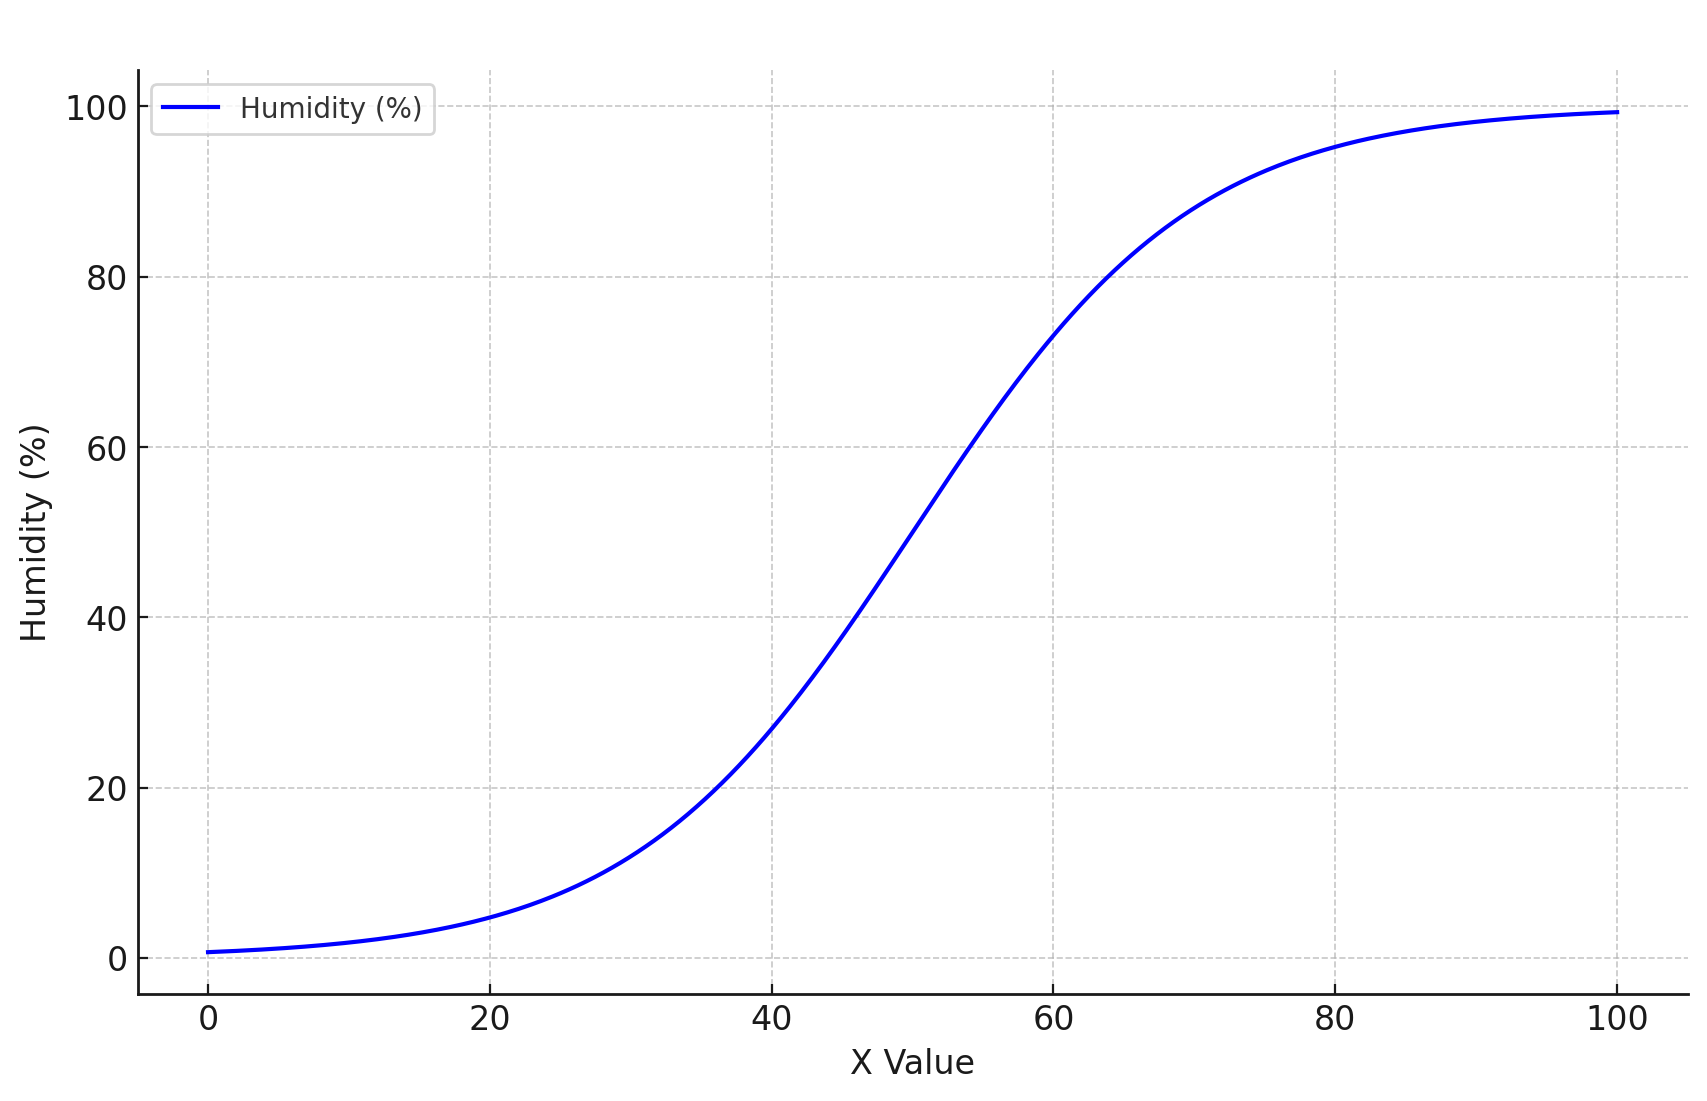 Humidity Distribution Humidity Distribution |
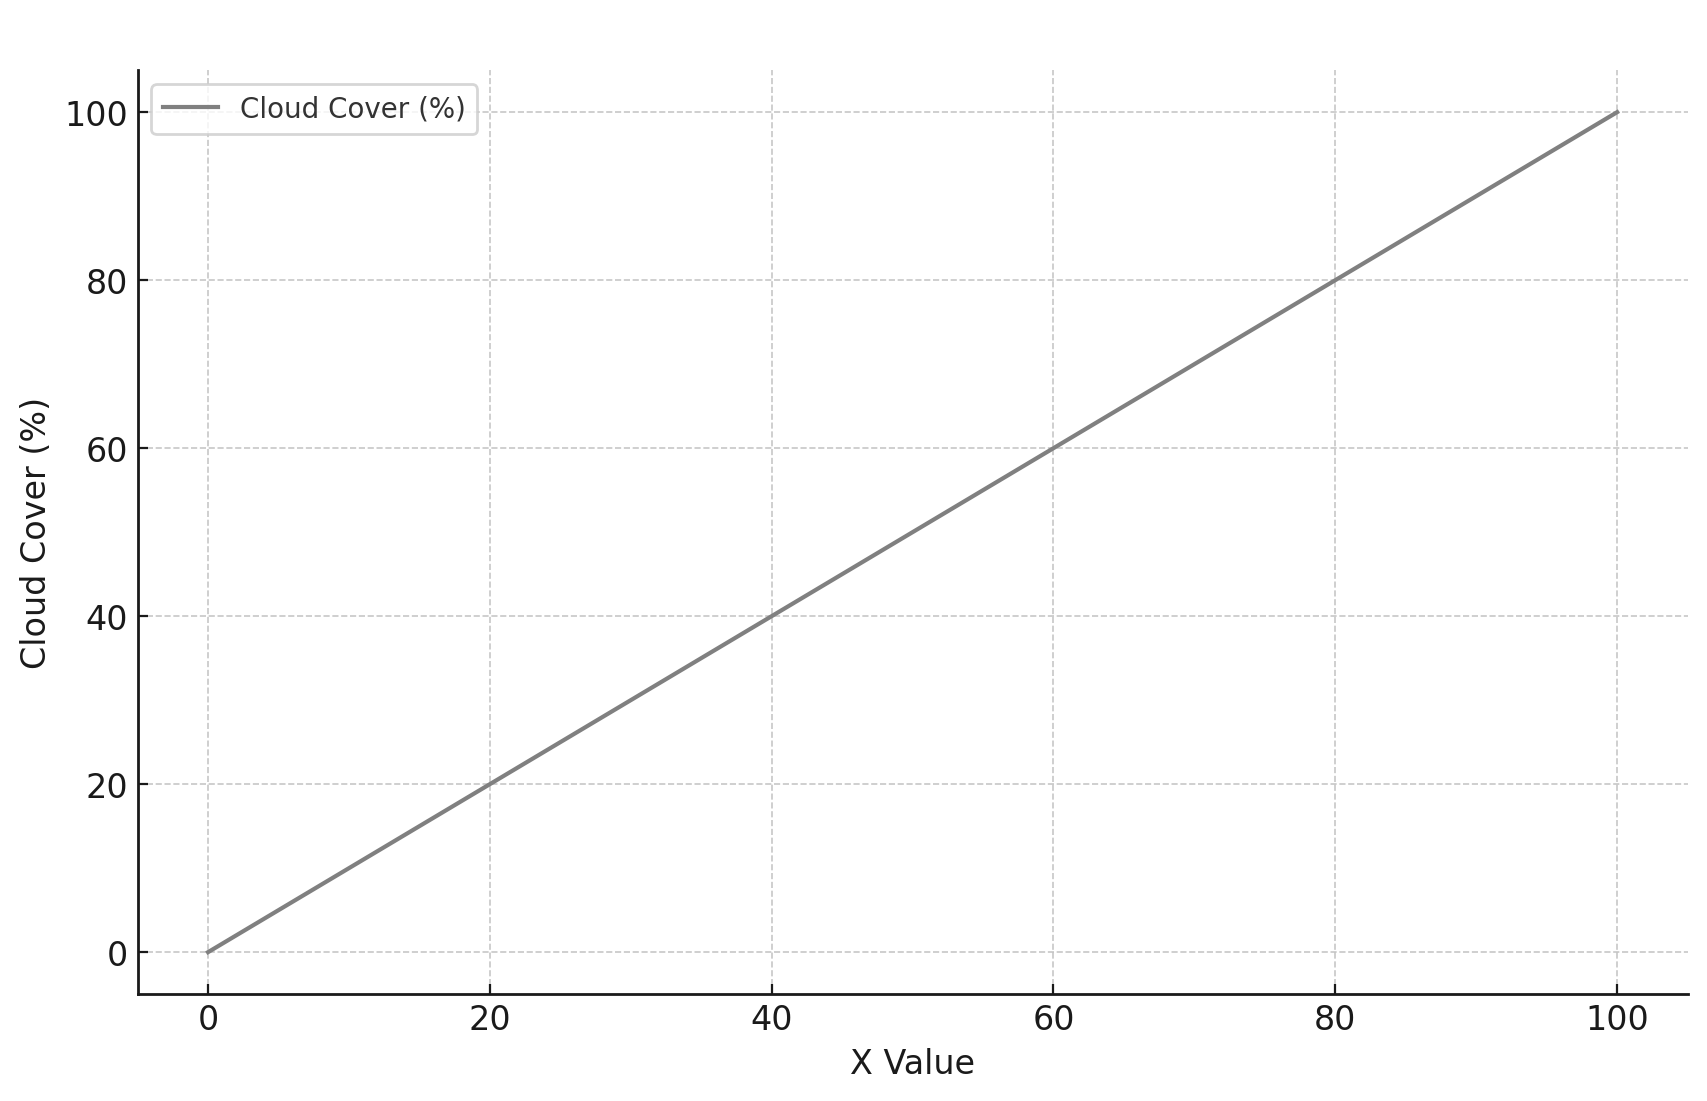 Cloud Cover Distribution Cloud Cover Distribution |
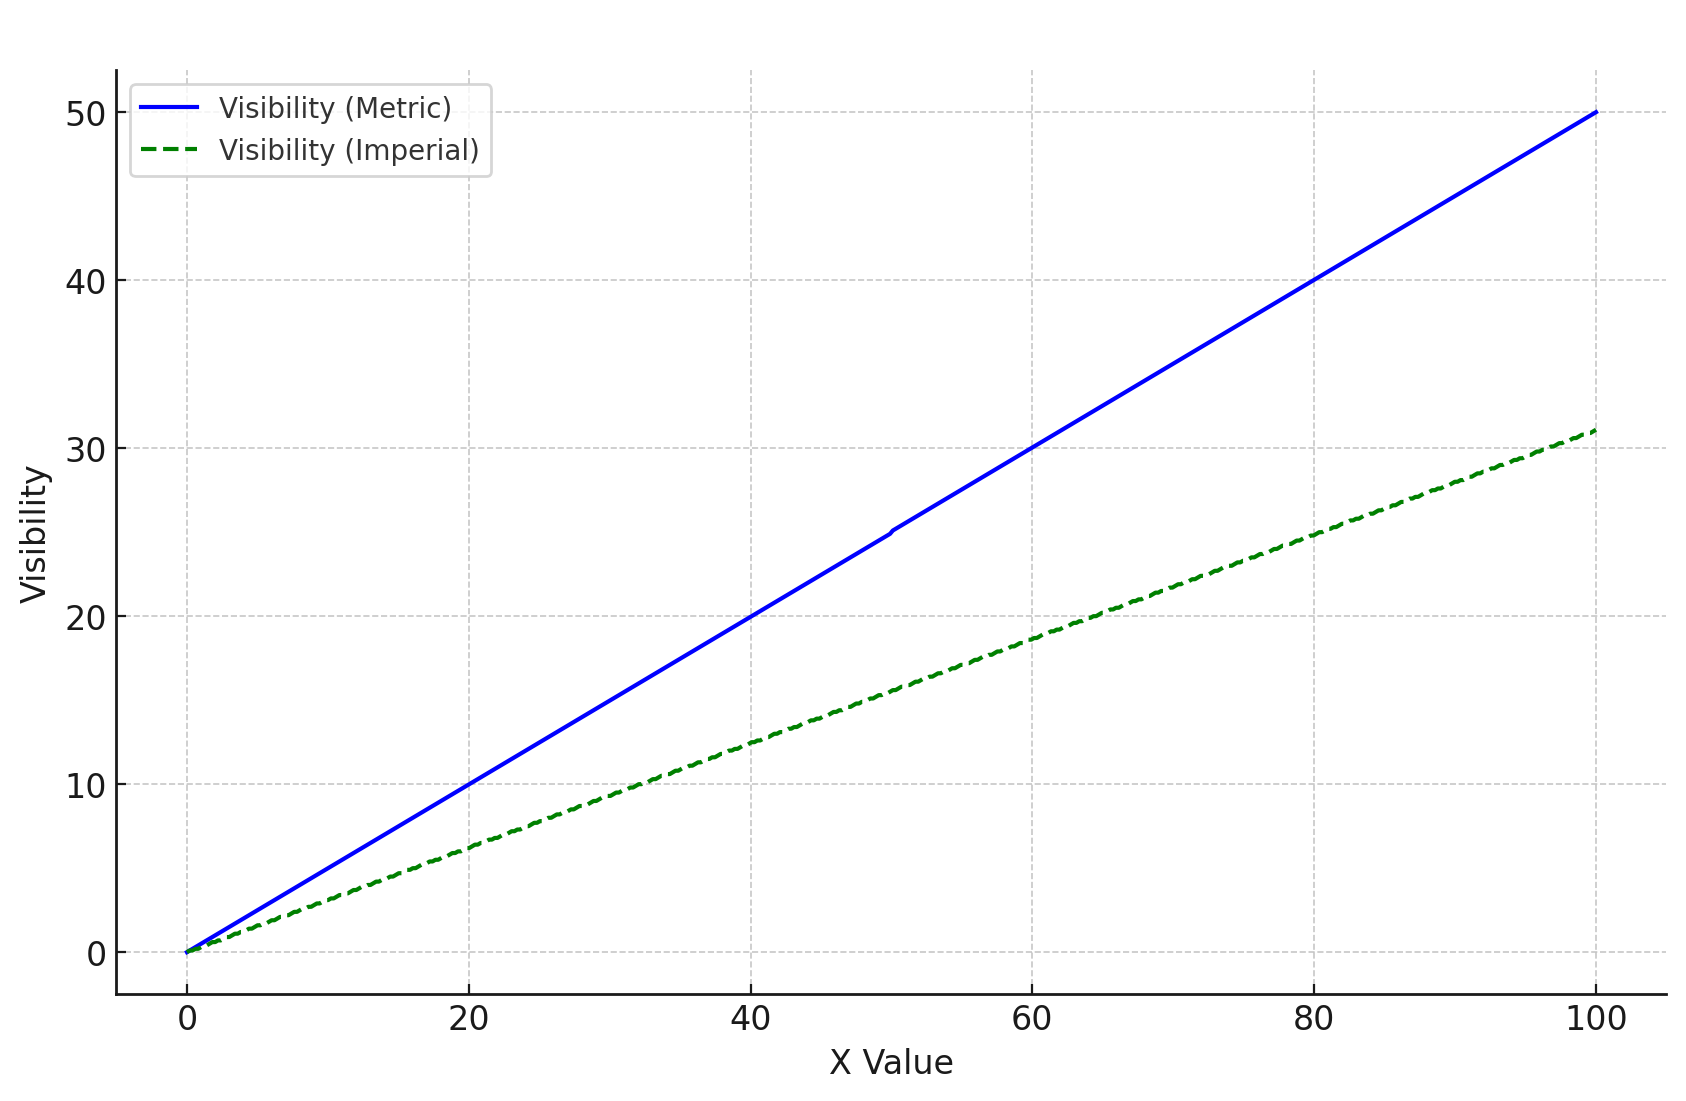 Visibility Distribution Visibility Distribution |
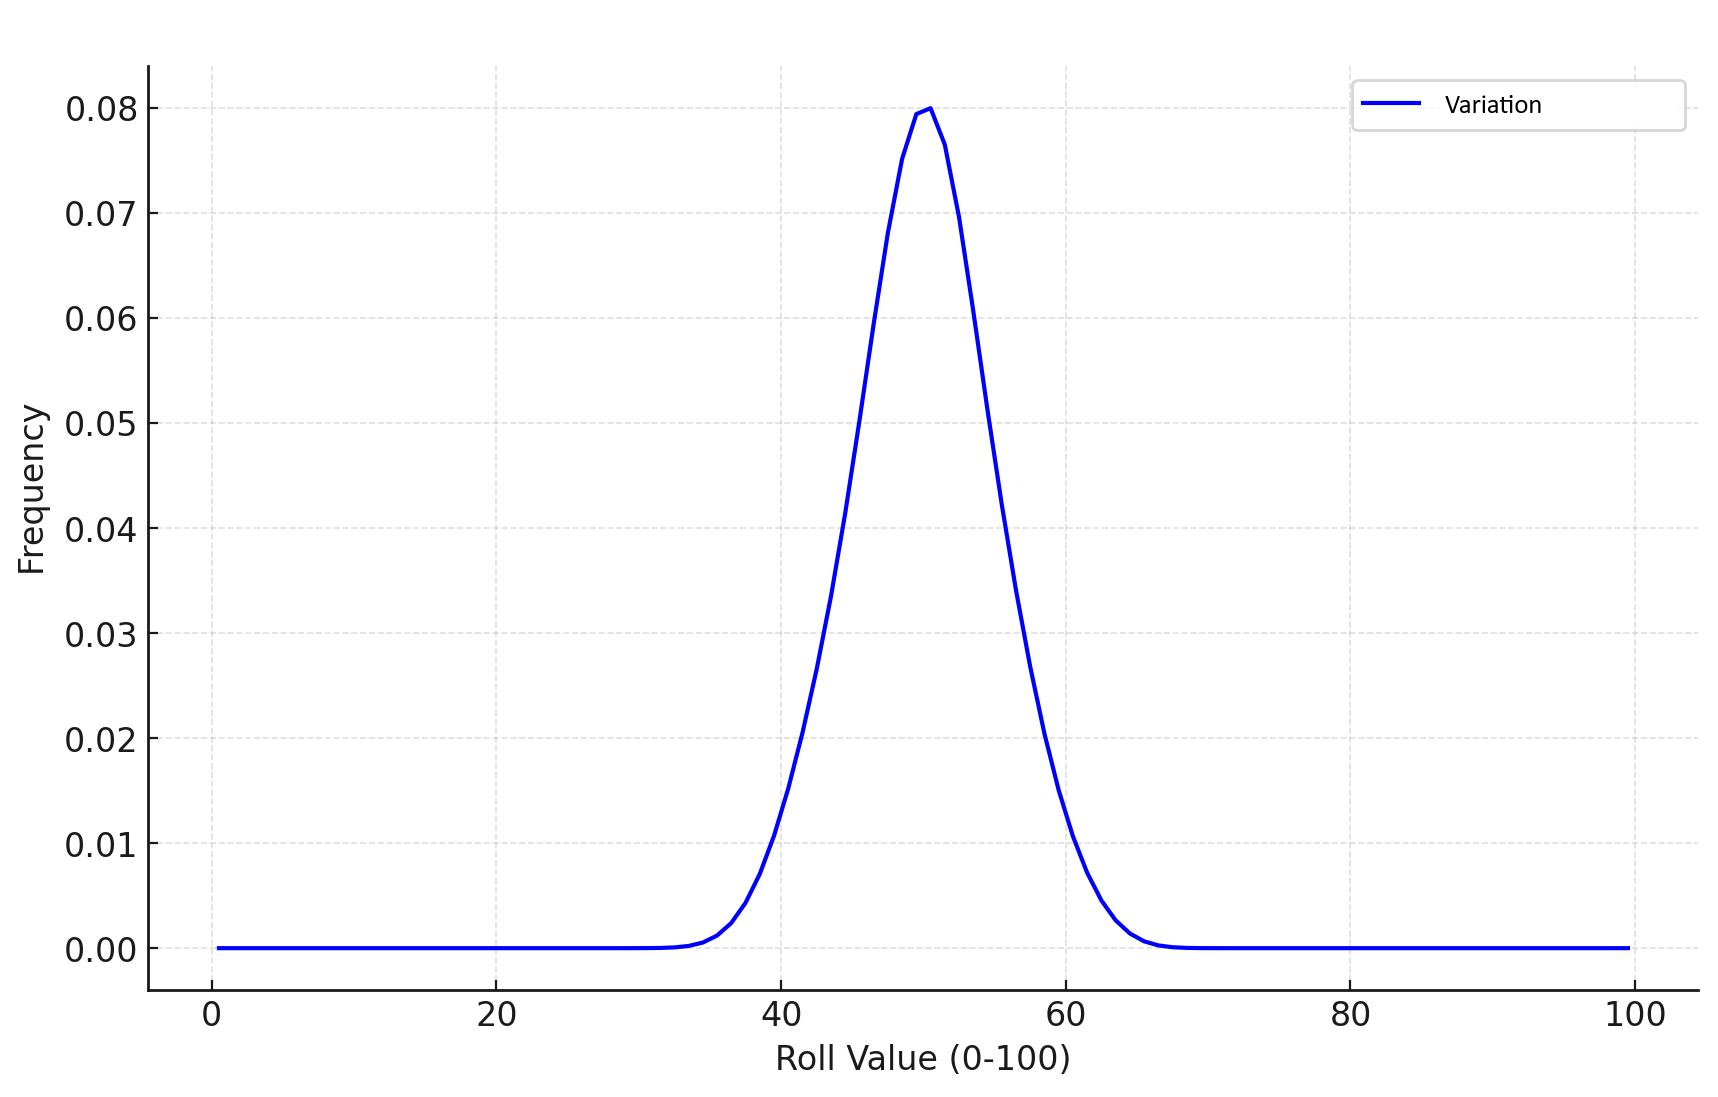 Bell Curve Graph Bell Curve Graph |
Users can select a specific climate configuration, which adjusts weather values based on predefined modifiers. These modifiers vary between -20 to +20 and are season-dependent, linked to the Calendar Module. For instance:
Icewind Dale (Forgotten Realms): During the "Long Winter" season, the temperature adjustment is -20, the maximum possible adjustment.
Weather values change by a maximum of +/- 5 points per day. Near seasonal boundaries (e.g., winter transitioning to spring), this limit increases to +/- 10 points. There is a small chance, especially near seasonal boundaries, that these adjustments can double to +/- 10 or +/- 20 points, resulting in massive weather shifts.
A Forced Trend feature can be toggled on or off. When activated, this applies a fixed +/- 20-point difference to simulate significant weather deviations, overriding standard adjustments, this option can be can be found underneath configutation

The weather system can be enabled or disabled in the configuration menu. It is enabled by default.
In the configuration menu, choose the climate zone your players are in (e.g., Northern Temperate or Equatorial). Climate zones are specific to the selected calendar. For instance, the Harptos climates are based on common adventure areas rather than a general climate type like temperate.
You can change the location the players are in under the 'Adjust Date' menu. Examples include selecting Plains, Swamp, or other terrain types.
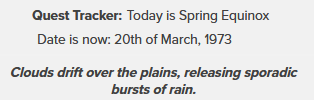
The module provides detailed descriptions of weather conditions based on the player's location and daily weather parameters. When weather is enabled, the description is shown to players as a /desc message whenever the day advances.
Each day, weather conditions are matched to predefined scenarios. For example:
"Persistent Downpour": {
    "conditions": {
        "temperature": { "gte": 50, "lte": 70 },
        "precipitation": { "gte": 60 },
        "wind": { "lte": 50 },
        "humidity": { "gte": 60 },
        "cloudCover": { "gte": 60 },
        "visibility": { "lte": 50 }
    }
}
Each scenario is linked to over 11,000 unique descriptions for potential player locations, such as plains, farms, or forests. These descriptions create immersive and varied environmental narratives.
The Calendar Module is a comprehensive system designed to manage and integrate various calendar types into your campaign. It supports custom events, lunar cycles, leap years, and dynamic seasonal markers.
The module includes several pre-configured calendars:
- Gregorian
- Harptos (Forgotten Realms)
- Barovian (Curse of Strahd)
- Golarion (Pathfinder) - A Pathfinder-specific calendar with varying month lengths and leap year logic.
- Greyhawk (Original and 2024 Default setting)
- Exandria (Critical Role)
Each calendar includes options for tracking lunar phases. The lunar cycle will display key phases, such as the below and are setting specific. Each Calander can have multiple moons and their lunar cycle including their custom phases is displayed along with the weather.
- New Moon
- Waxing Crescent
- First Quarter
- Full Moon
- Waning Crescent
Calendars with leap year logic will account for additional days. for example:
- Gregorian: Leap years occur every 4 years, except for years divisible by 100 but not by 400.
- Harptos: Leap days occur every 4 years as "Shieldmeet."
The module supports predefined seasonal and celestial events, such as:
- Spring Equinox
- Summer Solstice
- Autumn Equinox
- Winter Solstice
These events are always shown to your players.
Users can add custom events tied to specific dates. These can include festivals, holidays, or recurring milestones within your campaign world.
Select a calendar type from the configuration menu. The system will automatically set the date to the default starting date for the selected calendar.
Warning: Changing the calendar type resets the current date to the default date for the chosen calendar.
Users can add custom calanders by editing the QuestTracker Calendar Handout; as with other QuestTracker handouts all data is stored in the GM Notes field; the structure used is below as an example along with explanations for each field.
NOTE: it is very easy to mess this object up, so be careful. use a to confirm it is a valid object before refreshing the JSON files in the configuration settings.
{
  "mythic": {
    "name": "Mythic Calendar",
    "months": [
      { "id": 1, "name": "Primus", "days": 30 },
      { "id": 2, "name": "Secundus", "days": 30 },
      { "id": 3, "name": "Tertius", "days": 30 },
      { "id": 4, "name": "Quartus", "days": 30 },
      { "id": 5, "name": "Quintus", "days": 30 },
      { "id": 6, "name": "Sextus", "days": 30 },
      { "id": 7, "name": "Septimus", "days": 30 },
      { "id": 8, "name": "Octavus", "days": 30 },
      { "id": 9, "name": "Nonus", "days": 30 },
      { "id": 10, "name": "Decimus", "days": 30 }
    ],
    "daysOfWeek": [ "Day 1", "Day 2", "Day 3", "Day 4", "Day 5", "Day 6", "Day 7" ],
    "defaultDate": "0001-01-01",
    "startingWeekday": "Day 1",
    "dateFormat": "{day}{ordinal} of {month}, {year}",
    "significantDays": {
      "1-1": "New Era Day",
      "10-30": "Harvest Festival"
    },
    "lunarCycle": {
      "mystara": {
        "name": "Mystara",
        "baselineNewMoon": "0001-01-01",
        "cycleLength": 28,
        "phases": [
          { "name": "New Moon", "start": 0, "end": 7 },
          { "name": "First Quarter", "start": 7, "end": 14 },
          { "name": "Full Moon", "start": 14, "end": 21 },
          { "name": "Last Quarter", "start": 21, "end": 28 }
        ]
      }
    },
    "climates": {
      "mythic region": {
        "seasons": [ "Spring", "Summer", "Autumn", "Winter" ],
        "modifiers": {
          "temperature": { "Spring": 10, "Summer": 20, "Autumn": 15, "Winter": 0 },
          "precipitation": { "Spring": 15, "Summer": 10, "Autumn": 5, "Winter": 10 },
          "wind": { "Spring": 5, "Summer": 5, "Autumn": 10, "Winter": 15 },
          "humid": { "Spring": 20, "Summer": 15, "Autumn": 10, "Winter": 5 },
          "visibility": { "Spring": 10, "Summer": 20, "Autumn": 15, "Winter": 5 },
          "cloudy": { "Spring": 15, "Summer": 10, "Autumn": 20, "Winter": 25 }
        },
        "seasonStart": { "Spring": 3, "Summer": 6, "Autumn": 9, "Winter": 12 }
      }
    }
  }
}
Type: String
- Description: The name of the calendar.
- Example Value:
"Mythic Calendar" - Usage: Used as a display name for the calendar system.
Type: Array<Object>
- Description: Defines the months in the calendar year.
- Structure:
{ "id": Number, "name": String, "days": Number } - Fields:
id: Unique identifier for the month.name: Name of the month.days: Number of days in the month.
- Example:
[ { "id": 1, "name": "Primus", "days": 30 }, { "id": 2, "name": "Secundus", "days": 30 } ] - Usage: Determines the structure of the year and is used to calculate dates.
Type: Array<String>
- Description: Defines the days of the week.
- Example Value:
["Day 1", "Day 2", "Day 3"] - Usage: Provides names for weekdays, enabling mapping of days within a week.
Type: String
- Description: The initial date of the calendar system.
- Example Value:
"0001-01-01" - Usage: Acts as a reference point for date calculations.
Type: String
- Description: The name of the first weekday in the calendar.
- Example Value:
"Day 1" - Usage: Determines which day of the week the calendar starts on.
Type: String
- Description: The format for displaying dates.
- Example Value:
"{day}{ordinal} of {month}, {year}" - Usage: Configures how dates are rendered.
Type: Object
- Description: Highlights specific dates with special events or names.
- Structure:
"<month>-<day>": String
- Example:
{ "1-1": "New Era Day", "10-30": "Harvest Festival" } - Usage: Used to mark and describe important days.
Type: Object
- Description: Defines the phases and duration of lunar cycles.
- Structure:
{ "<moon_name>": { "name": String, "baselineNewMoon": String, "cycleLength": Number, "phases": Array<Object> } } - Fields:
name: Name of the moon.baselineNewMoon: Reference date for the new moon.cycleLength: Length of the lunar cycle in days.phases: Array of phase definitions.
- Example:
{ "mystara": { "name": "Mystara", "baselineNewMoon": "0001-01-01", "cycleLength": 28, "phases": [ { "name": "New Moon", "start": 0, "end": 7 }, { "name": "Full Moon", "start": 14, "end": 21 } ] } } - Usage: Tracks moon phases for gameplay or storytelling.
Type: Object
- Description: Defines seasonal and climate data for regions.
- Structure:
{ "<region>": { "seasons": Array<String>, "modifiers": Object, "seasonStart": Object } } - Fields:
seasons: List of seasons.modifiers: Environmental modifiers (temperature, precipitation, etc.).seasonStart: Month identifiers marking the start of each season.
- Example:
{ "mythic region": { "seasons": ["Spring", "Summer"], "modifiers": { "temperature": { "Spring": 10, "Summer": 20 } }, "seasonStart": { "Spring": 3, "Summer": 6 } } } - Usage: Provides seasonal and environmental context.
NOTE: Keeping values between -20 and 20 will allow the weather module to perform correctly.
Navigate to the "Events" section in the configuration menu. Add, edit, or remove events as needed. Assign dates for recurring or one-time events.
 |
 |
 |
You can set or move the date using the "Adjust Date" menu.
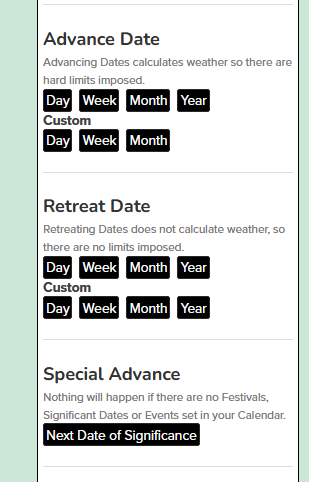
There are also quick commands available for date adjustments. These commands provide a streamlined interface, bypassing the full GUI, and include a cut-down weather display with key information for players:
- !qt-date advance Increases the date by 1.
- !qt-date retreat Decreases the date by 1.
The Quest Tree Page provides a visual representation of quests and their relationships.
Make sure the page Quest Tree Page is created, this script will not create this page automatically. Once this is done, navigate to the configuration menu. Press the "Generate Quest Tree Page" button
The Quest Tree Page will be updated sporadically but often you may need to refresh the page by pressing the button again.
- Quest Visibility
- Quest Status
- Quest Name:
- Quest Description:
- Changes to relasionship data
- adding or deleting new quests
This is intentional as the calculations to create such a page can get increasingly complex, and recalculating new quests and relationship is something which needs to be done irregually. Also, I cannot see a need for this to be updated on the fly.
Quests that are marked as hidden are not shown on the quest tree, although it can become obvious if entire sections are missing or ther is a 'quest shaped gap' in the viible tree. When a quest is hidden all of their connections are also hidden, this can result in edge cases where there is no obvious connection between quests as the interveneing quests are hidden. You need to keep this in mind when designing Quest Trees.
Quests are organised into quest groups on the Quest Tree page, they are ordered in their creation order, this order is seen in the UI.
Quest can have images which are tokens. These are set manually using the rollable table; they will not how unles it is directly pulled from your own roll20 library (no external or using premium assets)
Simply use the command !gmnote (create it as a token macro) when selecting a quest token and it will open up an small menu with quick functionality with the main interface. actioning any of these commands will open up the full quest interface afterwards. I highly recomend using !gmnote --config to toggle off the footer buttons when you set it up.
Use the in-game interface provided by the tool. Simply open the menu to begin navigating quests, rumors, and events by typing !qt into chat
Yes, the graphical interface allows you to adjust weather trends, add forced conditions.
Mutually exclusive quests are visually highlighted and organized in the quest tree to prevent conflicts.
Technically, yes you can, by editing the JSON files direct and setting the date to before these changes took place. It is advisable to use the inbuilt tools and make sure the weather runs for a couple of months bfore you start the campaign to even out any extreme fluctuations. Look to forcing weather trends if you wanted to have a drought or cold snap effect the world outside of the seasonal changes.
Can I change the order of Quest Groups to have them display in a different order on the Quest Tree Page
Yes, you can carefully edit the qt-quest-groups rollable table, although this is not an ideal solution and I may add a reordering functionality later should there be call for it.
I've noticed you can create quest relationships and then move them into separate quest groups, this results in weirdness on the Quest Tree Page
Yes, that is a workaround to having relationships between quest groups and it can result in a very pretty Quest Tree Page, but without a lot of trial and error the Quest Tree Page is not designed to work with this in mind. I left this in as the only other option would be to wipe all relasionships when you add a quest to a quest group which would cause more frustration.
- v1.0.2 Added Krynn (Dragonlance) and Galifar (Eberon) Calanders. also expanded to allow for multiple moons and different cycles. Added the smaller and secondary moons to both Exandria and Grekhawk calander.
- v1.0.1 Various small fixes. Made Compatable with Supernotes Mod
- v1.0 Official Release
- v0.9.2 Fixed quest dropdown to deal with single quests without a dropdown. Also an ungrouped quest which get assigned a relasionship to a quest within a quest group automatically now gets assigned to that quest group.
- v0.9.1.7.2 Adjusted font and rectangle size on quest tree page
- v0.9.1.7.1 Swapped DELETE for CONFIRM in a popup
- v0.9.1.7 Removed JumpGate Toggle and where it was used (paths fixed now), kept variable in case it is needed later.
- v0.9.1.6 If a rollable table needs to be created, it is now hidden from players.
- v0.9.1.5 Added Switches to toggle between Imperial or Metric Weather Measurements.
- v0.9.1.4 Fixed Allias Date Advance to show cut down description.
- v0.9.1.3 Fixed Climate modifiers and adjusted bellcurve
- v0.9.1.2 Disabled Quest Relationship buttons when no quests available.
- v0.9.1.1 Fixed Quest Group Dropdown Menu
- v0.9.1 Adjusted climate values and streamlined climate values
- v0.9.0.1 Fixed rumour filtering issue
- v0.9 Initial Upload
Contributions are welcome! Please submit pull requests or report issues on the GitHub repository:
- Author: Steven Wrighton (Boli)
- Contact: Roll20 Profile
- License: MIT
Thank you for using Quest Tracker. Happy gaming!