Musashi and Emu68 on the same µSD, booting from the same drive
Index:
- Raspberry Pi OS installation
- Repartitioning
- Installing Musashi and AmigaOS
- Installing Emu68
- Setting up the switching procedure: scripts
- Mounting FAT partition
- Setting apart Musashi/Emu68 programs
First of all, this procedure is not for beginners, some of the steps can, if you make a mistake, destroy your hard disk or your data. Seriously, I consider this procedure for EXPERTS, for users who are already good with Linux commands, with the configuration and use of the PiStorm, with the AmigaOS and with computing in general.
As I put in another guide, the one on shared HDFs: "caveat emptor", or "do it at your own risk". This has worked for me, but it might not work for you, it might destroy your microSD card, set your A500 on fire, kill your pets, make your house explode.......... Whatever happens, it's up to you, not me.
MY ADVICE: read the documentation first and then proceed with the installation.
IMPORTANT NOTE: these instructions DO NOT COVER the specific configuration of Musashi or Emu68, on things like networking or RTG. It is possible that, being a shared unit, some problem, some incompatibility, may arise, but it is not the aim of these instructions. In any case, we will discover them and, if they are important enough, I will include them here so that they can be taken into account.
Let's start:
This part is covered in the first step of the PiStorm software installation guide ( https://github.com/captain-amygdala/pistorm/wiki/PiStorm-Software-Installation#Raspberry-Pi-OS-installation ). Note, ONLY POINTS 1 and 2. That is, the ones that explain how to write the RPi OS image to the µSD card.
The first difference this time is that, instead of installing the Lite version, I have installed the desktop version, the Full version and, VERY IMPORTANT, the Buster (legacy) version, to avoid RTG configuration problems. The desktop version allows me to have a browser to, for example, copy and paste the installation commands from the browser, with the instructions page open (the PiStorm wiki), to the shell where they are executed (be careful, in the shell Ctrl-C to copy or Ctrl-V to paste doesn't work, you have to use the right mouse button to get the menu with those options).
The second and decisive difference is that, once the image has been written to the µSD, I am not going to put it on the RPi yet to finish the process, it is necessary to work on its partitions first.
For this installation I used a 32 GB card, but you can do it with any size, deciding how much space you want to dedicate to each partition. When the RaspBerry Imager (or any similar utility) copies the Buster image onto the µSD, what it does is create two partitions: a small 256 MB FAT32 partition, from which the initial system load is done, and another EXT4 partition of about 3 GB, leaving the rest of the space unpartitioned, free space. If we were to put this card directly into the RPi, what the system would do when booting would be to expand the file system of the EXT4 partition, the one containing Linux, to occupy all the free space, and we are not interested in that, so we are going to do it manually.
What is needed is a utility that allows you to move and resize partitions in a non-destructive way, so that you do not lose the data, features and properties of existing partitions, e.g. the UUID of the EXT4 partition, which is essential for the correct loading of Linux.
At first I thought of a very good utility that can be installed on Linux, GParted, so that you could do everything from the RPi itself, or even download from its page a "Live" disk/USB with which to boot any Intel computer, including Macs, but, after several tests and a lot of reading, it turns out that GParted has an annoying bug that has lasted over time: it does not allow moving/resizing FAT32 partitions equal to or smaller than 256 MB. That bug is in the Linux libparted library, the library on which practically all Linux tools that allow you to do that are based.
So, there is no choice but to resort to Windows or Mac tools. For Mac, the best (and the one I've used) is Paragon's Hard Disk Manager, which is commercial but has a 10-day trial. ( https://dl.paragon-software.com/demo/HDM4Mac_trial.dmg ). For Windows there are several (WARNING, I have not tested them), some free for personal use, some freeware: Windows, free for personal use:
https://www.partitionwizard.com/free-partition-manager.html
https://www.easeus.com/download/partition-manager.html
Windows, freeware:
https://software.lsoft.net/PartManFree-Setup.exe
Of course, if you know of any other tool that can move/resize partitions in a non-destructive way, you are free to use it. Just make sure it recognises EXT4 partitions, not all of them do, some Windows apps only work with NTFS and FAT partitions.
Let's get down to business: with the Hard Disk Manager application for Mac running, I insert the card on which I have recorded RPiOS Buster and what I see is this:
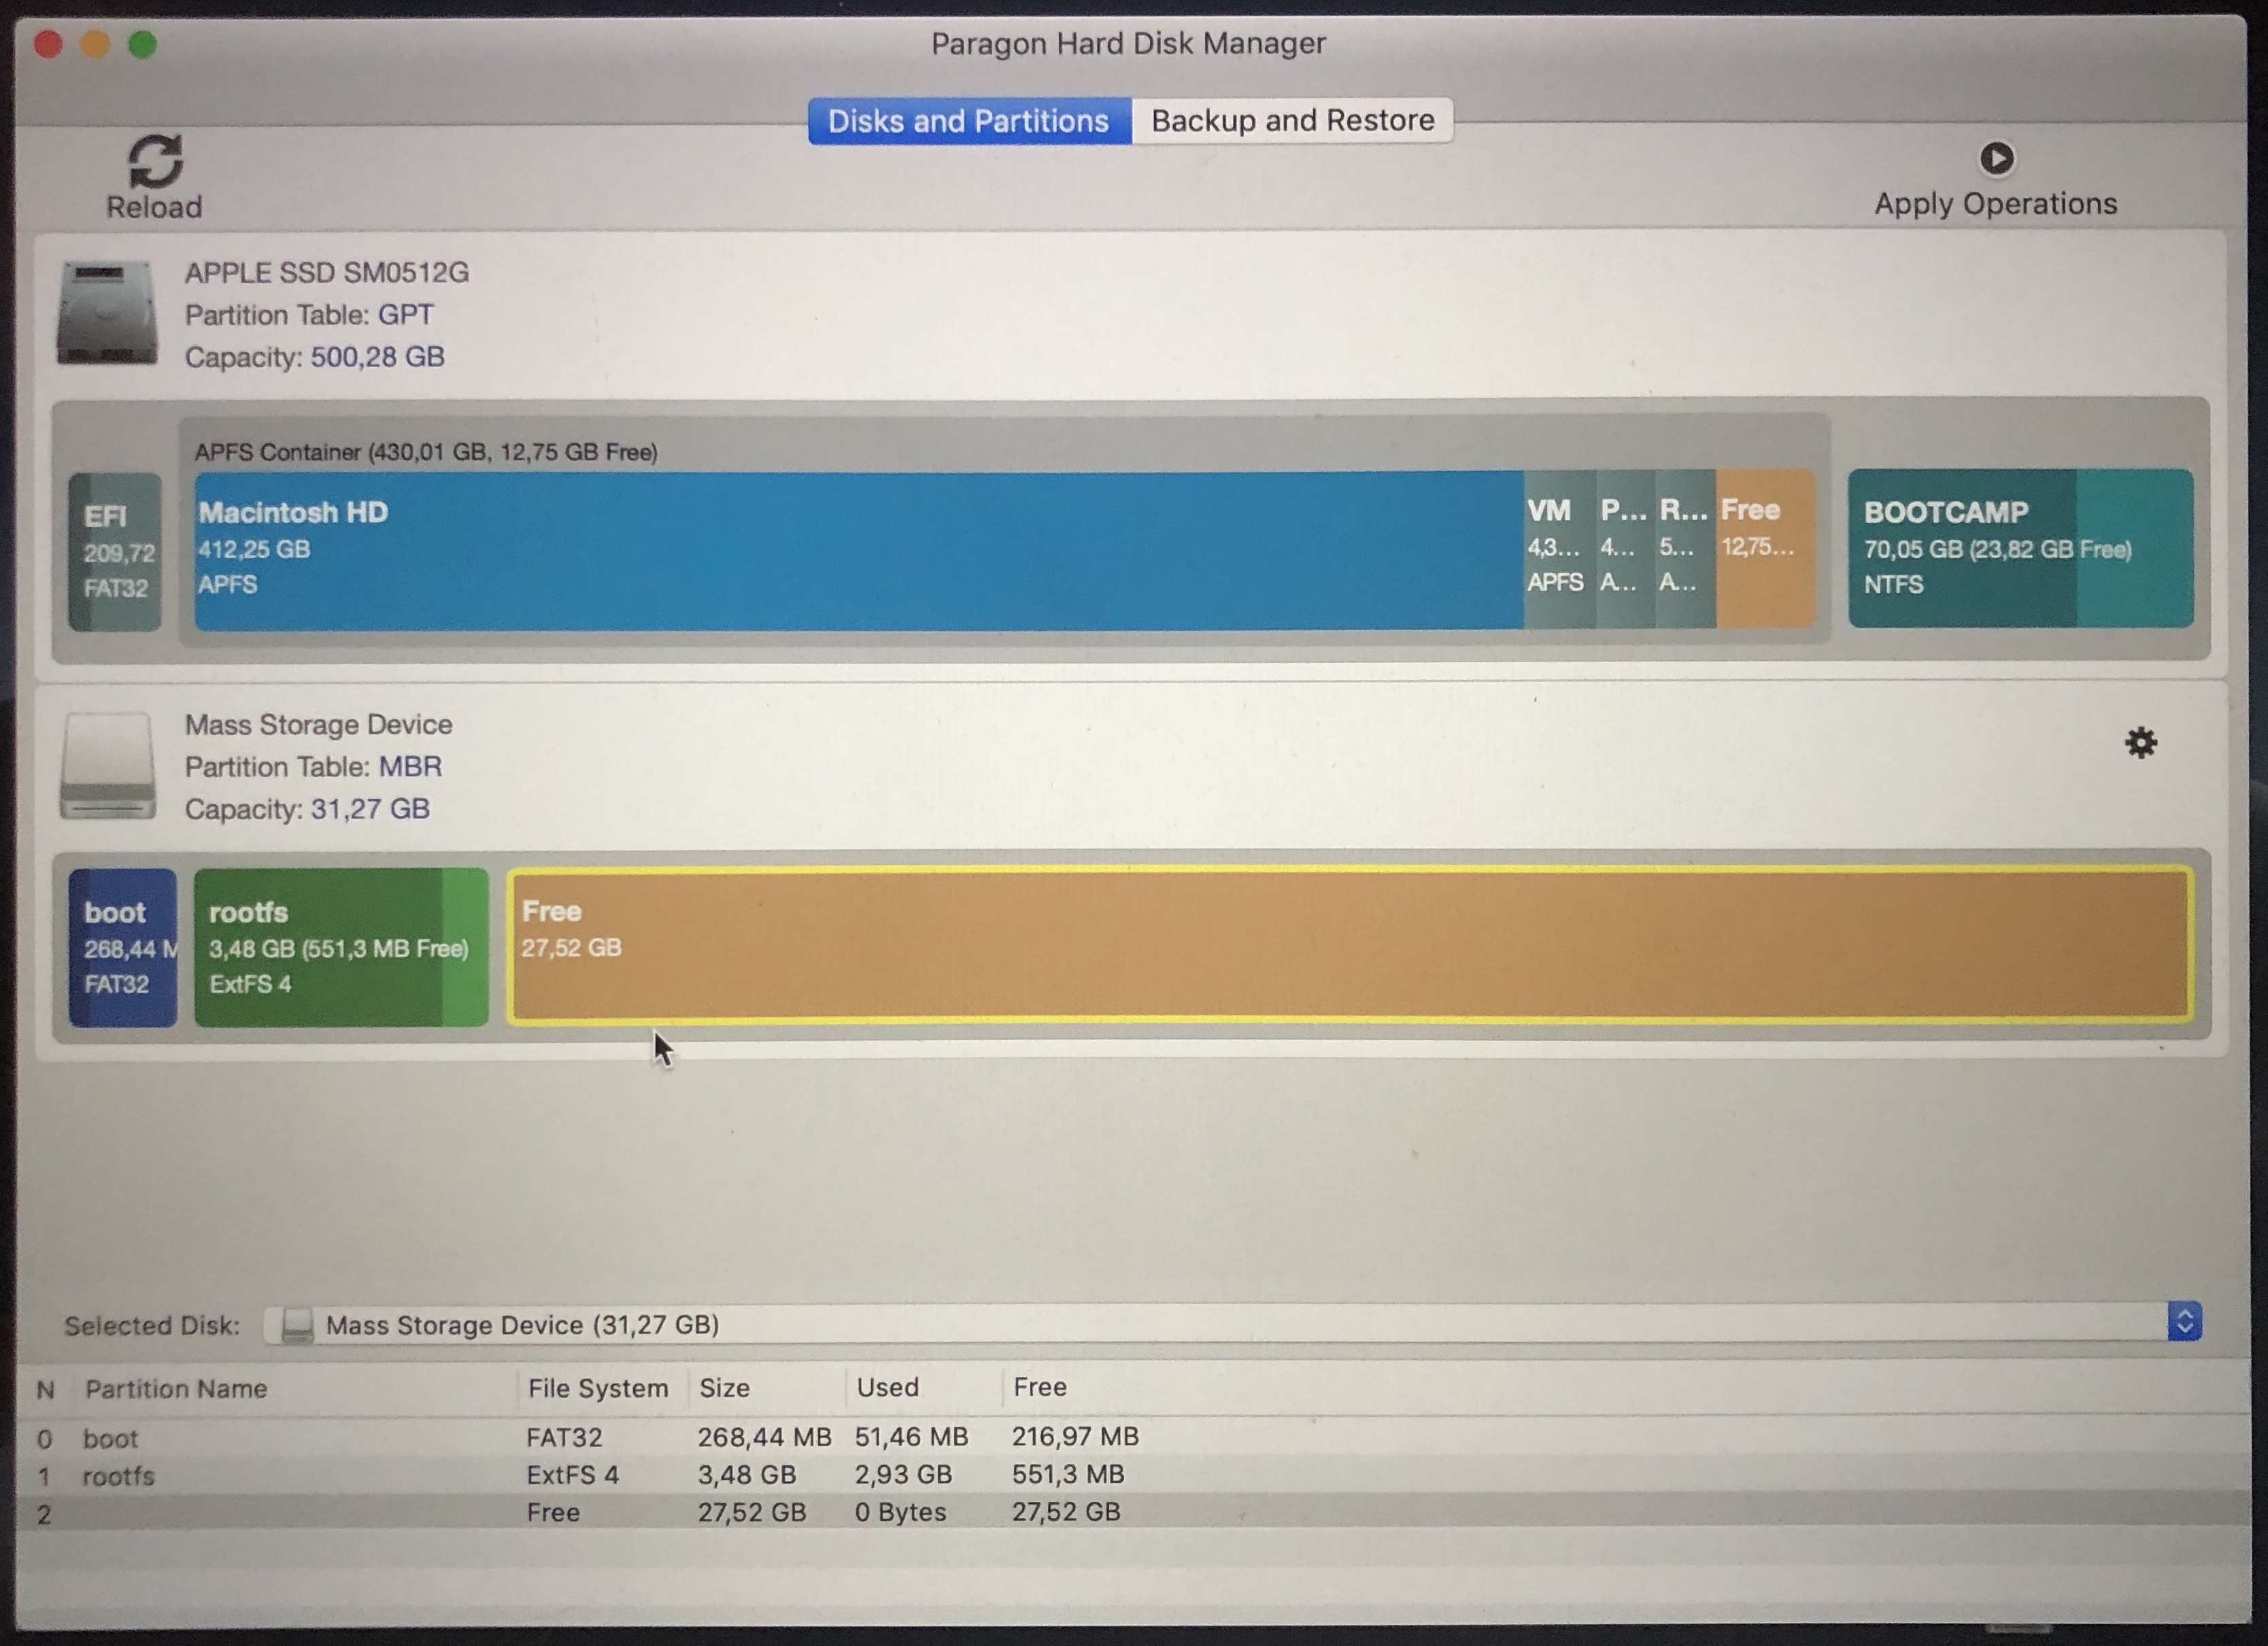
At the bottom you can see the structure of the card: FAT32 + EXT4 + Free. What we are going to do is to create a partition for Emu68 and move and make FAT32 and EXT4 bigger. It is worth having a larger FAT32 because it can be used to move data from another computer, as this format is "universal".
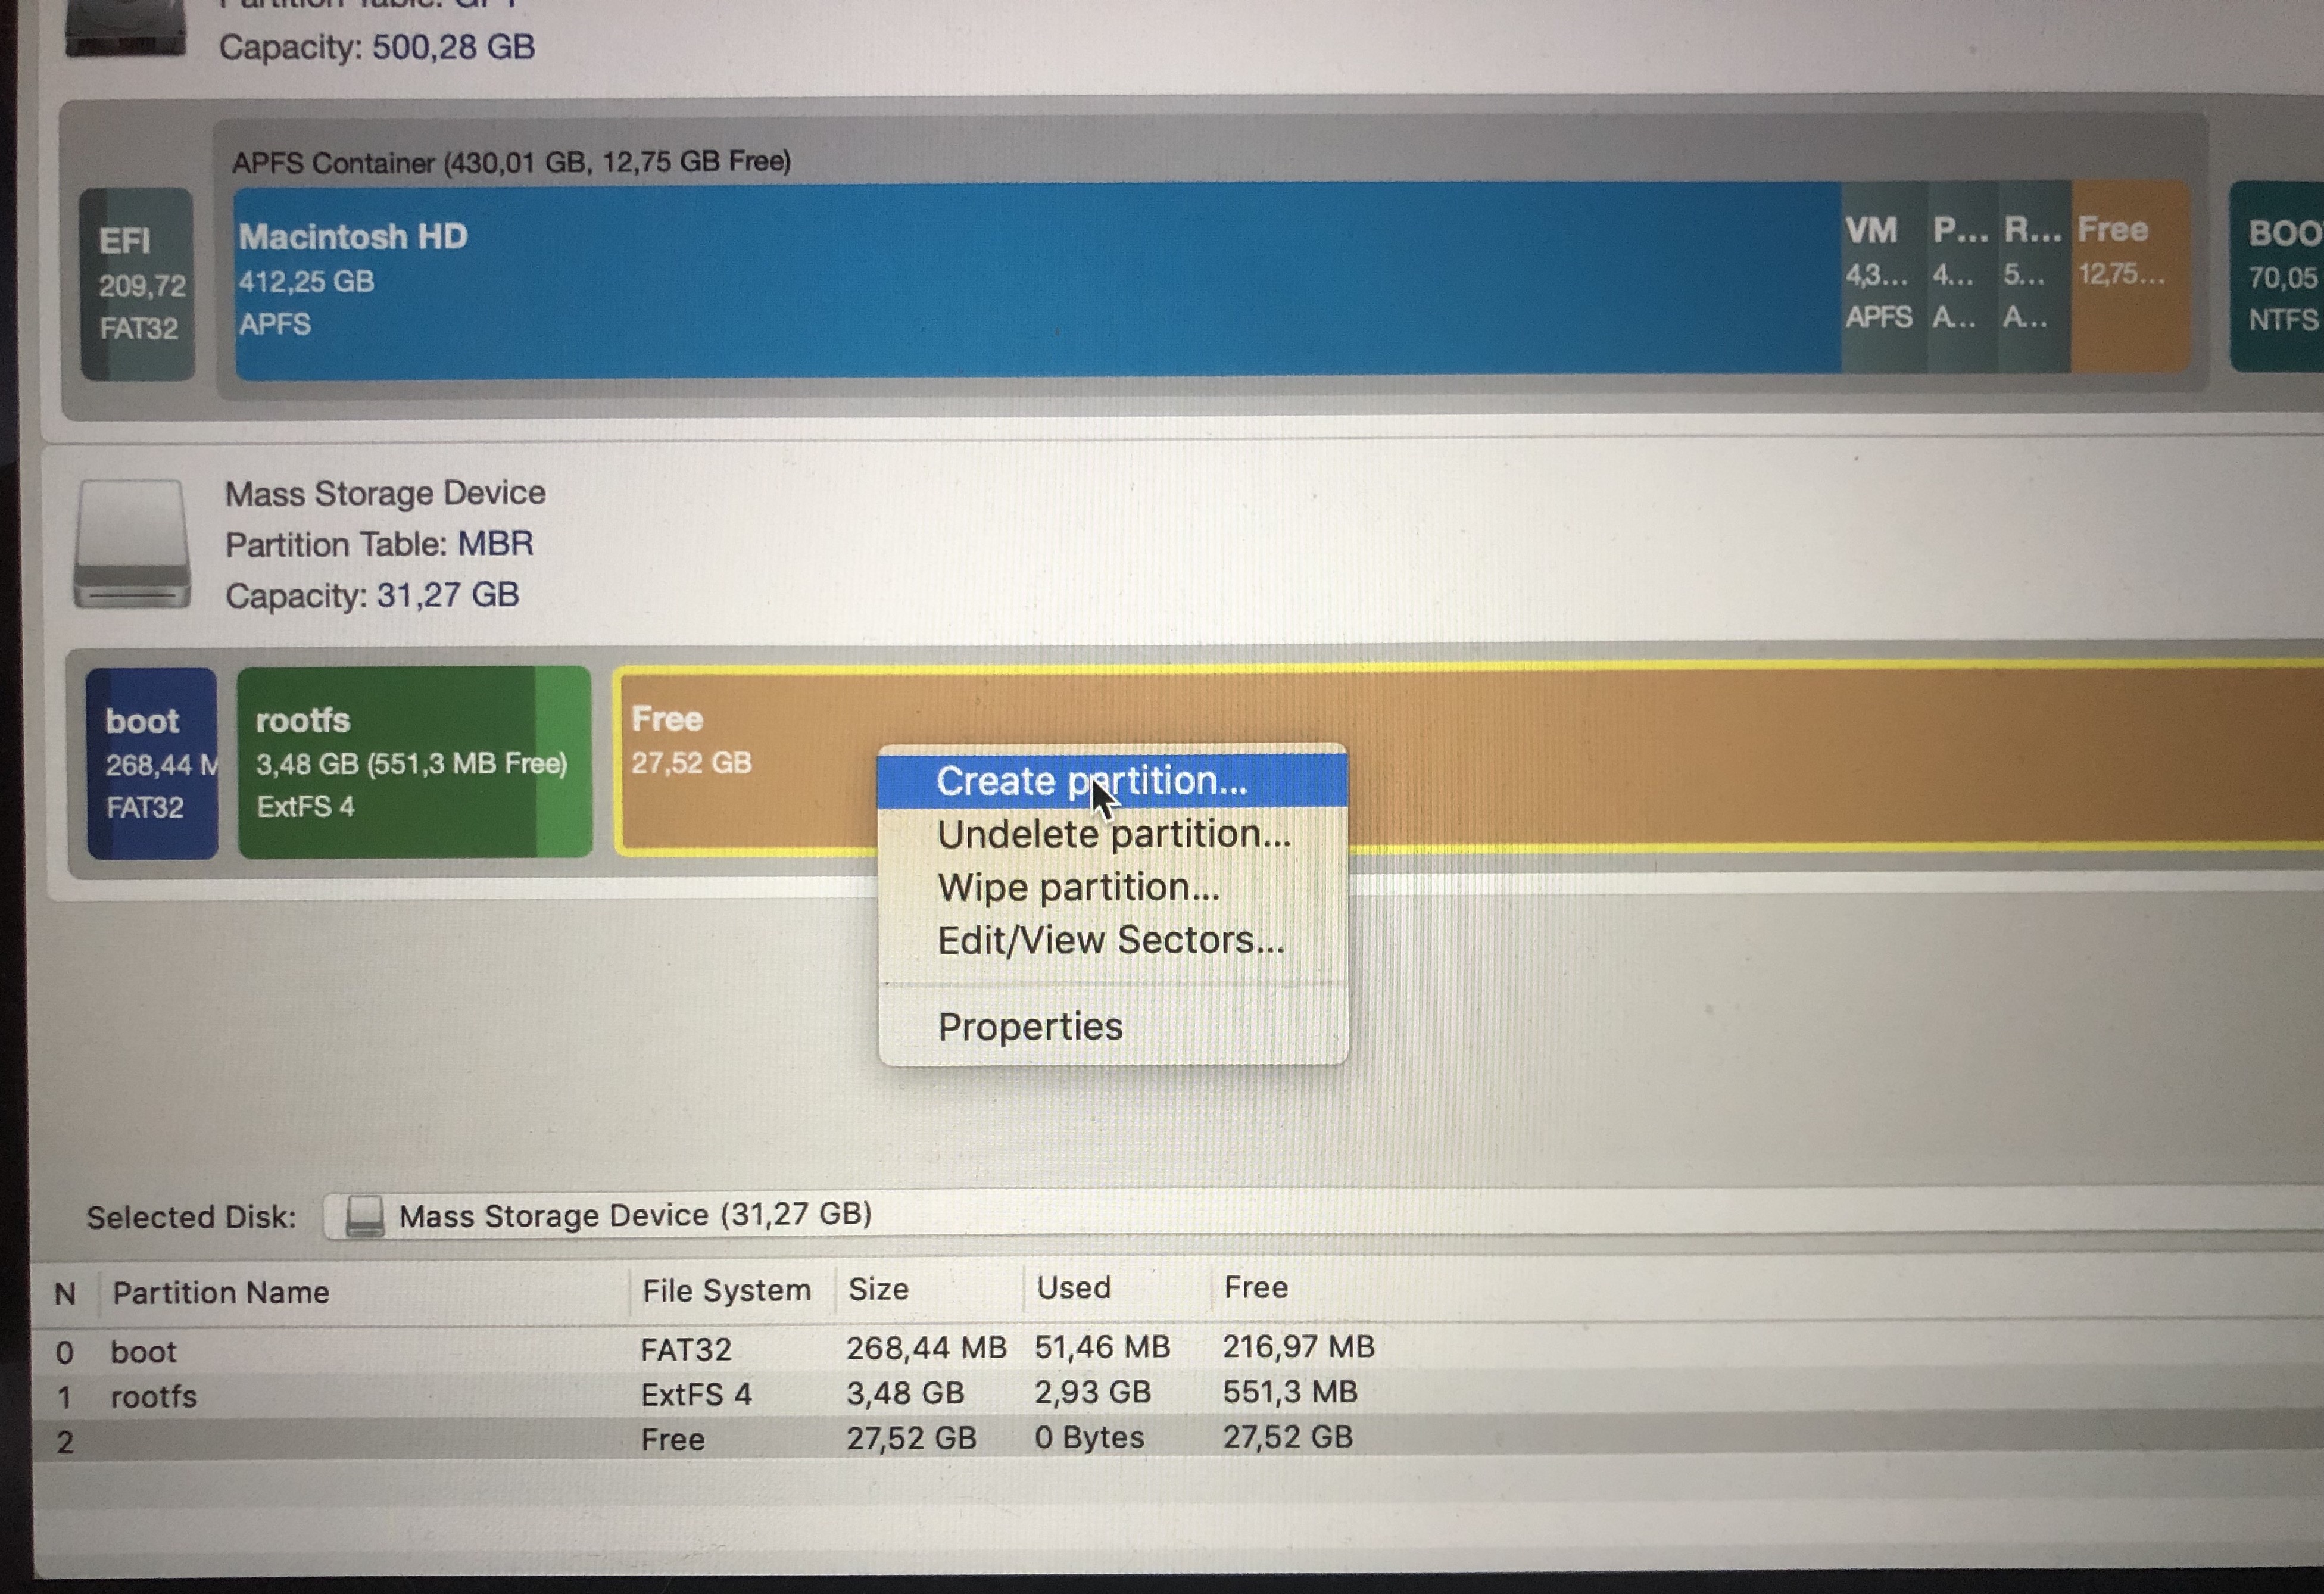
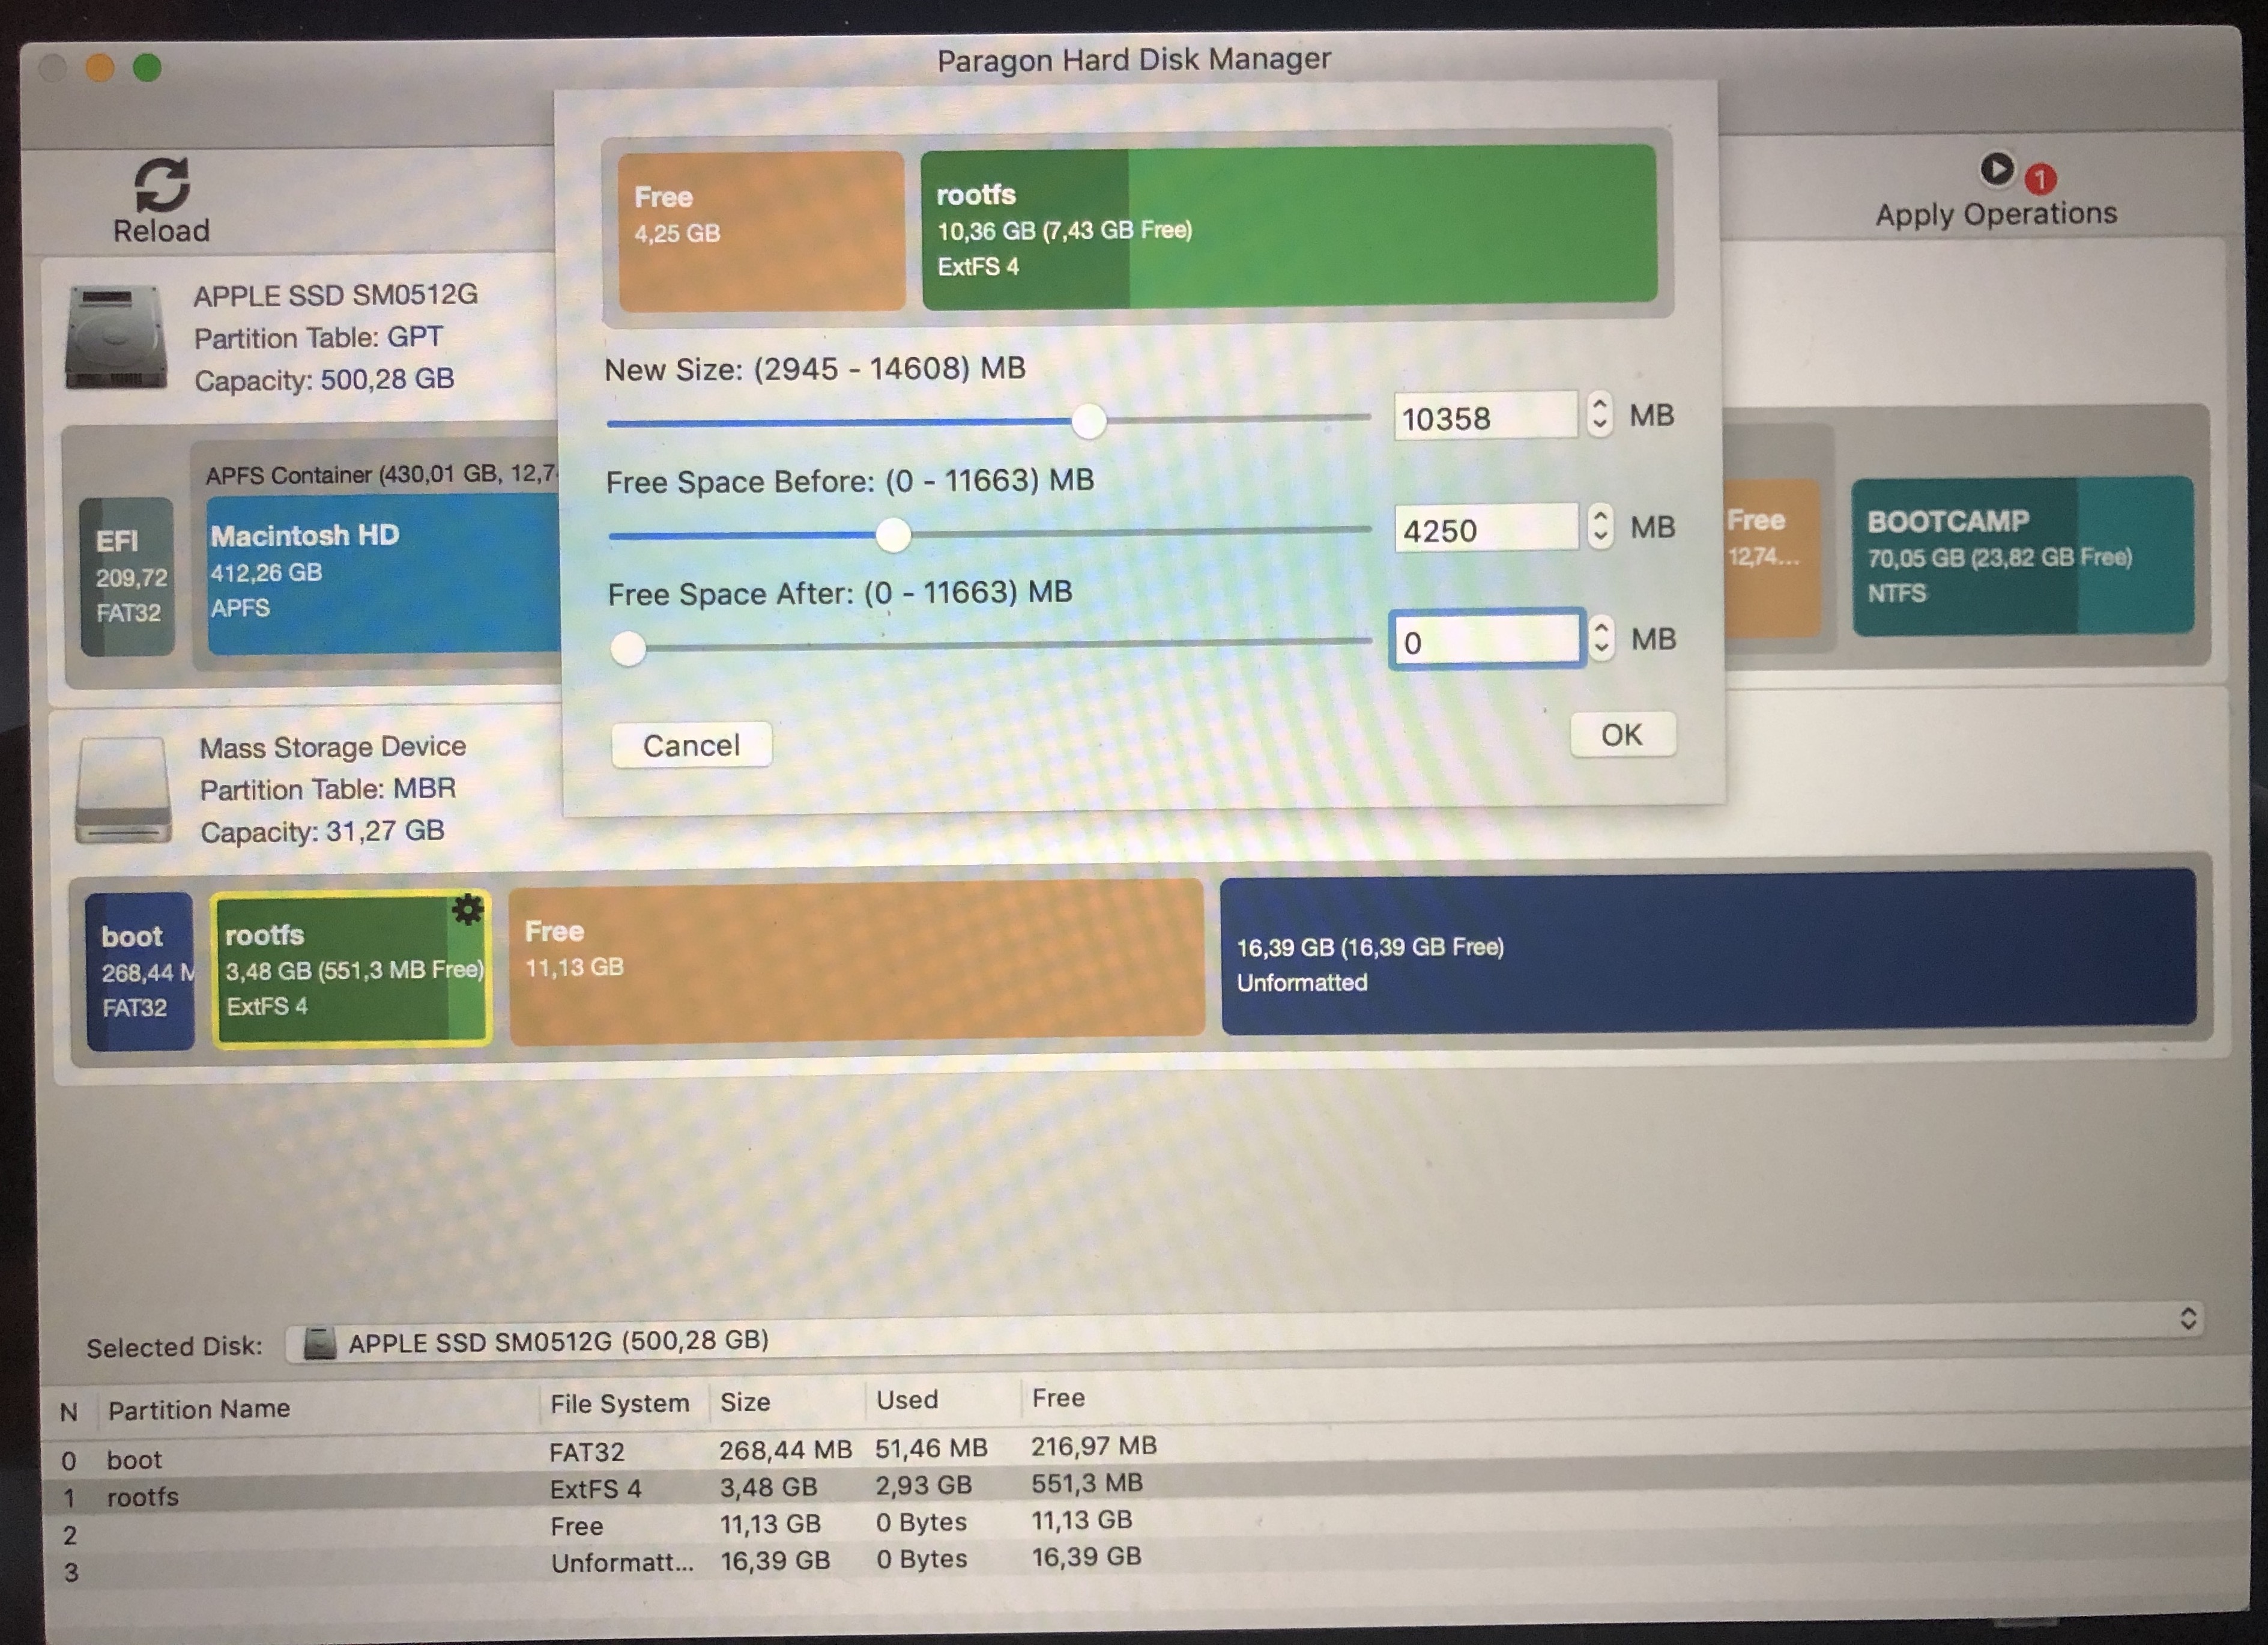
We start from the back to the front. First, we define the partition for Emu68, we are going to give it half the space on the card, about 16 GB. Click on the unpartitioned space, Free, and create a new partition, one that goes to the end of the available space, counting the 16 GB from the end:
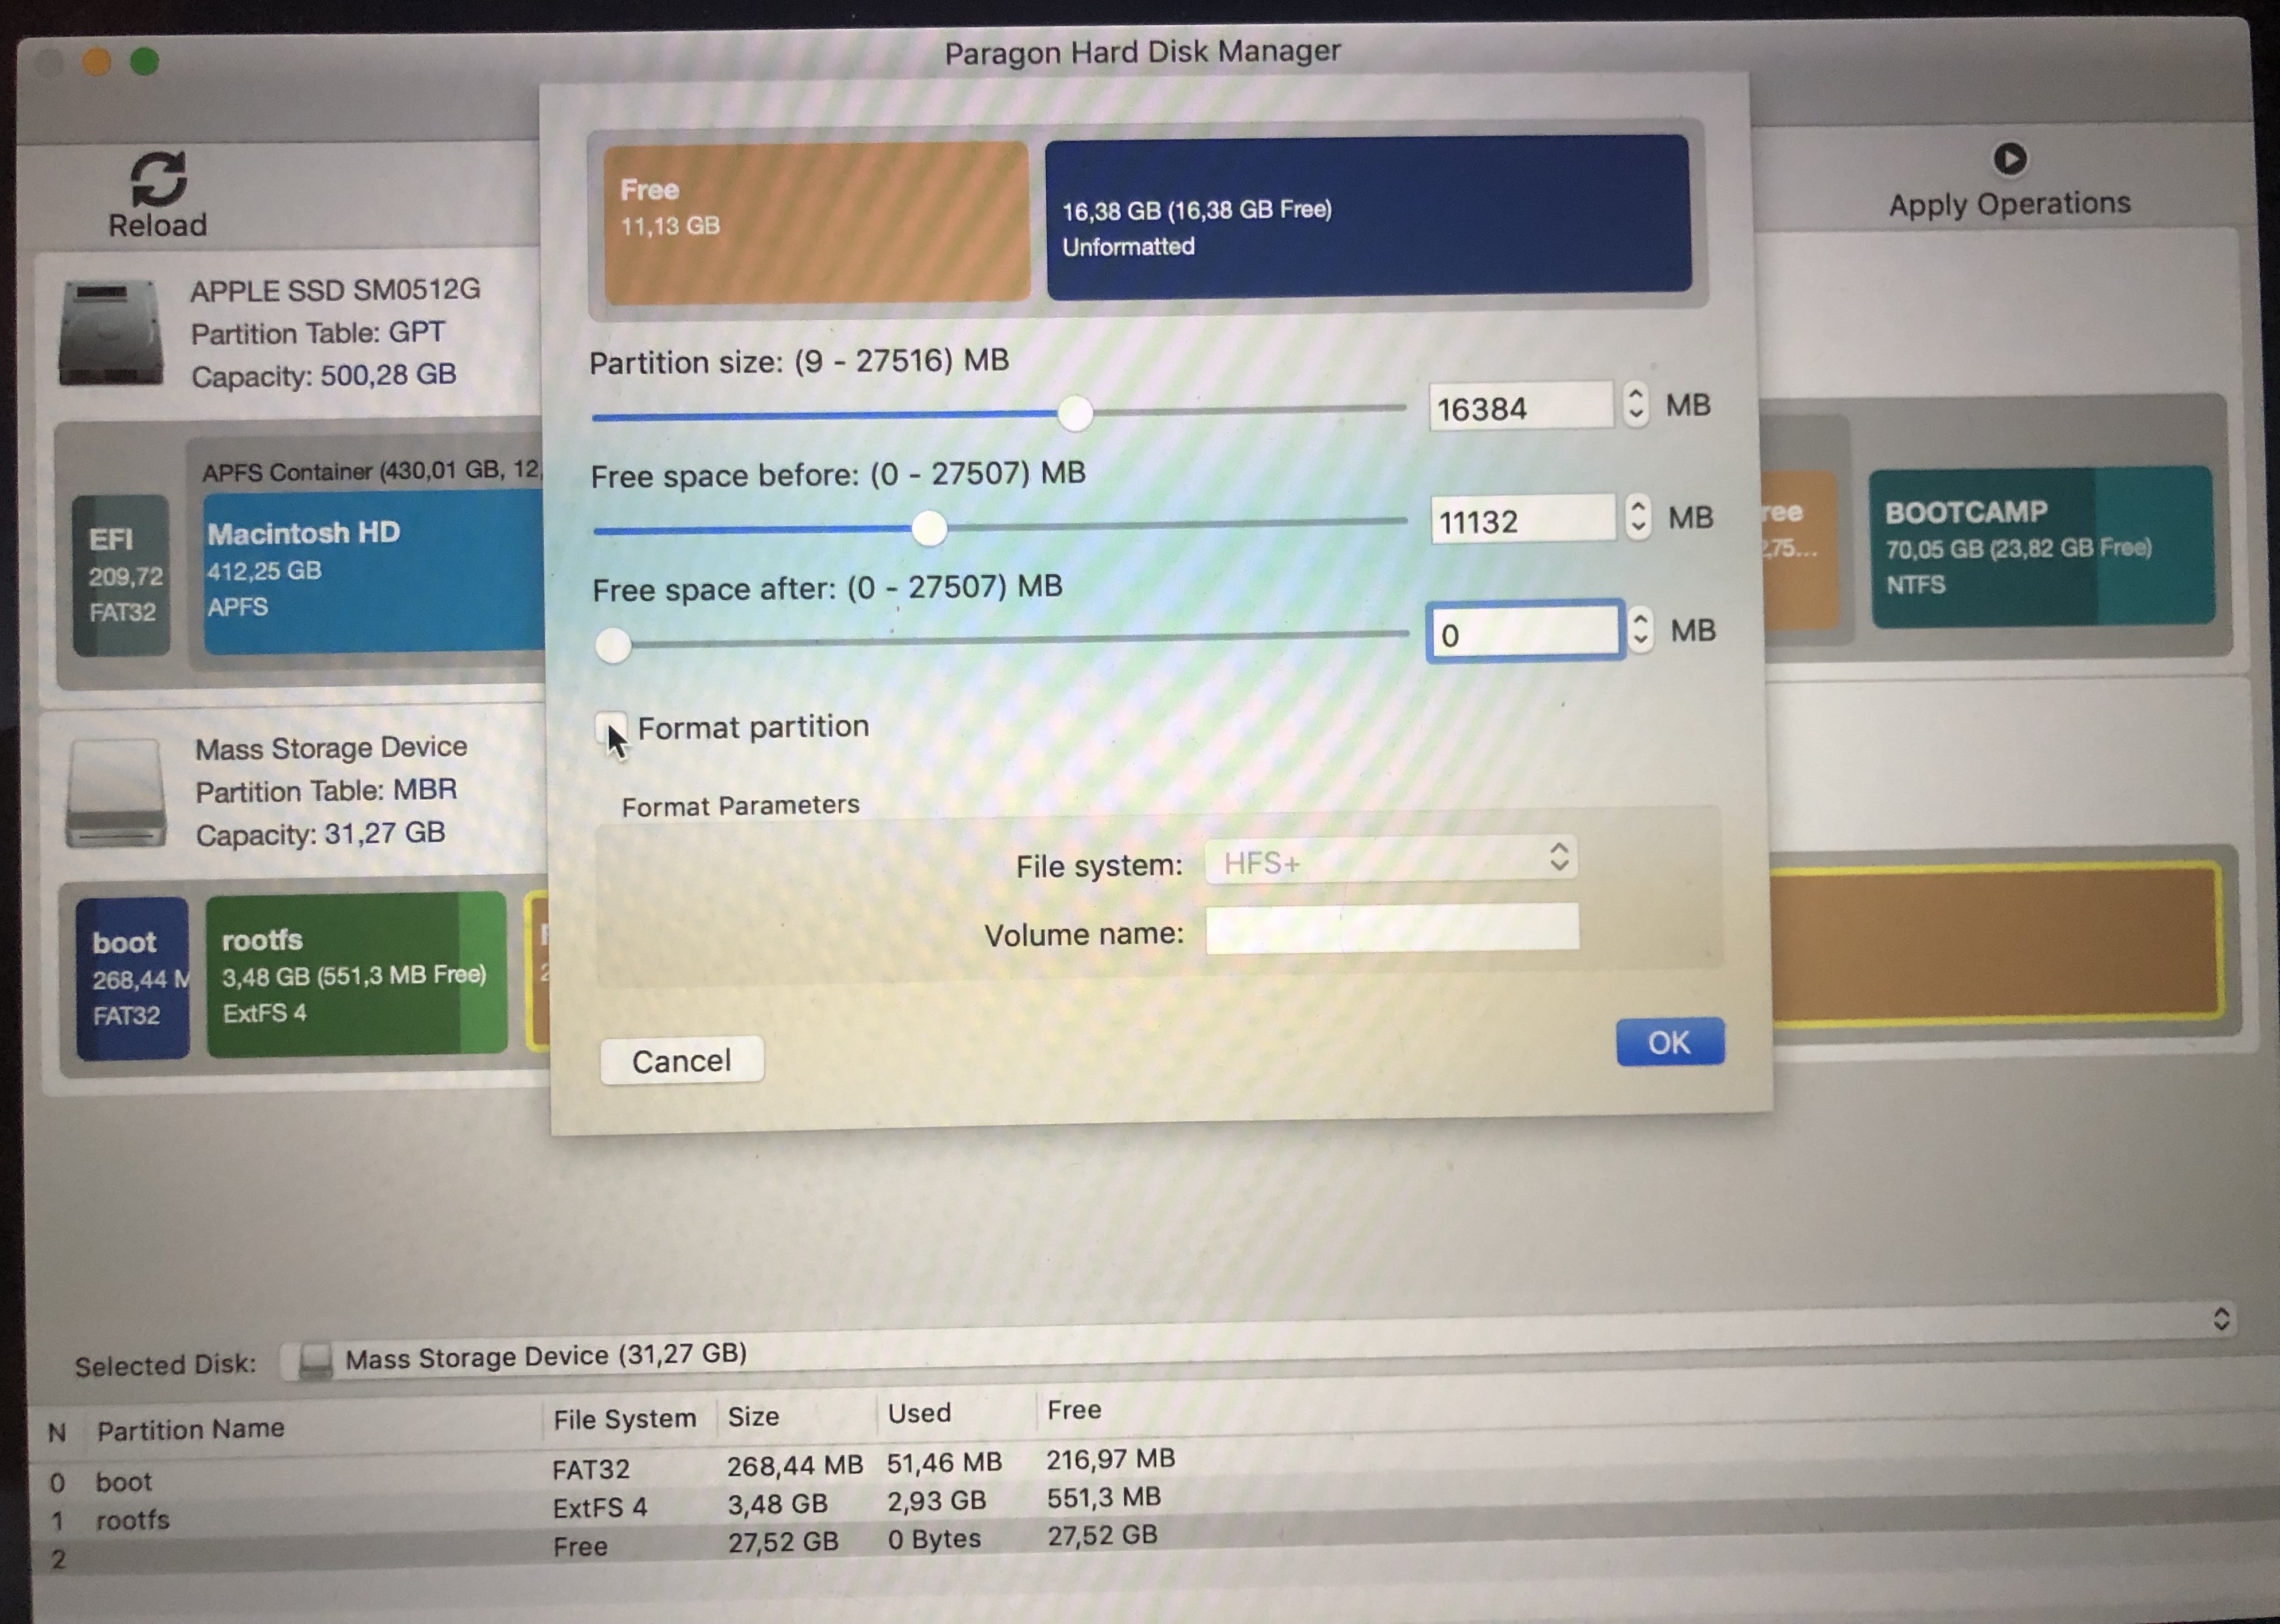
There will still be some space left in front of the partition, which we will use to move and increase the EXT4 partition:
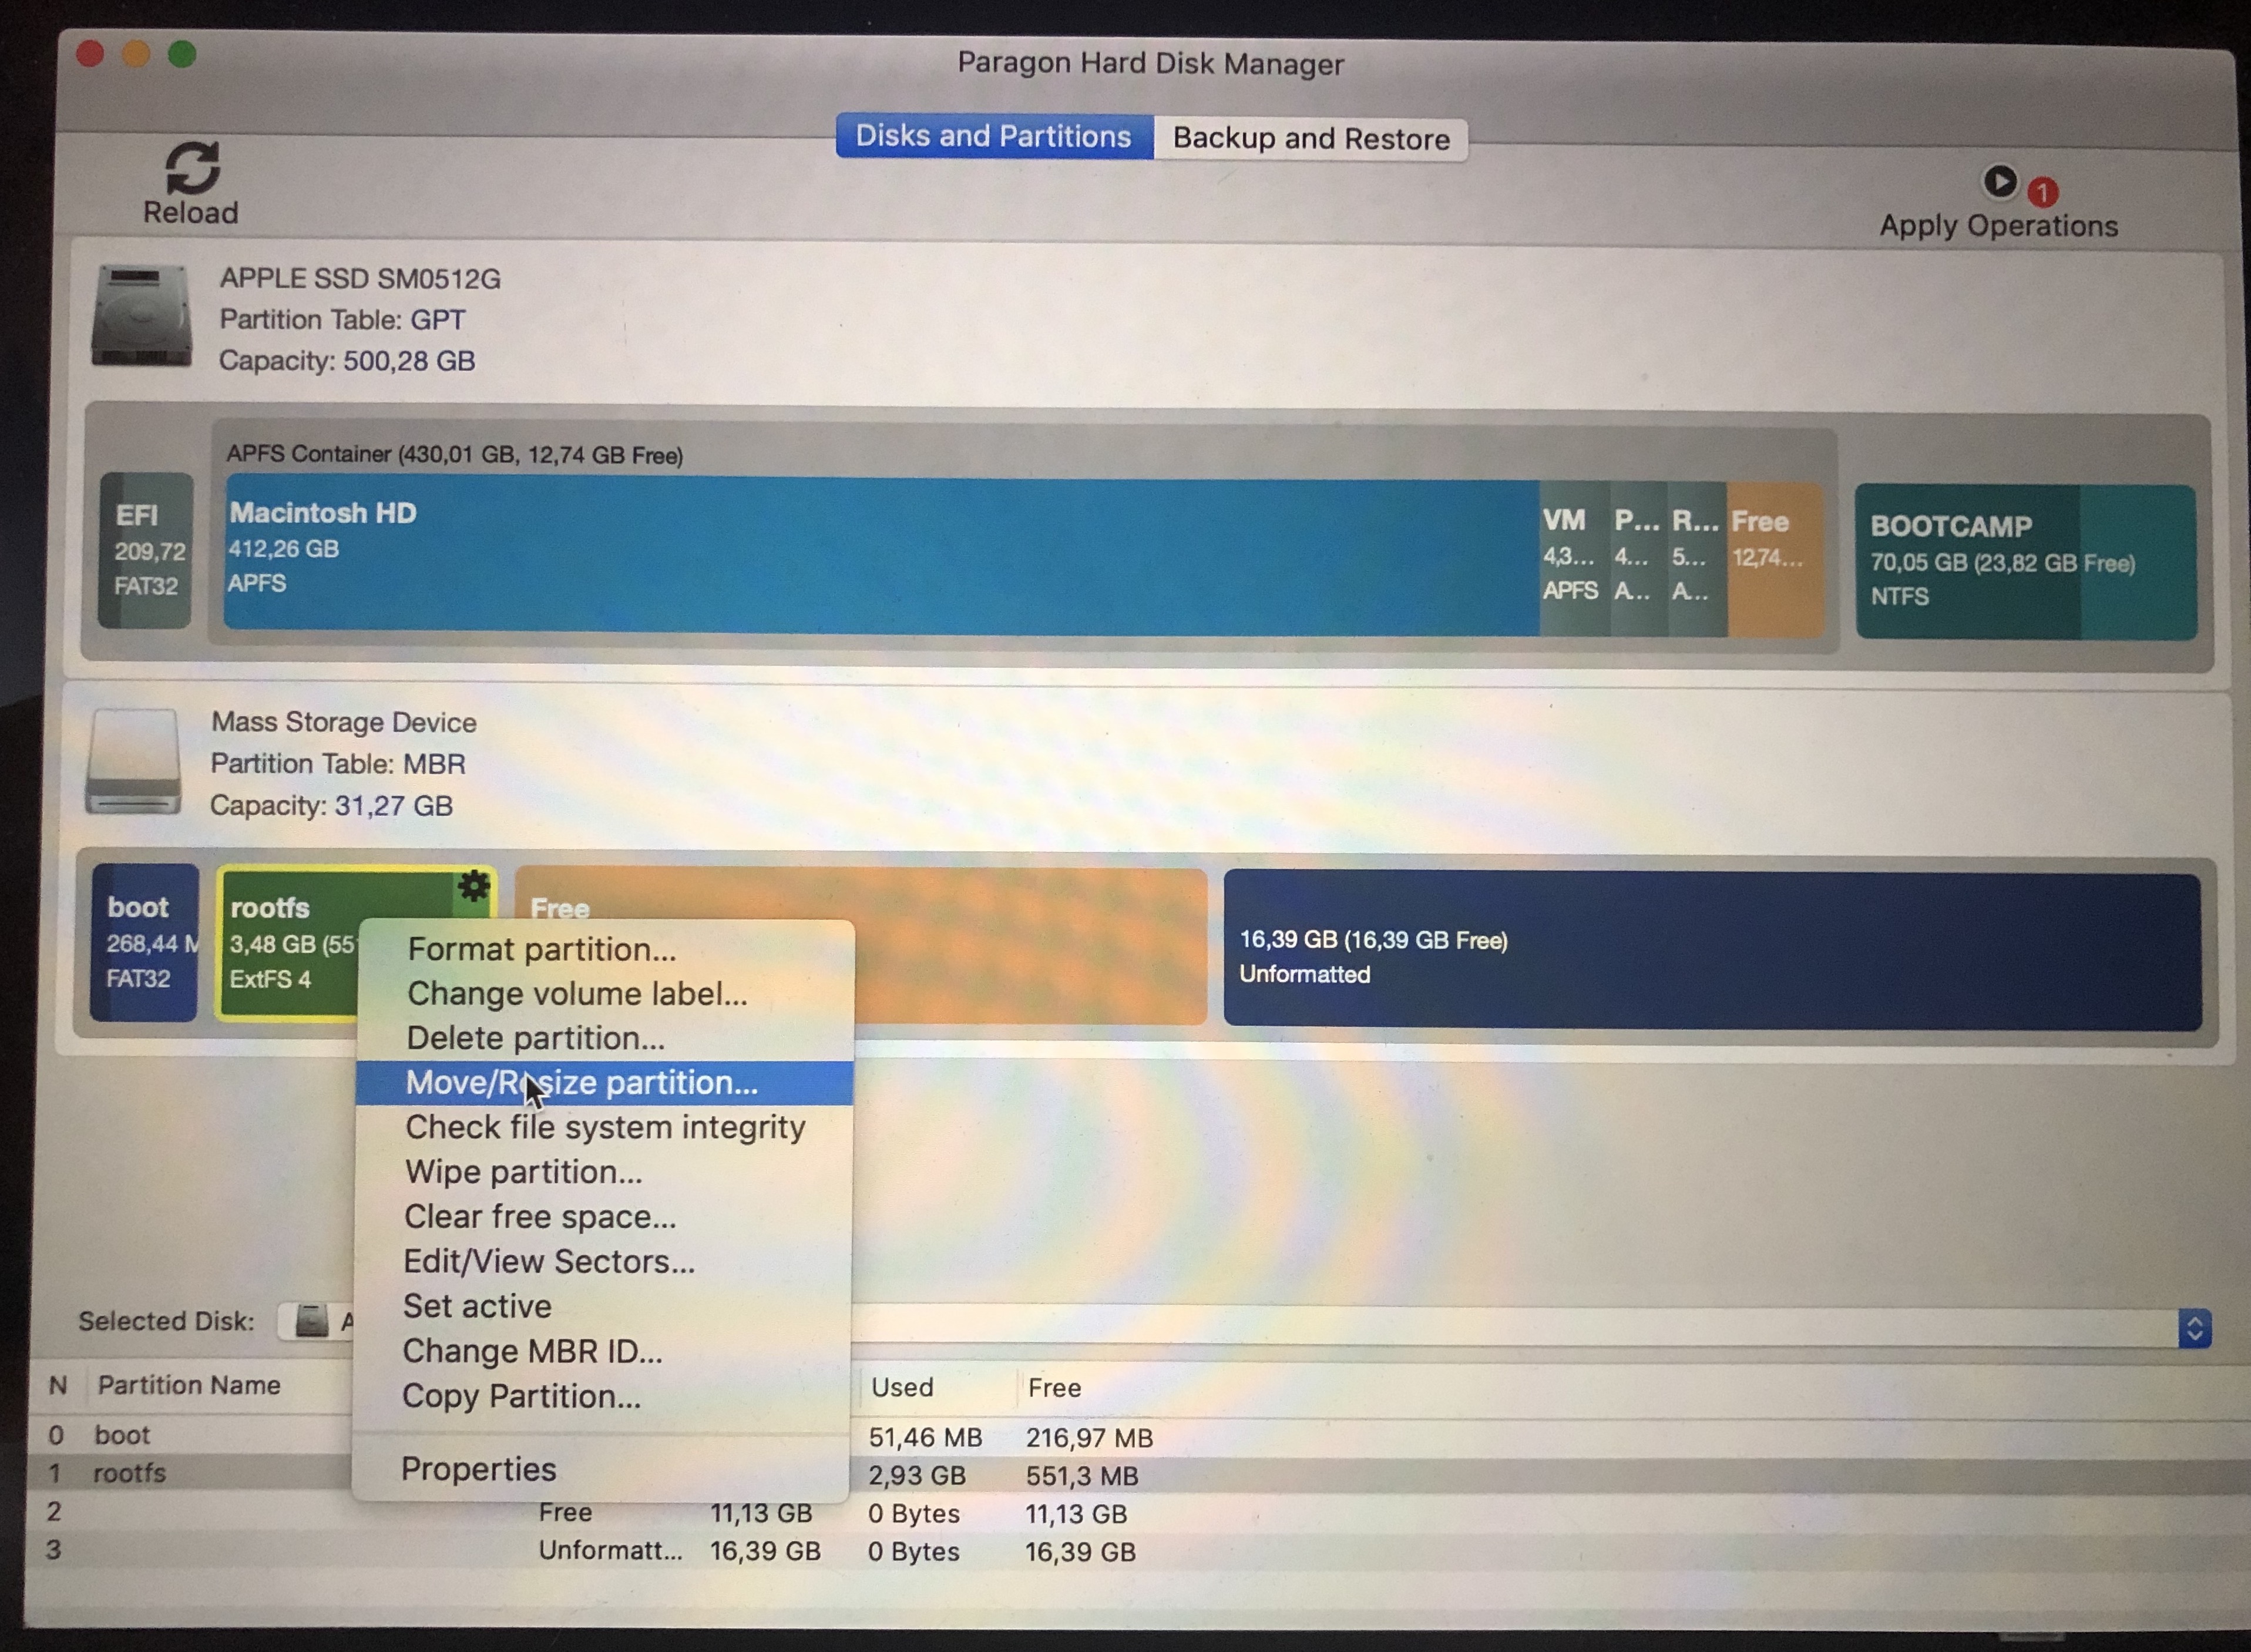
We move the partition so that it is next to the Emu68 partition, calculating that we have to leave about 4 GB for the FAT32 partition:
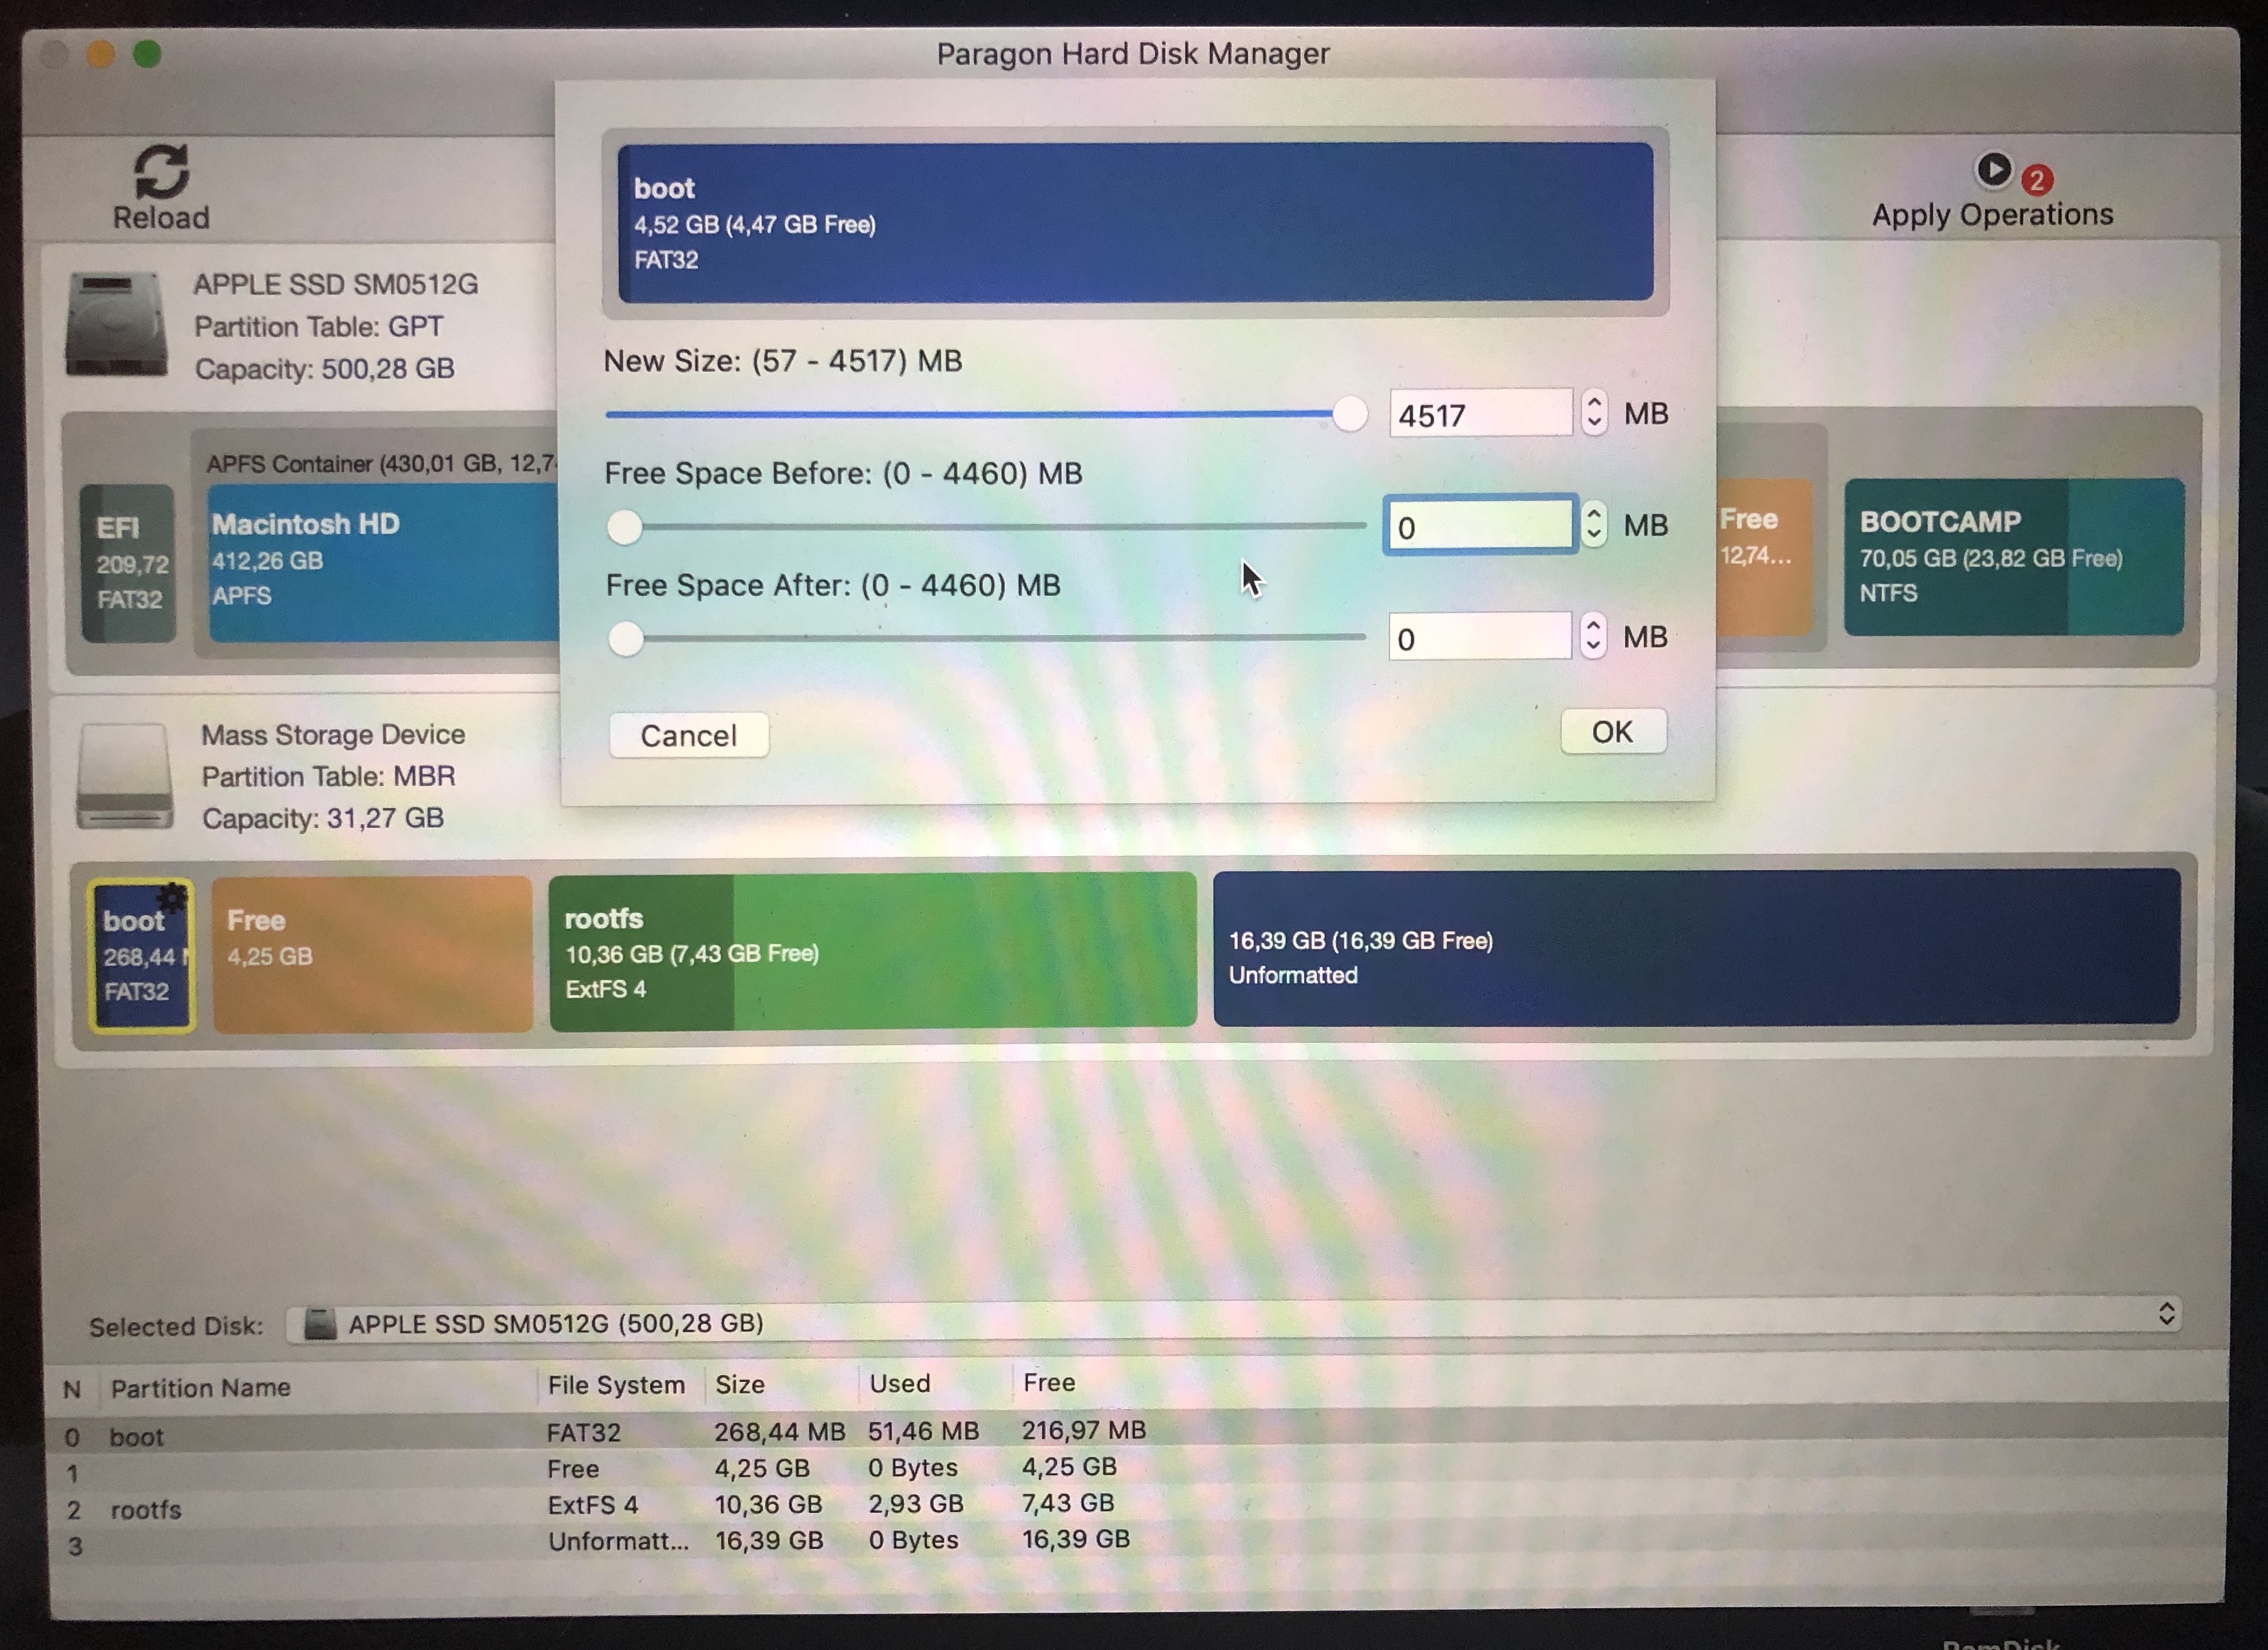
Then, do the same with the FAT32 partition, allocating the remaining space to it:

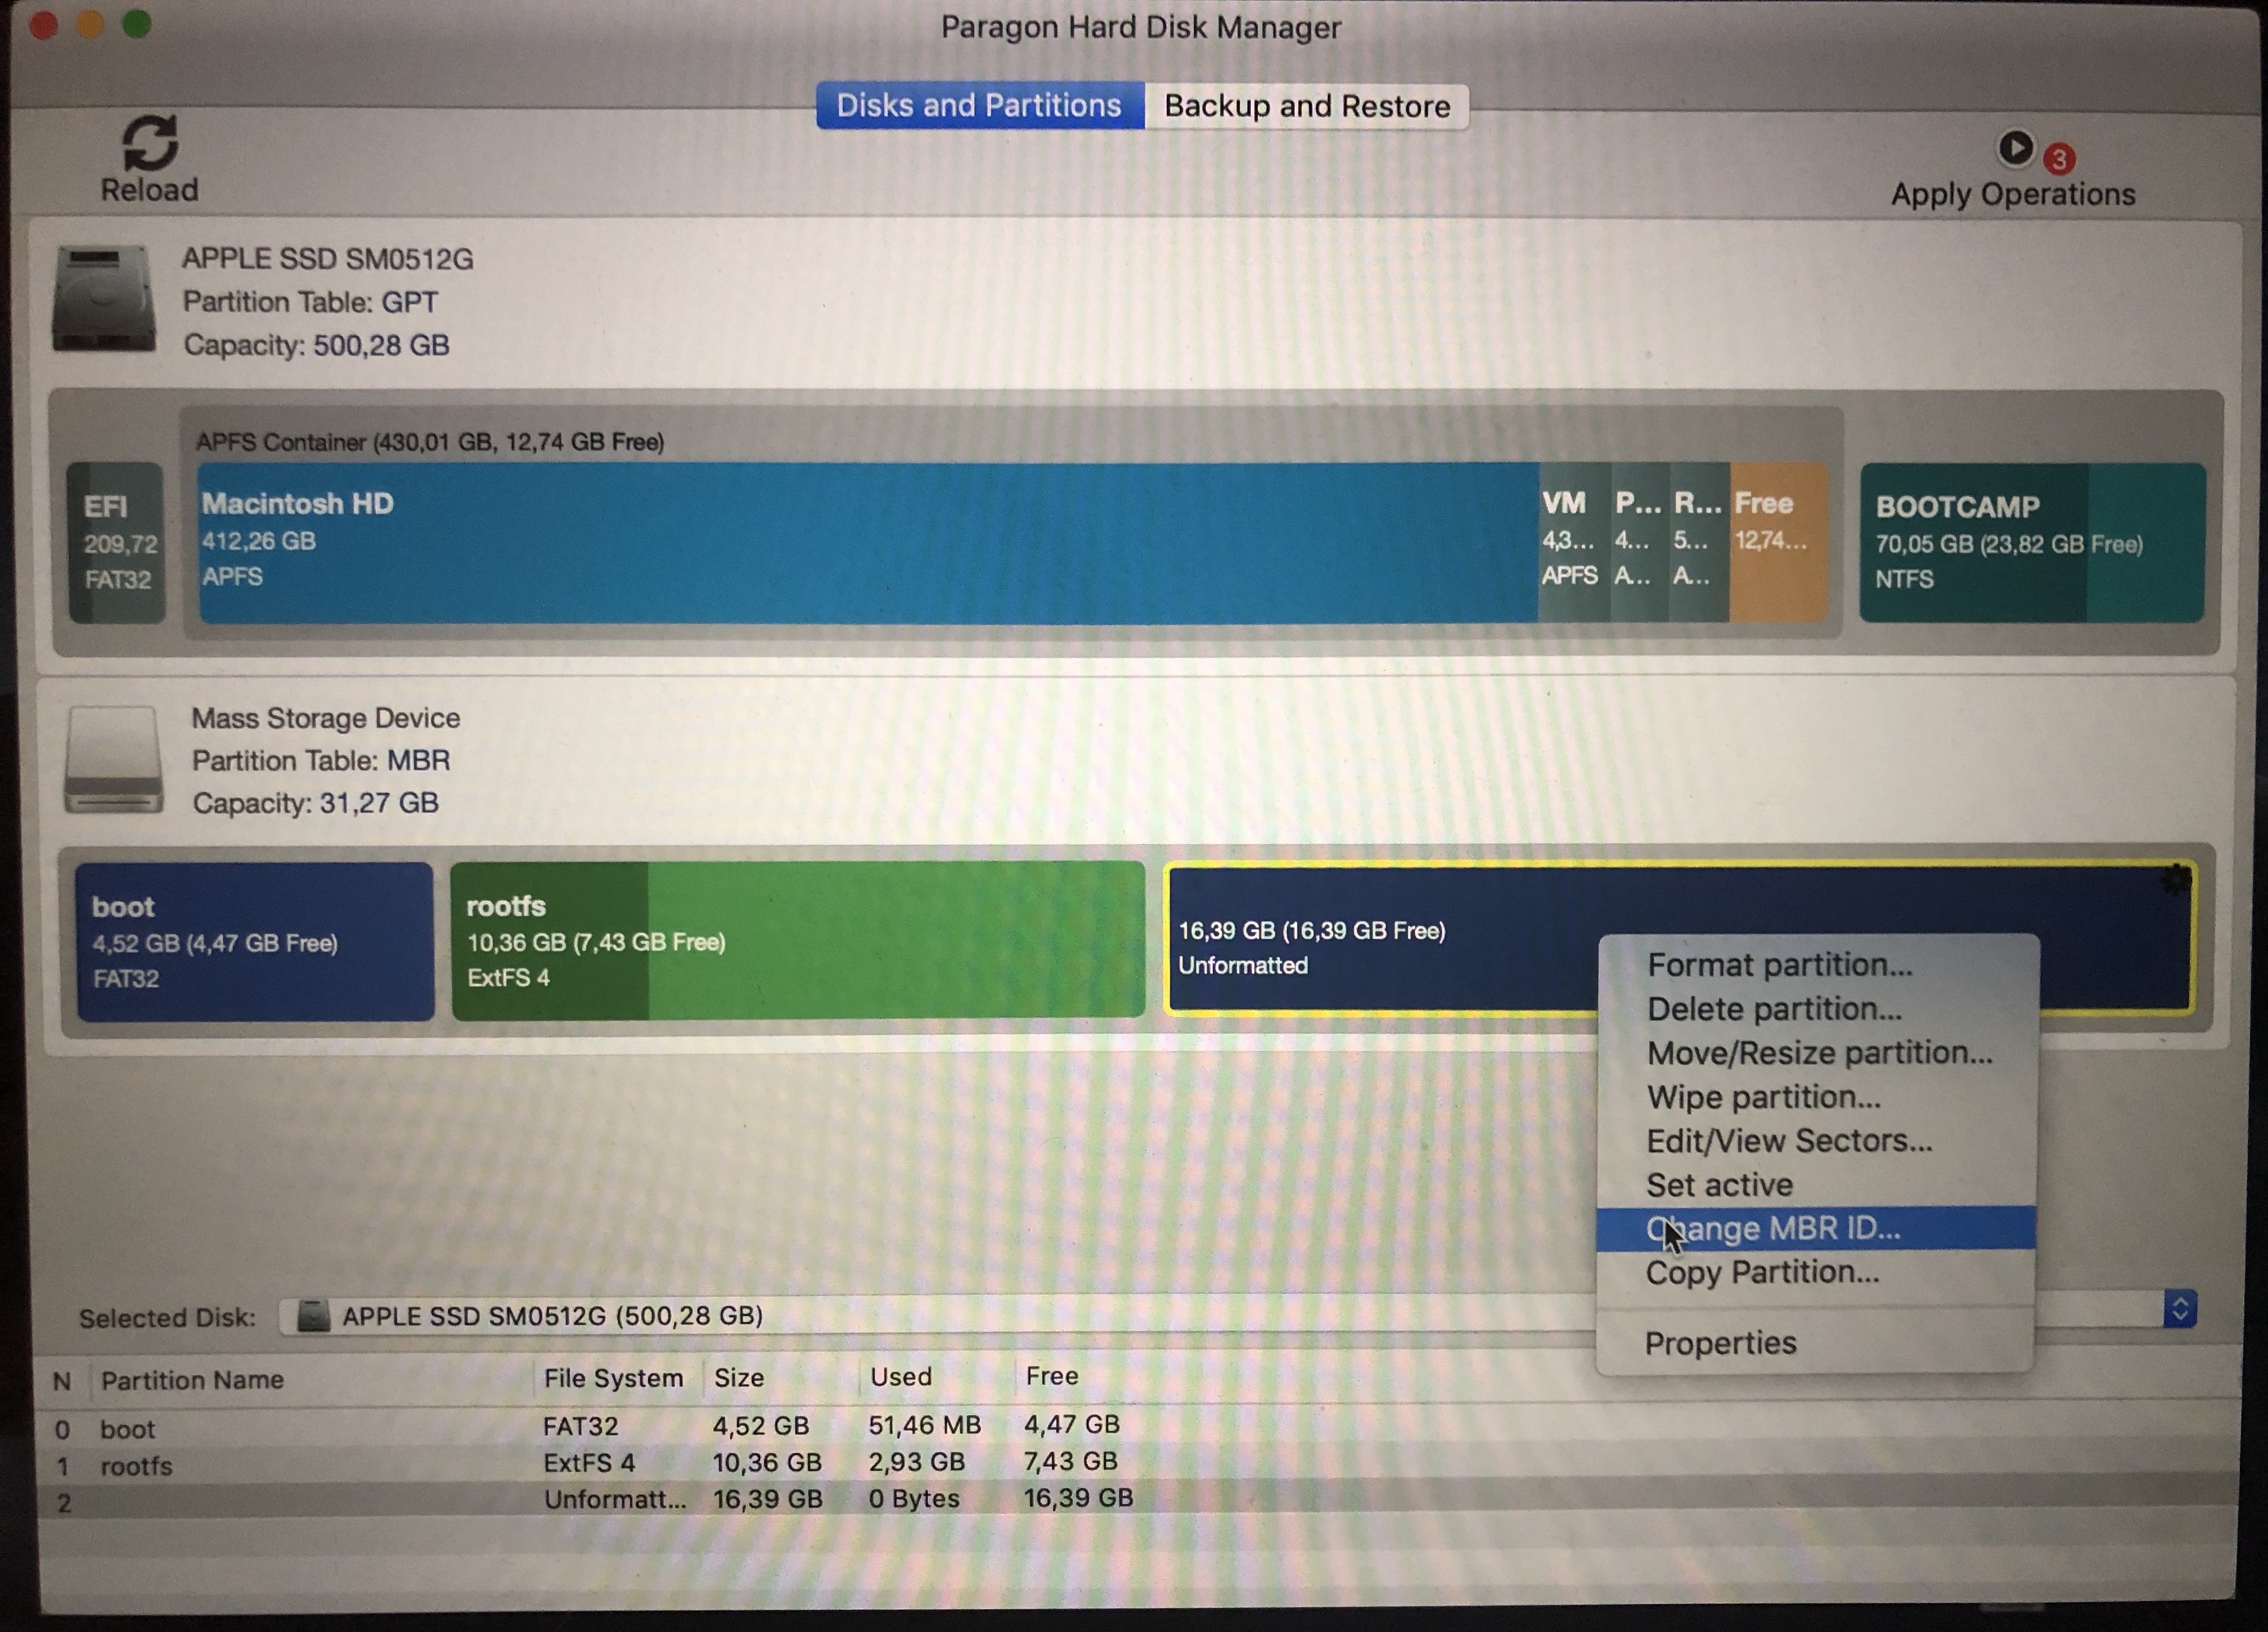
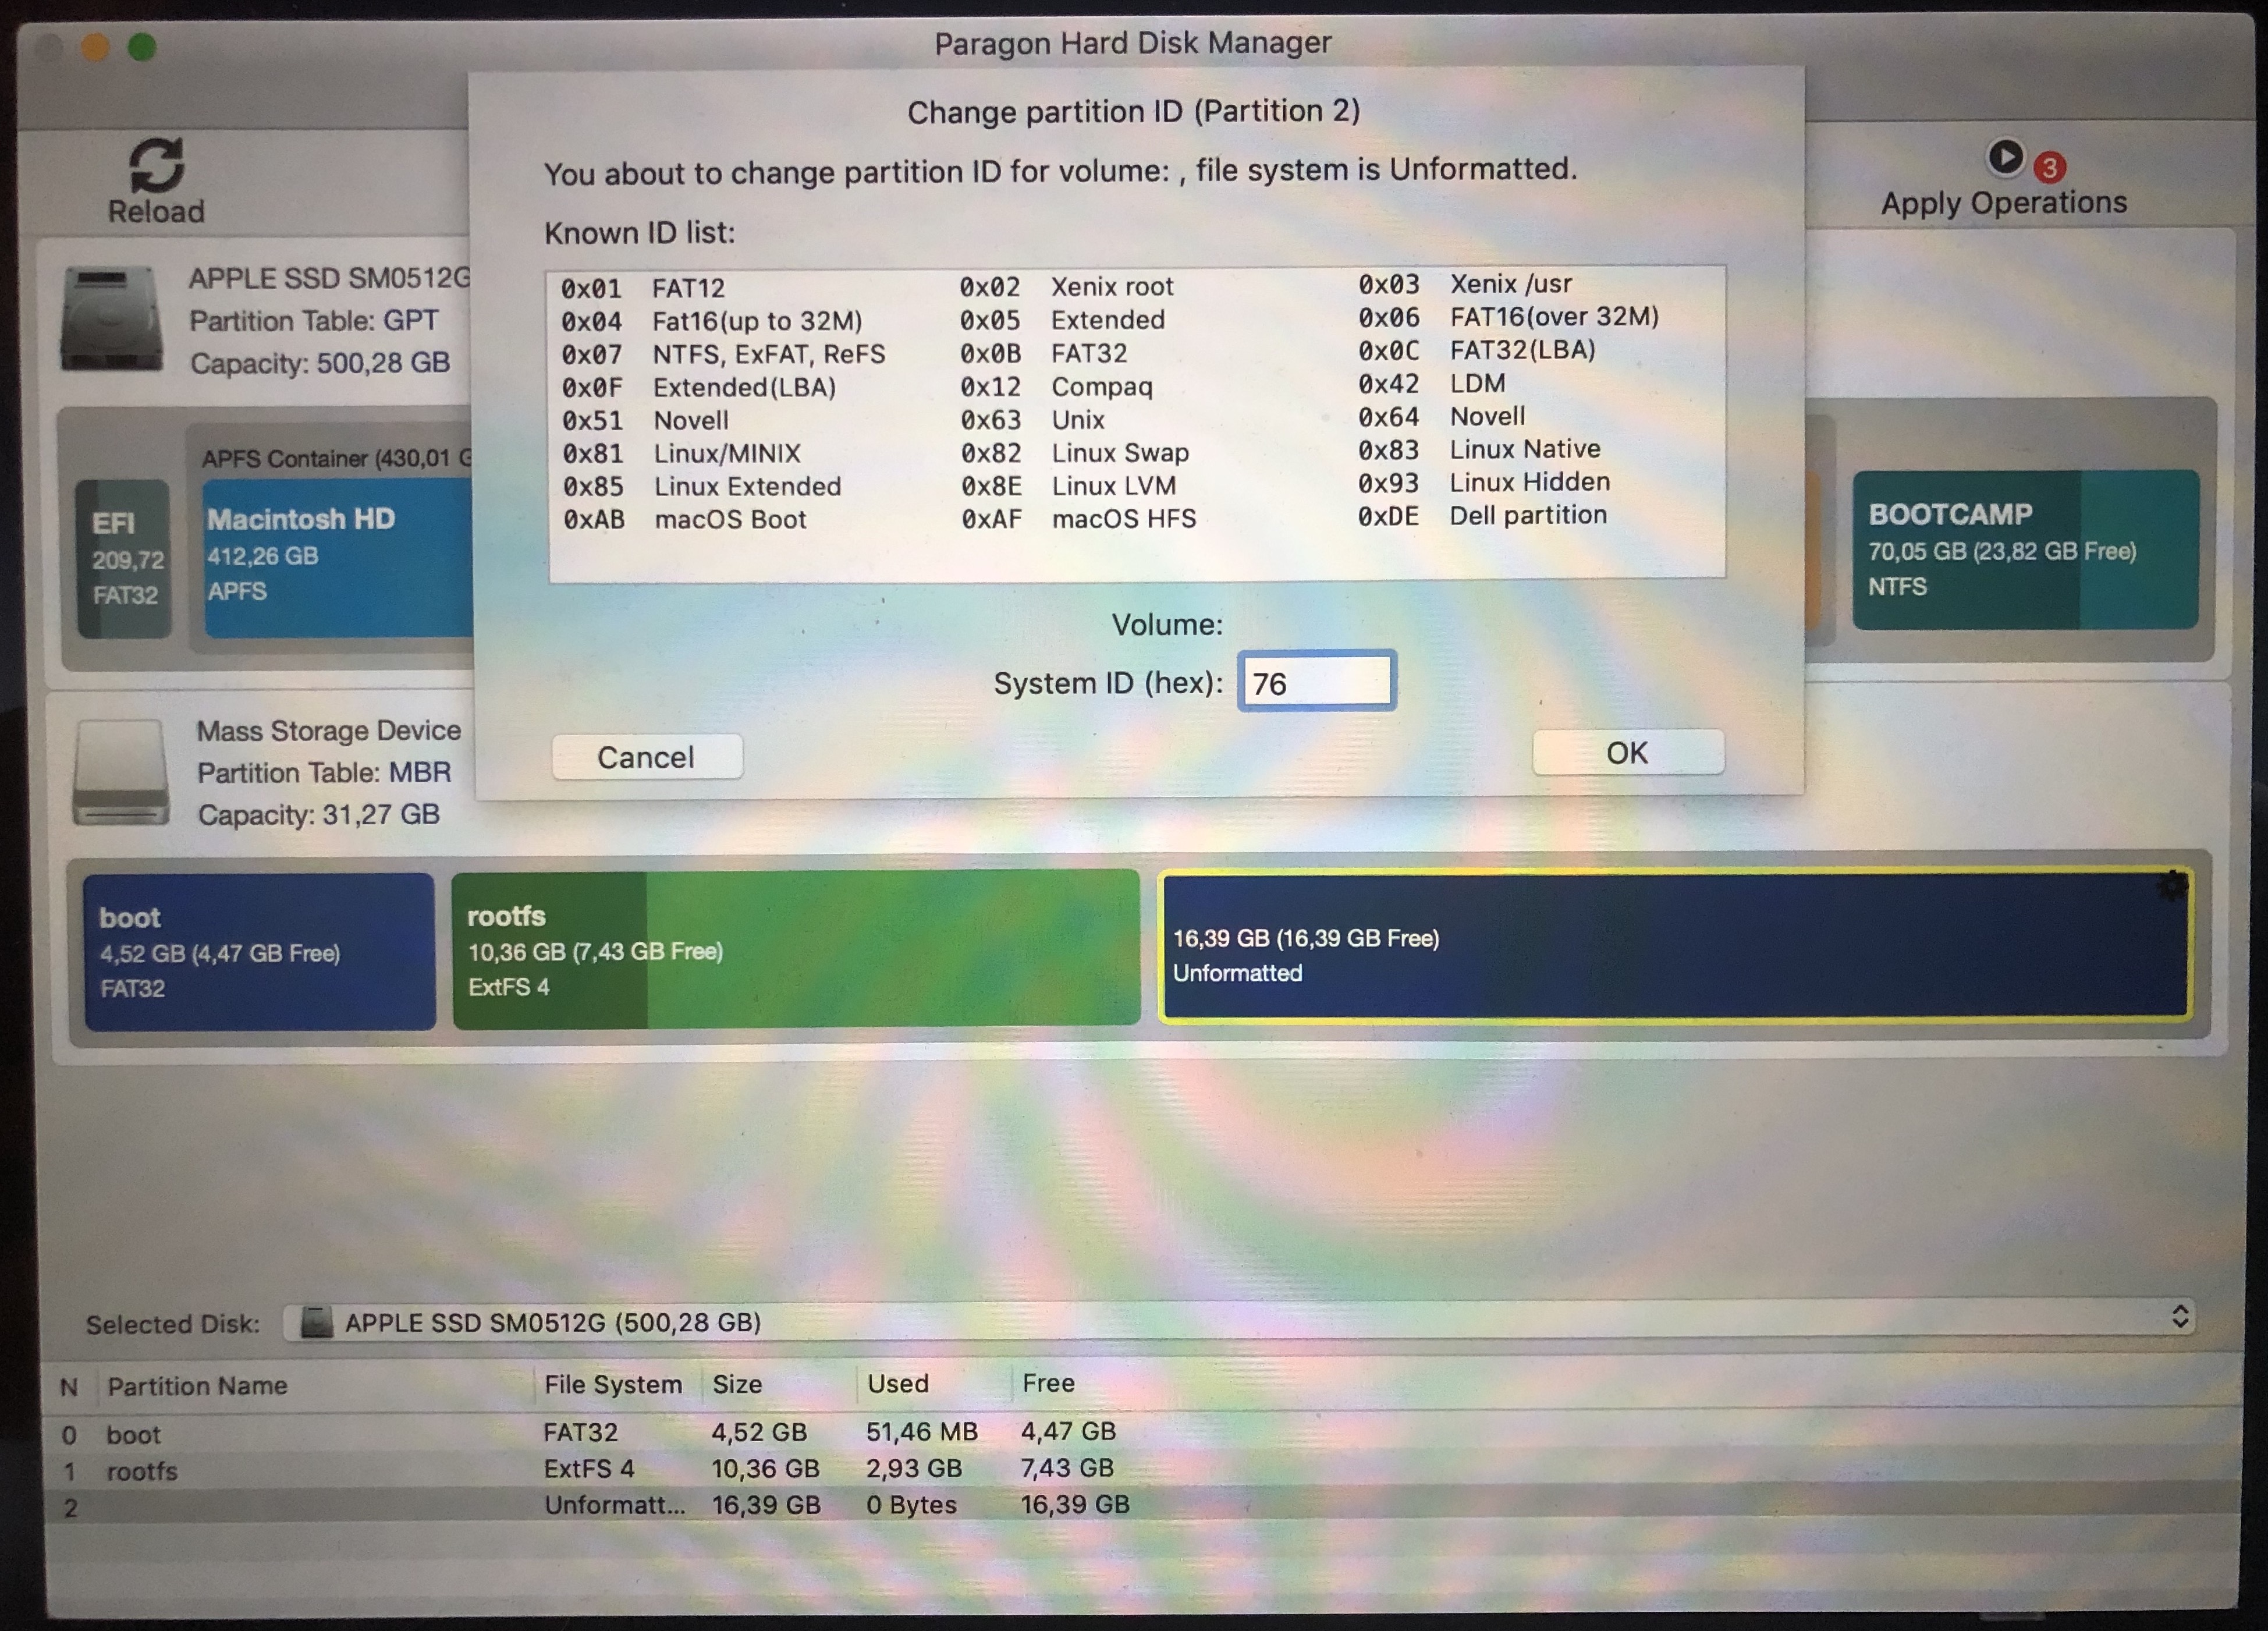
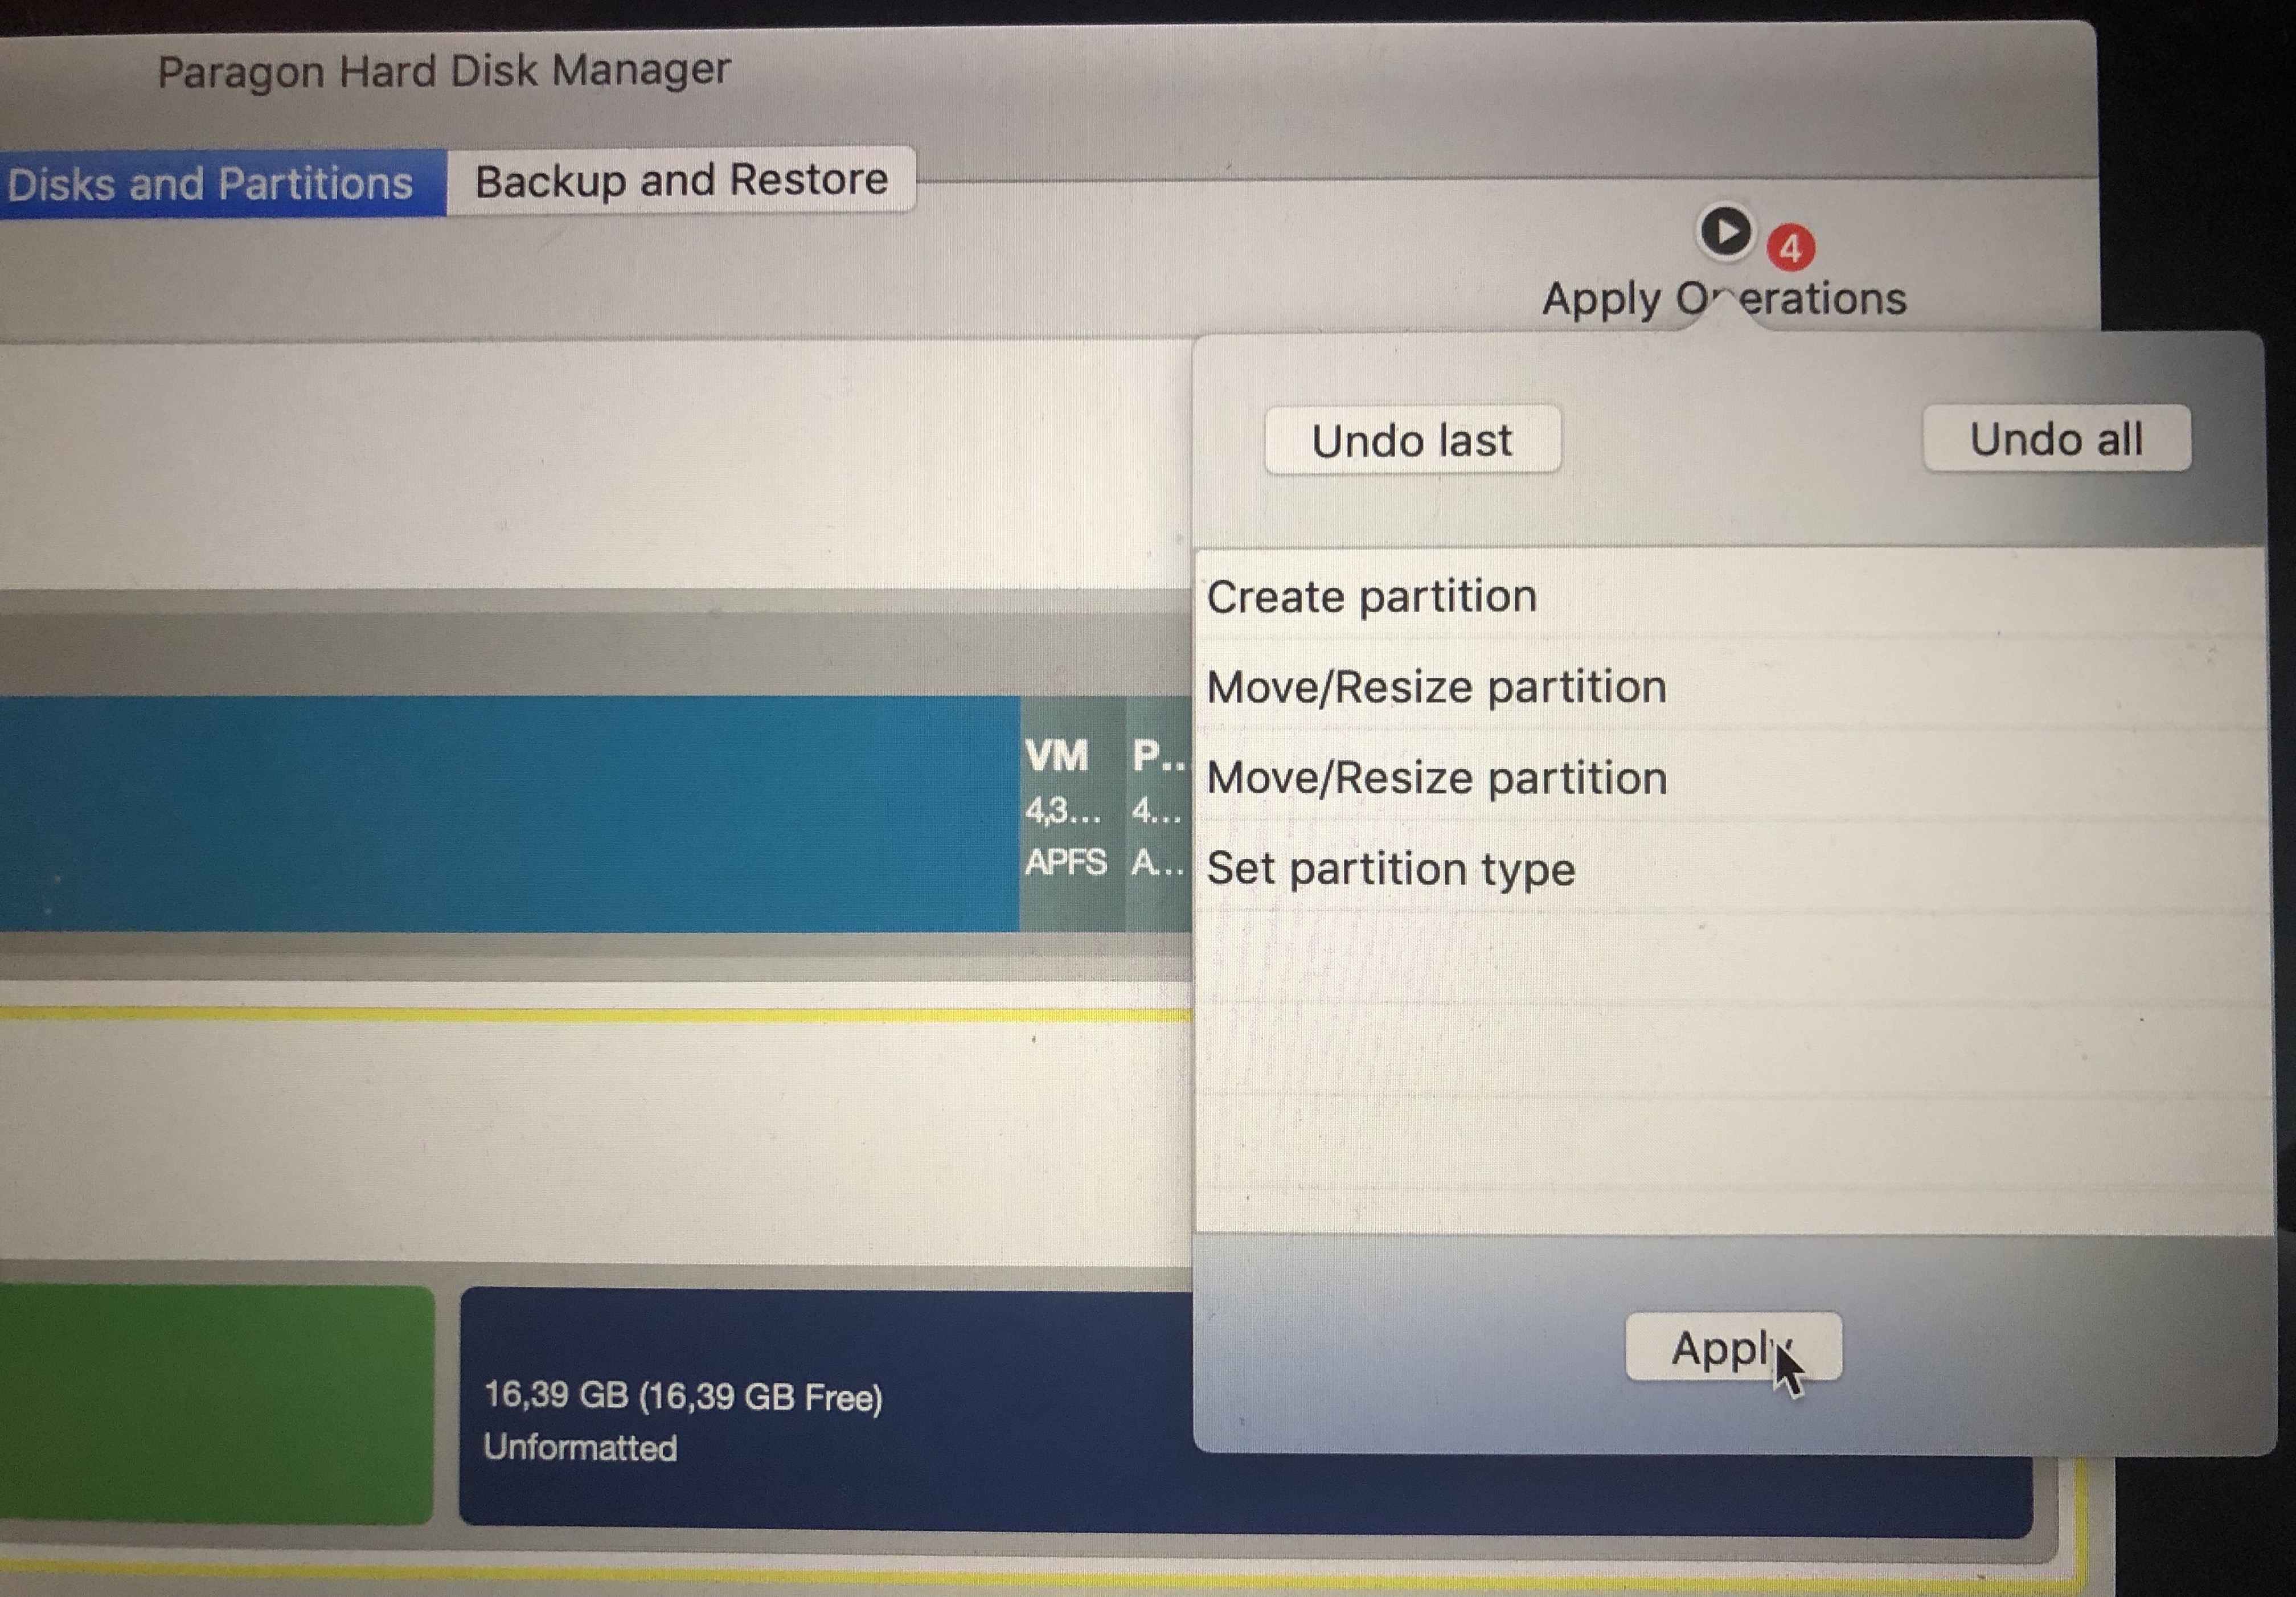
We will also take the opportunity to change the partition type of the Emu68 partition to 0x76, essential for Emu68 to recognise it (no need to format the partition, that will be taken care of by AmigaOS):
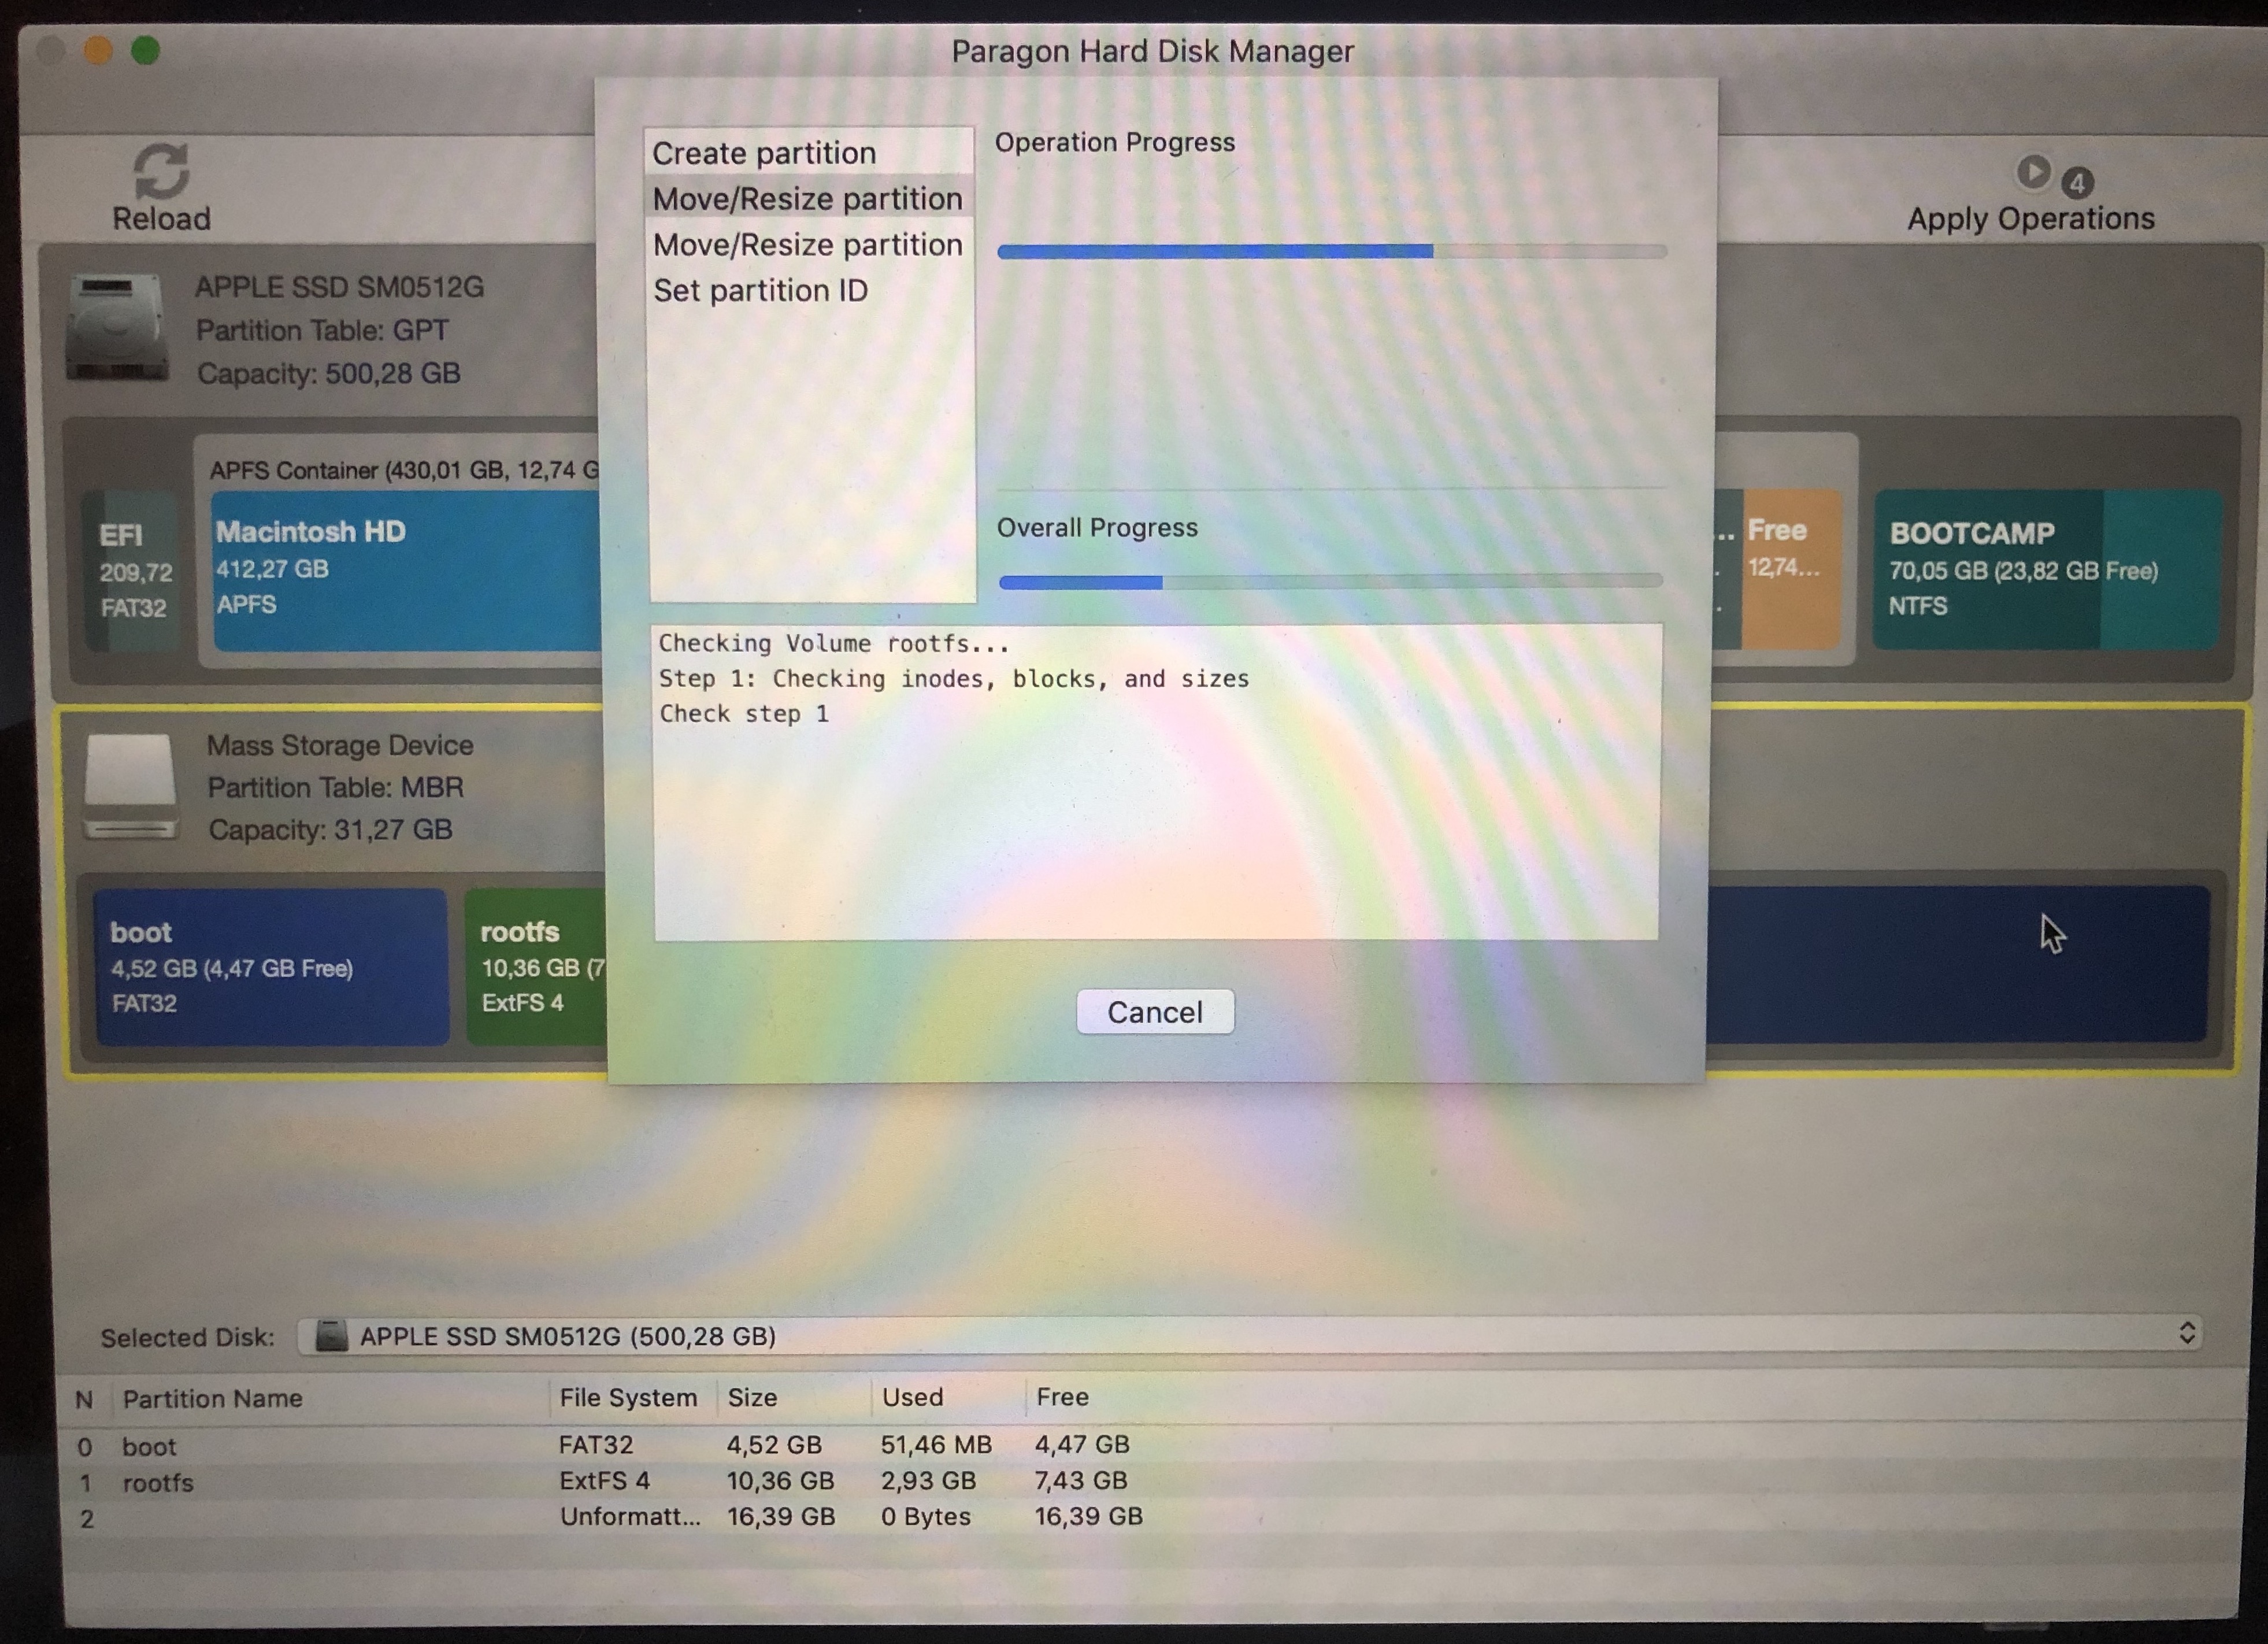
At the moment, we have told the programme what we want it to do, but, for safety's sake, it doesn't do it until we confirm it, until we tell it to proceed, so go ahead:
This process, moving the data contained in each partition, takes a while, so be patient.
Once it has finished, we can insert the card into the RPi. In the initialisation process, Linux will warn us that it cannot extend the filesystem, because there is no more free space behind, we have used it for the Emu68 partition:

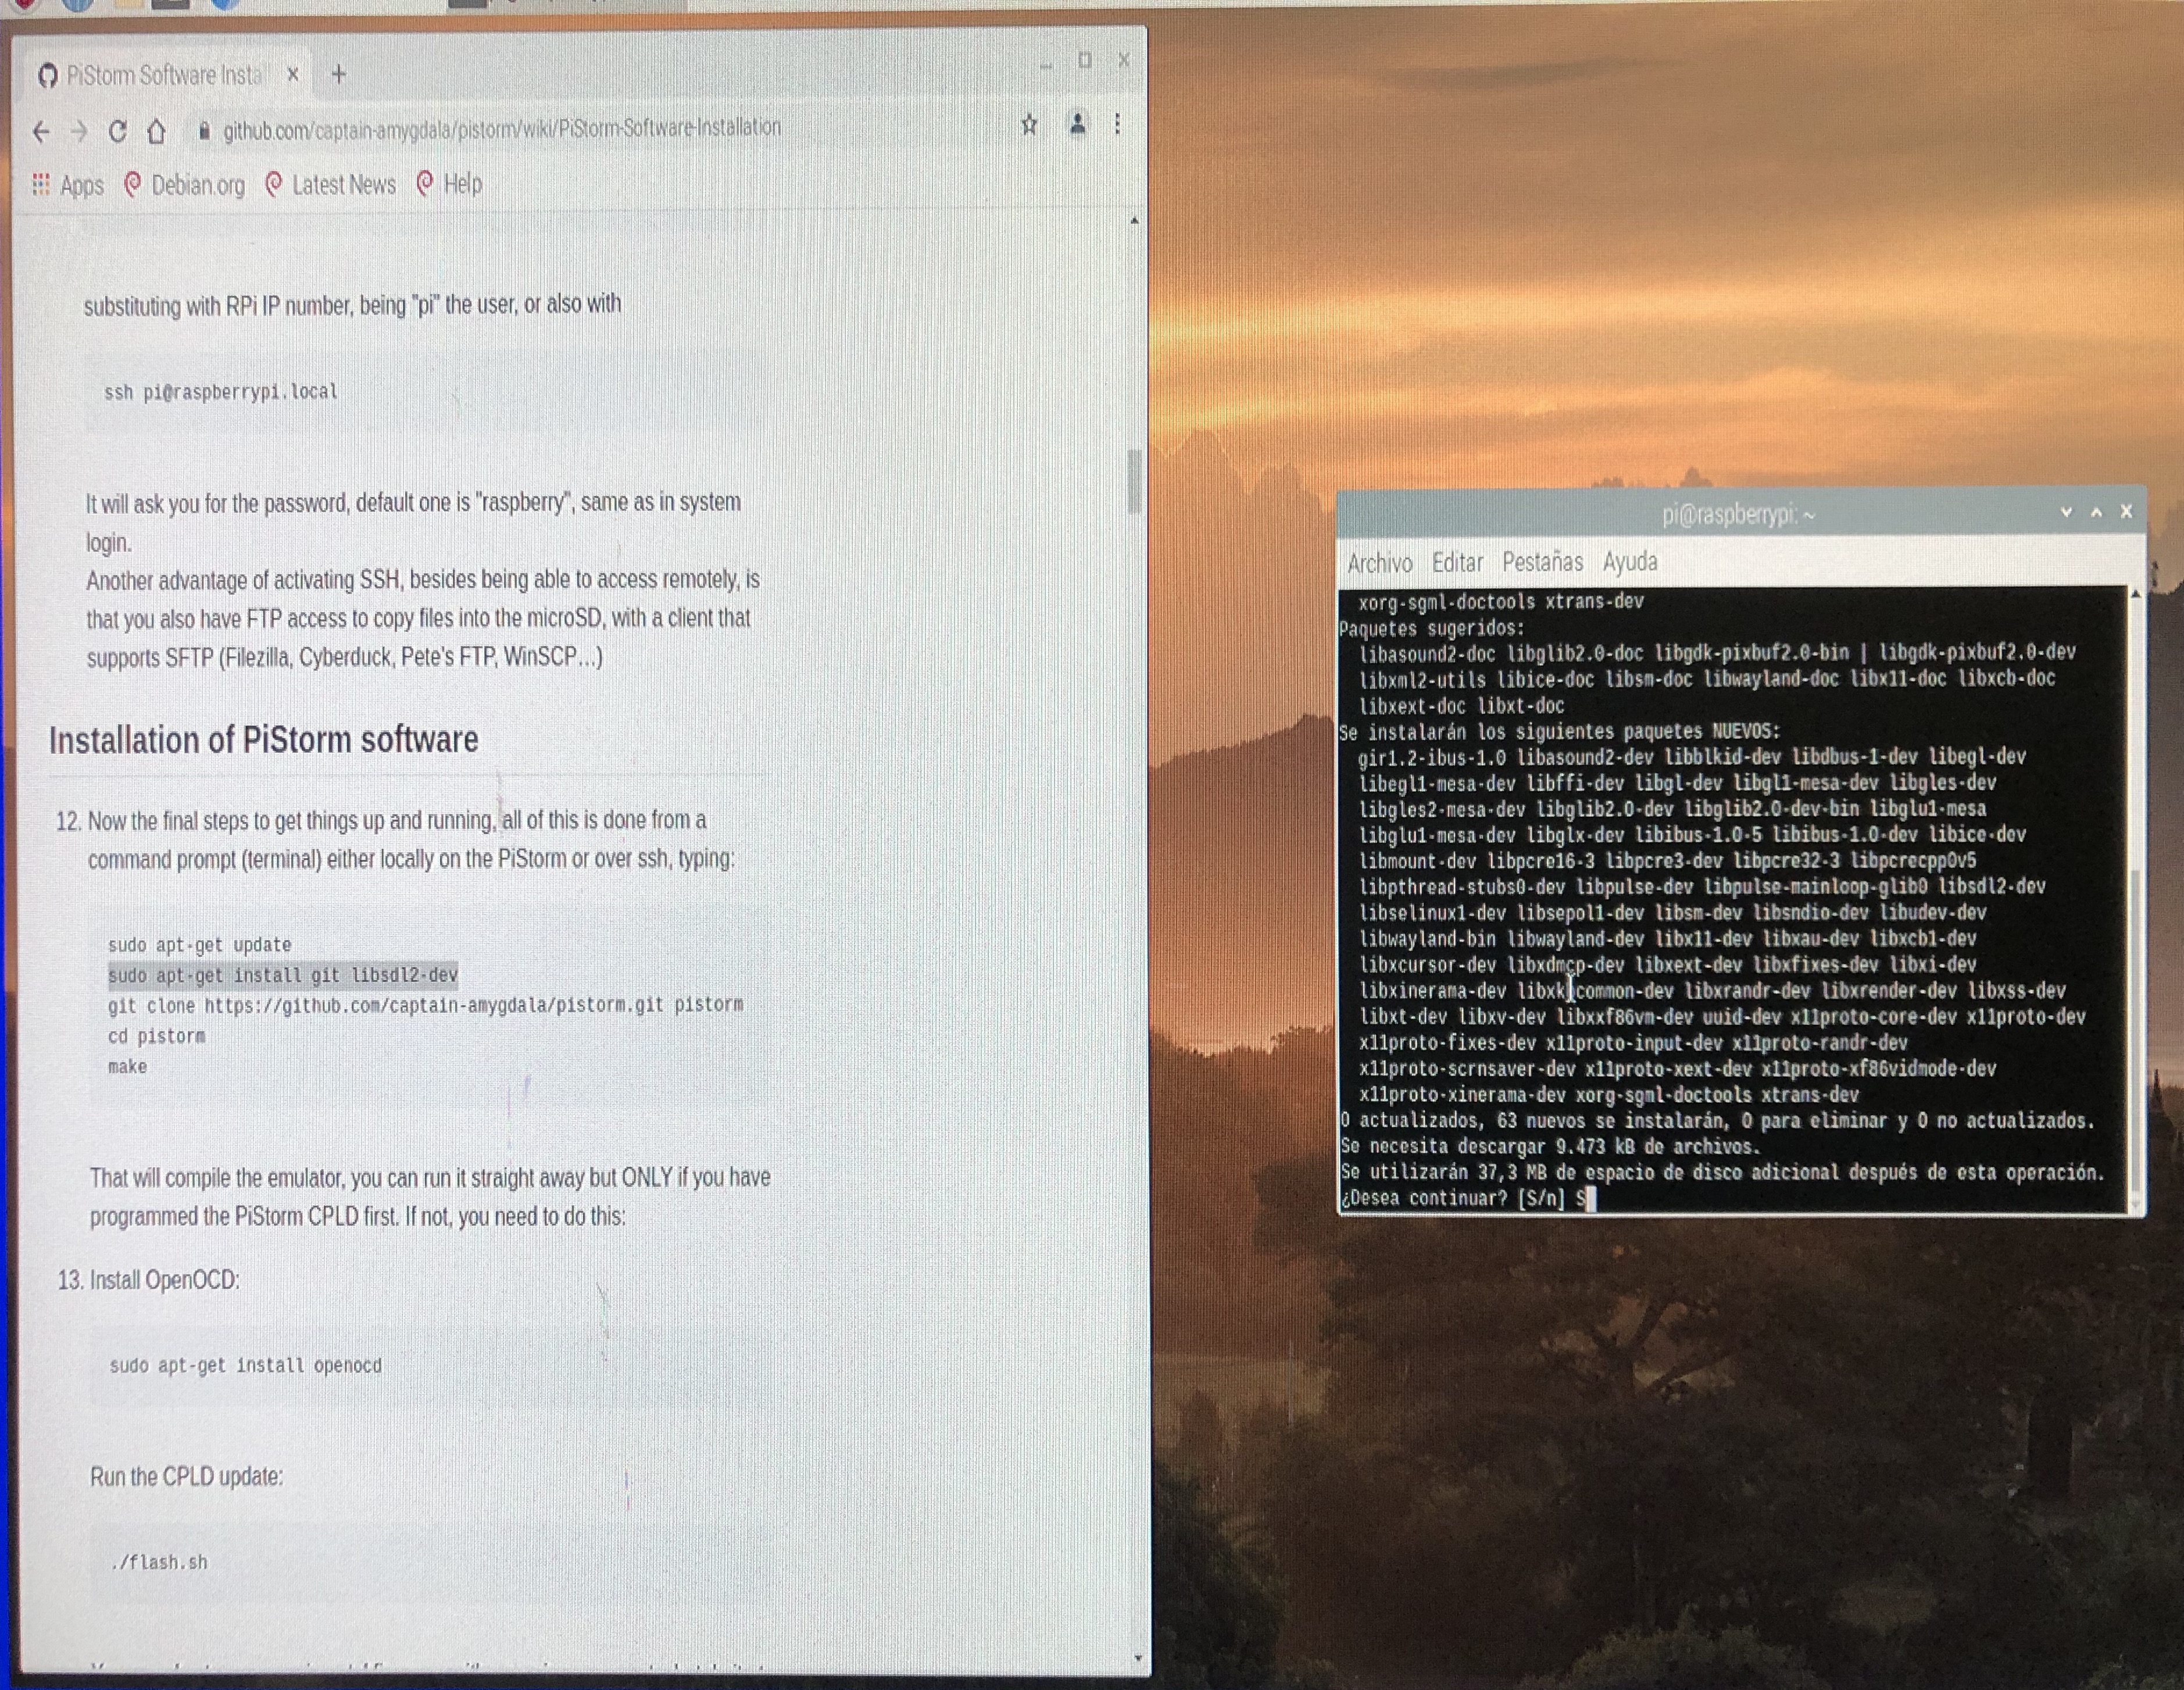
Finally, and once Linux has done its own installation, you can proceed to install the software that Musashi will need as described in the installation manual, from Installation of PiStorm software ( https://github.com/captain-amygdala/pistorm/wiki/PiStorm-Software-Installation#Installation-of-PiStorm-software ) onwards.
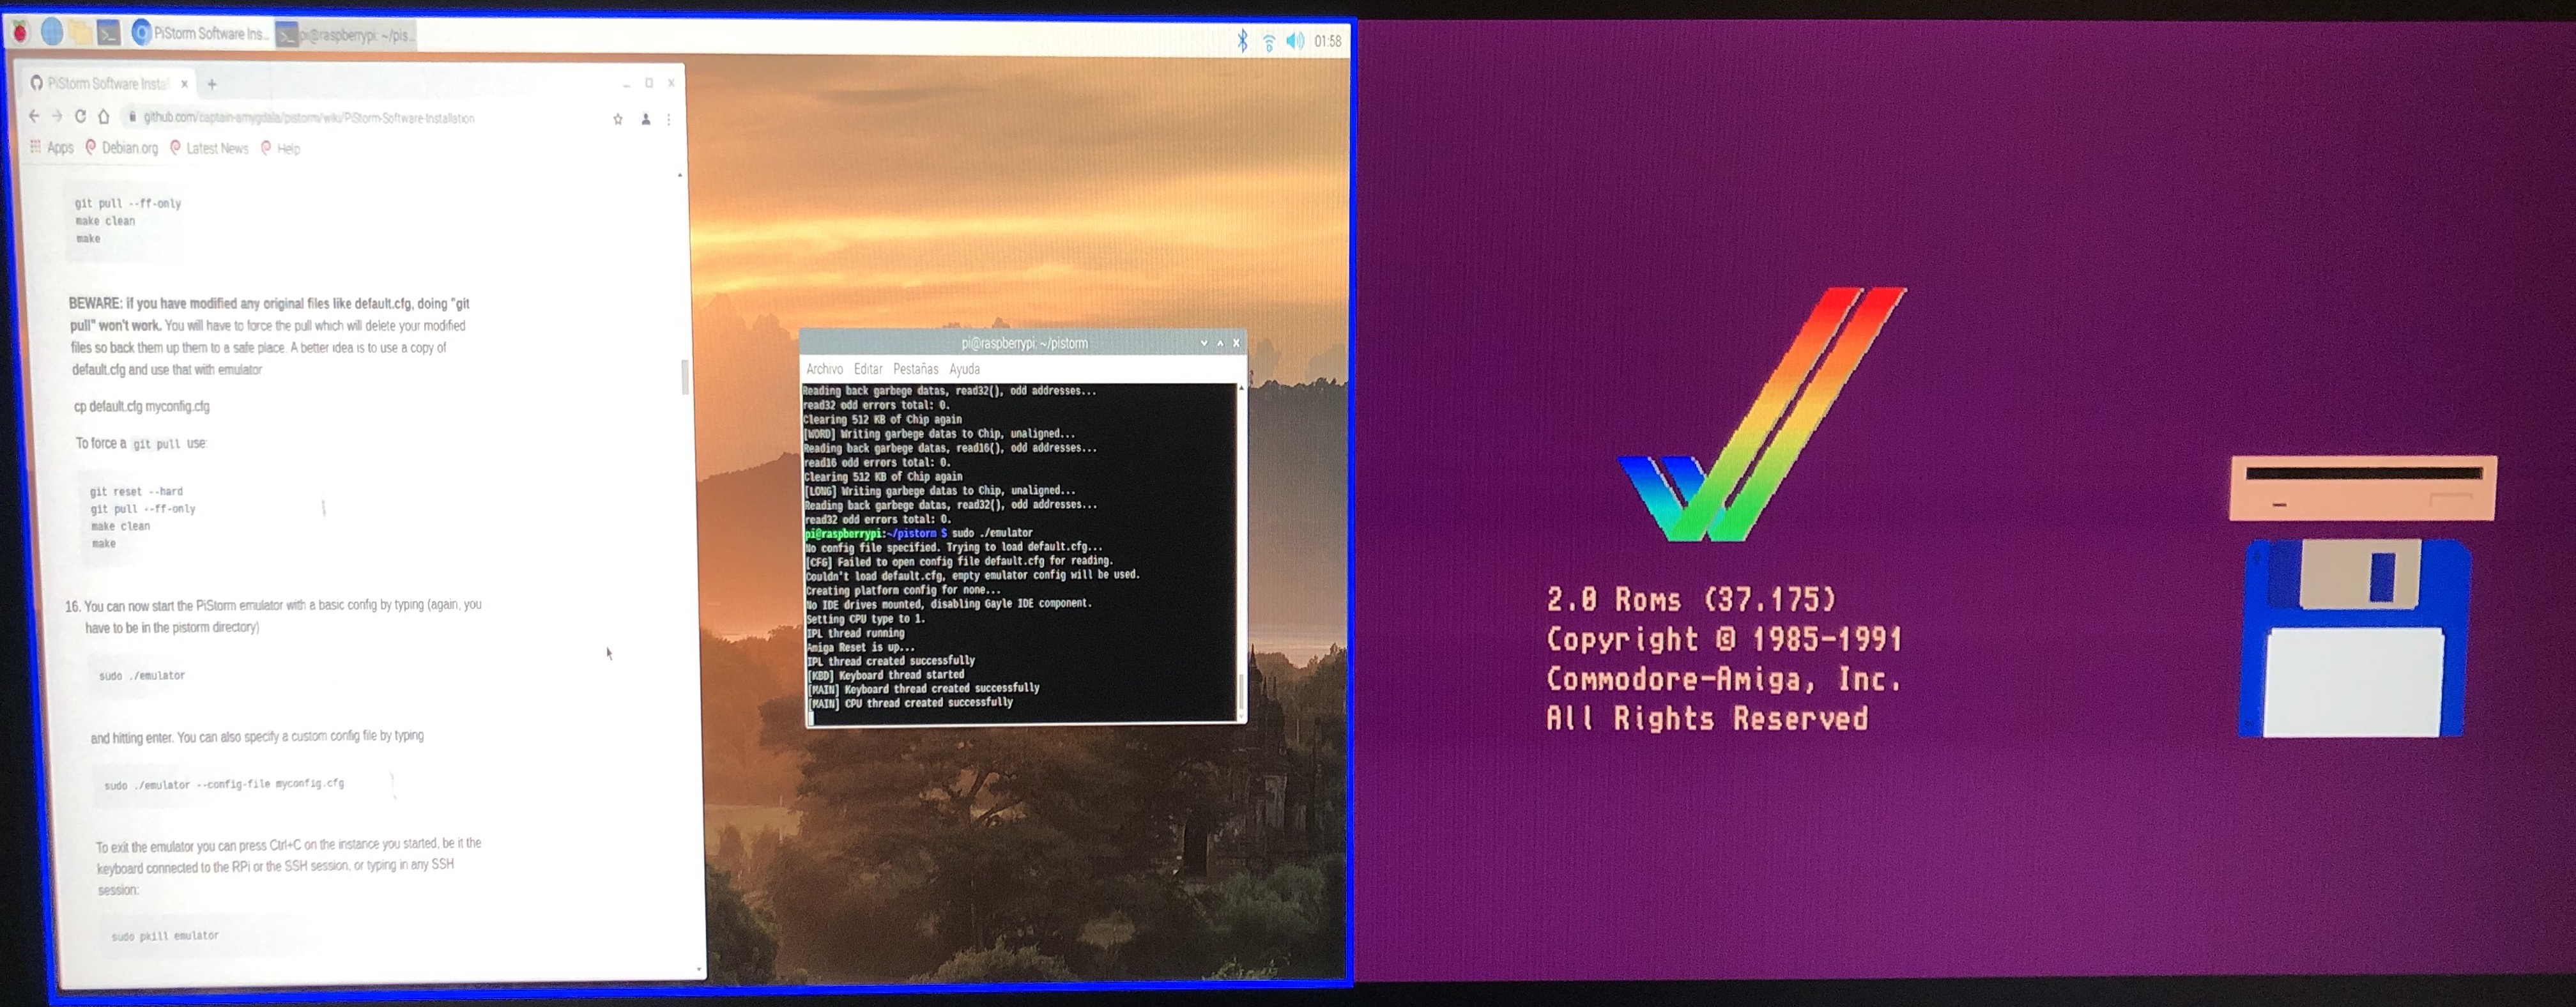
Once everything is installed correctly, it should look something like this (I'm using a Dell monitor with PictureByPicture capability, both Linux and Amiga displays are visible):
At this point, you can do two things: either install an operating system from scratch, or add an HDF with an operating system installed (you have to have the KS corresponding to that OS and reflect the new HDF and the new KS in the configuration file). I have opted for the second option, using an HDF with AmigaOS 3.2.1 installed plus some software, and the corresponding KS.
In either case, it is advisable to define 68040 as CPU in the Musashi configuration file, because it is the one that Emu68 will use, so both systems will have the same CPU, reducing incompatibilities.
With either method, and after verifying that the system boots correctly, we will proceed to give Musashi access to the Emu68 partition. First of all, from a Linux shell, type in
sudo pkill emulator
to stop emulation, then
sudo fdisk -l
The result should look like this:
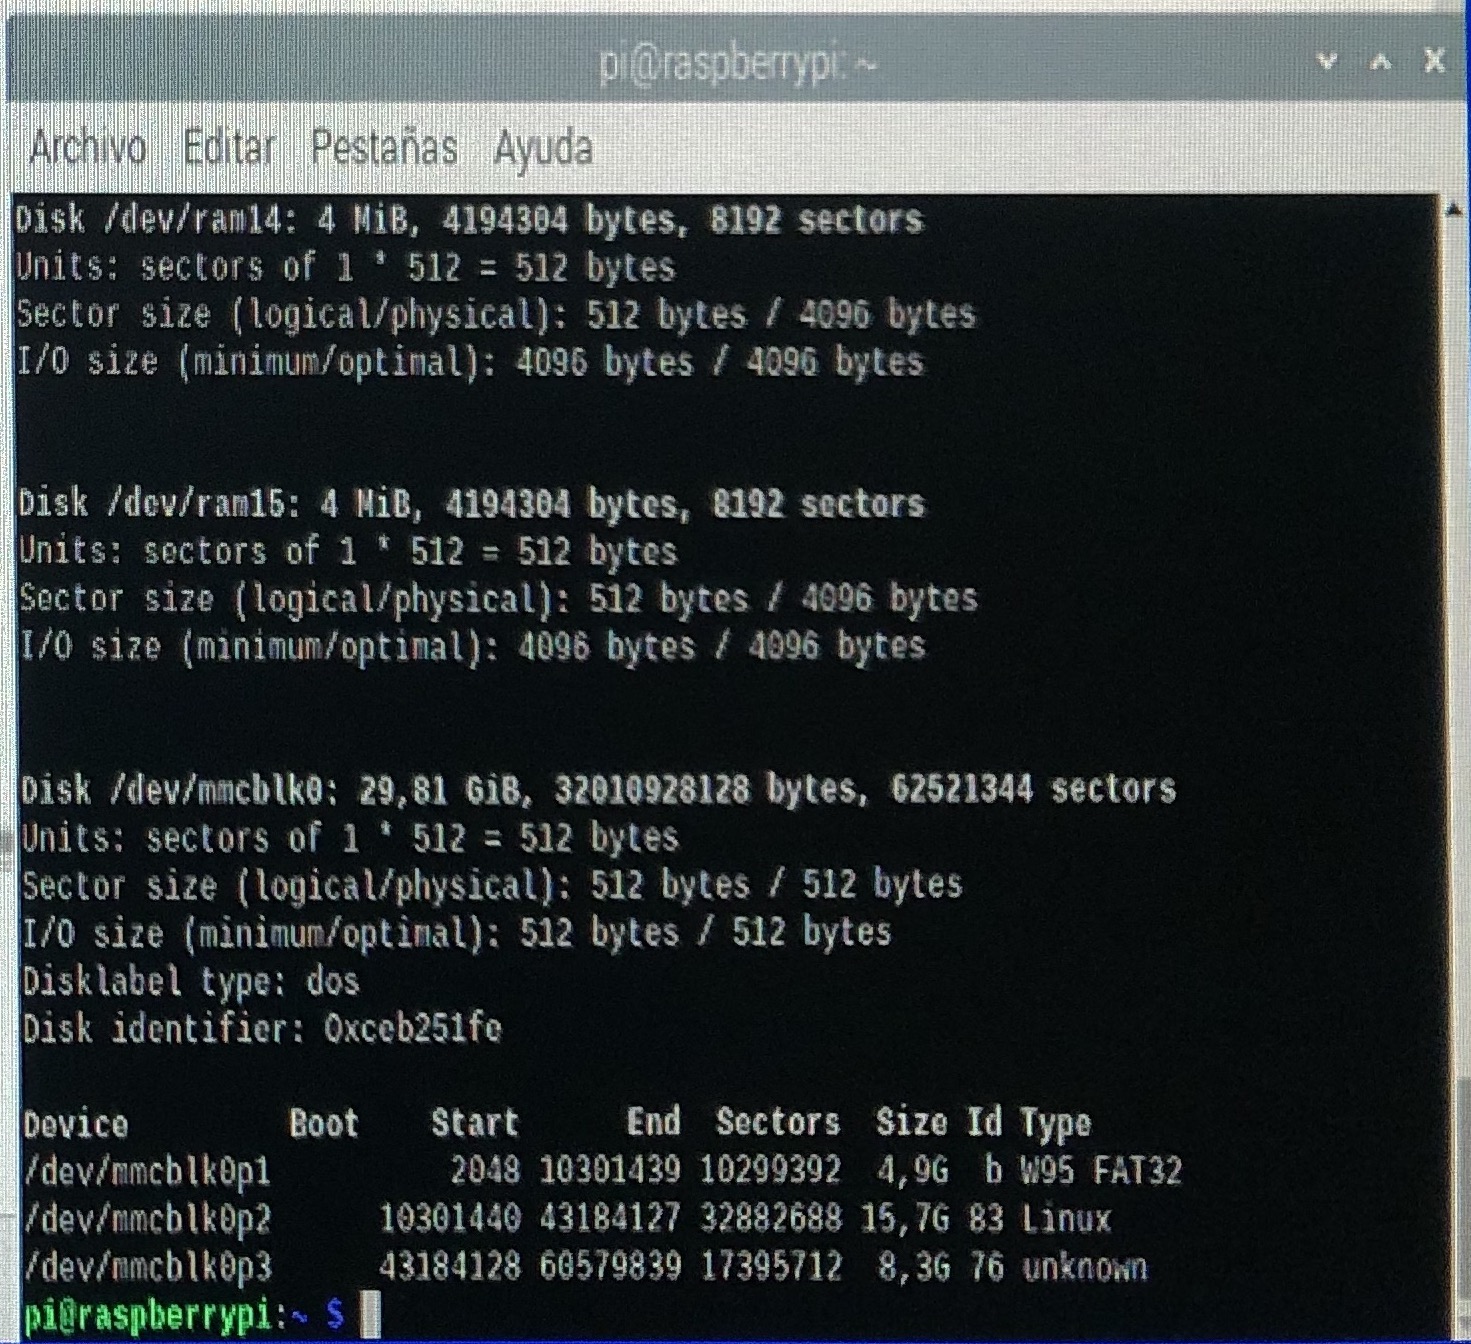
In the last lines we will see the partitions of the µSD card. The one we are interested in is the last one:
/dev/mmcblk0p3
which we will use to create a line in the Musashi configuration file (by default, Amiga.cfg), with which we will define the path for Musashi to have access to:
setvar piscsi5 /dev/mmcblk0p3
preferably after the line defining the Musashi loading disk. The number of the "piscsi" variable can be anything between 0 and 5 that is not already occupied (6 is reserved for the disk with PiStorm software, although it could also be used if the disk is deactivated). Save the configuration file with the changes.
Once this has been done, restart Musashi, with
sudo ./emulator
from the shell, which will start the emulator with the default configuration file, or with
sudo ./emulator --config-file myconfig.cfg
where myconfig.cfg is your custom configuration file.
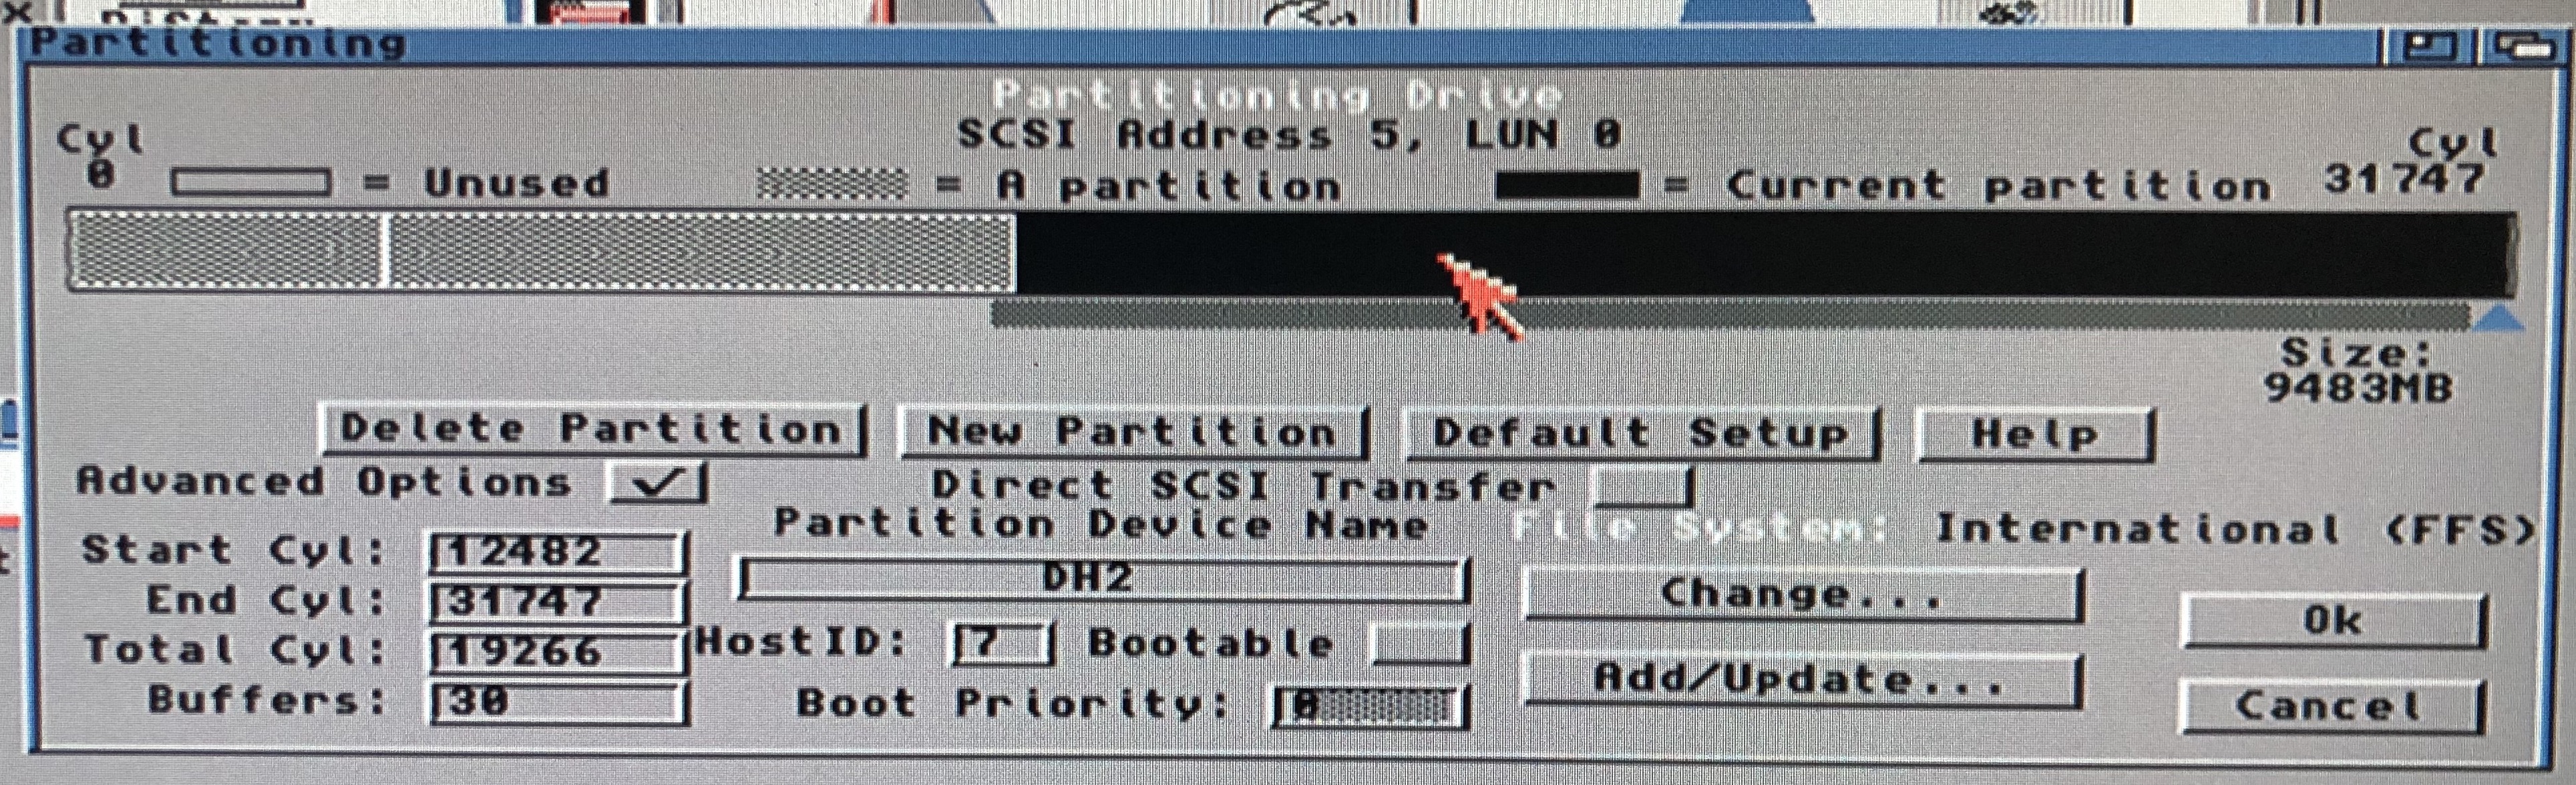
Once AmigaOS is up and running, we will partition the Emu68 space with HDToolBox:
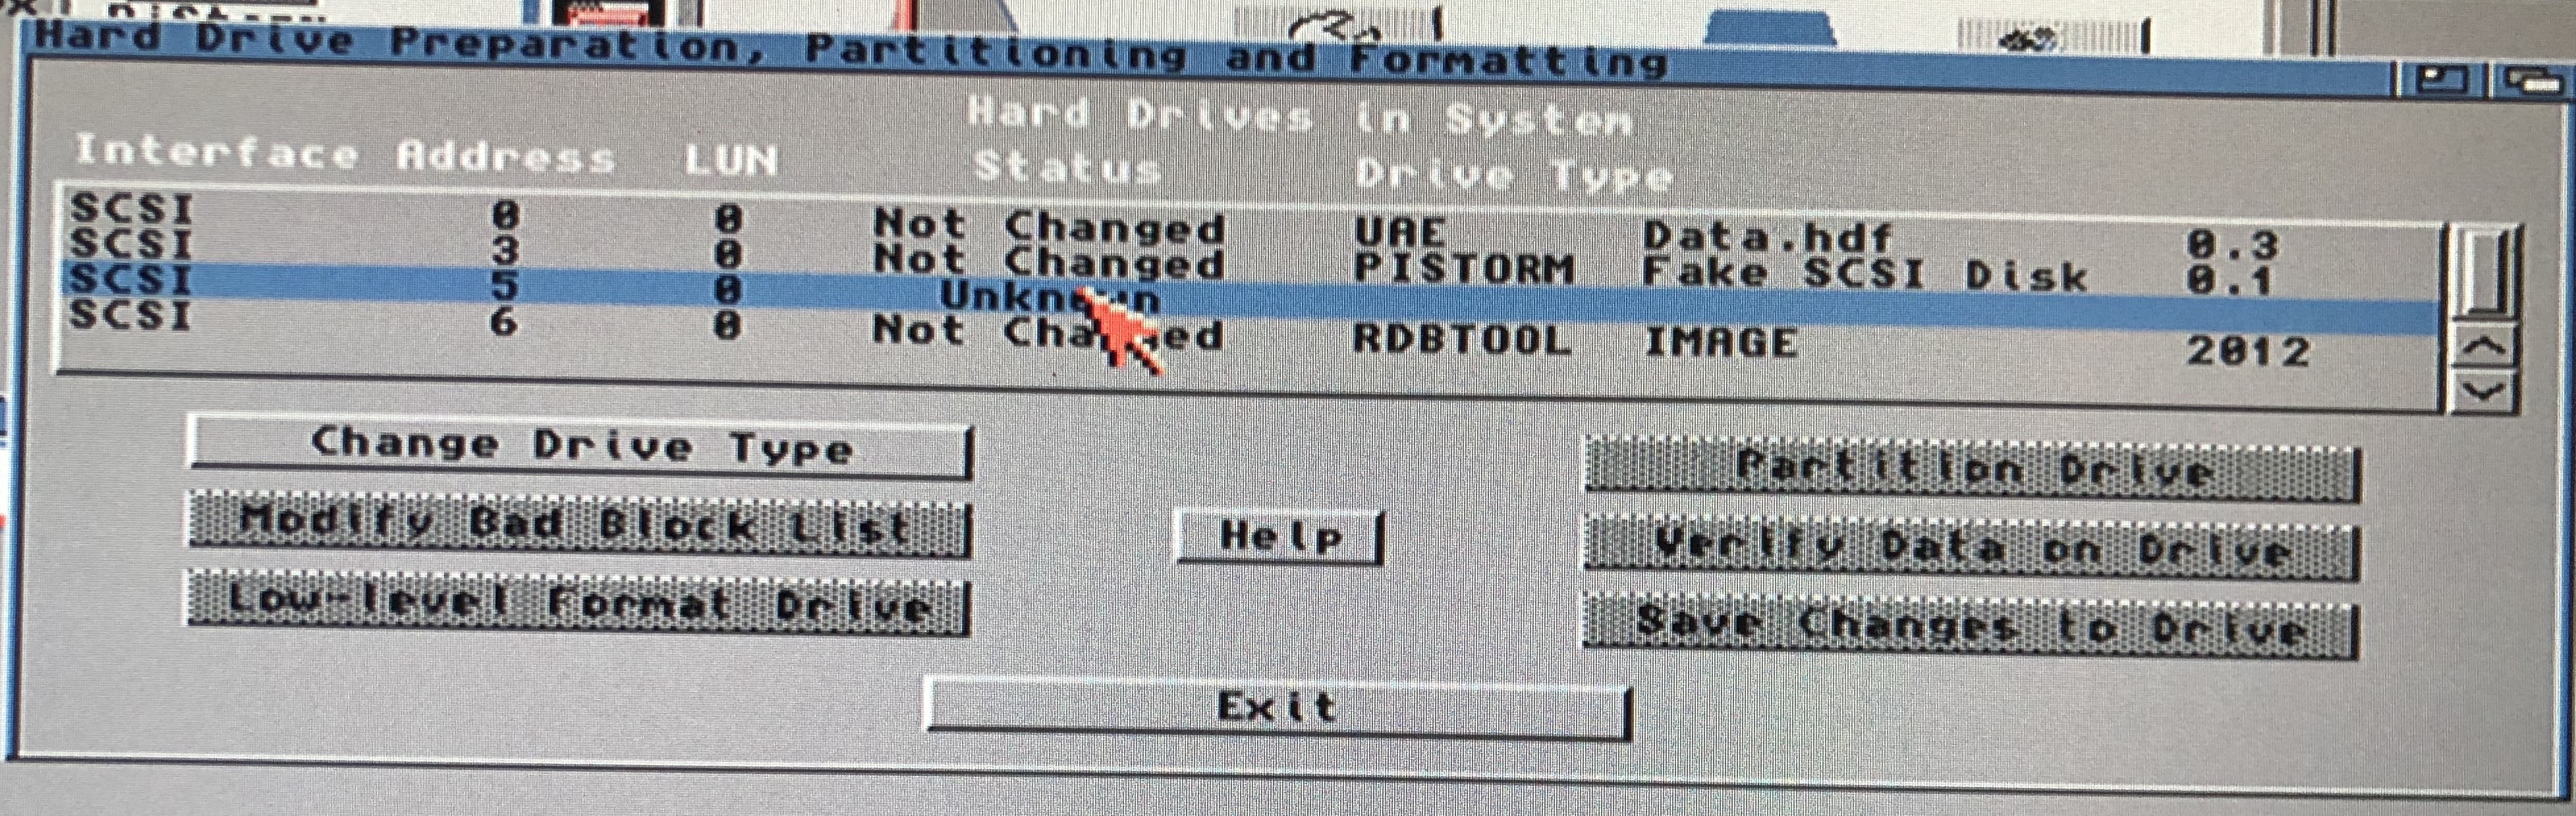
A new hard disk type has to be defined, by reading the disk configuration:

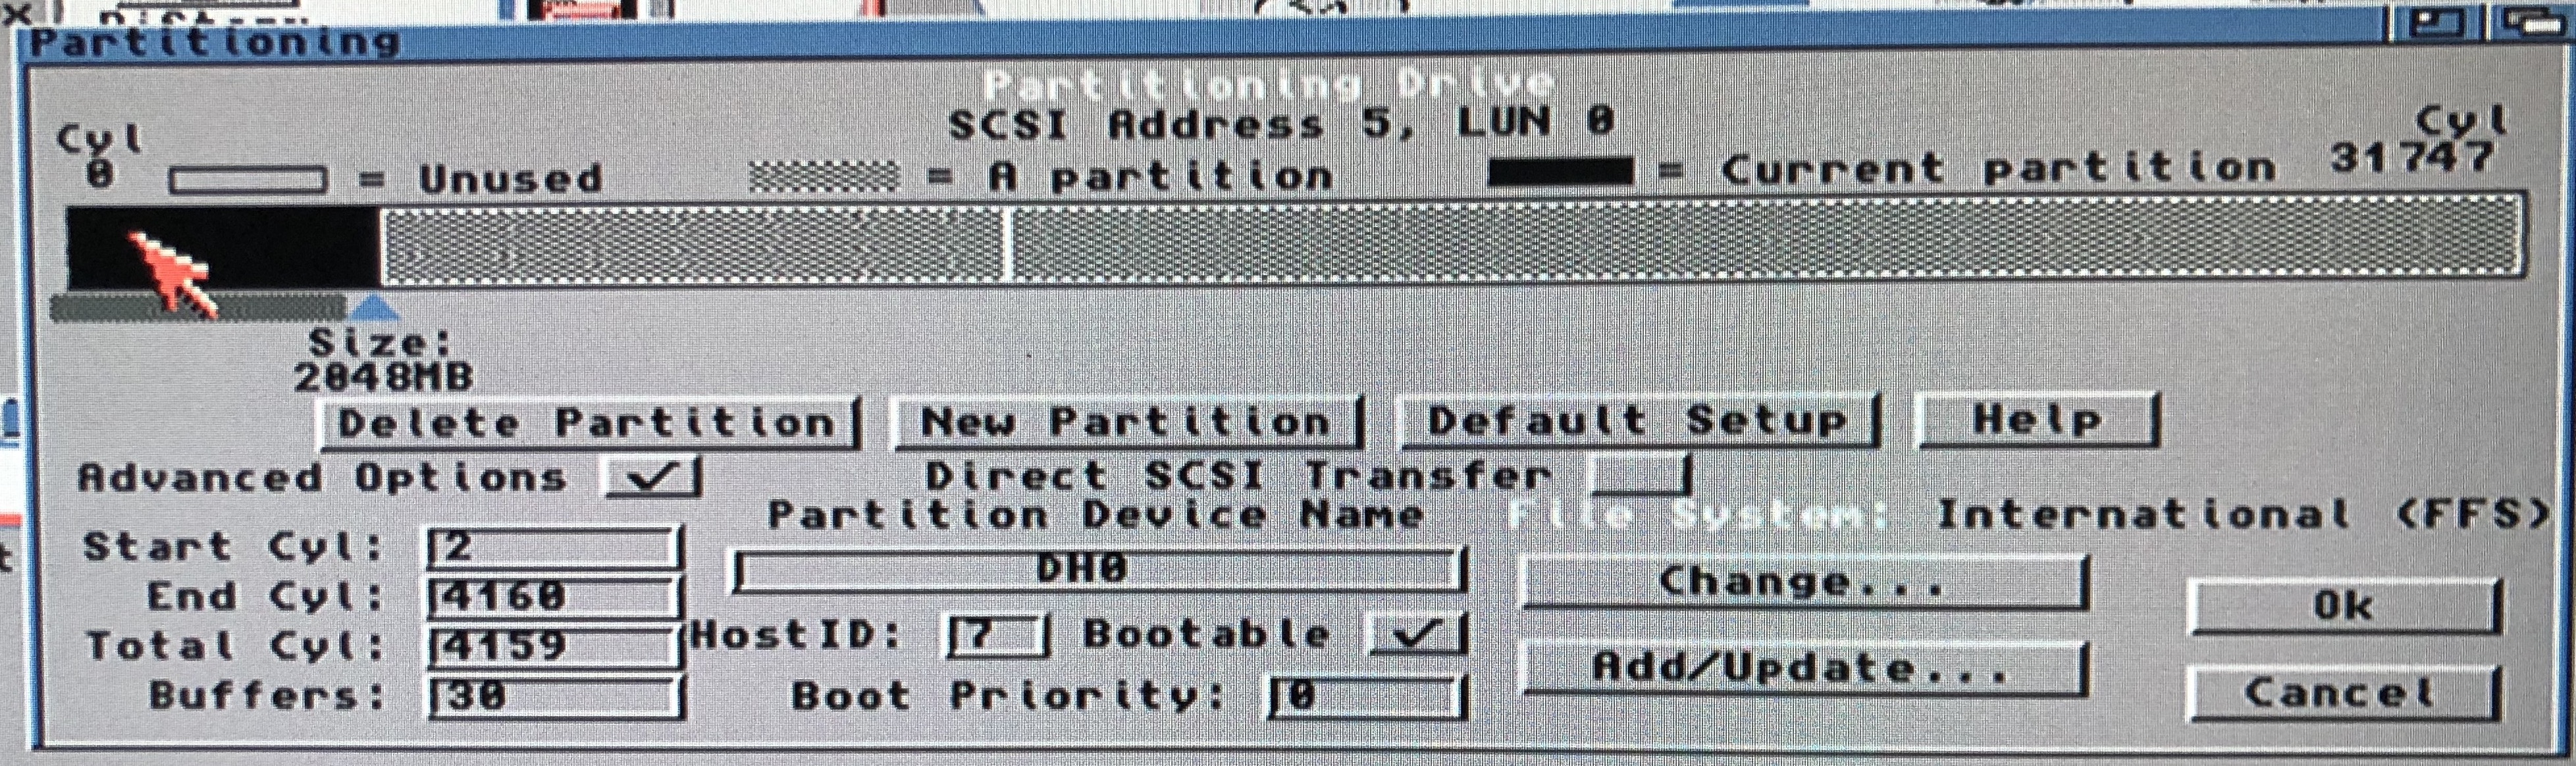
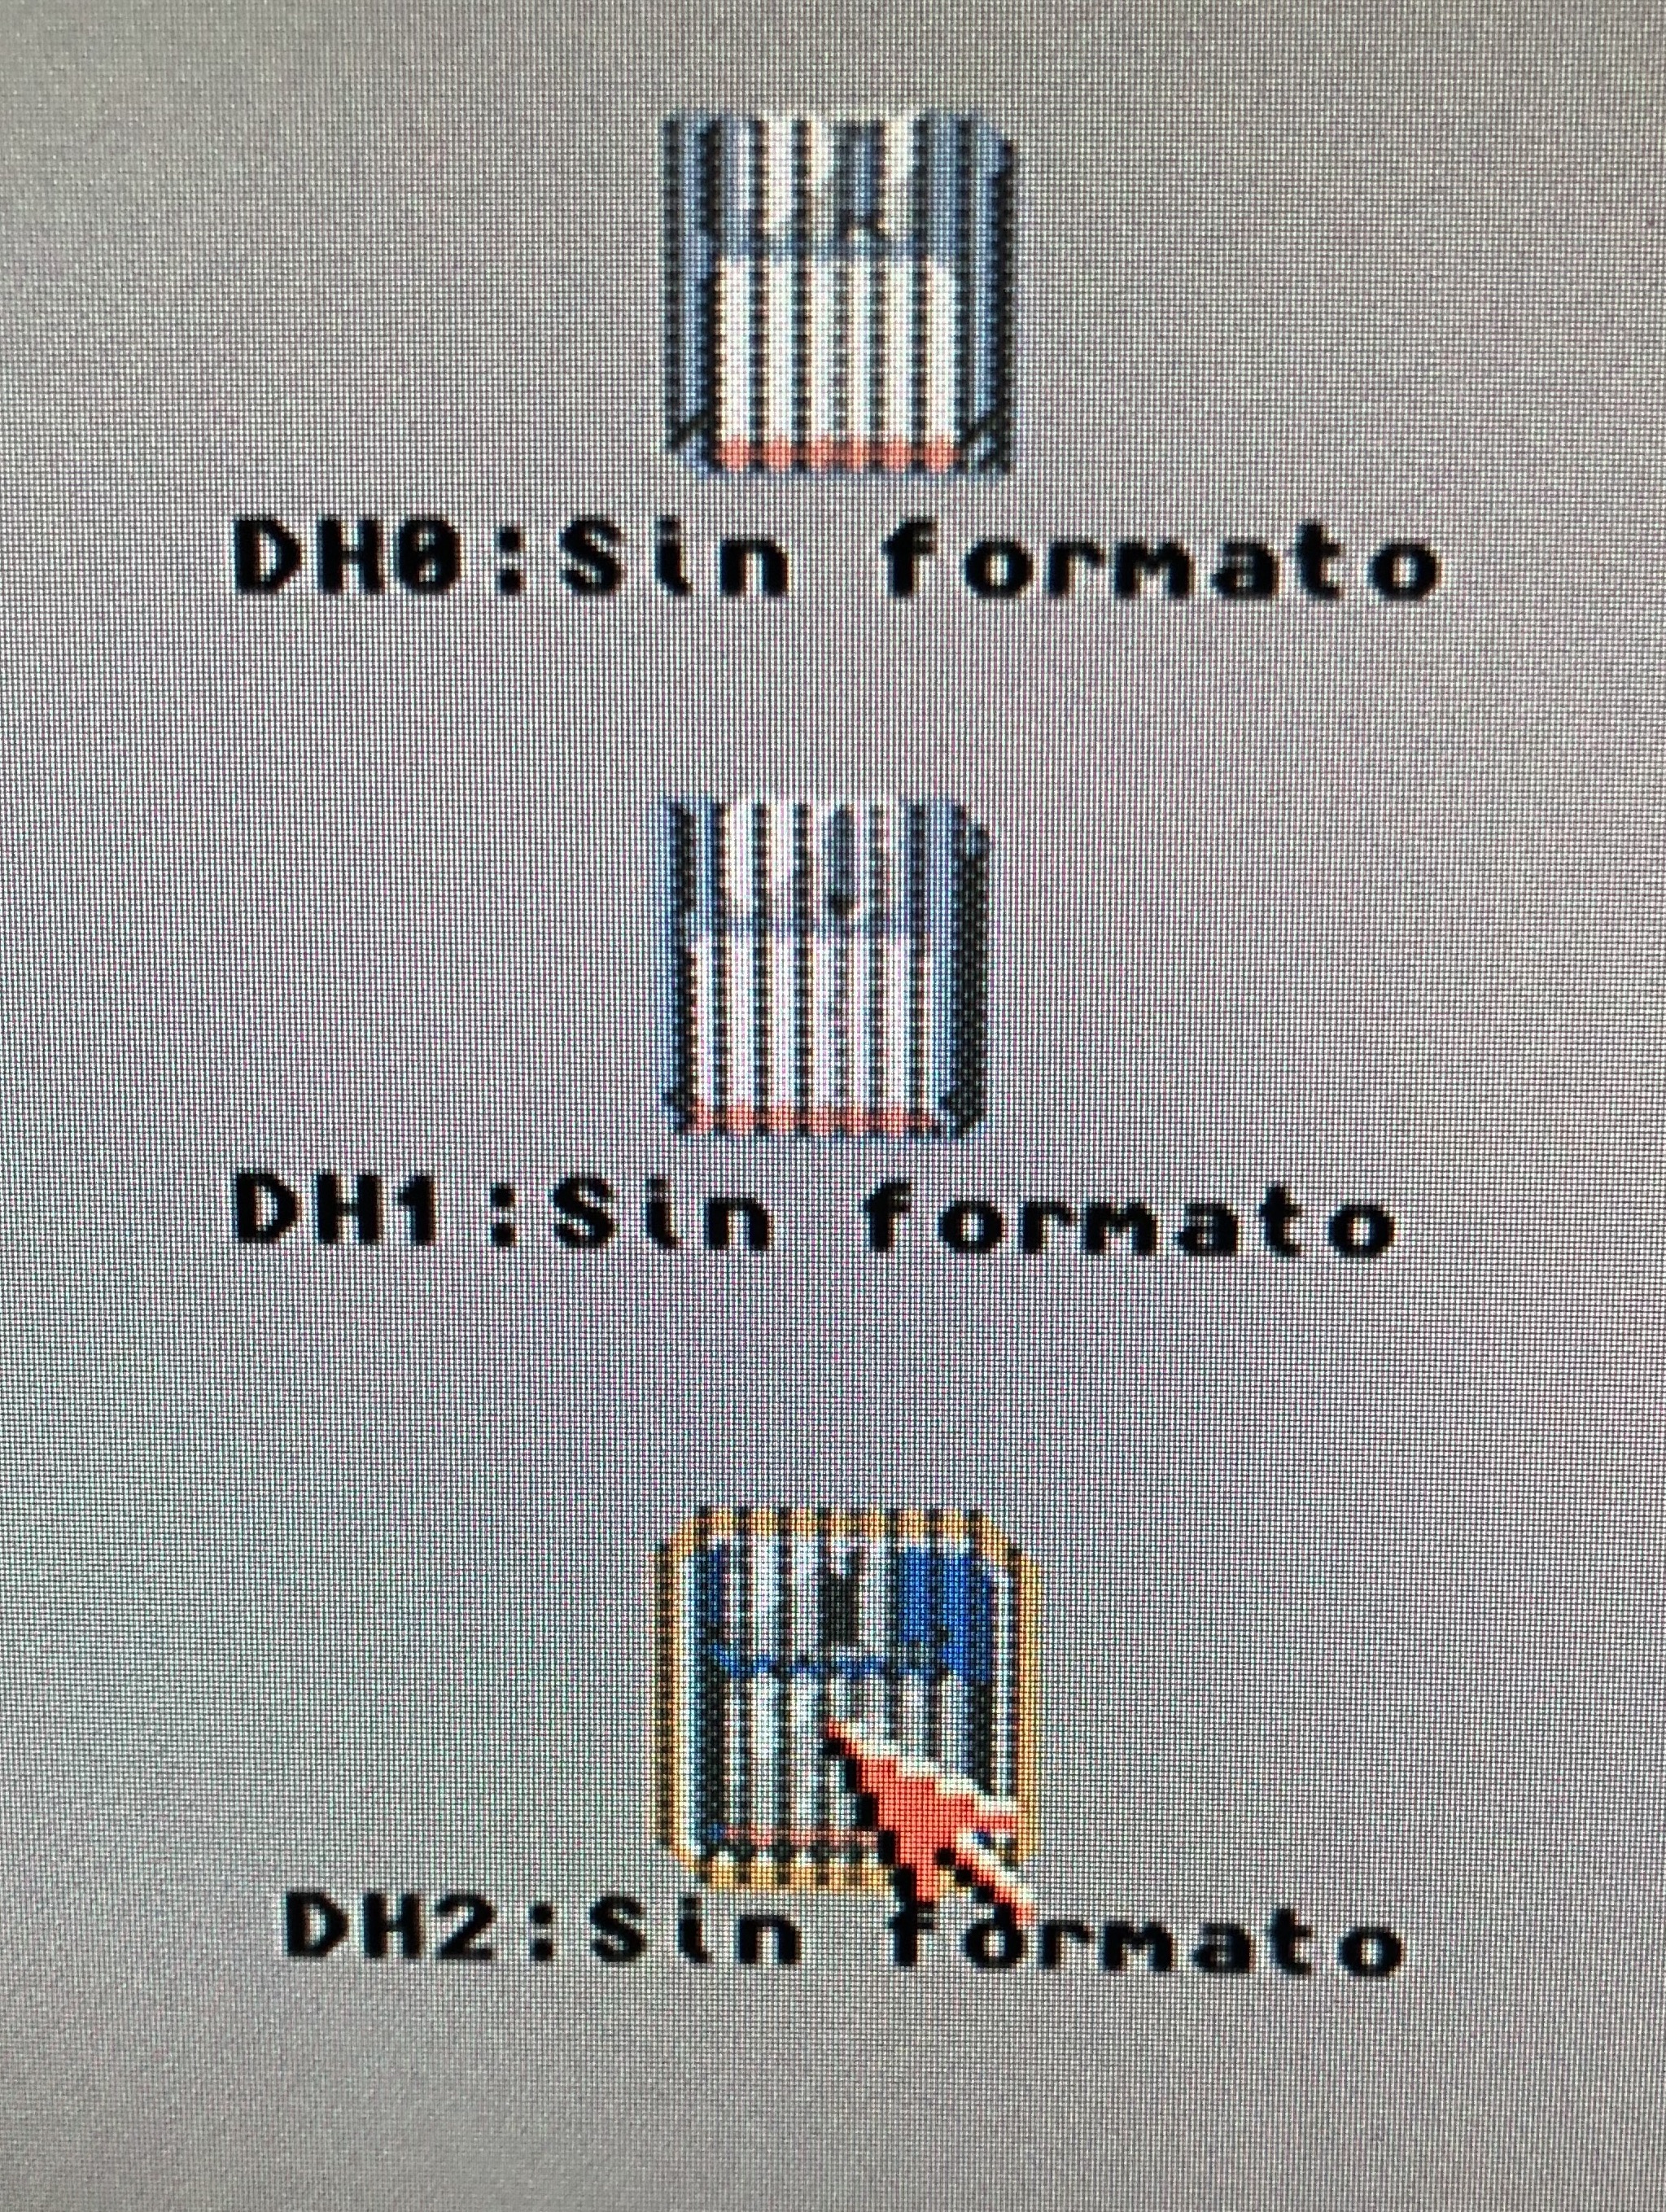
saving the changes to disk and then proceeding to partition it, with the number of partitions and sizes we want, but leaving a load partition, for the operating system. In this test case, I have opted for three partitions, one of 2 GB for the OS (with the "Bootable" option enabled):
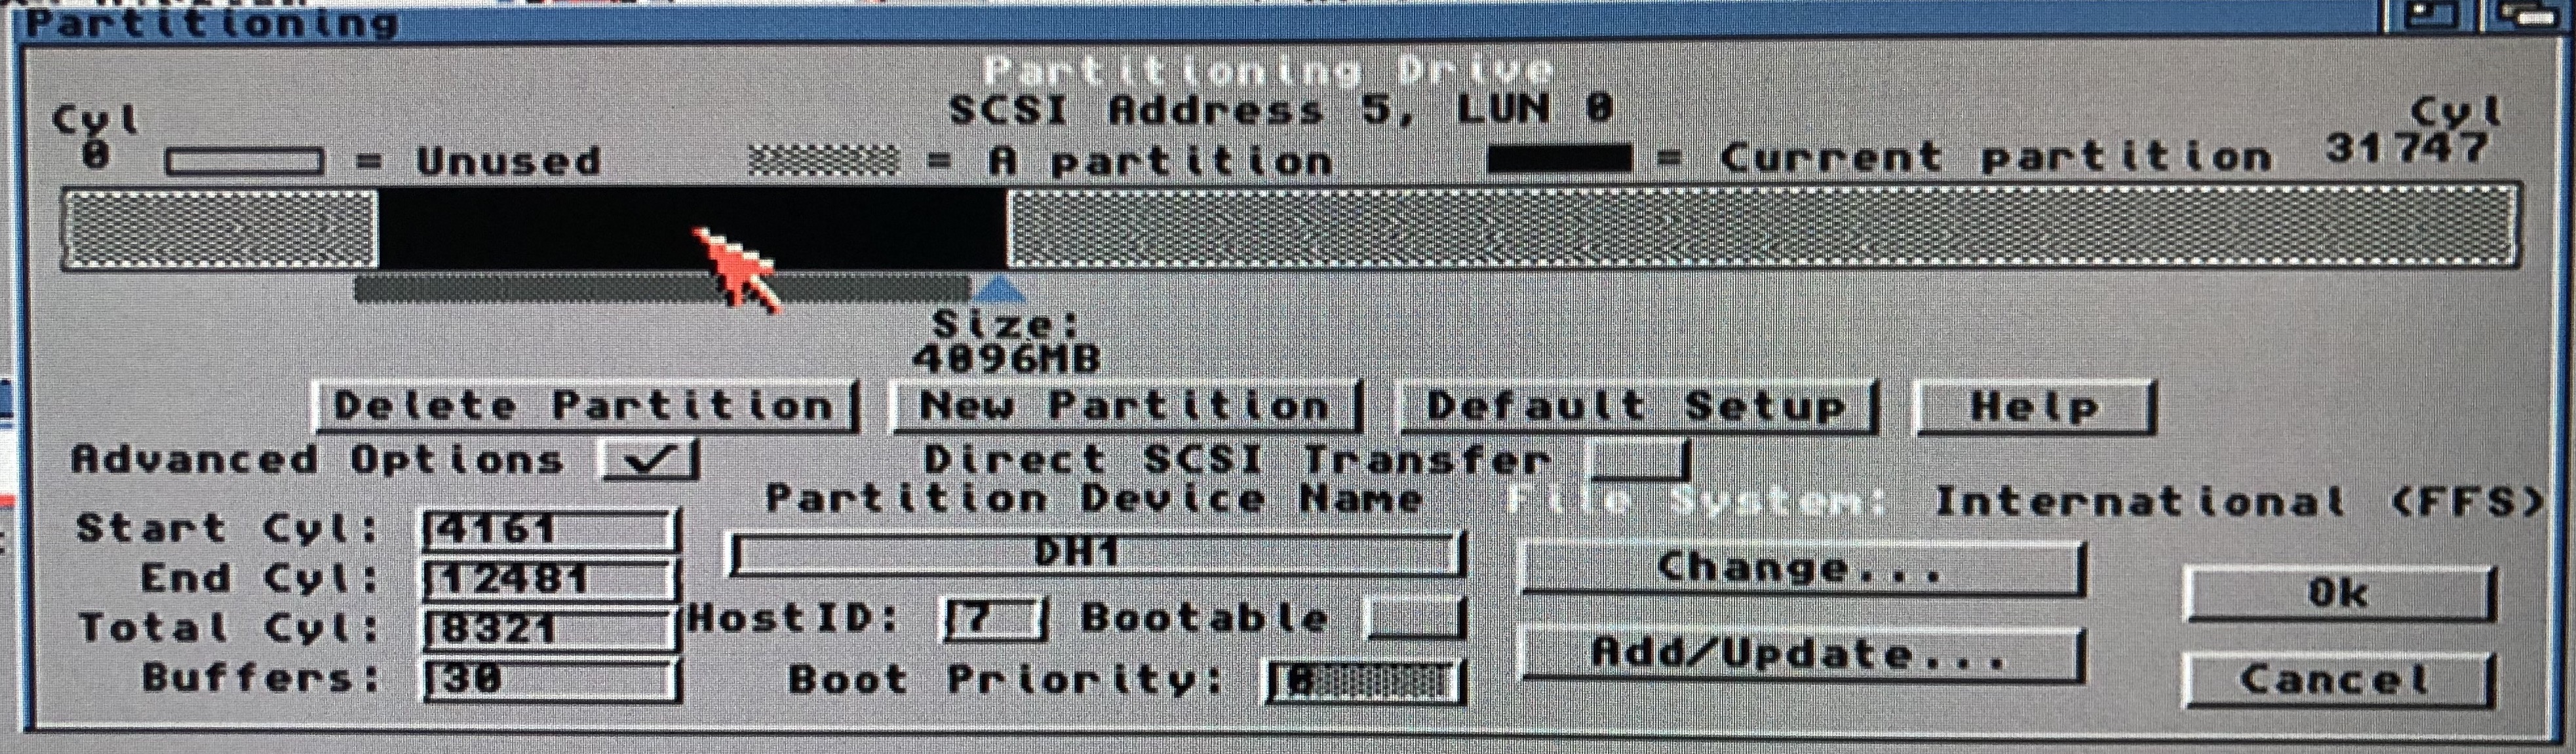
one 4 GB partition for applications:
and a last one for games, of the rest of the available space, about 10 GB:
As this is a test, I haven't changed anything else, I use the FastFileSystem from AmigaOS v3.2.1 and the default values. Once the changes are saved and the Amiga restarted, you should see three drives ready to be formatted in the Workbench:
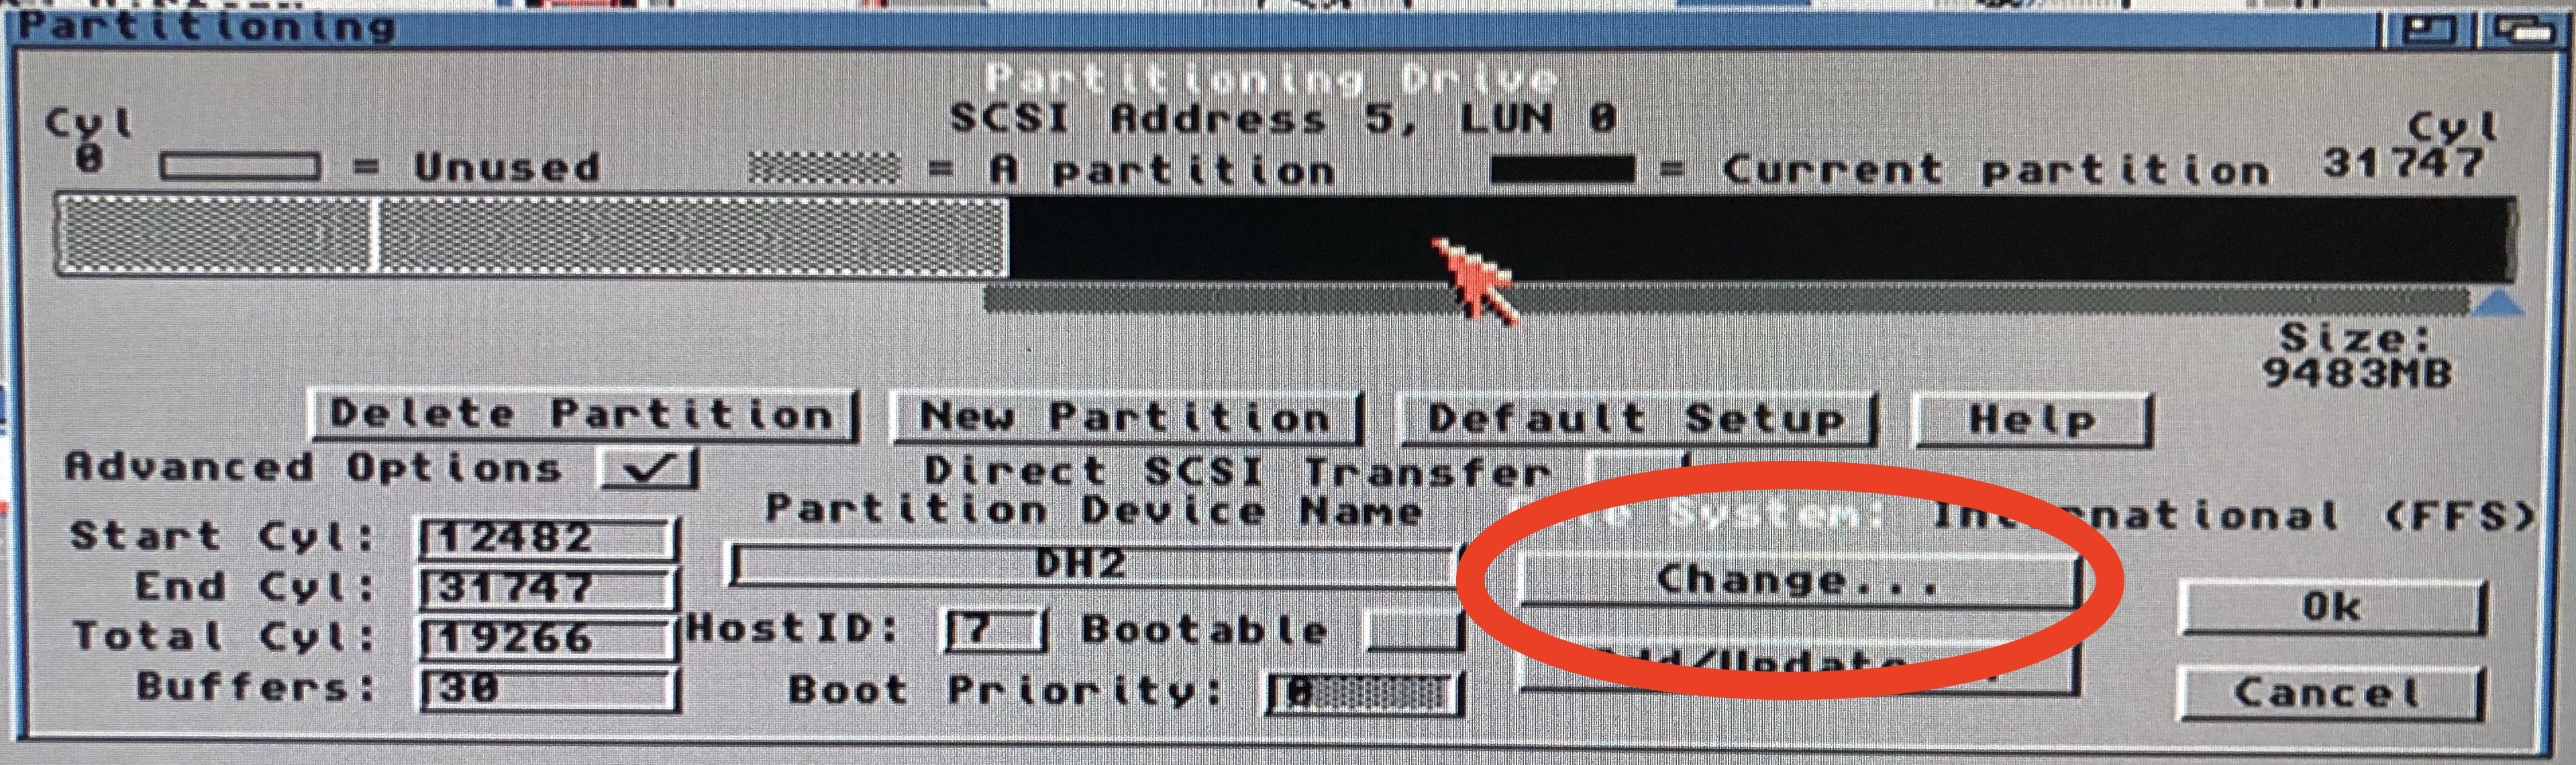
VERY IMPORTANT NOTE: By default, AmigaOS v.3.2.1 sets partition block size to 4096 in big partitions, but if you want to share any of these partitions in Linux, the module in Linux that can read Amiga partitions, AFFS, only understands FastFileSystem ones, and those with a maximum block size of 2048, so make sure that the partition you want to share has that filesystem and that block size or less. You can check those values here:
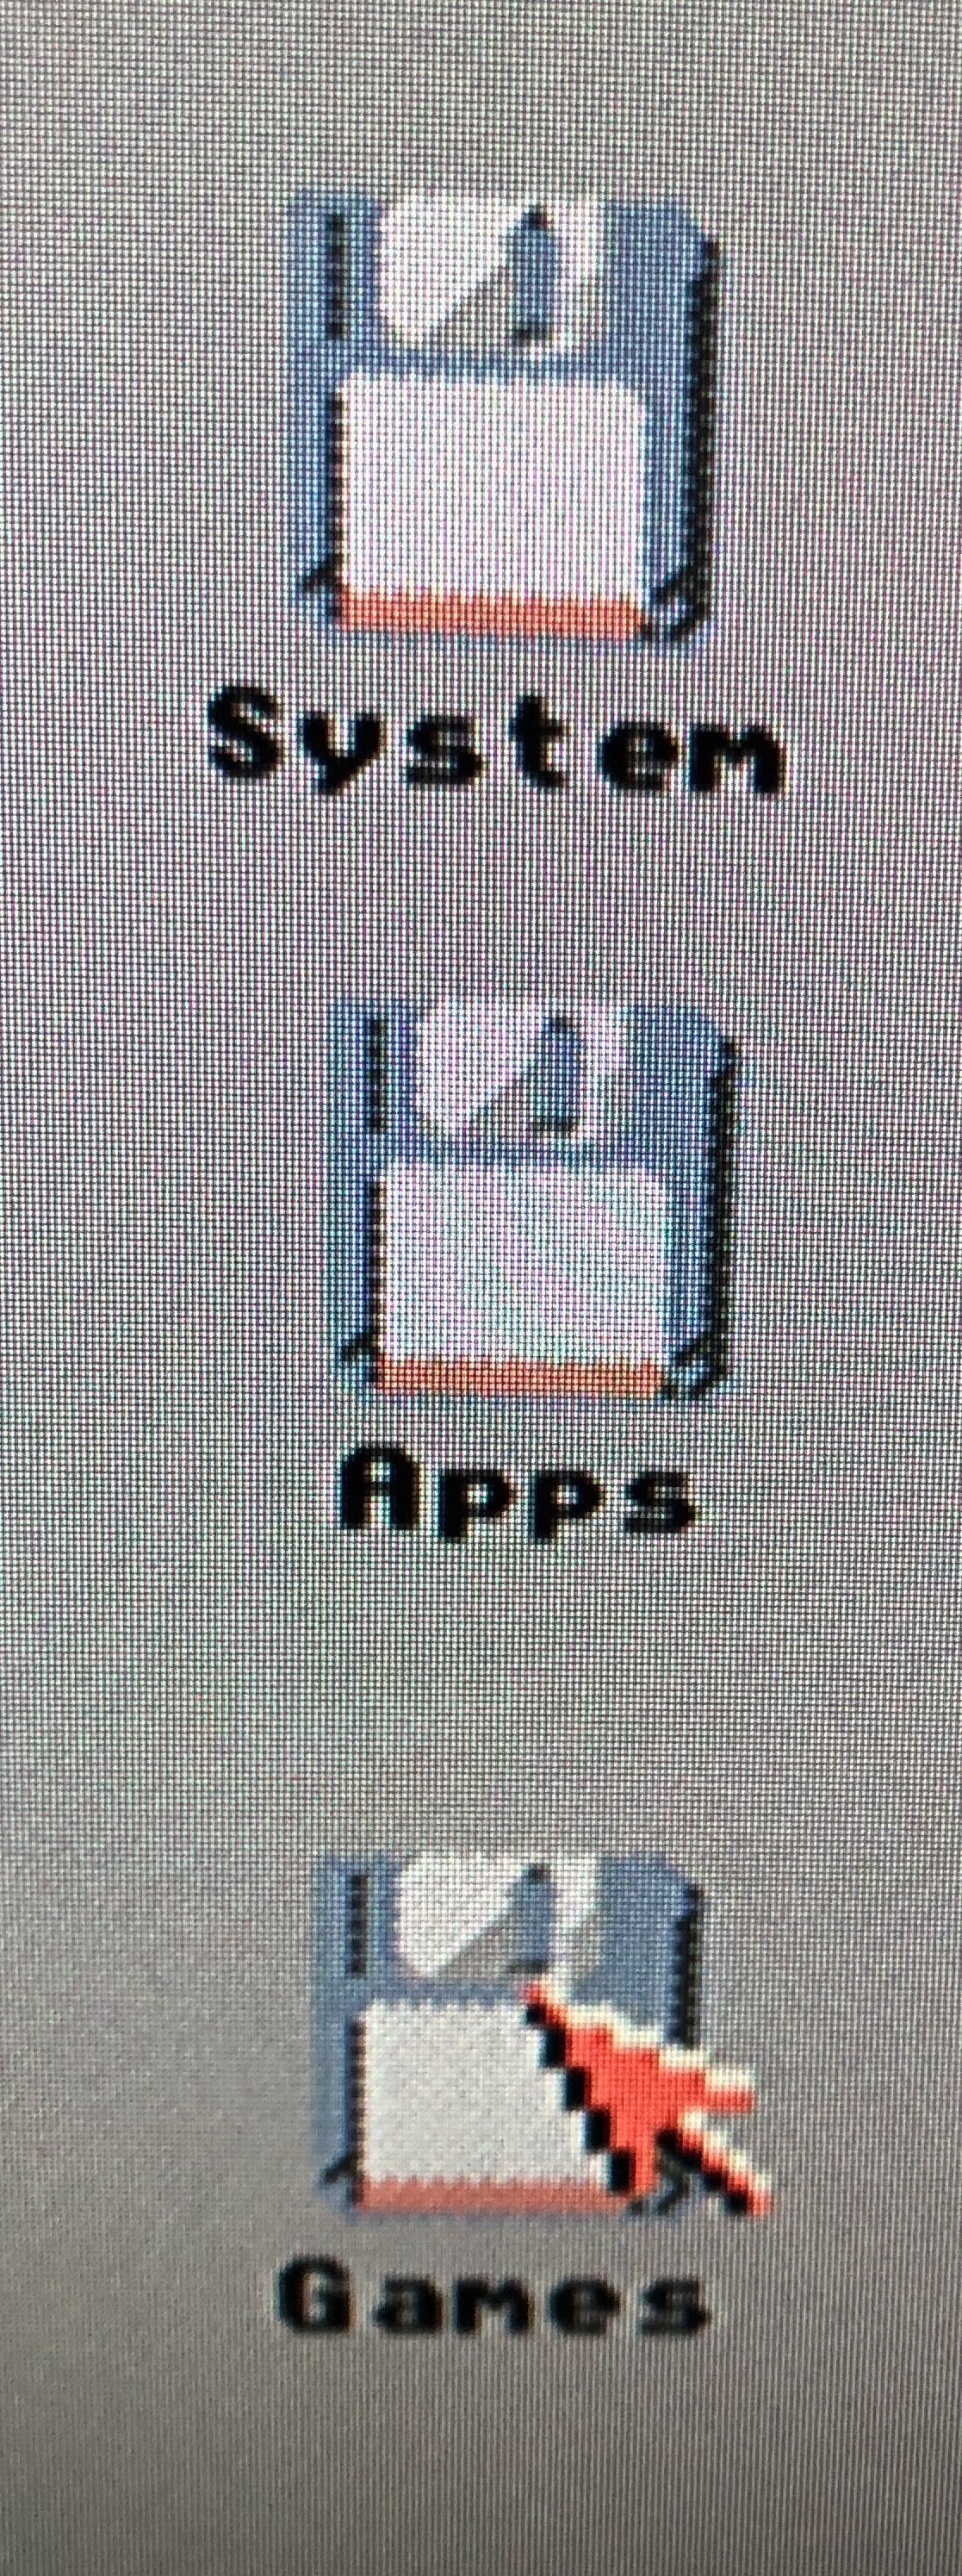
They can be formatted directly by selecting each one and using the "Format" option in the Workbench menu, until they look something like this:
The next step is to copy ALL the content of the Musashi disk to the Emu68 system disk. I have done it using DOpus, which I had already installed on the Musashi disk, but you can do it from the WB (open the Musashi disk, choose the WB option "Show all icons", select all and drag the content to the destination disk) or from the CLI, with the command "copy".:
copy SYS: DH0: CLONE ALL QUIET
where SYS: is the Musashi disk and DH0: the Emu68 system disk (double check that). The "quiet" option is optional, if you want to show what is being copied or not.
Once the copy is done, we have to check that Musashi boots from the Emu68 drive, so we reset the Amiga and press the two mouse buttons while it restarts, so that the Early Boot Menu appears. There we deactivate the Musashi unit (in my case, the UDH1: ) and we tell it to boot from DH0:, the Emu68 system disk.:

If everything went well, Musashi should boot perfectly fine from that drive, even faster than from the HDF. If so, you can edit the Musashi configuration file you use and disable the system HDF, from which Musashi was booting until now, by putting a # in front of it or, directly, deleting the line. In my case:
#setvar piscsi0 /home/pi/v32.hdf
Now it's time to make Emu68 boot from the same disk. To do this, the first thing to do is to download the Emu68 distribution from its page ( https://github.com/michalsc/Emu68/releases/tag/nightly ), downloading from the "nightly" section the file starting with "Emu68-pistorm..." which is the most recent one (now, September 5th, https://github.com/michalsc/Emu68/releases/download/nightly/Emu68-pistorm-20220905-bca29f.zip ).
You could also download the ones that are generated automatically every night ( https://github.com/michalsc/Emu68/actions/workflows/nightly.yml ), but for that you have to be registered on the GitHub page.
This process can be done on your regular computer, the following operations will be with the FAT32 partition of the card.
Once downloaded, decompress it. In the folder where it has been decompressed you will find the file "config.txt". You have to edit it and, in the last line
initramfs kick321.rom
you have to change "kick321.rom" to the name of the KickStart you are using in Musashi. In my case, for example:
initramfs kick47.96.rom
Save the file and rename it to "config_emu68.txt". Then, create in the same folder the text file "cmdline_emu68.txt" with the following content:
z2_ram_size=0 vc4.mem=64 sd.clock=75 sd.unit0=rw
Once saved, copy the files "config_emu68.txt", "cmdline_emu68.txt" and "Emu68.img" from that folder to the FAT32 partition of the µSD card, and, if you have it at hand, copy also the same KickStart you use in Musashi, if not, you can do it from Linux, with the command
sudo cp /home/pi/kick47.96.rom /boot/
(assuming that is the name of the file, "kick47.96.rom" and that the location is the user directory "/home/pi/", of course).
Then, in the main directory of the FAT32 partition, or "boot", duplicate the files "config.txt" to "config_musashi.txt" and "cmdline.txt" to "cmdline_musashi.txt".
You will also need the following programs:
-
Emu68Info (inside Emu68-tools, you have to put it in the Amiga's C: directory.)
https://github.com/michalsc/Emu68-tools/releases/download/nightly/Emu68-tools-20220613-b5a71b.zip
-
GiggleDisk ( decompressed, in /bin, the file "GiggleDisk_AOS68K" and its icon, put them in the Amiga's C: directory as "GiggleDisk".)
-
Fat95 (is, once decompressed, in /fat95/l, you have to put it in the Amiga's L: directory.)
To transfer all this information to the Amiga you can use the Musashi PiDisk: on Linux it is a folder in the PiStorm installation (by default, /home/pi/pistorm/data/a314-shared ), on Amiga it is a drive, PI0: (mounted with "mount PI0:" in the CLI). It's not very fast, but it will be enough. You copy the information to the folder on Linux and it will appear in the PiDisk on Amiga.
Once all the programs are in place, you have to make the scripts that will allow you to switch from one emulator to another. The first one, from the Linux side, create the file "StartEmu68.sh", by means of:
sudo nano /home/pi/StartEmu68.sh
putting inside this text:
#! /bin/bash

# Start Emu68 from Musashi

sudo rm /boot/cmdline.txt
sudo rm /boot/config.txt

sudo cp /boot/cmdline_emu68.txt /boot/cmdline.txt
sudo cp /boot/config_emu68.txt /boot/config.txt

wait -f

sudo reboot
Save and close with Ctrl-X and press 'Y'.
Now, on the Amiga side, create with TextEdit the following scripts: first, "Start_Emu68", with the following content:
; $VER: Start Emu68 1.0 (26.06.2022)

failat 21

version brcm-sdhc.device >nil:

if fail

    pi /home/pi/StartEmu68.sh

else

    echo "Musashi not running"
    wait 1

endif

;EOF
and save it in S:
Then the file "Start_Musashi", with the content:
; $VER: Start Musashi 1.0 (26.06.2022)

failat 21

version brcm-sdhc.device >nil:

if not fail

    assign sd0: exists >ENV:SD0

    IF "$SD0" EQ "sd0: not assigned"

       mount sd0: >nil:

    EndIf

    delete sd0:cdmline.txt >nil:
    delete sd0:config.txt >nil:

    copy sd0:cmdline_musashi.txt sd0:cmdline.txt >nil:
    copy sd0:config_musashi.txt sd0:config.txt >nil:

    wait 3

    c:Emu68Info HARDRESET

else

    echo "Emu68 not running"
    wait 1

endif

;EOF
also saved in S:
The icons of the two files (open it with the WB menu option "Information") must be of type "Project", the protection bits must include the "Script" bit set, the tool to open the file must point to "C:IconX" and the ToolTypes field must include the text, for "Start_Emu.info",
WINDOW=CON:100/100/250/20/Start Emu68/AUTO/NOWAIT/CLOSE
and for “Start_Musashi.info”
WINDOW=CON:100/100/250/20/Start Musashi/AUTO/NOWAIT/CLOSE
It is a good idea, for convenience, to leave the icons in the WB, to keep them handy, with the WB menu option "Leave out".
If everything went well, it's time to test if Emu68 boots correctly from the same disk, so double click on the "Start_Emu68" icon.
Once the system has loaded under Emu68, we must prepare the mount file of the FAT32 "boot" partition of the µSD card, which is essential to be able to return to Musashi. For this purpose, we use GiggleDisk from the CLI:
GiggleDisk brcm-sdhc.device 0 TO RAM:
This will create in RAM: mount files for all the partitions contained inside the µSD card, both the real ones (starting with GGDx) and the virtual ones contained in Amiga partition 0x76 (DHx). The one we are interested in is the first of the real ones, GGD0, which corresponds to the FAT32 partition. It looks like this:
/*
** DosDriver automatically created by GiggleDisk
**
** GiggleDisk (c)2005 Guido Mersmann
**
*/

FileSystem       = WIN95 OSR2 FAT32
Device           = brcm-sdhc.device
Unit             = 0
BlockSize        = 512
Surfaces         = 1
SectorsPerBlock  = 1
BlocksPerTrack   = 1
Reserved         = 0
PreAlloc         = 0
Interleave       = 0
MaxTransfer      = 0x00FFFE00
Mask             = 0x7FFFFFFE
LowCyl           = 8192
HighCyl          = 8830976
Buffers          = 50
BufMemType       = 1
StackSize        = 16384
Priority         = 10
GlobVec          = -1
DosType          = 0x0000000B
Activate         = 1
Mount            = 1
/* Bootable      = FALSE */
(Note: LowCyl and HighCyl values may be different, depending on the size and characteristics of the partition FAT32)
From the line starting with "FileSystem", replace the text "WIN95 OSR2 FAT32" with "l:fat95", and save it. Then rename both the file and its icon from GGD0 to SD0, and copy it to "sys:Storage/DosDrivers/".
Once you have done this, you should be able to double-click on the "Start_Musashi" icon to return to that emulator.
And, in theory, that would be all.
In reality, a couple more details need to be "fine-tuned". For example, there are programs that work in Musashi that will give some kind of error in Musashi, such as, for example, the start-up of any TCP/IP stack, like MiamiDX, or programs that, even if they do not give any error, do not work in Emu68 because it does not have that functionality, for example, the HDF shared with Linux. Therefore, it is not a bad idea to put at the start of the boot, in the "Startup-Sequence", a checkpoint in which the behaviour of these programs is changed. I have made one using as a "test point" the existence or not of the "brcm-sdhc.device", which is not a file stored in sys:, it only exists when Emu68 is running, so checking if it is there or not tells you which emulator is running.
In my case, they are MiamiDX and XF0Check (checks that the shared disk is not mounted in Linux), both in WBStartup: Emu68 has no network and doesn't support file sharing (it doesn't even have a Linux to share them with, hehehe), so better disable them before the programs in the WBStartup drawer are activated. The checkpoint is placed just after the CPU check, and looks like this, using the "rename" command to actually move files to a folder of disabled programs, inside WBStartup:
;------BEGIN move files Musashi/Emu68

failat 21

version brcm-sdhc.device >nil:

if not fail
    if EXISTS Sys:WBStartup/MiamiDX
        rename Sys:WBStartup/MiamiDX Sys:WBStartup/Desactivados/MiamiDX QUIET
        rename Sys:WBStartup/MiamiDX.info Sys:WBStartup/Desactivados/MiamiDX.info QUIET
    endif
    if EXISTS Sys:WBStartup/XF0Check
        rename Sys:WBStartup/XF0Check Sys:WBStartup/Desactivados/XF0Check QUIET
        rename Sys:WBStartup/XF0Check.info Sys:WBStartup/Desactivados/XF0Check.info QUIET
    endif
else
    if EXISTS  Sys:WBStartup/Desactivados/MiamiDX
        rename Sys:WBStartup/Desactivados/MiamiDX Sys:WBStartup/MiamiDX QUIET
        rename Sys:WBStartup/Desactivados/MiamiDX.info Sys:WBStartup/MiamiDX.info QUIET
    endif
    if EXISTS Sys:WBStartup/Desactivados/XF0Check
        rename Sys:WBStartup/Desactivados/XF0Check Sys:WBStartup/XF0Check QUIET
        rename Sys:WBStartup/Desactivados/XF0Check.info Sys:WBStartup/XF0Check.info QUIET
    endif
endif

;------END move files Musashi/Emu68
I know that it is possible to simplify the movement of files with the use of wildcards in the names, but I didn't want to risk it.
Also, another good idea is to duplicate all programs that use disk devices for partitioning, mounting partitions, etc., e.g. HDToolBox, or Mounter, and have each version specify which device to use. So, there would be a HDToolBox_Musashi, with the "pi-scsi.device" in its Tooltypes, and a HDToolBox_Emu68 with the "brcm-sdhc.device" in its Tooltypes. And I say it's a good idea because, for example, if you start HDToolBox in Emu68 with the "pi-scsi.device" in its ToolTypes, the computer crashes.
Note: I'll provide in separate docs the way to also mount the FAT partition from Musashi, be it installed in the same µSD that Emu68 or not, and the method on how to mount a virtual partition inside the 0x76 physical partition as a shared mount in Linux using Musashi, so you can use it to directly transfer of data to the Amiga side, available for both Musashi and Emu68, no need for intermediaries: when you switch to Emu68, the data is already there.
And that's it.
It only remains to thank Alberto "Lince" Benitez (@ea4gge in the networks) for his work, most of the merit is his: starting from my idea of the two emulators in a single card, he was the first to partition a µSD with Linux and the 0x76 disk for Amiga (I have no idea about Linux, he does), to be able to load Musashi or Emu68 at convenience, I was in charge of the scripts to automate it. It happens that he did it by hand, transferring an existing Linux installation to the corresponding partition, but it required certain "tweaks" that I wanted to avoid, I wanted to be able to do it from a standard installation, and also to be able to use both Musashi and Emu68 with the same disk, the Emu68 one, for which he also provided indispensable solutions to be able to do it. Thank you, Alberto. This is a real team work.
By the way, a video of the system in operation can be seen at https://www.youtube.com/watch?v=wFltCjt_i-o
Saluditos,
Ferrán.