![]()
Clean server sources for educational purposes.
It builds as it is, without external dependencies.
For more installation/configuration, check out the instructions below.
mkdir build
cd build
cmake ..
cmake --build .
- Death: Fixed mobs attacking player's corpse, player regenerating HP while dead and revive functionality
This is the first (and perhaps the most complex) project that needs to be configured for a smooth system installation.
Below you will find a comprehensive guide on how to install and configure all the necessary components from scratch.
This guide is made using a Windows environment as the main environment. If you are not using Windows, please feel free to adapt these instructions for your operating system.
This guide also uses the latest versions for all software demonstrated as of its creation date at January 31, 2026.
© All copyrights reserved to the owners/developers of any third party software demonstrated in this guide other than this project/group of projects.
If one or more of the previous items is not yet configured please come back to this section after you complete their configuration steps.
▶️ M2Dev Server Source [YOU ARE HERE]- ⏳ M2Dev Server
- ⏳ M2Dev Client Source
- ⏳ M2Dev Client [ALSO CONTAINS ADDITIONAL INFORMATION FOR POST-INSTALLATION STEPS]
The source and the server project can be ran in either a FreeBSD or a Windows environment. Other Linux flavors are not fully supported and may not be fully compatible yet.
This tutorial will be showing how to install in both FreeBSD and Windows environments.

Please make sure that you have installed the following software in your machine before continuing:
VirtualBox: You can also use VMWare or whatever Virtualization software you prefer, this guide will be covering the installation and use of VirtualBox. Download
WinSCP: You can also use FileZilla or any other FTP/SFTP software you prefer, this guide will be covering the installation and use of WinSCP. Download
Navicat Premium Lite (Free Version): You can also use the official MySQL/MariaDB Workbench clients from Oracle, or any other database management software you prefer, but most people in this space are more familiar with Navicat. Download
PuTTY (optional): Using an SSH/Telnet software can be a little more convenient than the defaut interface as it allows you to easily scroll, copy/paste content into the terminal and renders a little bit faster. Feel free to download alternatives if you are more familiar with one or even use the default VirtualBox VM interface to execute your commands. Download


First things first, a Virtual Machine is something like "a computer within your computer". You can install any operating system you wish in your virtual machine, could be macOS, Android, Linux, or even an old and forgotten Windows version (XP, 7, etc...).
First things first
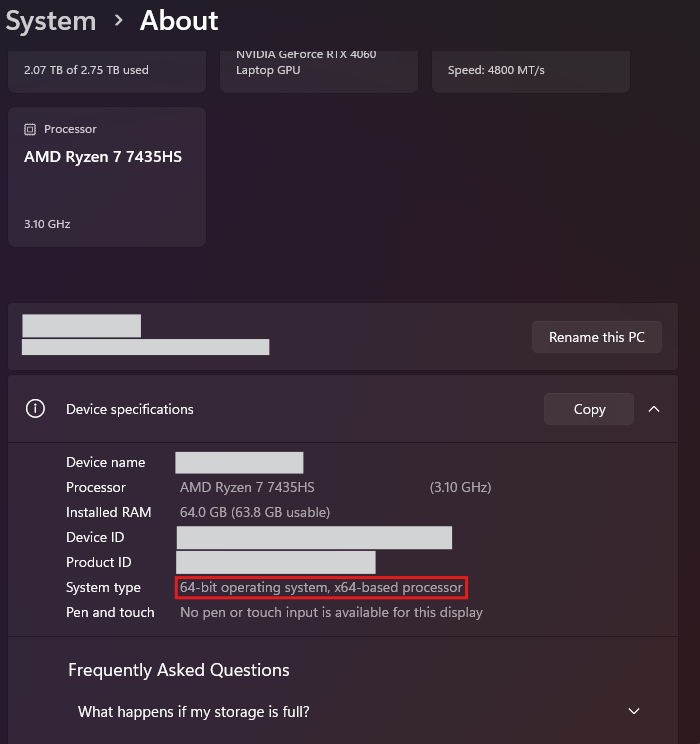
It is very important to know if your machine is x32 (x86) or x64.
Systems that are x32 cannot run x64 virtual machines. If your system is an x64, make sure you have the "Virtualization" settings to ON in your BIOS settings, otherwise the x64 virtual machine options won't appear in your interface when creating the VM.
This tutorial will not be covering how to turn on virtualization as every BIOS differs from the rest although most modern PC's have this option ON by default, so you're probably fine. Here is how to check if your system is x32 or x64 (mine is x64):
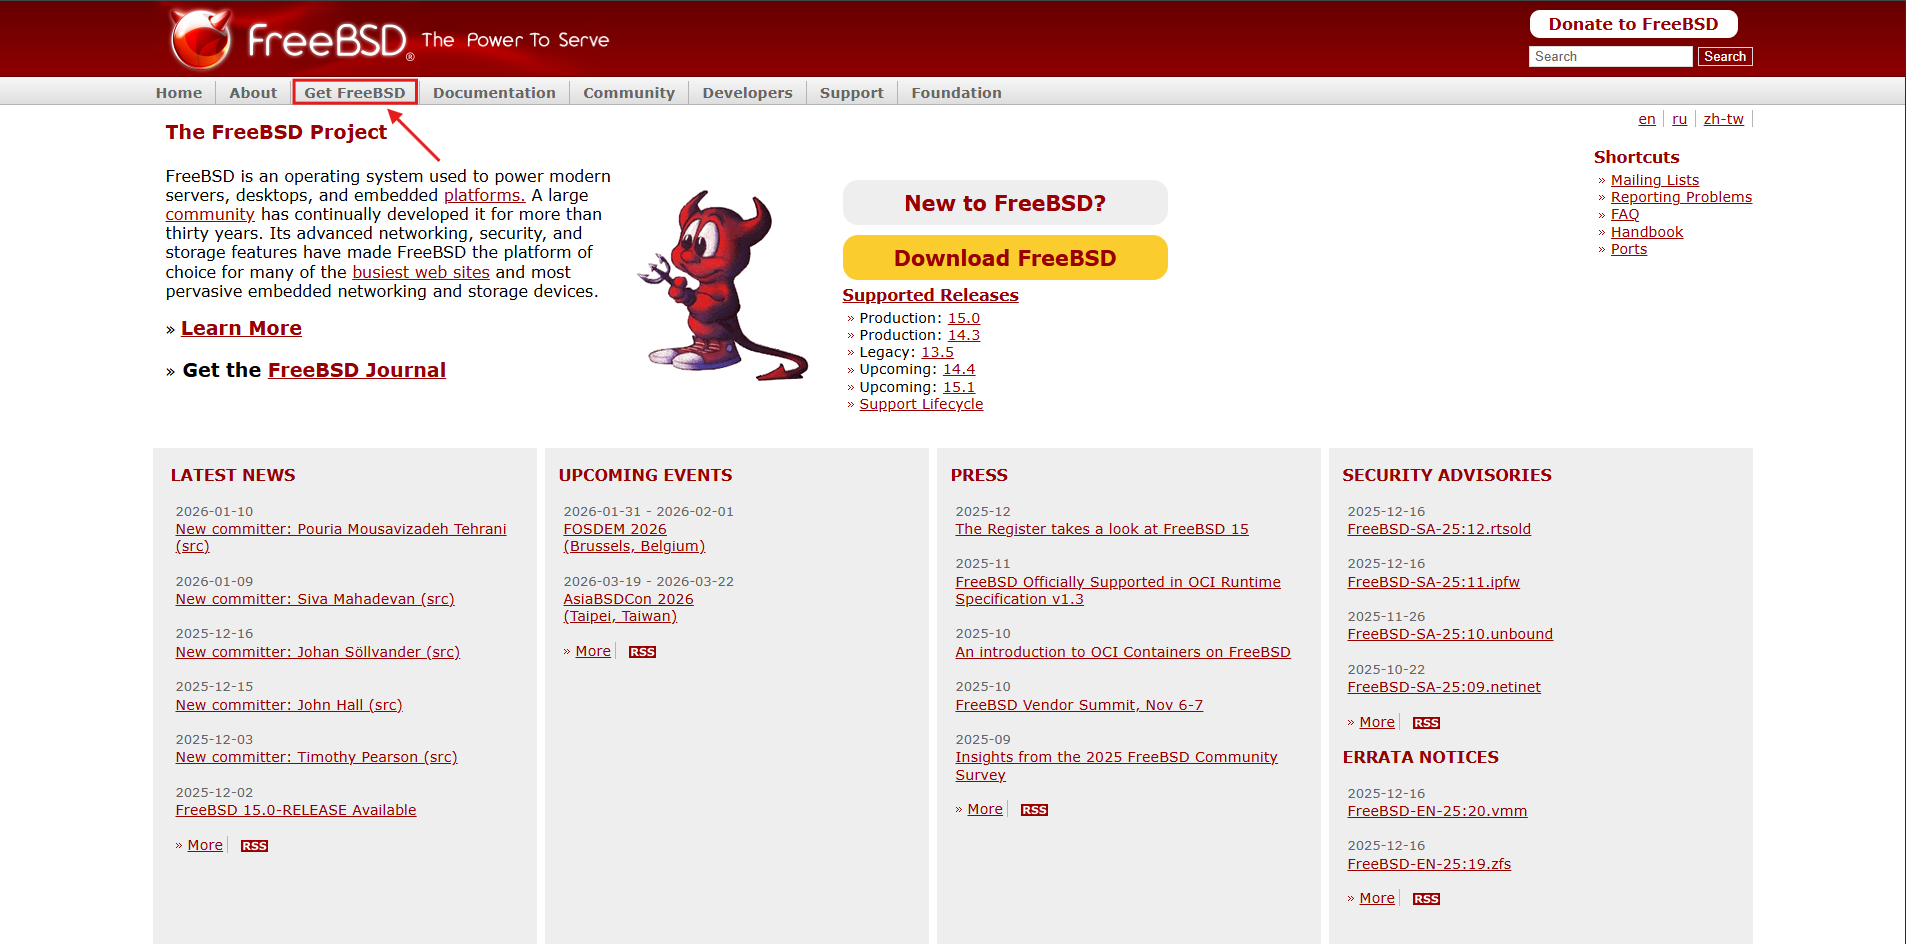
Next, we will be installing the FreeBSD operating system. To install an OS (whether it's in your physical PC or a VM) you need the "installer". This is gonna be an ISO file that contains the installation files. For our case you can download the FreeBSD ISO file like this:
Downloading a FreeBSD ISO
- Go to the official FreeBSD website and select "Get FreeBSD" from the navbar:
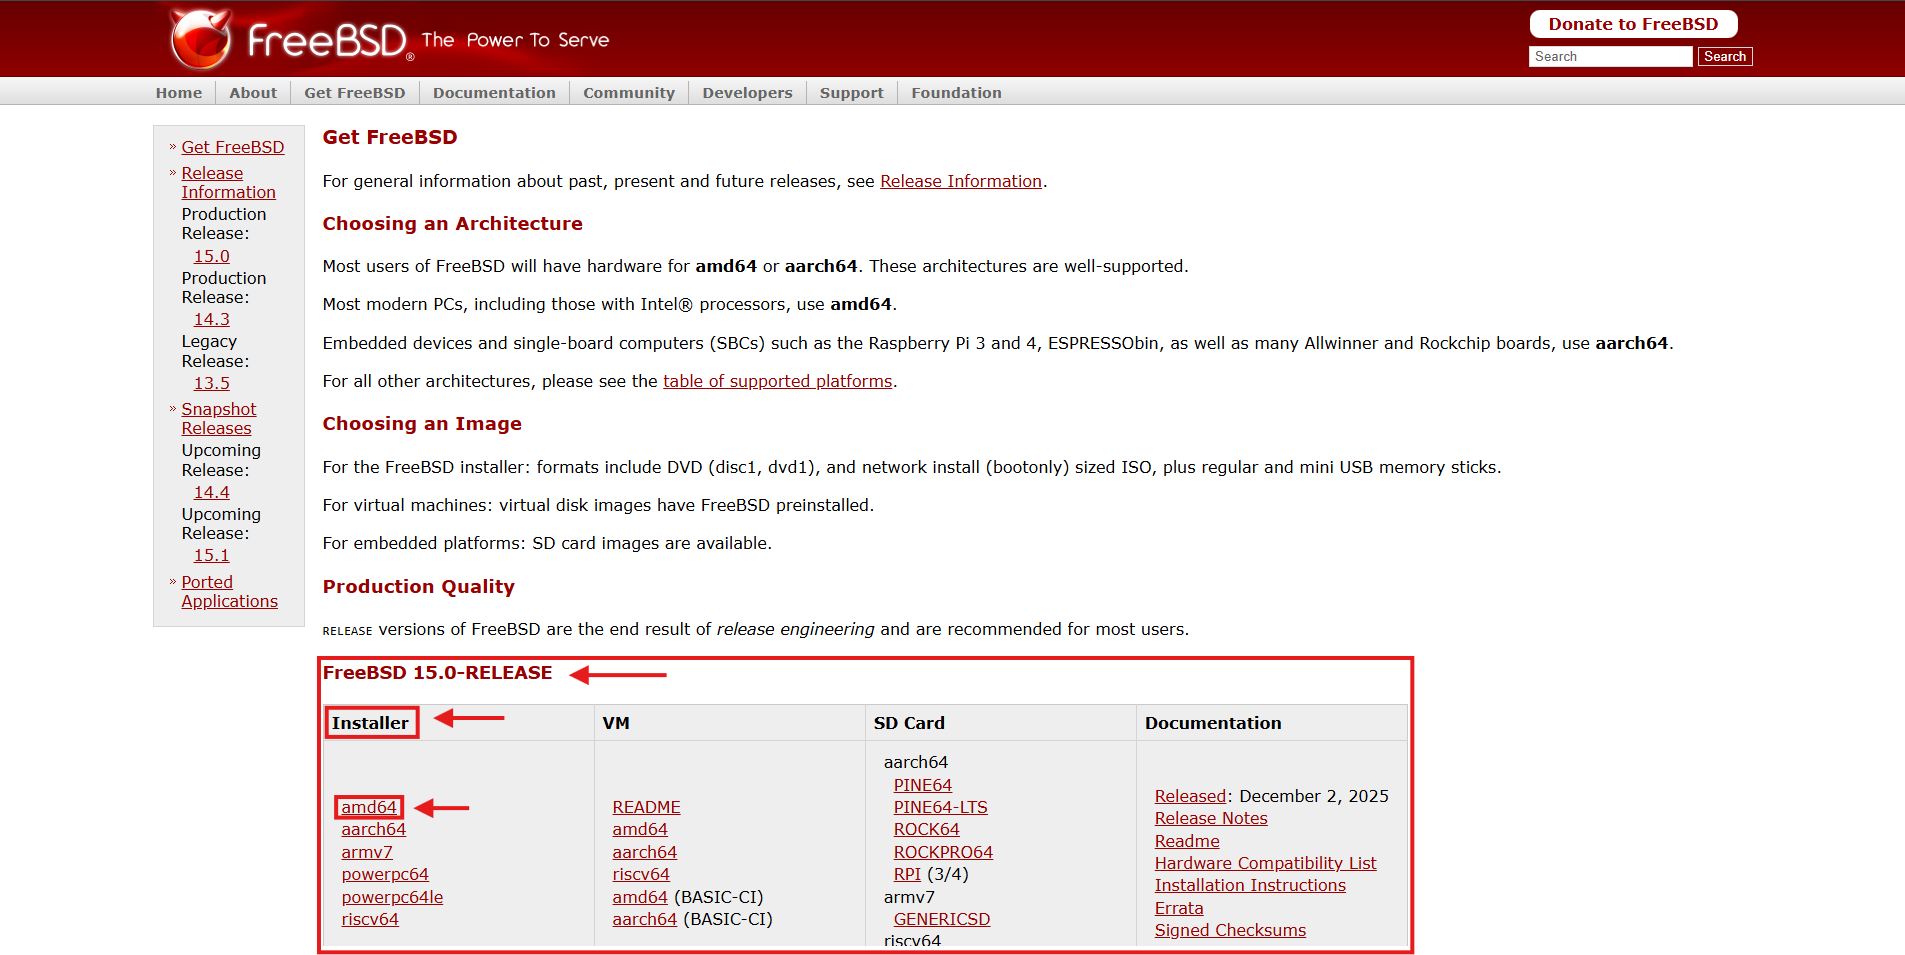
- Scrolling down in that page, you will find sections for different versions. Go to your desired version and select amd64 for an x64 installer, or i386 for an x32 installer (not available in latest versions) from the Installer tab (first one).
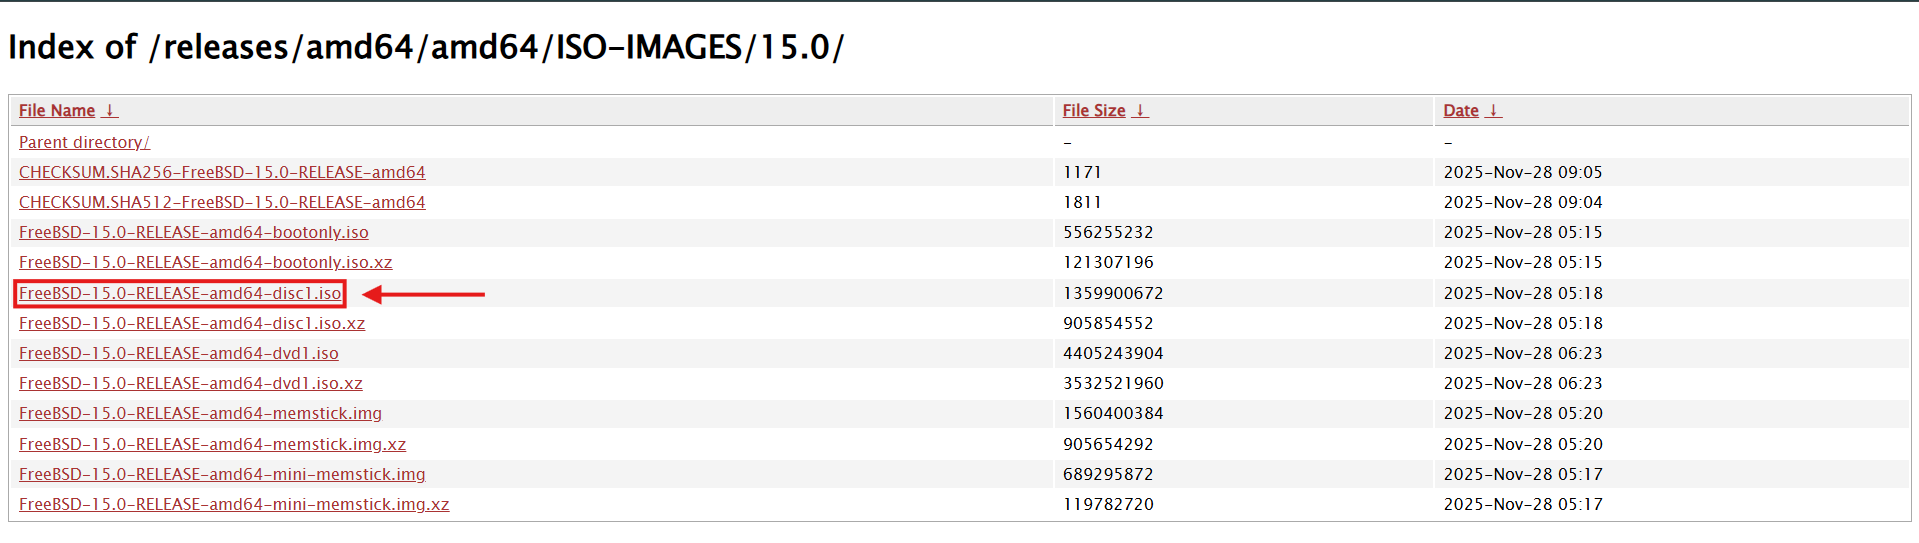
- You will be redirected to the folder with the available downloads, here select the one that ends in "XXX_disc1.iso".
- Grab a coffee ☕, may take its time to download depending on your connection speed...
You now have everything you need to create your virtual machine.
Creating the VM
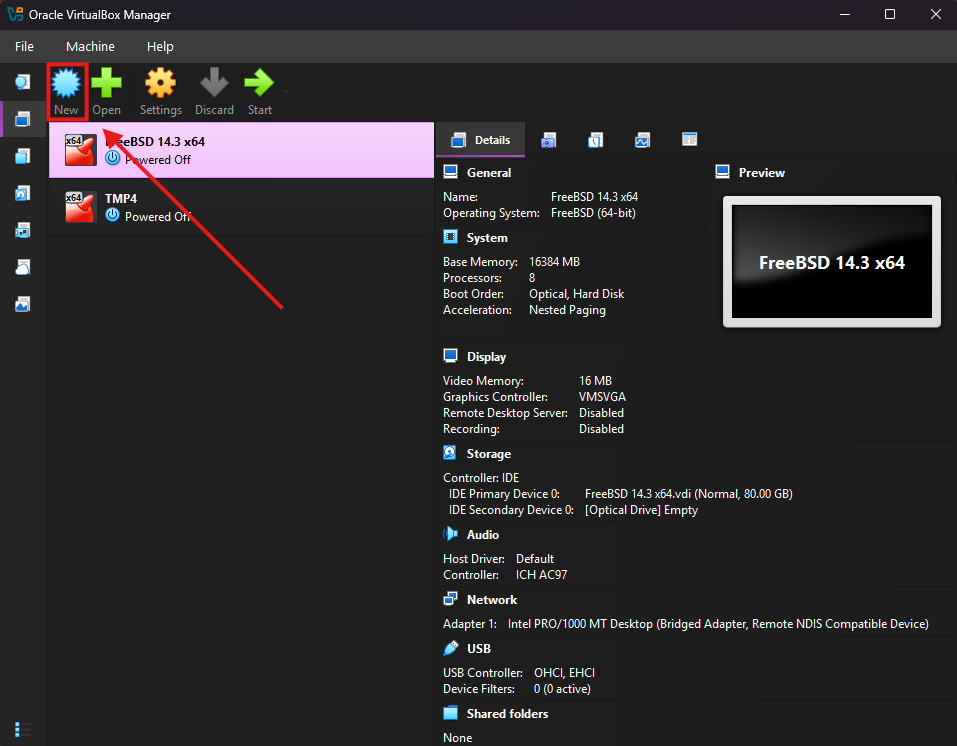
Open up your newly installed virtualization software and create a new virtual machine:
Small note: if you just installed the program, your list of VMs will obviously be empty
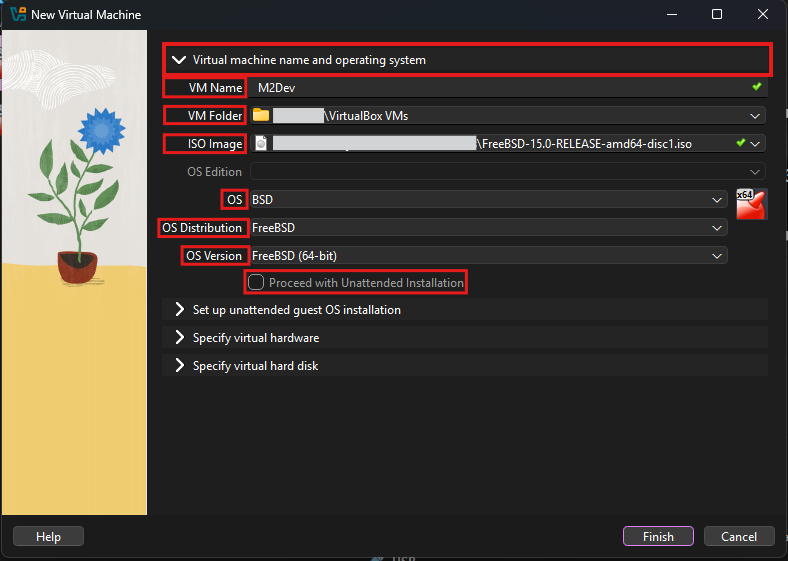
You will now see the New VM wizard. Starting from the first step:
Add a VM Name. It can be whatever you want.
VM Folder is where the files of your new VM will be stored. You don't need to change that unless your current selection's drive doesn't have enough space (20-50 GB free)
In ISO Image select your downloaded ISO file (the installer of the OS)
In OS choose BSD (obviously)
In OS Distribution, choose FreeBSD (duuh 😂)
In OS Version choose 32-bit or 64-bit according to the ISO image you downloaded
Leave "Proceed with Unattended Installation" unchecked
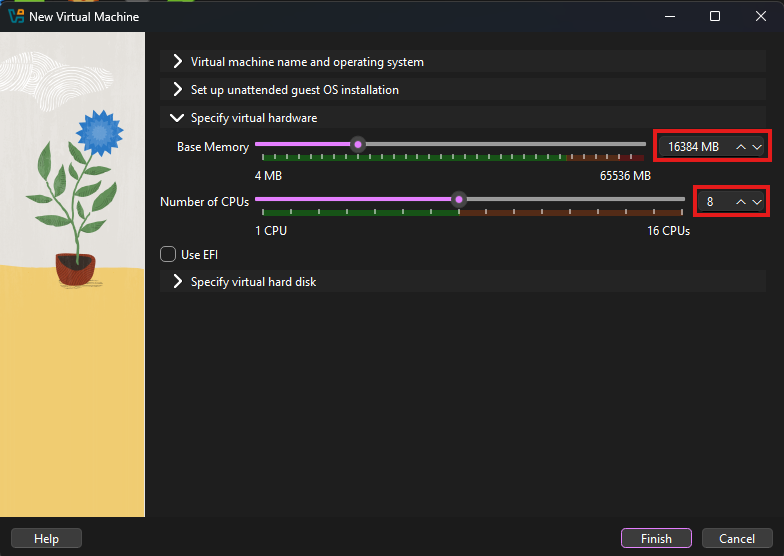
Now, skip to the 3rd step, where you will set the number of RAM and CPU processors available to your VM:
RAM: FreeBSD can run with very low amounts of RAM consuption, however the higher the number, the more resources it has to compile the source. Choose the maximum number of MB of RAM you would like to allocate. It is not recommended to go over the middle. The number must be (the GB you wanna allocate * 1024). Here is a free tool that can help with this calculation if you're too lazy to open up your calculator (copy the in binary number).
The max amount of CPU cores you would like to allocate. One is super enough for the VM to run however this is the resource that can truly make your builds even lightning fast, the more cores the faster the build.
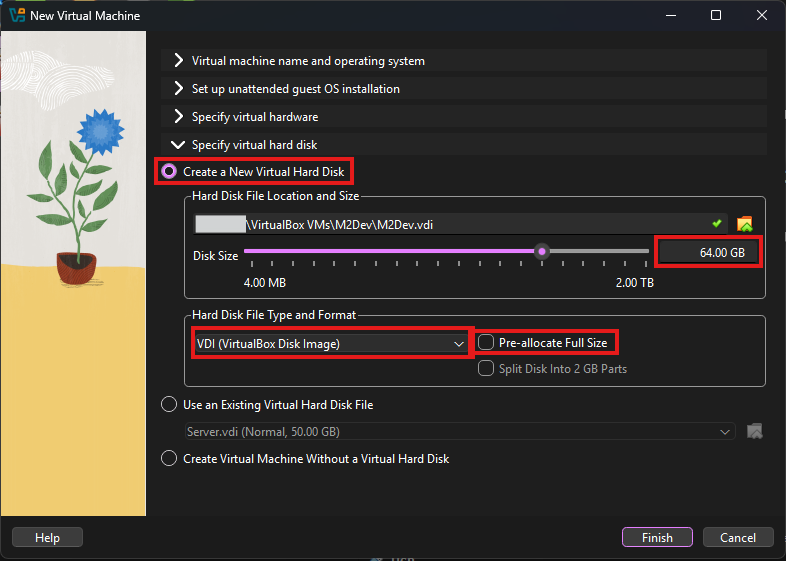
In the final step you must define the maximum disk space your VM's "hard drive" can occupy:
Select the virtual hard drive's space. In my case I will pick 64 GB so I can have room for various builds
Leave Hard Disk File Type and Format to VDI
It is recommended to leave the "Pre-allocate Full Size" option unchecked. By checking it you will occupy the selected GB of space in your hard drive and the space will be reserved only for your VM. Leaving it off will ensure that the VDI will only occupy its actual size within your physical drive.
That's it! Click Finish!
Before diving in to the installation let's tweak some additional settings that are required for the connectivity of the VM.
Configuration
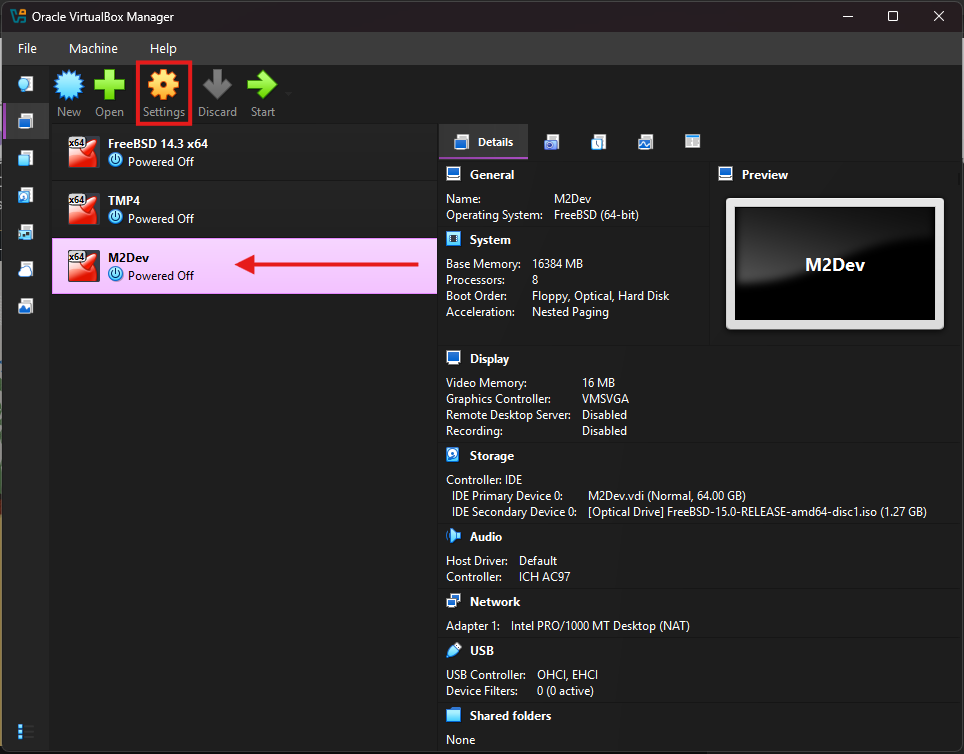
With your VM selected in the main interface, click on Settings
Scroll down to the Network section and make sure that:
- Enable Network Adapter is checked in the Adapter 1 tab
- Set Attached to to Bridged Adapter
- In Name you have a few different options depending on your device's connection type and the names will differ according to the manufacturer of your machine and the parts they used to build it:
- <anything> Family Controller: this is for Ethernet connections
- <anything> WiFi/Wireless/WLAN: this is for WiFi connections
- Remote NDIS Compatible Device: this is for USB-tethered hotspot from a smartphone
- Anything else is probably virtual network drivers, likely from VPN software, ignore those.
- Adapter Type: the name of the device used to connect, usually the default selection is ok...
- Leave the rest to their default values.
- Click OK.

Start your new VM by double clicking it in the VM list of your main interface or by clicking the Start button with your VM selected.
Installation
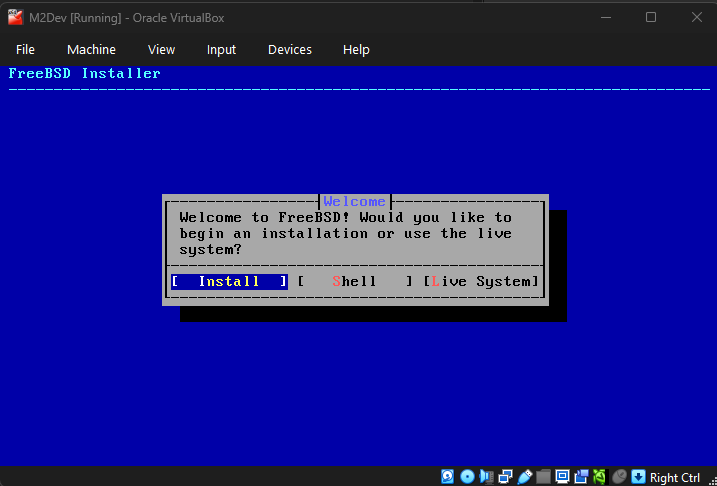
The boot countdown will start, optionally you can press ENTER to skip it. Wait until you see the blue screen:
Instructions for navigating in the installer:
- ENTER: confirm option (hilighted with blue color)
- TAB: go to the next option
- Arrow keys: move left or right in selections like the one above, or up and down in vertical list selections like the next image
- SPACE: Activates or deactivates the option (works like a checkbox) for available options:
- [ ]: deactivated state, press SPACE while you have the option selected to activate it
- [X]: activated state, press SPACE while you have the option selected to deactivate it
- ( ): deactivated state, press SPACE while you have the option selected to activate it, ONLY ONE SELECTION IS AVAILABLE
- (X): activated state, press SPACE while you have the option selected to deactivate it, ONLY ONE SELECTION IS AVAILABLE
Select Install to continue (ENTER)
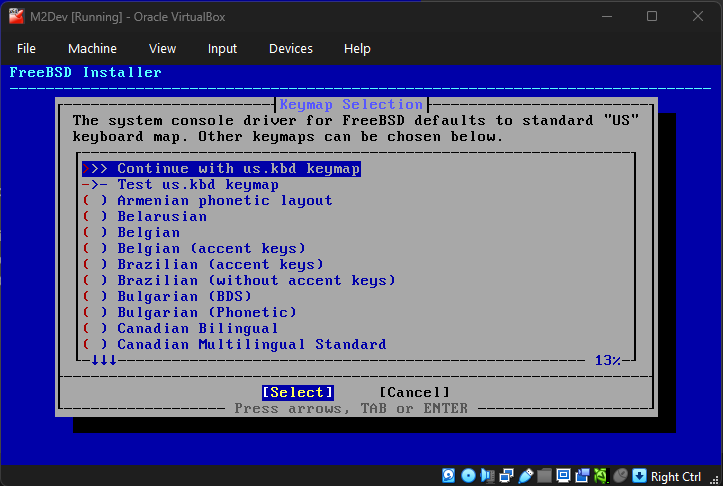
In the next screen you will need to choose your keyboard layout. You can only select one. Usually the default (US) is fine but it is recommended to use your language. Press ENTER on the first option to confirm your selection and move to the next step.
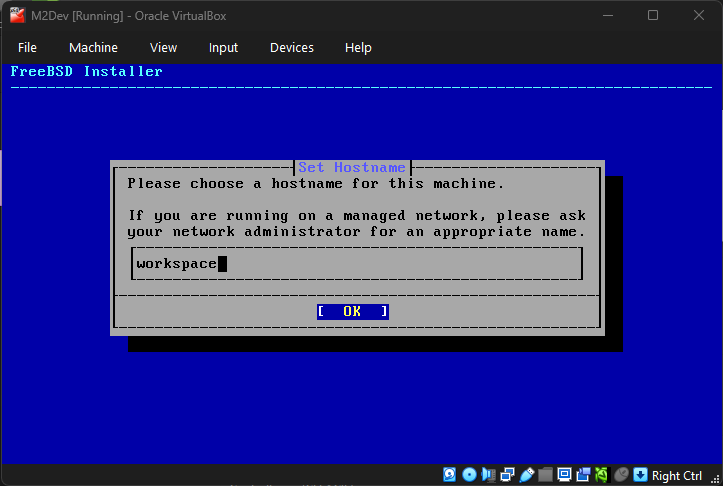
Now set up a hostname. It can be whatever you want.
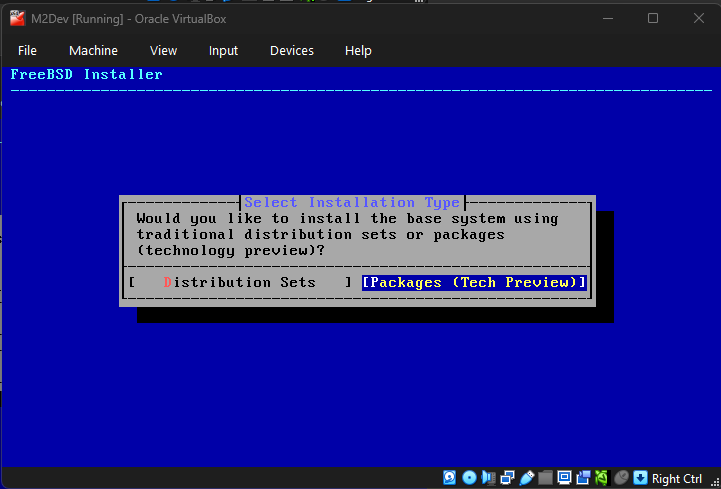
This next step is about the method of the system dependencies installation. So far FreeBSD had the system packages updated via the freebsd-update command. From 15.0 and later you have the option to use pkg to install these dependencies. The traditional method will be removed in FreeBSD 16.0-RELEASE. This option will not be available if you are installing FREEBSD 14.3 or lower. I will proceed with the new option (Packages (Tech Preview)) for this VM:
If you selected the new packages installation option you will be prompted to select whether you wanna install via the online method (Network) or the "offline installer" method (Offline (Limited Packages)). If you have configured your VM's network settings correctly you will be able to use the Network option, otherwise proceed with the Offline method and continue the package installation once your OS installation is finished and you have established internet connection to your VM.
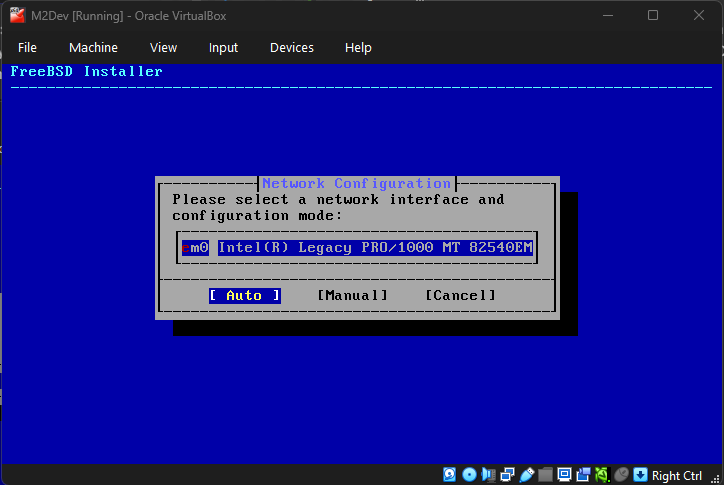
Network configuration
If you are installing FreeBSD 14.3-RELEASE or lower version this step might show up later. This step should give you the option to select a network interface.
Auto vs Manual: select Auto for automatically obtaining a DHCP address from your router or select Manual to setup a static IP address that will never change (requires further configuration).
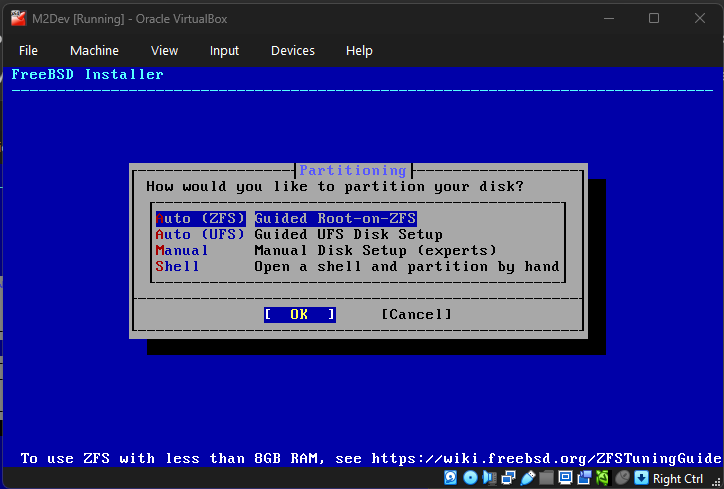
Disk partitioning
To keep this guide short, the difference between these options will not be explained here.
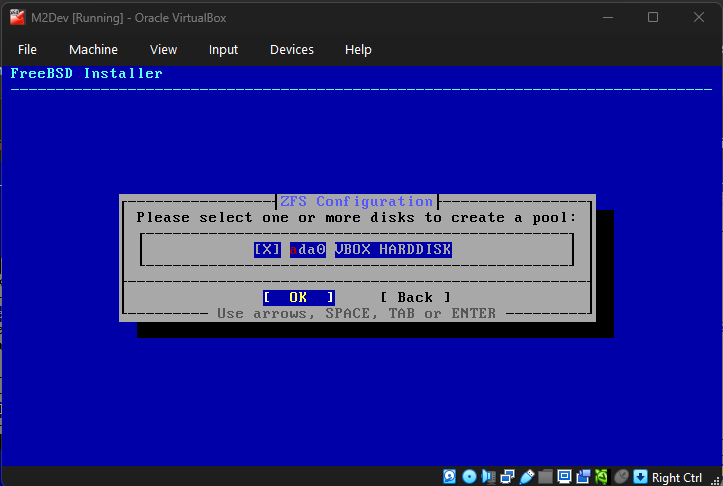
Simply pick whatever the default is for your selected version. In some older versions, UFS is the default because ZFS was still experimental while in newer versions like 14.3-RELEASE and above, ZFS is the new default standard.
Once the content of the second image appears, hit ENTER one more time to accept the default configuration.
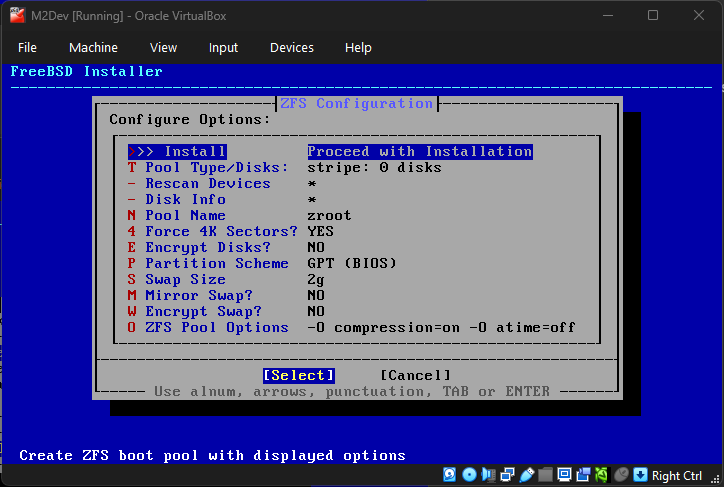
Continuing with disk partitioning, select the No Redundancy option in striping as you only have one disk.
In the second screen, press SPACE to select your disk and then ENTER. If you accidentally press ENTER without selecting the disk, press ENTER again to close the error dialog and make the content in the second image appear again.
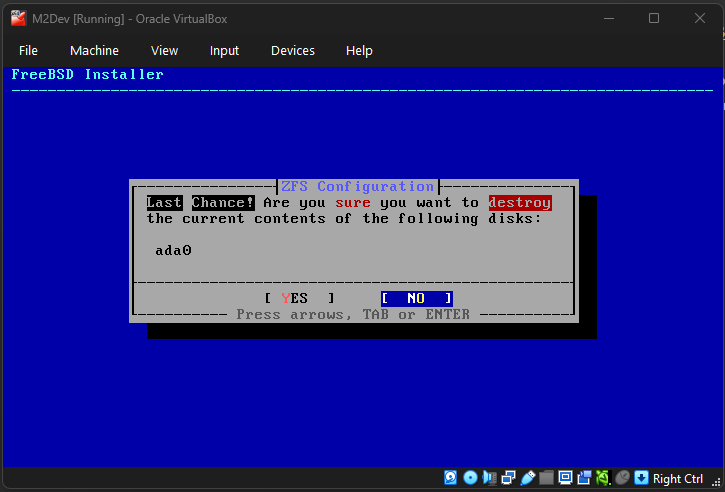
A final confirmation dialog will appear. Use the arrow keys and ENTER to confirm YES.
Note: this may take a while as your VM will now download and install packages.
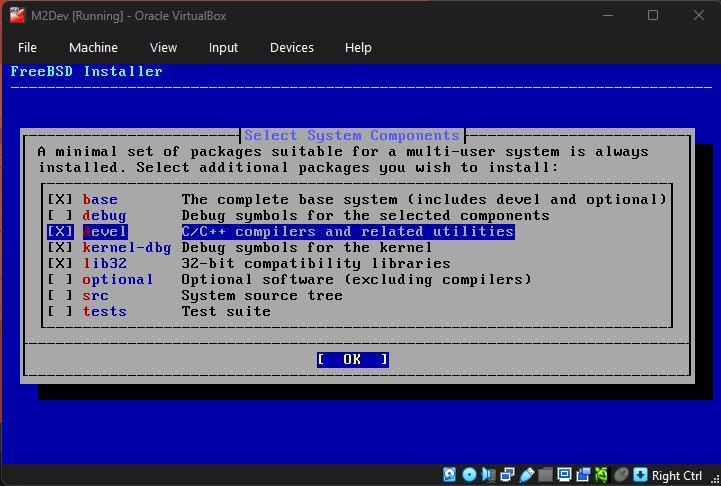
Next you will have to select the components to be installed in the OS. The default options are fine, however, here is a big difference between 14.3-RELEASE and lower vs 15.0-RELEASE:
FreeBSD lower than 15.0-RELEASE: In versions before 15.0 there is a "ports" option (deselected by default) which installs the ports tree (/usr/ports). Before 14.0-RELEASE, we had portsnap for the ports tree. Once 14.0-RELEASE rolled out, the new standard became cloning the ports in /usr/ports from the official Github repo. Enabling ports will pre-install the ports tree index and that will save you the step of manually downloading it once the installation is complete. Using ports is NOT required for your complete setup but it is an option that will be explained further along the way.
FreeBSD 15.0-RELEASE: From this new distribution forward the ports option is no longer available. We will use pkg to install Git, and Git to install ports (if you are going for ports) for this version. One very useful thing in 15.0 is the devel option, which pre-installs Clang and LLVM, the biggest, most time consuming port to build (if going with ports). This guide will continue with the devel option selected so that these packages get pre-installed along with the system, instead of installing it manually later.
You may leave the rest to their default selection states and hit ENTER.
It will now start installing everything via pkg if you selected the Packages option, or the classic way if you selected Distribution Sets.
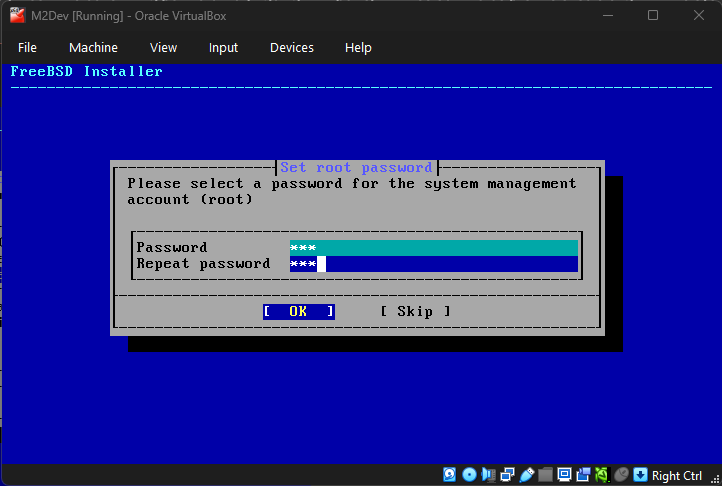
Next, it's time to set your root password. In versions lower than 15.0, it will be in terminal style. In version 15.0, it will look like the picture:
Since this is probably a VM and not a VPS, feel free to setup something small and easy for convenience.
Use strong passwords if you are setting up a server that is accessible from multiple IP's!
You can also skip root password (if installing a local, development instance) but it is not recommended.
Use the TAB or arrow keys to move between the text fields and ENTER to confirm your selection.
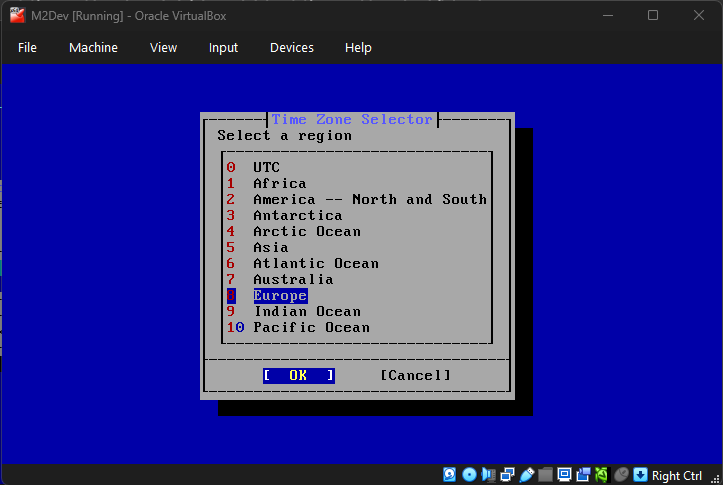
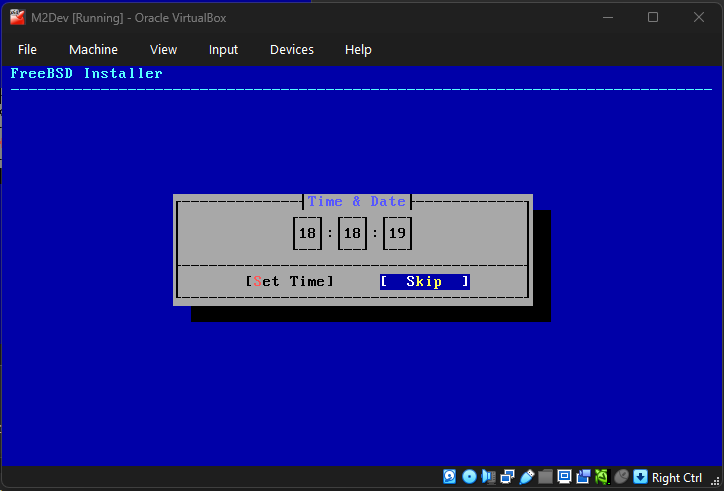
Setting up the timezone
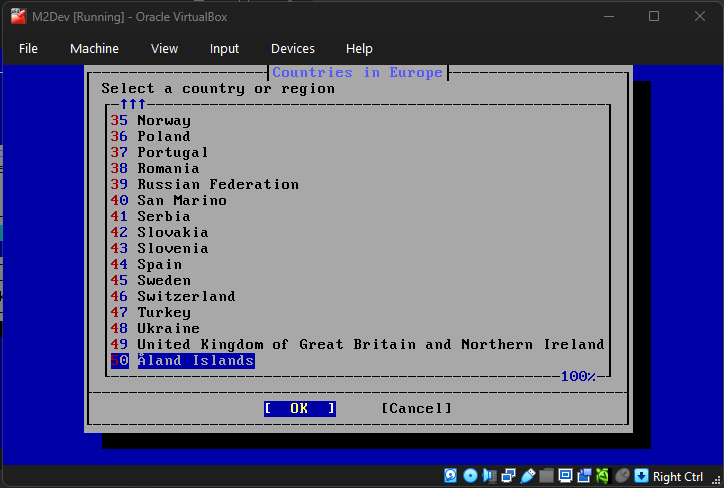
Select your desired timezone:
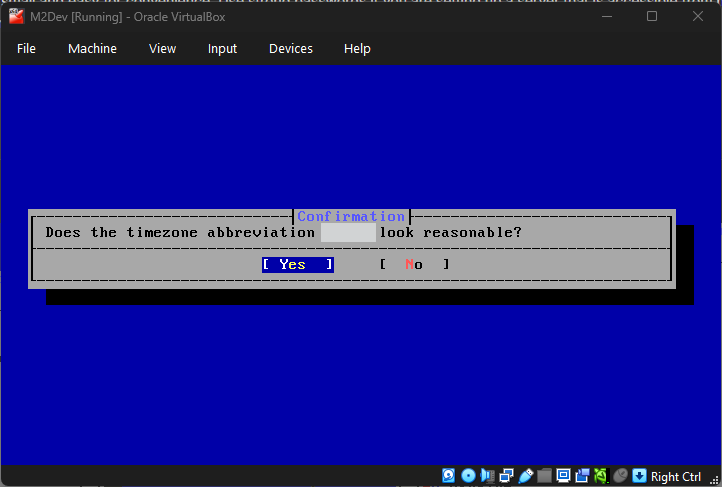
A confirmation like the one in the image will appear, simply confirm your selection:
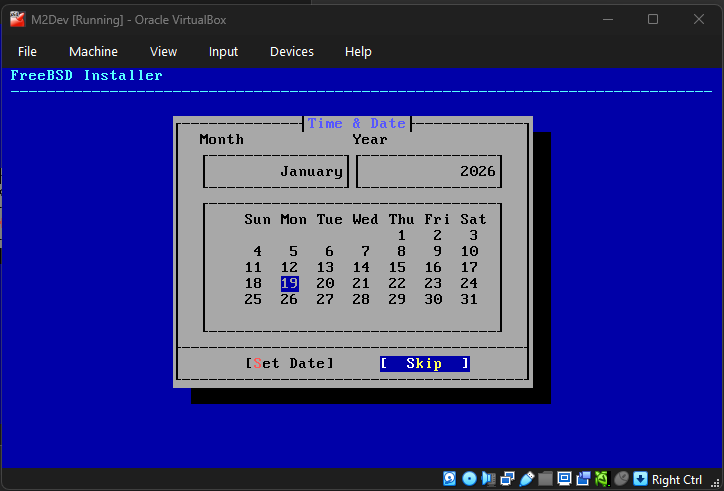
Adjust the date and time if you need to using the arrow keys (left/right = selection, up/down = change values), or simply skip these steps.
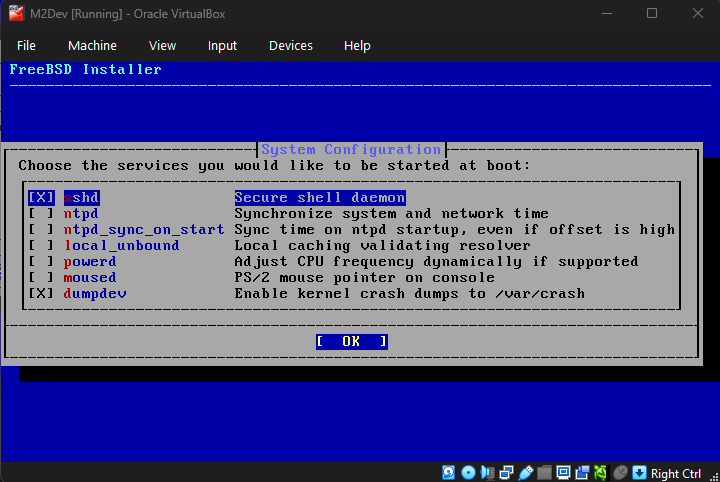
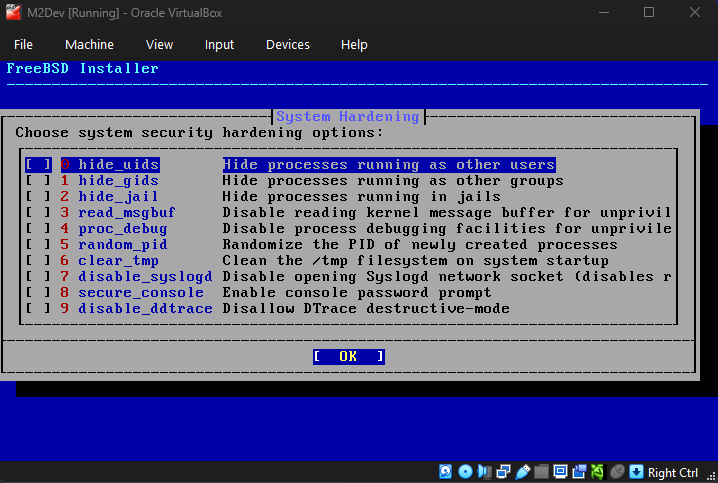
Some final touches
In the next 2 steps, accept the defaults. Next, wait for the countdown to end or hit ENTER.
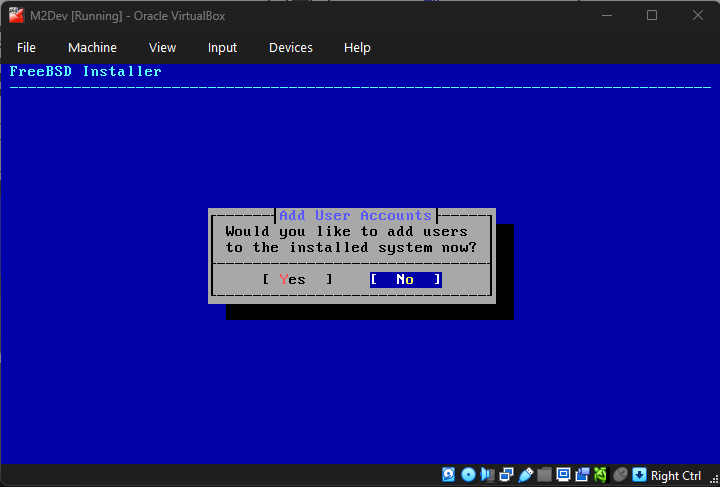
The system will now prompt you to add additional users. You don't need any, but feel free to add if you wish, if not, just confirm No.
In case you accidentally selected Yes and you don't want to create an additional user, simply type something whatever in the username and then keep hitting ENTER until you reach the final question, there just type N and hit ENTER to abort user creation. Then hit n and ENTER again.
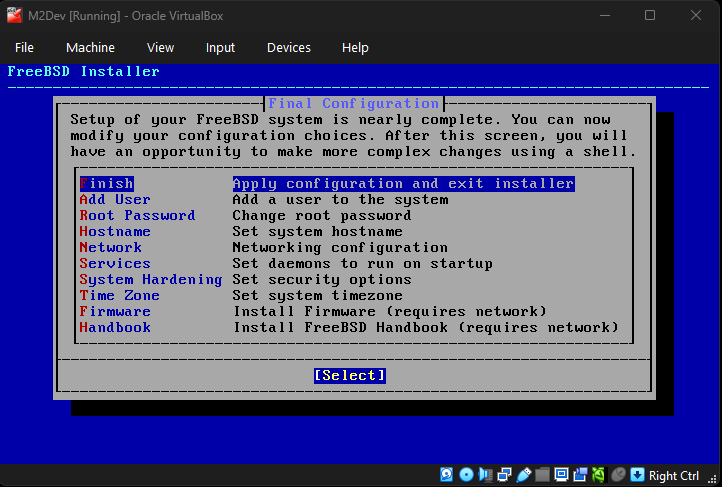
Finalizing the installation
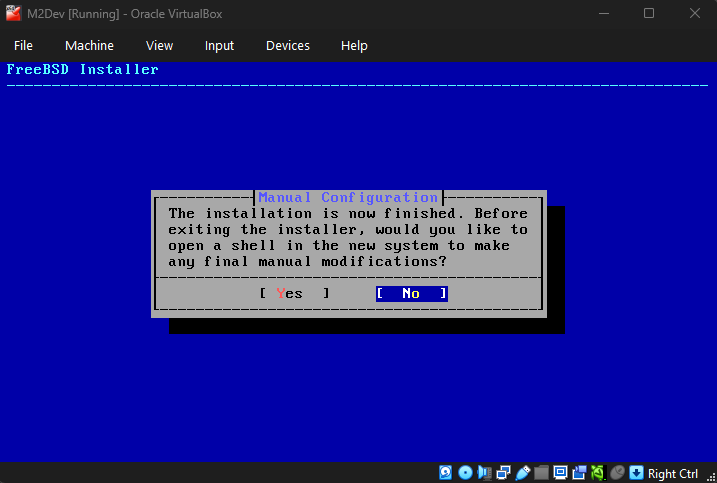
Select Finish once the screen from the first image pops up and select the default No once the second one does unless you wanna type a few final commands for modifying the installation further.
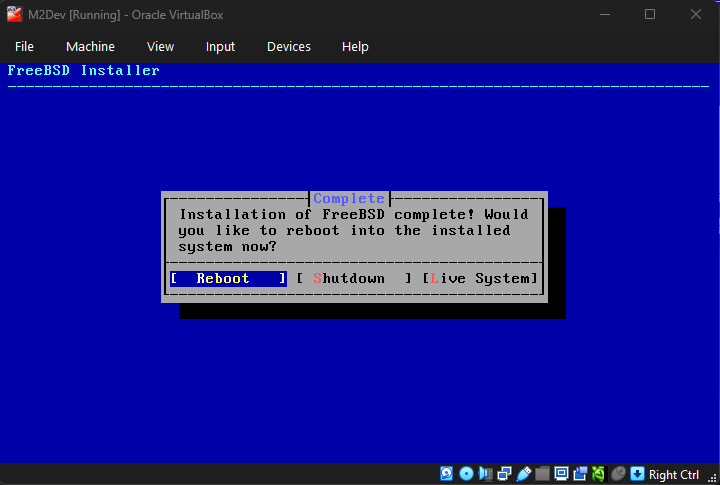
After that, select Reboot.
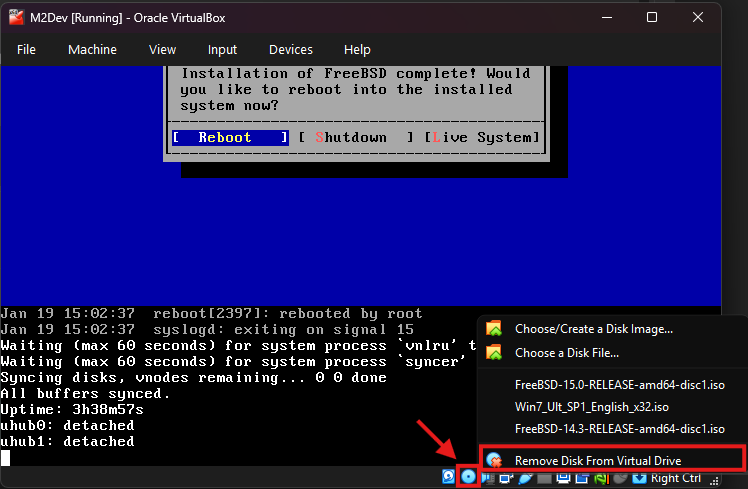
VERY IMPORTANT: After hitting ENTER wait for the system to shutdown and immediately right click on the disc icon at the bottom right corner (second icon to the left), then click Remove Disk From Virtual Machine (last option). You need to do this before the system boots otherwise the installation will start again.
Press ENTER on the boot countdown and once prompted, enter root and your selected password.
For a more in-depth guide to install FreeBSD 15.0-RELEASE, you can watch this video:
(DO NOT FOLLOW THE INSTRUCTIONS FOR THE INSTALLATION MEDIA AT THE BEGINNING, create a virtual machine instead like this guide explains)
For a more in-depth guide to install FreeBSD 14.3-RELEASE, you can watch this video:
(DO NOT FOLLOW THE INSTRUCTIONS FOR THE INSTALLATION MEDIA AT THE BEGINNING, create a virtual machine instead like this guide explains)

After entering your root username and password into the terminal, the first thing we need to do is ensure that external software from your host OS can connect as root to your new VM, such as PuTTY or WinSCP.
You can skip this step if you are gonna be working with a non-root user, but for a local VM it is recommended to work as root.
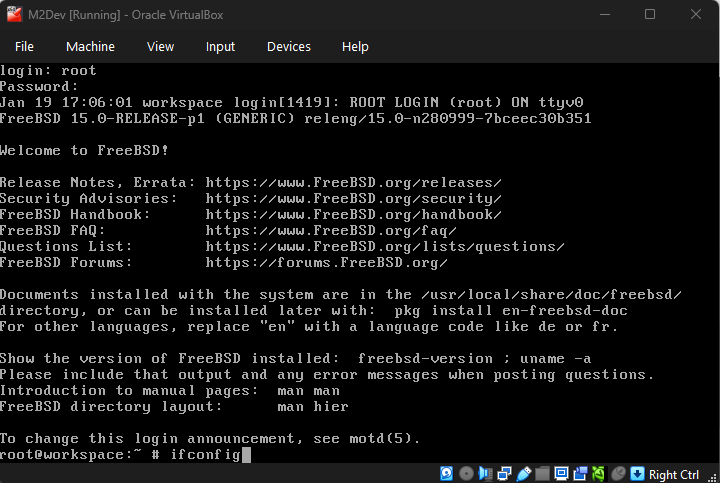
First things first, you need to know your VM's internal IP, the IP assigned to your instance by the DHCP server during the first time you connected it to the internet.
Acquiring the IP
Type
ifconfigin the terminal like this, and hit ENTER:
If your VM is connected to the internet, you should be seeing something like this:
Your IP should be printed in the
inetsection of your network's interface like the image highlights.If you selected
Family ControllerorWiFi/WLAN/Wirelessin the VM's netwrork settings, your IP most probably starts with192.168...instead of10...Copy this value from your VM's terminal and write/type it down somewhere, you will be needing it in the next steps.

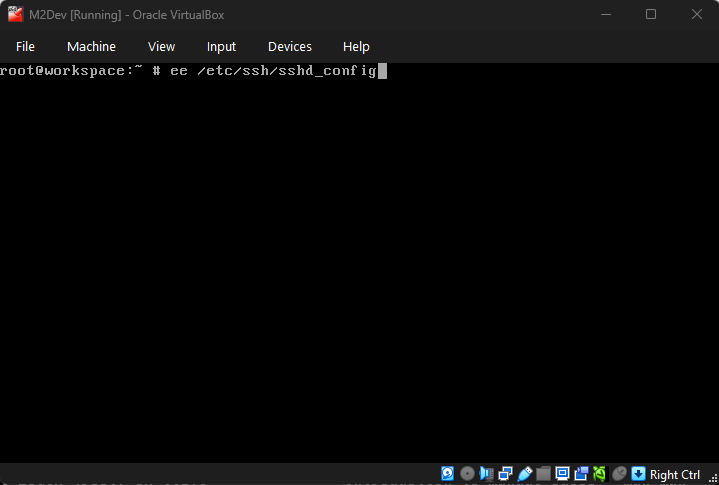
Enabling external root access
In your VM's terminal, type
ee /etc/ssh/sshd_configto edit the sshd configuration file.
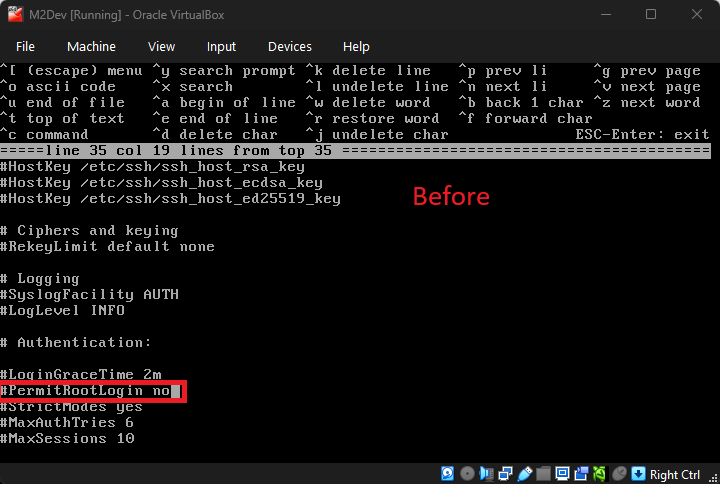
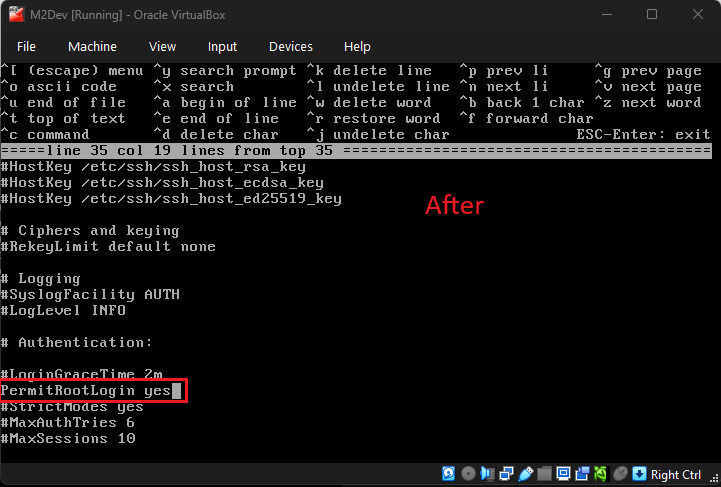
Use the ARROW KEYS to navigate through the editor between the different characters and words.
Keep going down until you find this line:
#PermitRootLogin noand change it toPermitRootLogin yes(remove the#character as well):

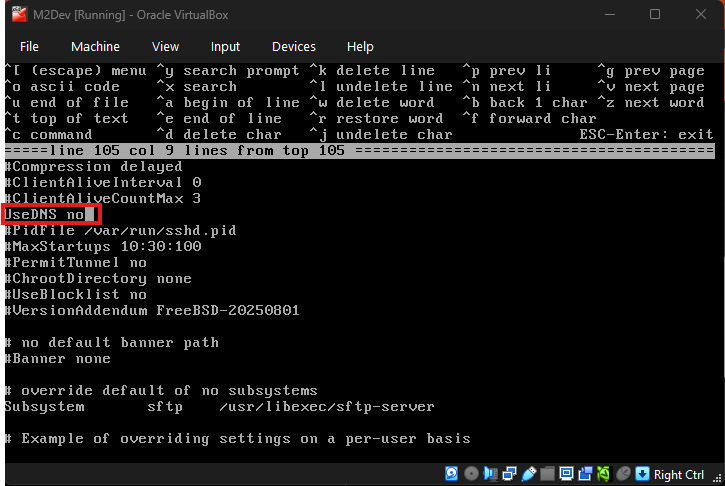
Next, keep scrolling down until you find
#UseDNS yesand change it toUseDNS no(remove the#character as well):
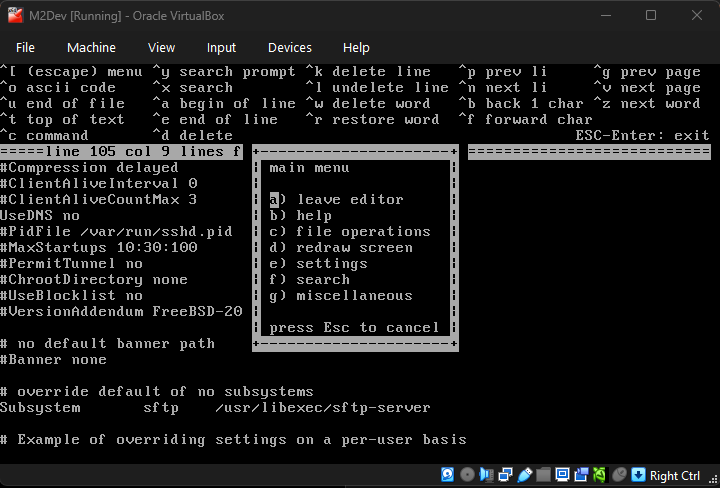
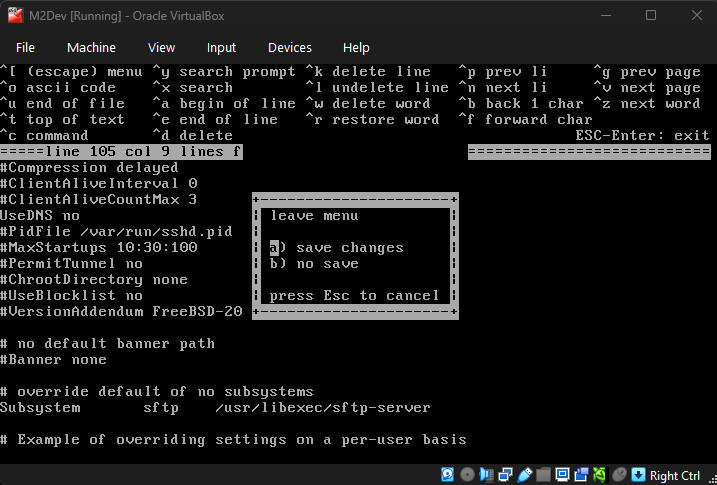
Done! Press the
esckey to exit the editor, and with optiona) save changesselected, press ENTER to exit:

Finally, restart the SSHD service by executing this command:
serivice sshd restart
This guide will now be showing you how to connect as root from your host OS with PuTTY and WinSCP.
Connecting with Navicat (or your database management software) is not yet possible as we have not yet installed MySQL/MariaDB, once we install the packages, this guide will show how to do that as well.
Connecting with PuTTY/SSH software
NOTE: You can also use your Windows Command Prompt (CMD/Powershell) to remotely connect to your VM's terminal
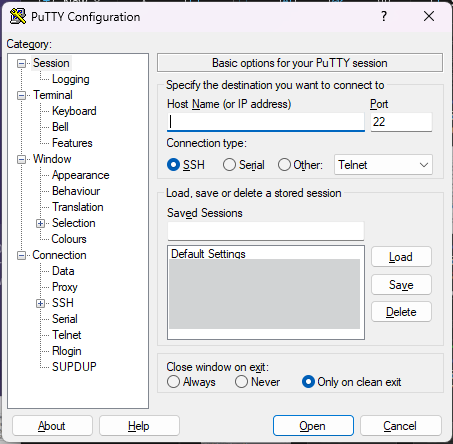
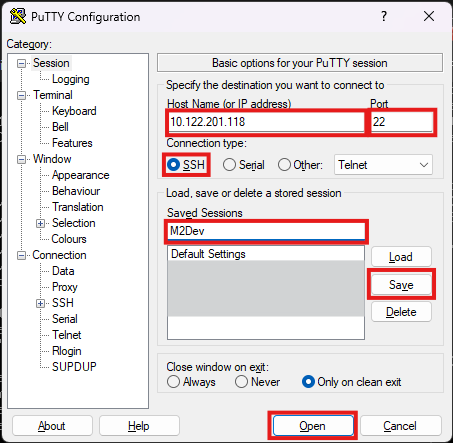
Fire up PuTTY. You should be seeing this screen (your list will obviously be empty if you've never done this before):
Configuration:
- Host Name (or IP address): The IP address you copied from the output of the
ifconfigcommand in the terminal.- Port: Leave that to
22.- Connection type: Leave that to
SSH.- Optionally you can type a custom name in Saved Sessions and click Save so you can easily load your saved session by double-clicking it in the Saved Sessions list, or by selecting it and clicking Load.
- Once you're done with your setup, click Open to open up your new session for the first time.
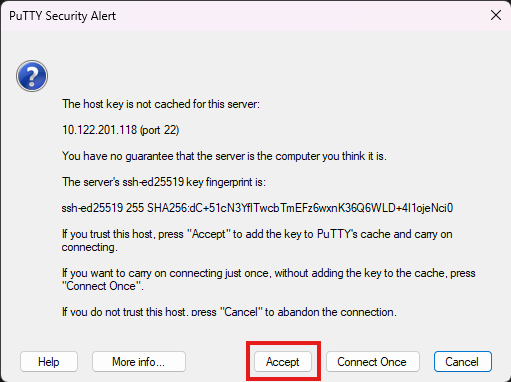
If your IP, port and connection type are correct and your VM has internet access, you should be seeing this along side with your new terminal window:
This dialog appears in every newly created session. Simply hit Accept to disable it from ever appearing again for this session.
You can also continue by clicking Connect Once but with this option, you will see this dialog again the next time you attempt to connect to your session.
Type in your root username (root) and password and hit ENTER.
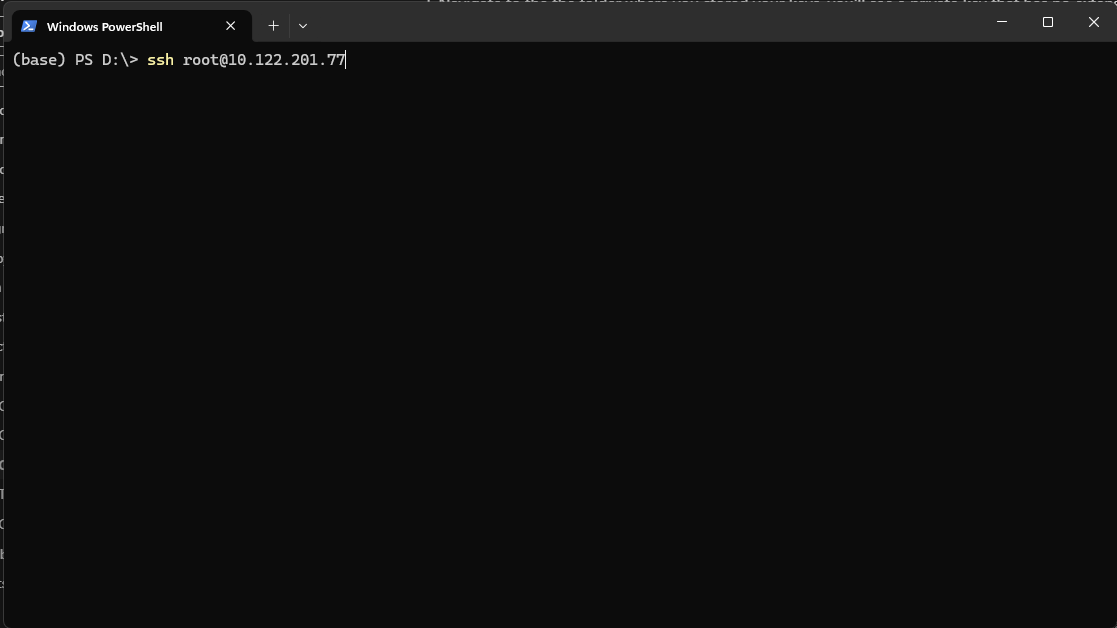
Fire up your command prompt in any directory and type
ssh root@<your_ip_address>and hit ENTER:
Type in your password and you're in!
Now let's connect with an FTP/SFTP software like WinSCP.
This kind of software will allow you to see your files and folders within your VM in a more user-friendly and familiar layout. Think of it as your Windows File Explorer, but for your VM.
Connecting with WinSCP/SFTP software
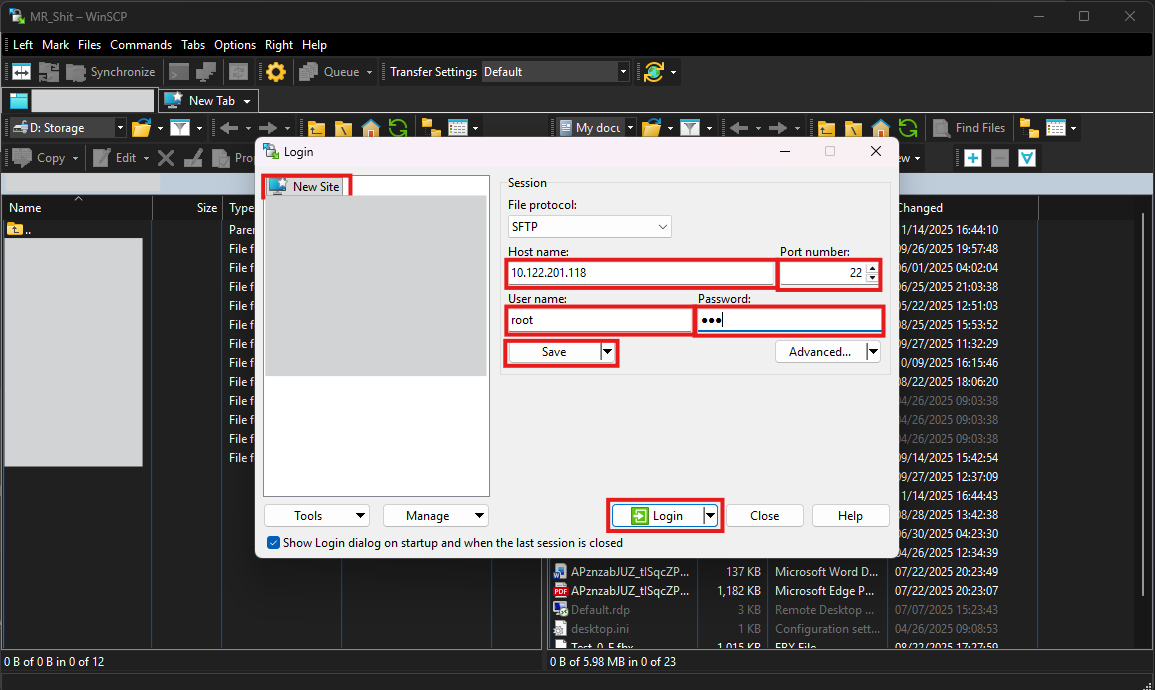
Fire up WinSCP (or your FTP/SFTP software) and make sure that New Site is selected at the left-side panel:
- Host name: Your IP address from the output of the
ifconfigcommand.- Port number: Leave that one to
22.- User name: Here make sure that
rootis your selected username.- Passsord: Your root password (obviously).
- Done! You can now either hit Login to connect straight-up, or Save to save your Site at the list in the left-side panel.
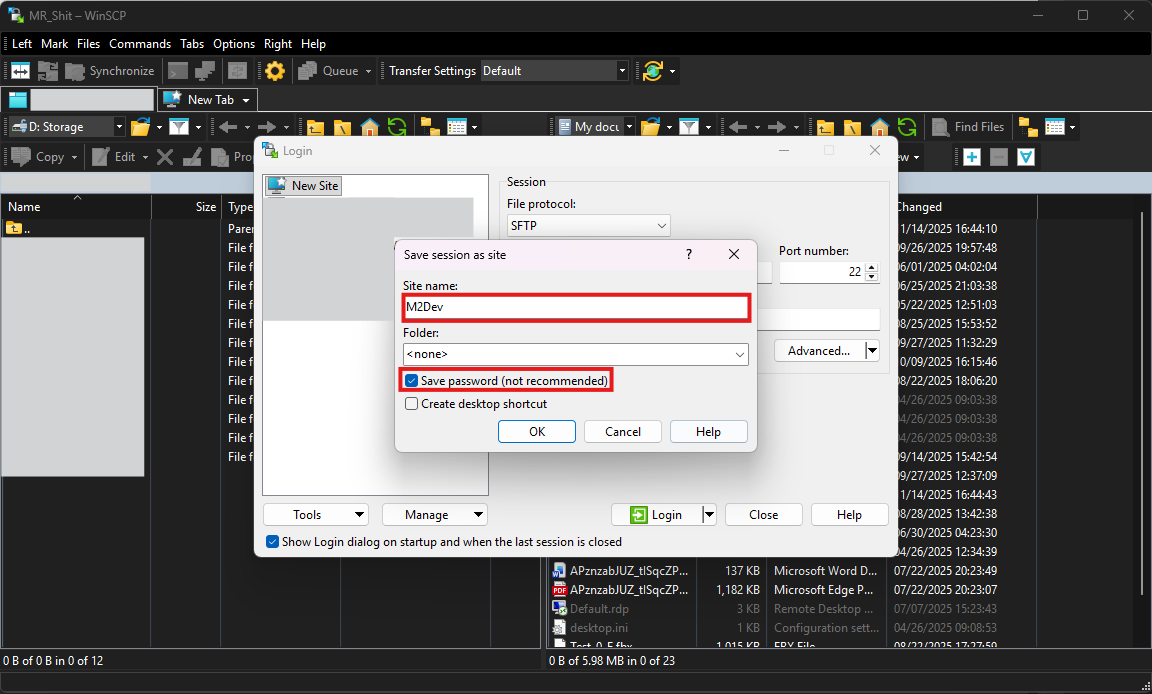
If you clicked Save you should be seeing this little additional dialog:
Here:
- In Site name give a custom, meaningful (for you) name to your new site.
- You can enable Save password (not recommended) for your convenience if your VM is a local instance! It is strongly recommended NOT to do this for VPS/remotely hosted machines.
- Click OK to save your site.
When the dialog closes, you can connect for the first time by clicking the Login button.
Like with PuTTY, during your first connection to the VM, the program is going to show this dialog:
Just click Accept to save this site in your whitelist. After that, this dialog will not appear again for this IP address.

As mentioned during the installation, FreeBSD works with packages/ports for accessing third-party software within the system.
You can think of packages and ports like apps on your phone, the system installs them and uses them to show or/and process new information.
The difference between ports and pkg is that pkg works like your phone's AppStore or Google Play Store, it simply downloads and installs apps (packages), or you can think of it as downloading an MSI installer from a website and running it.
Building with ports can be extremely slow compared to pkg but offers more customization.
ports from the other hand downloads the source code of the package and compiles it right inside your system. This option is useful for components you wish to edit their code before installing them, or adjust the build configuration, etc...
How to setup pkg and use it to install third-party software
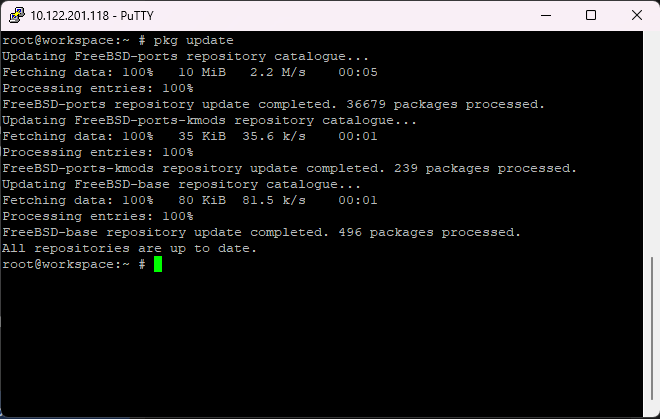
In your preferred terminal interface and while logged in as root, type the command
pkg update.If prompted, type
yas many times as the process asks you to in order to:
- Accept to download/update new packages.
- Maybe remove old packages and redundancies from the system (depends on what packages are being currently installed in your system).
- Accept new space allocation/deallocation depending on the process.
When everything is done, your pkg index should be up to date.
If you see something like this:
then your system is already up to date and there is nothing else for pkg to do.
Now you can install packages with pkg like this (using Git as an example):
pkg install gitor
pkg install devel/gitpkg can find and install packages by name only, but it is also compatible with the port system path like
devel/git(reference to the path/usr/ports/devel/git).
How to setup ports and use it to install third-party software
Ports have undergone major changes as new FreeBSD versions became available, select the method for your currently installed version.
Use these commands to update your ports tree, hitting
yto accept the changes every time:portsnap fetch extract portsnap fetch update
For versions between 14.0-RELEASE and 14.3-RELEASE that enabled the ports option during OS installation:
Use this command to fetch the ports tree from the official Github repo and install it in
/usr/ports:git clone --depth 1 https://git.FreeBSD.org/ports.git /usr/ports
For FreeBSD 15.0-RELEASE and versions between 14.0-RELEASE and 14.3-RELEASE that DID NOT enable the ports option during OS installation:
In order to fetch the latest ports tree, you will need to install Git. Since you don't have ports yet, install it with pkg with this command:
pkg install gitIf you did not run the pkg commands from the previous section, the system will ask you some additional questions before installing Git. In every case, type
yand hit ENTER to accept.
Once Git downloads and installs with pkg, use this command to fetch the ports tree from the official Github repo and install it in
/usr/ports:git clone --depth 1 https://git.FreeBSD.org/ports.git /usr/portsTo update your ports tree, simply
cdinto/usr/portsand executegit pull:cd /usr/ports git pull
Ports are located in
/usr/portswithin the system, it's where their source code will be downloaded once you run the install command.Note that unlike pkg, ports cannot install a component by name, you will have to
cdintoUsing git (devel/git) as an example, here are the basic commands for ports (and a few related ones):
- whereis git: Search the system for any directory/file references of git. If ports are installed correctly, one of the results would be /usr/ports/devel/git (the one starting with
/usr/portsindicates the full path). An empty result indicates that the port does not exist or ports have not been installed correctly.- make config: Open up the blue screen with the build options for the selected port (selected port = the one you have
cd'ed into)- make config-recursive: Run the build options for the selected port and all its dependency ports recursevely.
- make install clean: Build and install the port and its dependencies.
- make clean: Clean up the port directory from build files.
- make deinstall clean: Uninstall a port and clean up after.
cd /usr/ports/devel/git
make config-recursive
<accept the defaults by keep pressing ENTER>
make install clean
VERY IMPORTANT: It is highly recommended to AVOID mixing pkg and port installations because of dependency conflicts probability. Stick with one or the other as much as you can for smooth component installations.
List of packages/ports to be installed
- lang/python: Can execute python scripts. Required to compile quests, install, start and stop the server.
- devel/cmake: Required to build the Server Source project.
- devel/dbg: Required to debug core crashes.
- databases/mariadb118-server: Required to run a database. You can replace
118with your preferred version. Automatically installsmariadb118-clientalong with it.
Required, only for FreeBSD 14.3-RELEASE or lower and FreeBSD 15.0-RELEASE that did NOT selected the devel option during the OS installation:
- devel/llvm: Contains
clang, which is required to build the Server Source. You can also pickllvm-develorllvm-XXwhereXXis your preferred version.
Optional, in case you would like to be able to build other server sources as well (all FreeBSD versions):
- devel/gmake: Replaces
cmake, used by most server sources out there.- devel/makedepend: Required to work with Makefiles within the source.
Alternative to
mariadb118-serverin case you are gonna be running other server sources (CANNOT CO-EXIST WITH MARIADB, CHOOSE ONE OR THE OTHER!):
- databases/mysql80-server: Required to run a database. You can replace
80with your preferred version. Automatically installsmysql80-clientalong with it.NOTE: This guide will not be showing how to configure MySQL, only MariaDB.
- ports-mgmt/portmaster: Useful only if you are building with ports. Can help manage and update your ports tree and each port individually.
- sysutils/tmux: Session manager. If working with multiple people in the same VPS instance, you can create and rejoin sessions. Also useful for providers with connection errors that may constantly terminate your PuTTY session, reattaching your tmux session when relogging will display the process/build you had when kicked so you pick it up from where you left it. You can find the
tmuxcheatsheet here
✅ You have successfully installed all the required components in order to build the source and run the server!
In order to be able to use the database, we need to set it up first, and then of course access it.
First things first, we need to make the service auto-enable at boot.
Here's how:
In your terminal, type this command:
echo "mysql_enable=YES" >> /etc/rc.confor edit manually by finding the file with WinSCP and double clicking it to open it in the editor.
Next, let's start the service.
Here is how to manage a FreeBSD service like MariaDB
- service mysql-server status: Check whether the process is running.
- service mysql-server start: Start the service.
- service mysql-server stop: Stop the service.
- service mysql-server restart: Stop the service and immediately start it again.
In order to continue, you now need to start the service.
Now let's actually configure the database.
Setup
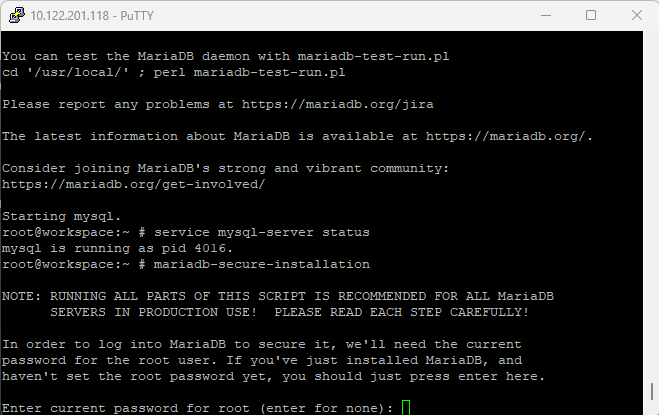
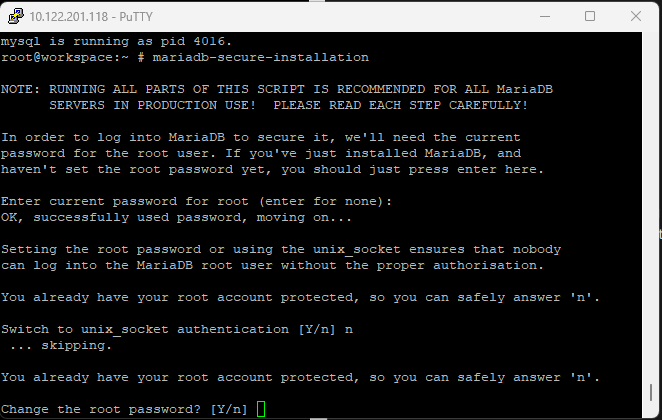
In your terminal, run this command:
mariadb-secure-installationIf you installed MySQL instead of MariaDB, you need to type this command:
mysql_secure_installationNote: the second command works for both.
Next, you will be asked to enter the root password. Since this is your first time setting up the database in your instance, there is no password, so hit ENTER.
Note: MySQL/MariaDB root is a different user than your OS's root user and their passwords can be different.
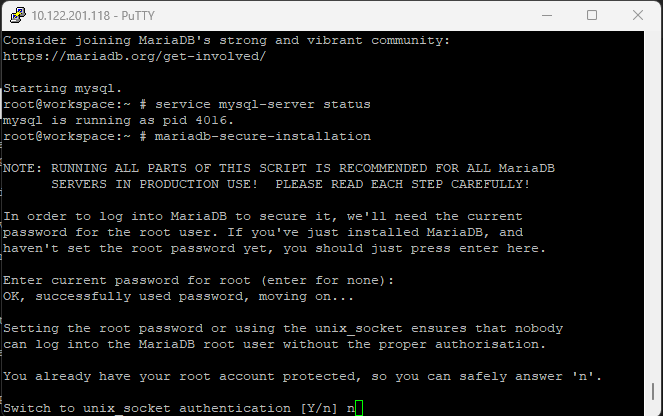
Now, the installer will ask you whether you want to enable unix socket authentication. Type
nhere as enabling it may give you issues when trying to connect through Navicat/MySQL Workbench.
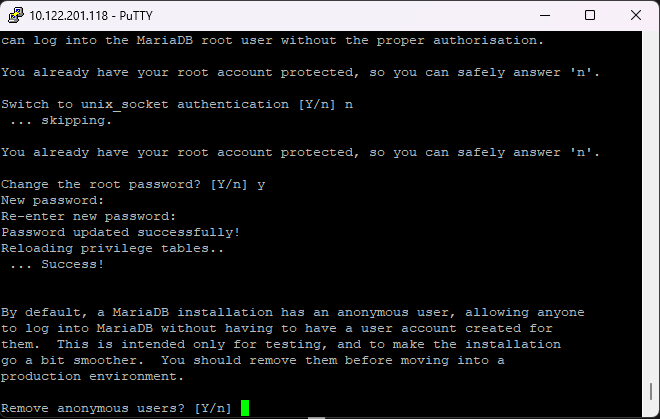
Next, you will be asked whether you would like to change the root password. It is strongly recommended to select
yand hit ENTER.After that, type your desired password for root and press ENTER.
Then once again for confirmation and press ENTER.
Note: Characters won't show but you will be typing.
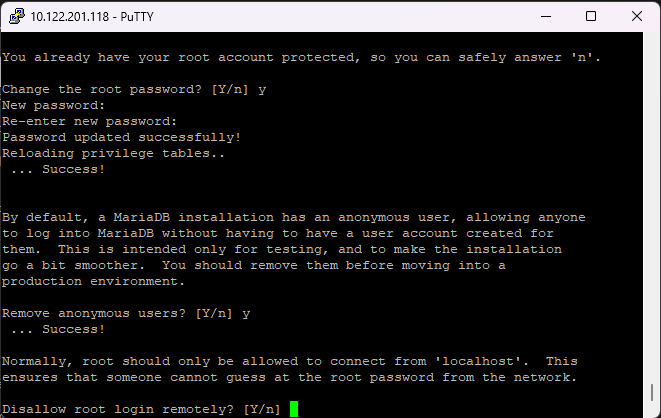
Now the installer will ask whether to remove anonymous users, select
yhere too.
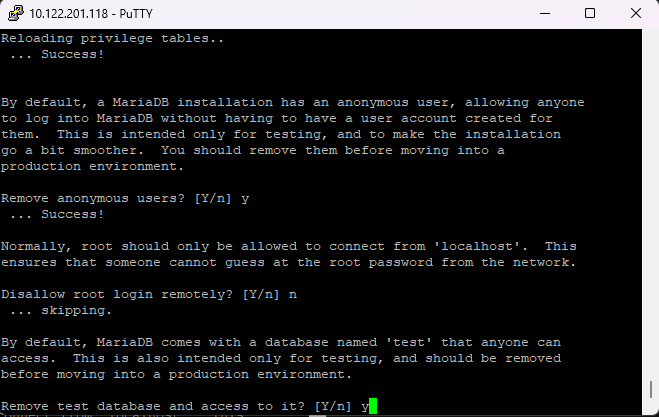
Next, it will ask you whether to prevent the root user from logging in remotely. Select
nhere, otherwise you will not be able to login as root from Navicat/Workbench.
Almost there, now it will ask whether to remove the test database, select
yfor this one.
Finally, it will ask whether to reload privileges, this step must be always executed at the end of a change within the database, so select
y.
The installer will now exit, please restart the
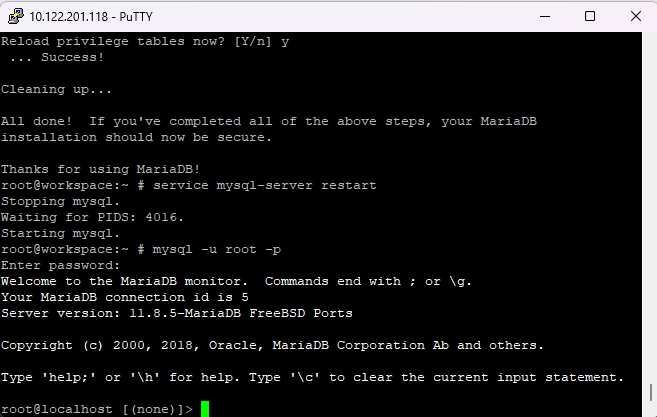
mysql-serverservice as shown in the previous section for the changes to take effect.
Now every time you need to login to your database from your terminal, you can simply execute this command:
mysql -u root -pand type in your MySQL/MariaDB root password.
In newer versions, localhost connections (from the same IP as the database server) can login with a wrong password or even by pressing ENTER. This is the default behavior in the latest releases.
And if you want to exit the MySQL Client mode, simply execute
exit;in the terminal.

A very important final touch!
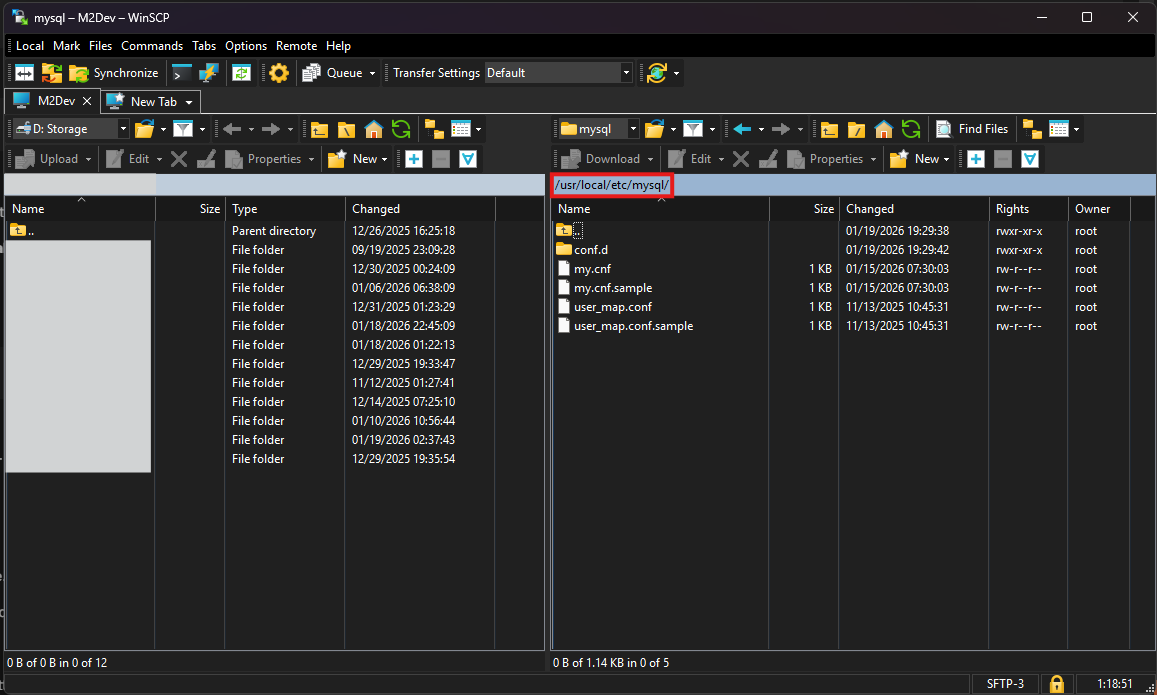
Find and edit the my.cnf file (either with ee or through WinSCP).
Here's what to do
You can find the file in
/usr/local/etc/mysql/my.cnf. In older versions, it may be in/usr/local/etc/my.cnf.
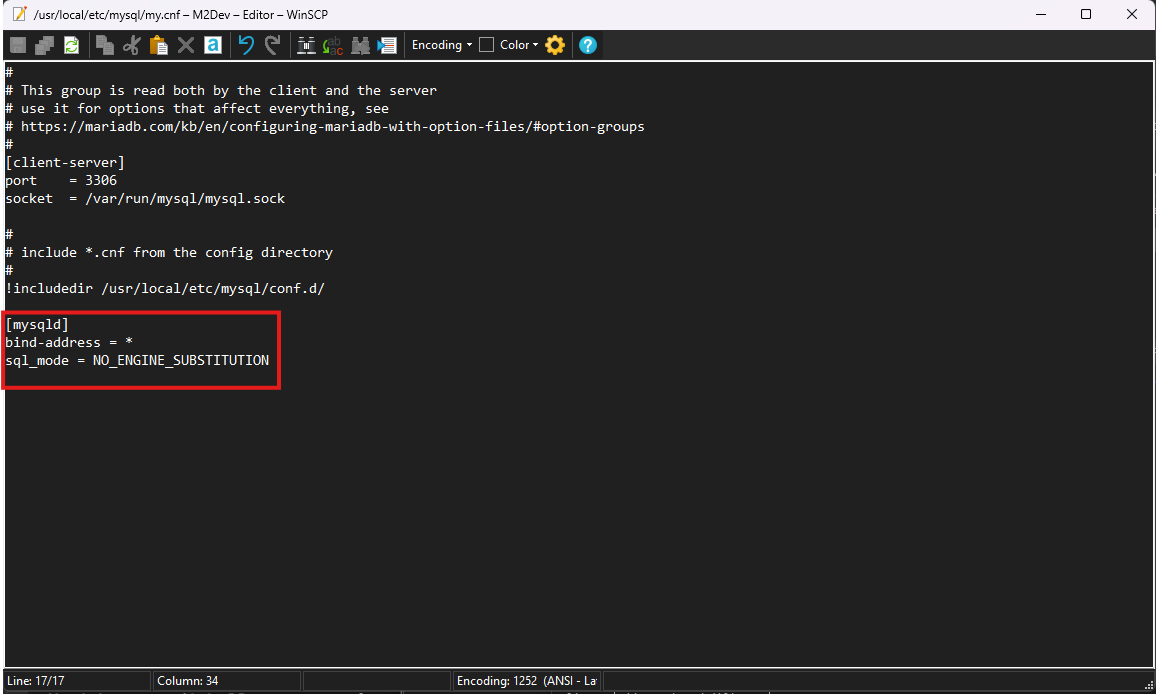
Inside the file, you need to add 2 new options under the
[mysqld]section:
- BIND-ADDRESS: Set this to
0.0.0.0or*(same thing).- SQL_MODE: Set this to
NO_ENGINE_SUBSTITUTION.
These settings are required to be able to run the project without errors!
Restart the service for the changes to take effect.
Now there's one more thing you need to do in order to be able to login as root remotely:
Access your database from your terminal by executing:
mysql -u root -pand entering your password.
Next, type the following commands to create the
'root'@'%'and assign full privileges to the new user:CREATE USER 'root'@'%' IDENTIFIED BY '<root password here>'; GRANT ALL PRIVILEGES ON . TO 'root'@'%' WITH GRANT OPTION;What's the difference from the existing root?
The existing root has
localhostas its host ('root'@'localhost'). This means that root can only login from the same IP as the database is installed.By creating a root user in the
%host, you are allowing root logins from anywhere, which is what you need to login from Navicat.Next, you need to create the "serverfiles user", a user controlled by the serverfiles to read and make changes to the database. This user is recommended to be
localhostonly, especially in production environments.This user also must have full privileges over the database.
In the Server project, an automated script has been added for this user, so you may skip this step, just make sure you run the script as shown in the second project.
If you wish to add the user now, here is what you need to know:
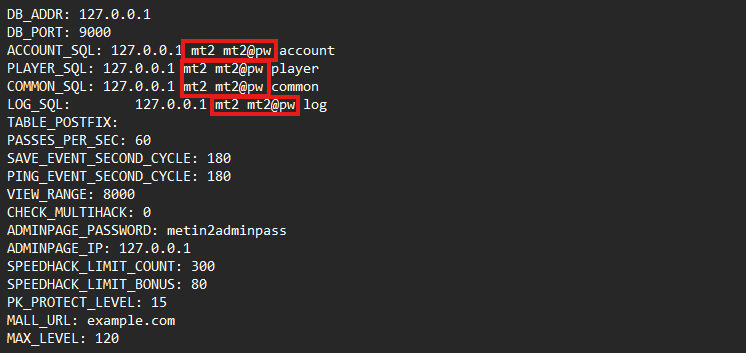
The user's username and password are being defined in the configuration files of the server.
It is CRUCIAL that the username and password within the database match the defined values in the config files of the server!
Screenshot from Server's
share/conf/game.txt.If you select different username/password than what the config files have, YOU MUST UPDATE THE FILES TO MATCH! More about this in the second project (Server).
To create the user
CREATE USER 'mt2'@'localhost' IDENTIFIED BY 'mt2@pw';
GRANT ALL PRIVILEGES ON . TO 'mt2'@'localhost' WITH GRANT OPTION;
Whether you added just the remote root user, or both root and the serverfiles user, you must execute this final command before exiting:
FLUSH PRIVILEGES;
exit;
Once more, restart the service.
Importing the game databases and tables will be shown in the Server part! Finish this part, and continue in setting up the Server project after you're done.
If everything has been setup correctly, here is how to establish connection to your VM's database through Navicat:
Instructions
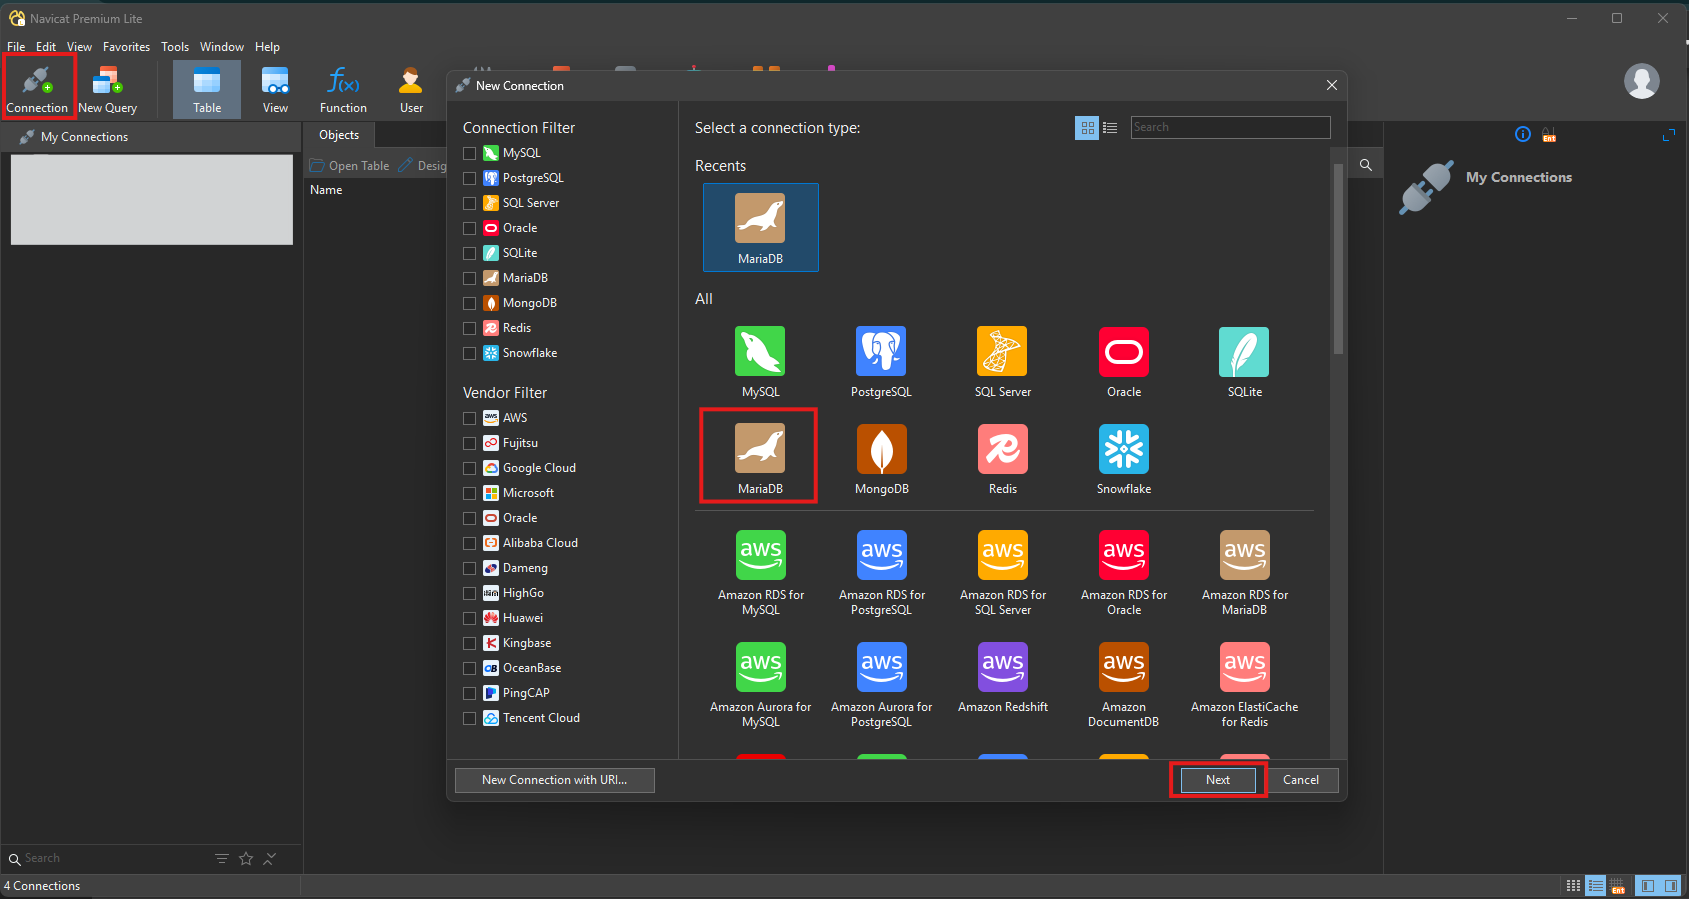
Fire up Navicat and click on Connection at the top left corner.
In the new dialog, select MariaDB and then click Next.
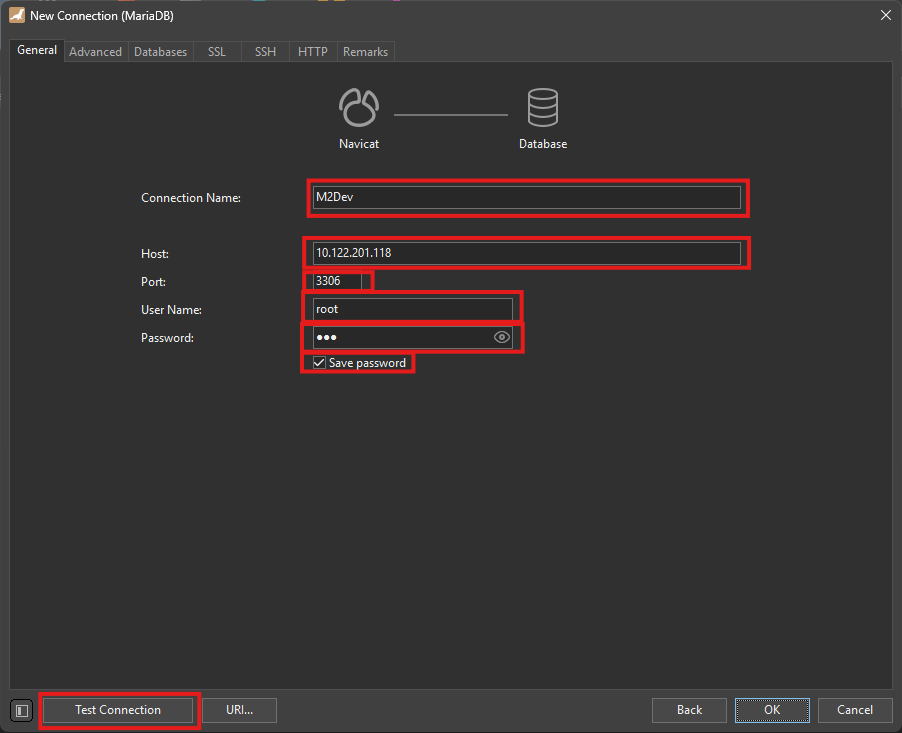
Now in this next step:
- Connection Name: Select a meaningful name for your connection. This is what you'll be seeing at the initial screen's left-side panel.
- Host: Your IP address from the output of the
ifconfigcommand.- Port: Leave that as 3306.
- User Name: Here type root (obviously!)
- Password: Your root password here.
- Save passsword: Optional, not recommended for production environments or devices you share with others.
- Finally, you can test whether Navicat successfully connects to your database.
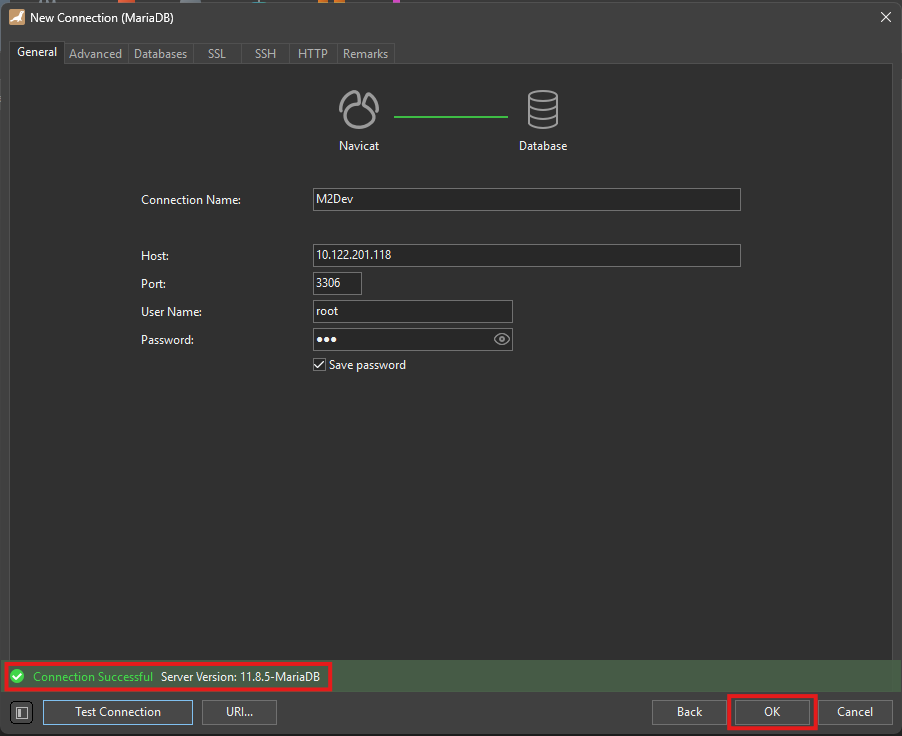
If everything is setup correctly, you should be seeing this test result:
Click OK to save this connection to your left panel.
In order to connect to your database, you can double click on your saved instance from the panel at the left.
The moment is here! In your terminal, cd into your desired location or create a new folder wherever you want and download the project using git.
Here's how
This example will use
/usr/home/srcas the working directory.Execute these commands:
mkdir /usr/home/src
cd /usr/home/src
git clone https://github.com/d1str4ught/m2dev-server-src.git .
Mind the
.in the end of the last command.With the
., the project will be cloned right in/usr/home/src, while without it, it will be cloned as/usr/home/src/m2dev-server-src.This is just a preference, either way is fine.
Building the project is extremely simple, if all packages/ports are being installed correctly.
Instructions
In your terminal,
cdin your project's root working directory:cd /usr/home/srcNow initialize the build:
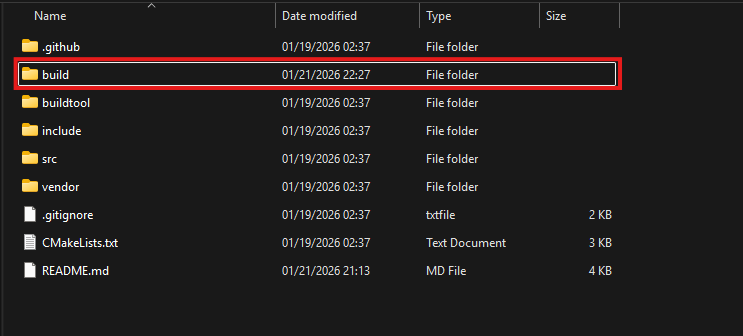
cmake -S . -B buildA new
buildfolder has been created in your project's root directory. This folder contains all the build files and configurations.Now, initiate the build!
cmake --build buildThis process will be slow. If you wanna accelerate this process use this command:
cmake --build build -j$(( $(sysctl -n hw.ncpu) + 2 ))What this does is enforcing multiple jobs at the same time using the available CPU Cores that were being set at the beginning, in the VM's creation process.
This is where the power of multiple CPU cores comes in. If you set a high amount of cores available to your VM, the build should only take a couple of minutes (CPU strength also matters for this speedup).
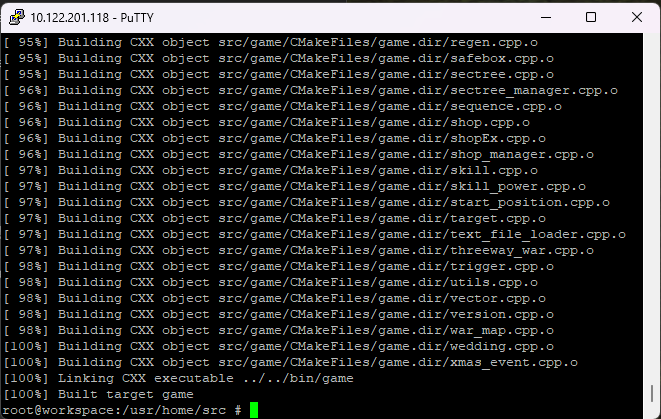
In the end, the finished build process should look like this:
Now you need to distribute the built binaries in their respective locations within the Server project and assign full system permissions (
0777).To do this, you need to have the Server project cloned in your VM the same way you cloned this project.
If you DON'T have the Server project cloned yet, skip this step, we will revisit it in the Server project anyway.
If you DO have the Server project available in your VM, execute these commands (replace the directories with your own structure!!!):
cd /usr/home/src/build/bin cp ./game /usr/home/game/share/bin/game chmod 777 /usr/home/game/share/bin/game cp ./db /usr/home/game/share/bin/db chmod 777 /usr/home/game/share/bin/db cp ./qc /usr/home/game/share/locale/english/quest/qc chmod 777 /usr/home/game/share/locale/english/quest/qcNote: For
qc, replaceenglishwith your locale if you have changed it.

This process will be relatively way easier than the FreeBSD method because it skips the installation of a whole new OS from scratch.
Please make sure that you have installed the following software in your machine before continuing:
Visual Studio: The software used to edit and compile the source code. Download
Visual Studio Code (VS Code): A lighter alternative to Visual Studio, harder to build the project in this software but it is recommended for code editing. Download
MariaDB: You can also use the official MySQL/MariaDB Workbench clients from Oracle, which contains the server and the client in one installer, but this guide will only show how to download the server and access it through Navicat. Download
Git: Used to clone the repositories in your Windows machine. Download
CMake: Required for setting up and configuring the build of the source code. Download
Notepad++ (optional but recommended): Helps with quick, last minute edits. Download
Python: The software used to execute python scripts. It is recommended to ADD TO PATH at the end of the installation. Download


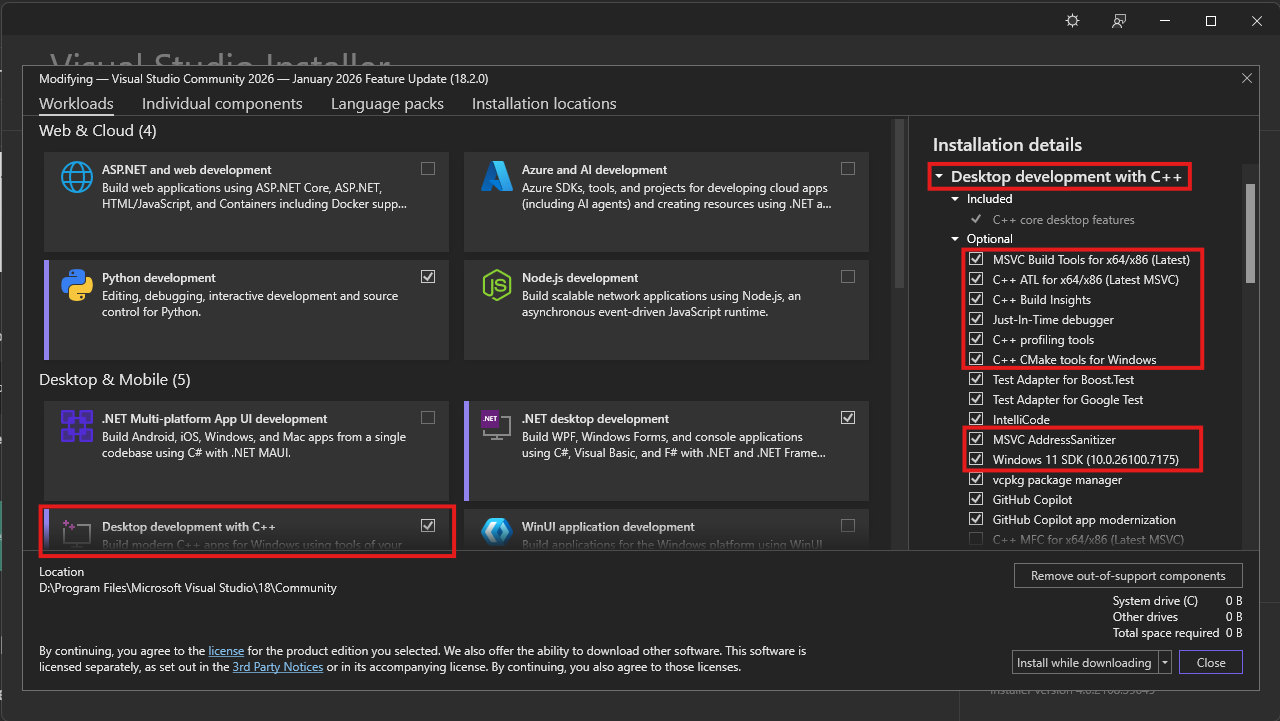
Make sure you have installed these packages with Visual Studio Installer in order to compile C++ codebases:
Packages
Note: Windows 11 SDK's can be replaced by Windows 10 SDK's, but it is recommended to install one of them.

It should be easy, but here are some notes about this installation:
Installation process
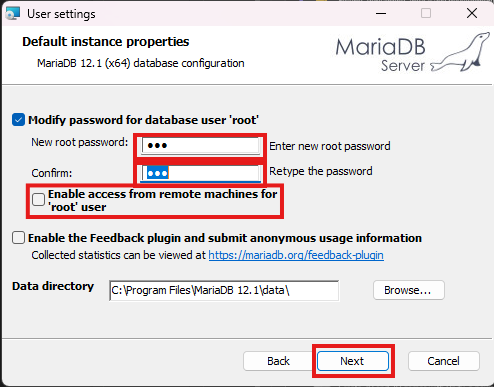
Execute the installer and click Next (accept the Terms as well), until you see this screen:
Here set a root password and choose whether you want to enable remote root access (root logins from different IPs than your device's), you should be totally fine and safer without this option enabled, then click Next.
In the next screen, accept the defaults and hit Next, then begin the installation.
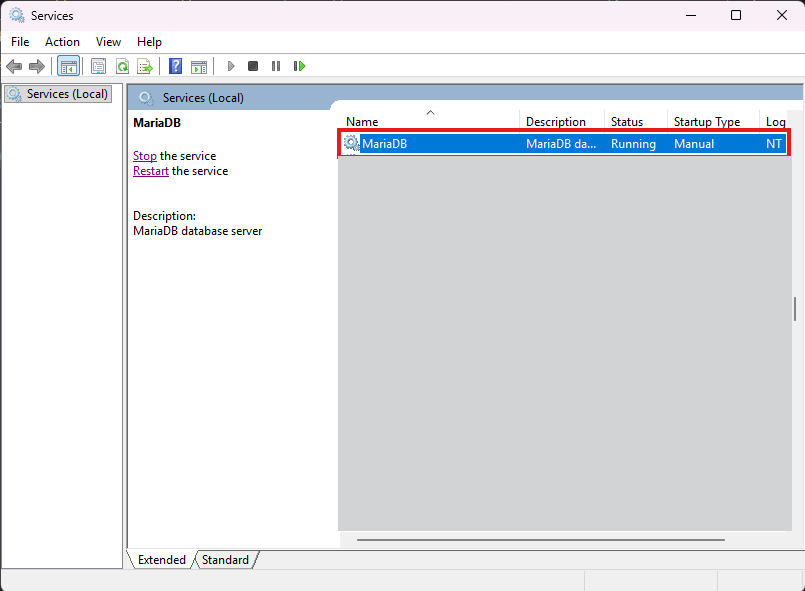
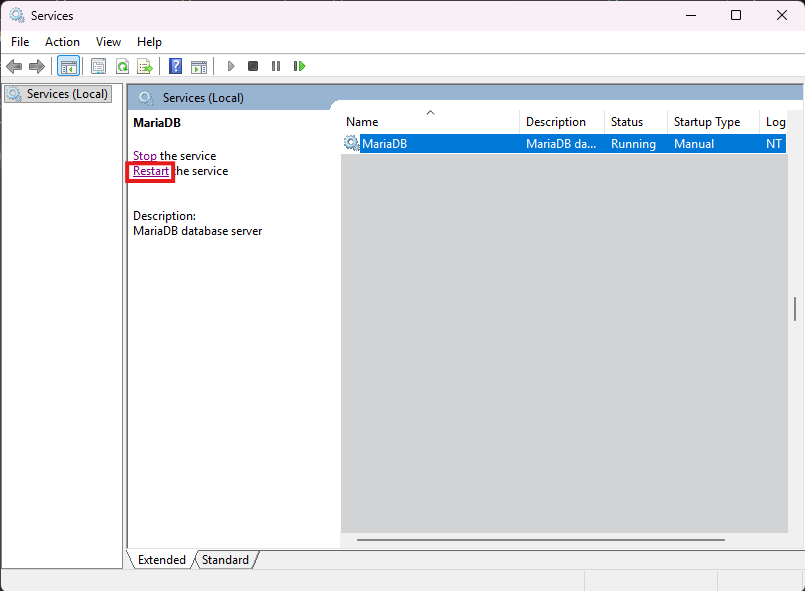
You should now be seeing the MariaDB service in your Services window:
If you ever find yourself unable to connect to your database with your terminal or Navicat, check whether this service is running or not.
The following adjustments are required for a smooth and issue-free experience.
Let's get started
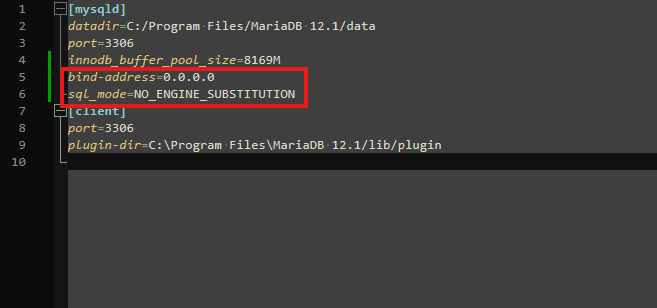
Find the file my.ini and open it with Notepad++ or any text editor of your choice.
The file should be in the data folder, inside your installation directory.
The default installation directory for MariaDB 12.1 would be
C:\Program Files\MariaDB 12.1\data\my.iniInside this file, in the
[mysqld]section, add the following lines:bind-address=0.0.0.0 sql_mode=NO_ENGINE_SUBSTITUTIONIt should be looking like this:
When you're done, restart your service from the Services window:
Next, you need to create the "serverfiles user", a user controlled by the serverfiles to read and make changes to the database. This user is recommended to be
localhostonly, especially in production environments.This user also must have full privileges over the database.
In the Server project, an automated script has been added for this user, so you may skip this step, just make sure you run the script as shown in the second project.
If you wish to add the user now, here is what you need to know:
The user's username and password are being defined in the configuration files of the server.
It is CRUCIAL that the username and password within the database match the defined values in the config files of the server!
Screenshot from Server's
share/conf/game.txt.If you select different username/password than what the config files have, YOU MUST UPDATE THE FILES TO MATCH! More about this in the second project (Server).
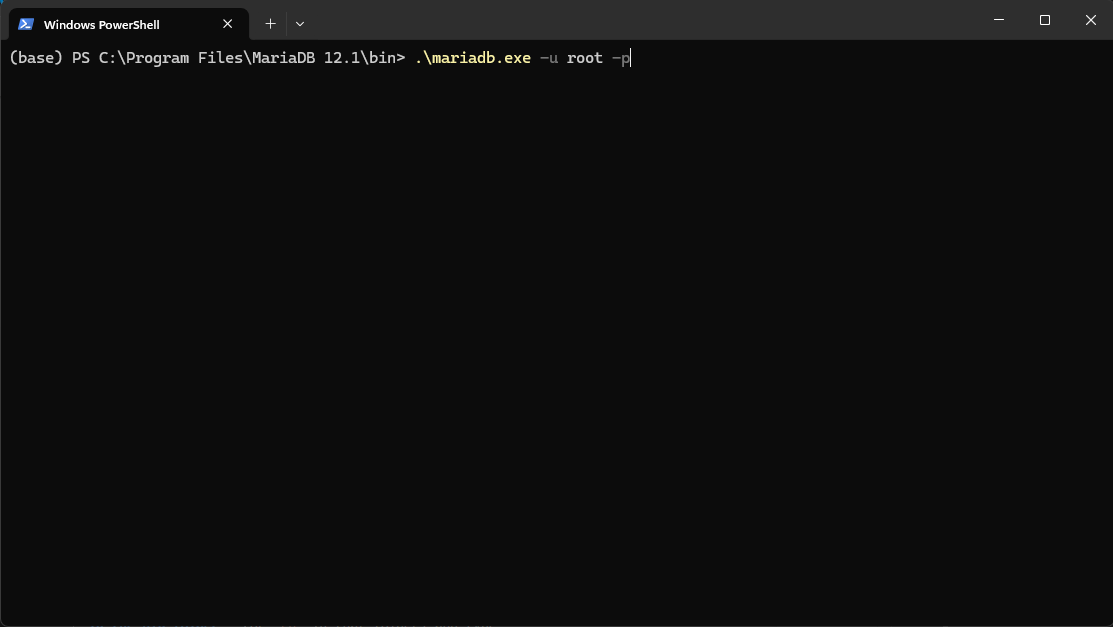
To create the user, open up a terminal inside your MariaDB installation directory, in the bin folder (or
cdin that folder) and type:.\mariadb.exe -u root -p
Enter your password and hit ENTER. Then execute these commands:
CREATE USER 'mt2'@'localhost' IDENTIFIED BY 'mt2@pw';
GRANT ALL PRIVILEGES ON *.* TO 'mt2'@'localhost' WITH GRANT OPTION;
FLUSH PRIVILEGES;
exit;
Once again, restart the service.
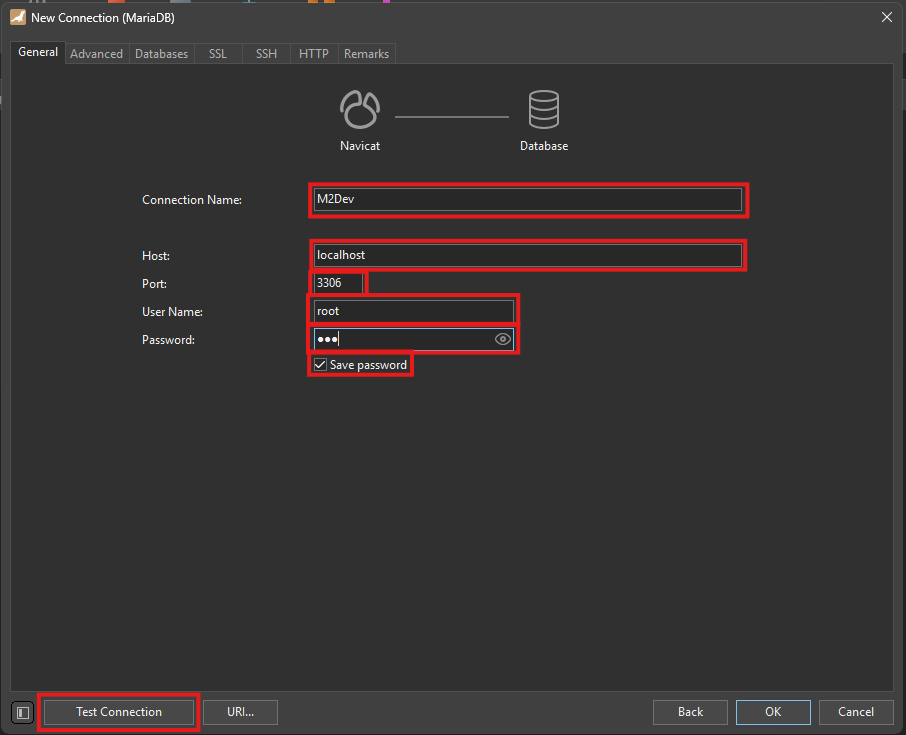
If everything has been setup correctly, here is how to establish connection to your localhost's database through Navicat:
Instructions
Fire up Navicat and click on Connection at the top left corner.
In the new dialog, select MariaDB and then click Next.
Now in this next step:
- Connection Name: Select a meaningful name for your connection. This is what you'll be seeing at the initial screen's left-side panel.
- Host: Your machine's IP address, the word
localhost, or127.0.0.1, any one of them will get you connected.- Port: Leave that as 3306.
- User Name: Here type root (obviously!)
- Password: Your root password here.
- Save passsword: Optional, not recommended for production environments or devices you share with others.
- Finally, you can test whether Navicat successfully connects to your database.
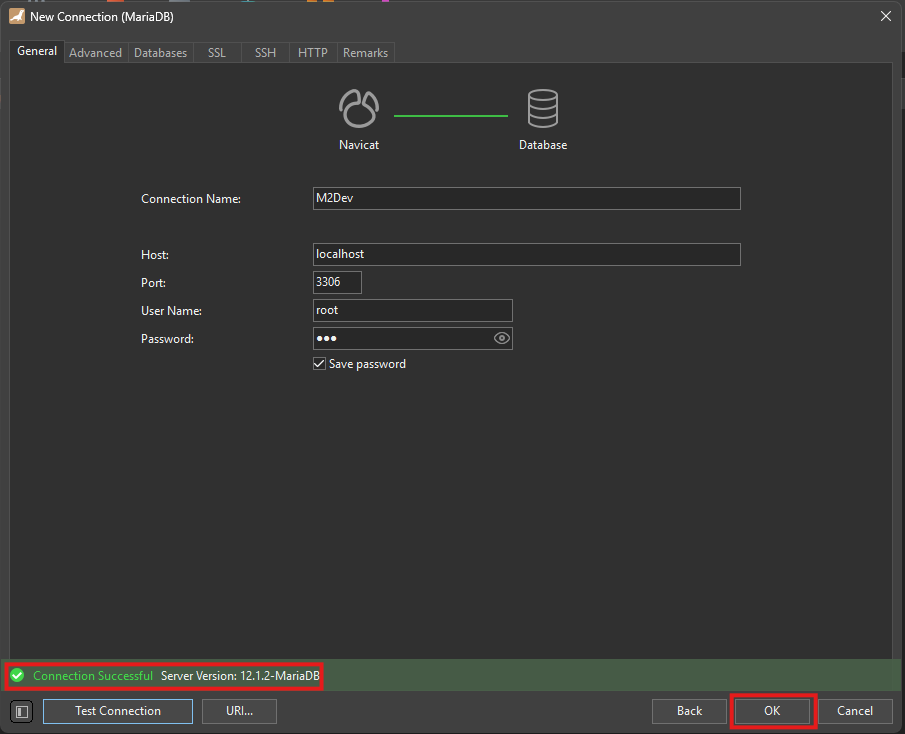
If everything is setup correctly, you should be seeing this test result:
Click OK to save this connection to your left panel.
In order to connect to your database, you can double click on your saved instance from the panel at the left.
The moment is here! In your terminal, cd into your desired location or create a new folder wherever you want and download the project using Git.
Here's how
Open up your terminal inside or
cdinto your desired folder and type this command:git clone https://github.com/d1str4ught/m2dev-server-src.git
Building the project is extremely simple, if all Visual Studio components are being installed correctly.
Instructions
Open up your terminal inside, or
cdin your project's root working directory and initialize the build with this command:cmake -S . -B buildA new
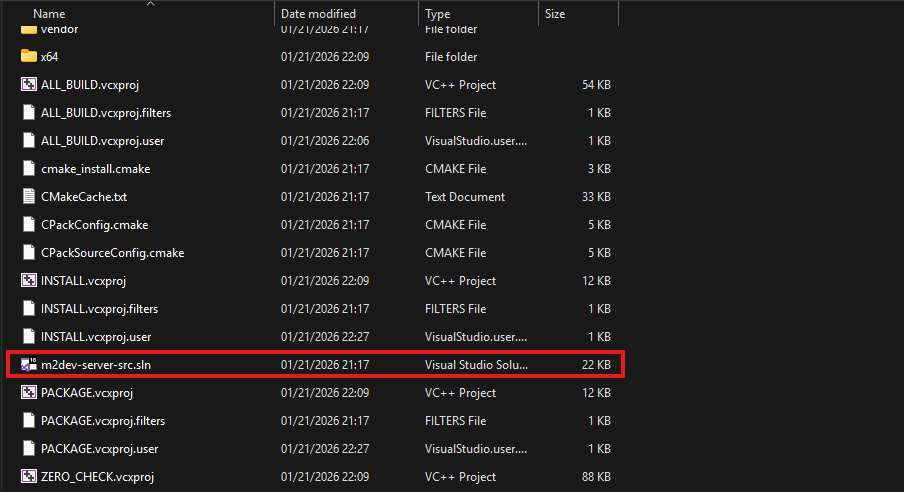
buildfolder has been created in your project's root directory. This folder contains all the build files and configurations, along with theslnfile to open the project in Visual Studio.
Double click on that file to launch Visual Studio and load the project.
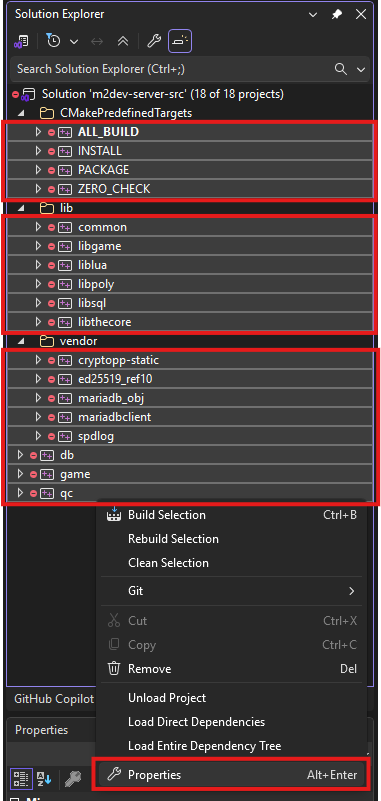
In the Solution Explorer, select all the projects minus the container folders, right click on one of the selected items, and click Properties
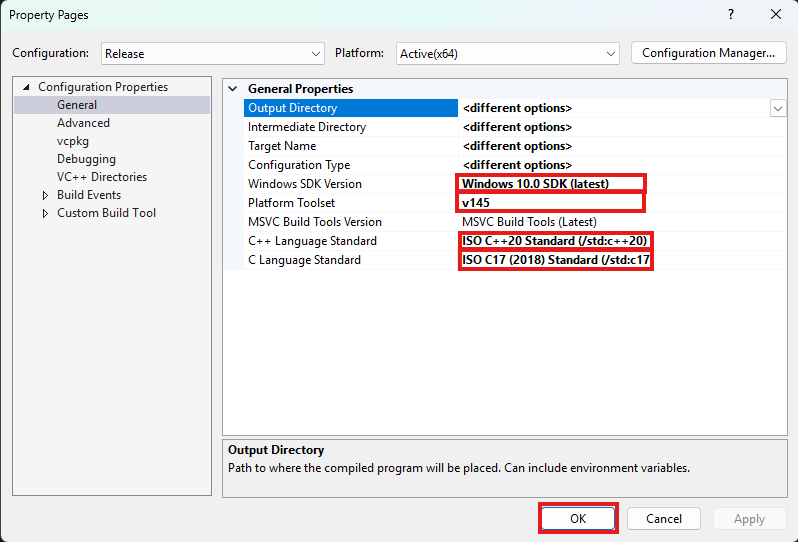
Next, make sure that the following settings are adjusted like this:
- Windows SDK Version should be the latest of Windows 10. It is not recommended to select any Windows 11 versions yet if avalable.
- Platform Toolset is the most important part for your build to succeed! Select the highest number you see. v145 is for Visual Studio 2026. If you are running Visual Studio 2022 you won't have that, you will have v143, select that one, same goes for older Visual Studio versions.
- C++ Language Standard should be C++20 as it is the new standard defined in the CMakeList.txt files as well. Might as well set it like that for all dependencies.
- C Language Standard should be C17 as it is the new standard defined in the CMakeList.txt files as well. Might as well set it like that for all dependencies.
Once done, click Apply and then OK to close this dialog.
After that, in the toolbar at the top of the window, select your desired output configuration:
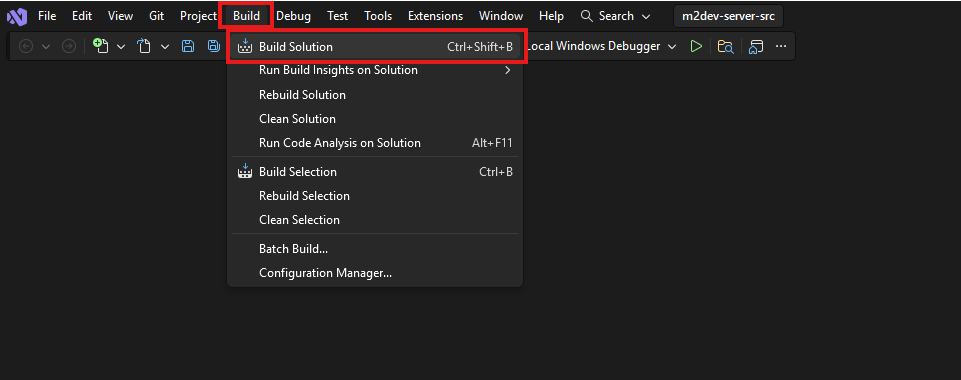
Finally, click on the Build option at the top and select Build Solution, or simply press CTRL+SHIFT+B in your keyboard with all the projects selected.
Note: if this is NOT your first build after executing the
cmake -S . -B buildcommand for this workspace, it is recommended to click Clean Solution before Build Solution.
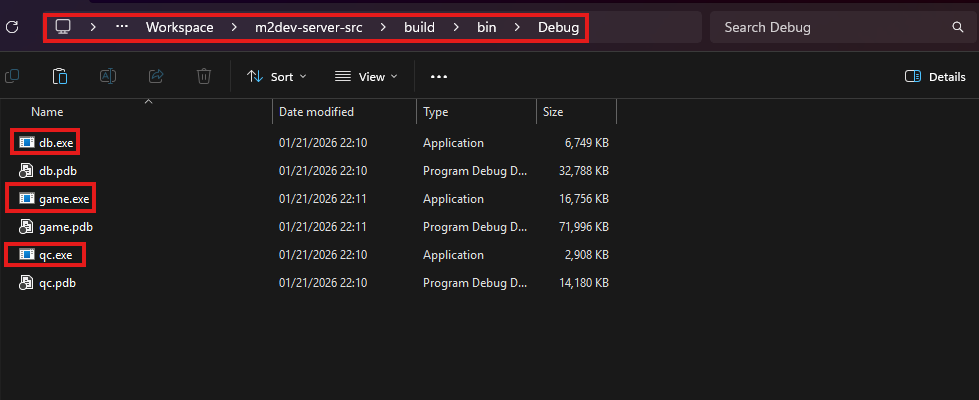
Where to find your compiled binaries:
Inside the build folder in your cloned repository, you should have a bin folder and inside that, you should have a Debug, Release, RelWithDebInfo or MinSizeRel folder, depending on your build configuration selection.
In that folder you should be seeing all your binaries:
If you did NOT install the Server project yet, you are done here.
If you HAVE the Server project installed, paste the 3
.exefiles in these locations inside the Server project:
- game.exe: inside
share\bin\game.exe- db.exe: inside
share\bin\db.exe- qc.exe: inside
share\locale\english\quest\qc.exe(replaceenglishwith your locale if you have changed it)

After finishing this part, you should now have knowledge of:
- Creating a virtual machine and connecting it to the internet
- Installing the FreeBSD operating system in a VM from scratch
- Connecting to your FreeBSD VM with PuTTY and WinSCP
- Enabling remote root access in FreeBSD
- Installing FreeBSD components either with pkg or with ports
- Managing FreeBSD services
- Assigning file permissions in FreeBSD
- Installing Visual Studio and its components for C++ builds
- Installing and configuring MariaDB from scratch in Windows/FreeBSD, adding and editing users, assigning permissions and accessing your database through Navicat
- Cloning Github repositories
- Configuring builds with CMake
- Building with FreeBSD or/and Visual Studio
After following either the FreeBSD method or the Windows method, you should be ready to proceed to the installation and configuration of the Server project
⭐ NEW: We are now on Discord, feel free to check us out!