Setting up Jupyterhub on AWS with kops/kubeadm
If you are well familiar with kubernetes, skip this section.
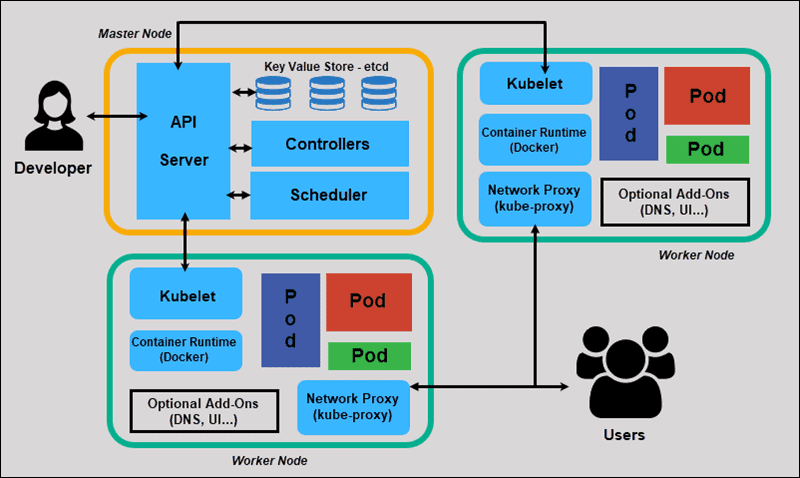
Refer to the image below, kubernetes is a container orchastration service that has a single control-plain/master to admin all activities of worker nodes and pods are containers that are running on nodes.
Just imagine that the cluster is a fleet, and the control-plane/master is the flag ship which does all the admin stuff but doesn't carry any cargo. Each of the worker nodes is a cargo ship of the fleet, carrying a number of containers.
As kubernetes admin, what you need to do is simply talking to the flag ship's captain(API server), then you have command over the whole fleet.
Then on each of the cargo ship(worker node), there is a network proxy that directs traffic from the node's port listener to pod, and this network proxy is what the users are talking to. Each of the pod is like mini self-sufficient operating system, has all the dependencies installed for its image to run.
If you are familiar with z2jh, skip this section.
Jupyterhub is a multi-user JupyterNotebook server. It is different from many individual JupyterNotebooks because it is able to take command over a shared resource and assign those resources to each of the notebooks. That is the task that could not be completed by individual JupyterNotebooks. Furthermore, JupyterHub supports Notebook sharing and many more collaboratory activities.
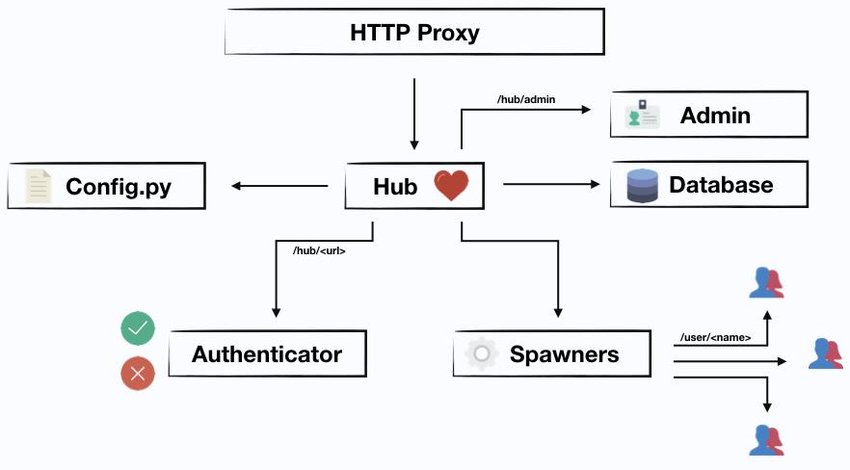
Refer to the image below, each of the 'Hub', 'HTTP Proxy', 'Authenticator' are pods that are running on our nodes. Pay attention to 'Hub', it is different from kuberentes master node, these two concepts are on different layers, kubernetes master manage the whole cluster on an instance level, and jupyterhub manages the services on a pod level.
There are a few kubernetes management softwares out there, we will choose 2, kops and kubeadm respectively.
The reason for these two choices is that, kops is well integrated with AWS, with a lot of automation supported, where as kubeadm is able to work in internet restricted environment.
A comparison table is made below

The key difference is that, kops is heavily dependent on the internet and it talks directly to AWS for provisioning of infrastructure(e.g. instances and storage). Whereas kubeadm only cares about bootstrapping, making it more vibrant in an internet-restricted environment. And this difference explains why kops is able to automate cluster-building and autoscale cluster but kubeadm cannot.
Just simply refer to z2jh website
https://zero-to-jupyterhub.readthedocs.io/en/latest/
https://zero-to-jupyterhub.readthedocs.io/en/latest/kubernetes/index.html
https://zero-to-jupyterhub.readthedocs.io/en/latest/jupyterhub/index.html
https://zero-to-jupyterhub.readthedocs.io/en/latest/jupyterhub/index.html
- You could export environment variables in ~/.bashrc such that you don't have to export everytime you ssh into the instance. For example, just add those to the end of ~/.bashrc
    export NAME=mykubes.k8s.local
    export KOPS_STATE_STORE=s3://mykubesbucket
    export ZONES=ap-southeast-1a
    export REGION=ap-southeast-1a
- Automatic Volume snapshot backup To save the snapshot of instance in case it went down accidentally, you could recover it. Use Amazon Data LifeCycle Manager (Amazon DLM) or AWS backup
- Temporarily stop the cluster and relaunch When you want to stop the cluster for maintenance or save cost, you could simply stop the cluster and relaunch. You could do this by following these steps.
- In AWS EC2 console, find the autoscaling groups for master group and worker group, change both of those desired nodes and min nodes to zero.
- Retain the hostCI node
- The nodes except for the hostci are going to be shut down
- When you wish to restart the cluster, in hostci run kops update --yes. (This step is going to sync the cloud configuration of cluster with local specifiction, since the local specification is still the original one)
Please refer to https://medium.com/paul-zhao-projects/the-ultimate-guide-to-deploying-kubernetes-cluster-on-aws-ec2-spot-instances-using-kops-and-eks-eecbb5988792 for detailed set up of both autoscaling and spot ig.
Particularly refer to sections autoscaling and spot ig
- Spot instance is much cheaper than on-demand, but it is not always available. So if we coud use two instance groups as our worker groups, one with on-demand instances and one with spot instances. We always request for spot instance first, if unavailable we request for on-demand instance. In this way we could exploit both the availability and discount pricing.
- In order to change what type of instance we want, we use
kops edit igand set nodeLabels ->on-demand: "true"/"false". - If spot instance group is chosen, we need to configure what is the
maxPrice: "0.0120", refer to the aws ec2 pricing before set the value, set the value slightly higher than current spot instance pricing. - We will always request for spot instances first before requesting for on-demand instances, this could be configured by setting taints for on-demand ig
  taints:
  - on-demand=true:PreferNoSchedule
- Use kops edit ig to enter specification file
- As for autoscaling, it is mainly the configuration of instance group
maxSize: 7andminSize: 1 - Also use cloudLabel
  cloudLabels:
    k8s.io/cluster-autoscaler/enabled: ""
    k8s.io/cluster-autoscaler/node-template/label: ""
- It is also required to create a policy and attach it to instance group
There are a few options for using persistent volume
- Use Amazon S3 by default, this is what used when following the official z2jh documentation set up. Each user's jupyternotebook will create a block volume under ec2-> volume of the size that you specify.
- Use local storage
- Use an exported NFS storage (e.g. Amazon EFS or isilon), the general procedure is as follows
- Create AWS EFS and create corresponding access point
- Try mount the EFS via access point
- Umount
- Kubectl apply pv and pvc file in the reference
pv.yaml (change the server address, path and metadata name)
apiVersion: v1
kind: PersistentVolume
metadata:
  name: efs-persist
spec:
  capacity:
    storage: 10Gi
  accessModes:
    - ReadWriteMany
  nfs:
    server: fs-00de7740.efs.ap-southeast-1.amazonaws.com  #Notice the id and region
    path: "/"
pvc.yaml
kind: PersistentVolumeClaim
apiVersion: v1
metadata:
  name: efs-persist
spec:
  storageClassName: ""
  accessModes:
    - ReadWriteMany
  resources:
    requests:
      storage: 10Gi
- Edit config file and run helm upgrade
singleuser:
  storage:
    type: "static"
    static:
      pvcName: "efs-persist"
      subPath: 'home/{username}'
  extraEnv:
    CHOWN_HOME: 'yes'
  uid: 0
  fsGid: 0
  cmd: "start-singleuser.sh"
- You can further specify mount options like this
apiVersion: v1
kind: PersistentVolume
metadata:
  name: nfs-storage
spec:
  capacity:
    storage: 10Gi
  accessModes:
    - ReadWriteMany
  mountOptions:
    - bg
    - hard
    - nfsvers=3
    - tcp
    - intr
    - rsize=8192
    - wsize=8192
    - retry=1024
  nfs:
    server: fs-00de7740.efs.ap-southeast-1.amazonaws.com
    path: "/mydir"
- When you encounter
The connection to the server localhost:8080 was refused - did you specify the right host or port?
or
no context set in kubecfg
Run with --state and --kubeconfig
kops export kubecfg --admin --kubeconfig ~/workspace/kubeconfig --state=s3://mykubesbucket
or
export KOPS_CLUSTER_NAME=mykubes.k8s.local
kops export kubecfg
There is no such documentation about setting up z2jh in an internet restricted environment, so I have explored both using kops and kubeadm to set up the cluster. I have gradually opened some sites to be accessed by firewall based on a few commands from kops, e.g. kops create cluster, kops upgrade etc. However, the sites that kops communicate with are from various sources which are hard to be tracked. Below I will provide a list of sites I know so far, with those sites enabled, you could create the cluster, but other commands remain unexamined.
https://raw.githubusercontent.com

https://kubeupv2.s3.amazonaws.com

https://artifacts.k8s.io

https://storage.googleapis.com

https://download.docker.com

https://hub.docker.com

https://jupyterhub.github.io

https://z2jh.jupyter.org

https://jupyter.org
- Launch Centos 7 instances as master and worker nodes on AWS
- edit /etc/yum.repos.d/CentOS-Base.repo to include your own defined mirror sites so as to enable yum. Alternatively, you could use raw ways to install the tools required(e.g. by scp binary files onto the instance and make)
- Set up kubernetes and bootstrap using kubeadm, refer to: https://docs.genesys.com/Documentation/GCXI/latest/Dep/DockerOffline
- Install helm manually or by yum
- Download Jupyterhub Docker Image from https://hub.docker.com/r/jupyterhub/jupyterhub/tags?page=1&ordering=last_updated, recommended version: 0.9.1
- Find the values.yaml file in , and find all dependent images(e.g. hub, image puller, proxy), you could do this by searching for "image:"
- Download those images of correct tag and copy everything over to the offline machine
- Docker load all those images on all offline machines
- Create a config.yaml file on master node and generate a proxy secret just like the one in open internet
- Install Jupyterhub with command
helm upgrade --cleanup-on-fail jhub ./jupyterhub --namespace jhub --version=0.9.1 --values config2.yaml --debug --no-hooks
- The --no-hooks option disables helm to pull images from internet, since we already loaded the required images on the machine, it is able to run smoothly.
- The --debug option allows you to print the whole log in command line, if anything goes wrong, you can locate the problem easily.
- You may run with --disable-openapi-validation option to forbid helm to validate online
- ./jupyterhub is the unzipped jupyterhub tar folder you downloaded previously
- When you edit the config.yaml file, you could update the running images with
helm upgrade --cleanup-on-fail jhub ./jupyterhub --namespace jhub --version=0.9.1 --values config2.yaml --debug --no-hooks
- Configure proxy address:
- Since we manually join the cluster with kubeadm, there won't be any external IP if you are in a private VPC that forbids external IP, so you may want to use a private IP (ip address for your aws instance) as the access point for users.
- Patch service: proxy-public’s external IP as proxy’s node cloud IP address
kubectl patch svc proxy-public -p '{"spec":{"externalIPs":["xx.xx.xx.xx"]}}' -n jhub
- Expose the service to the IP using
kubectl expose service proxy-public --name=proxy-exposure --type=NodePort --port=80
--target-port=8000 -n jhub
Since you want to use aws instance ip + port 80 to access JupyterHub, you need to expose it such that the traffic from port 80 is directed to the proxy-public of JupyterHub
There are two options that I have explored
- Use Sqlite-memory, config jupyterhub to use sqlite memory for both hub and user storage at the start. Eventually you may consider using some other forms of storage, but to get JupyterHub running, you could just use sqlite-memory first
hub:
  db:
    type: sqlite-memory
singleuser:
  storage:
    type: sqlite-memory
- Use an exported nfs share, for example, EFS(please refer to the section under open internet environment, they are the same), or some other forms of exported nfs.
- Temporarily stop the instances and relaunch (1) Stop the instances(both master and worker nodes) in AWS cloud (not terminate) (2) Start instances when needed to use (3) In master, worker nodes run
sudo systemctl start kubelet
sudo systemctl enable kubelet
Before any authenticator is used, you need to set up https for your JupyterHub. Basically you need to generate your own RSA key pair to be inserted into config file.
sudo openssl req -new -x509 -sha256 -days 365 -nodes -out /jhubCert/jhub.cer -keyout /jhubCert/jhub.pem
the cert files will be located at the -out and -keyout options you specify, then modify the config.yaml to include those. After which a helm install is able to show the changes in your site.
proxy:
  https:
    enabled: true
    type: manual
    manual:
      key: |
        -----BEGIN RSA PRIVATE KEY-----
        ...
        -----END RSA PRIVATE KEY-----
      cert: |
        -----BEGIN CERTIFICATE-----
        ...
        -----END CERTIFICATE-----
hub:
  config:
    JupyterHub:
      authenticator_class: ldapauthenticator.LDAPAuthenticator
    LDAPAuthenticator:
      bind_dn_template:
        - uid={username},ou=xxx,o=xxx,dc=xxx,dc=xxx,dc=xxx
      server_address: "YOUR LDAP SERVER ADDRESS WITHOUT QUOTATION MARK"
A tip is that you can first try if connection with your remote ldap server can be established by running commands like ping or ldapsearch, but ldapsearch requires you to install ldap client first.
There are two sample config files under root directory, those are for your reference, for example, how each field should be typed or entered.
- If rebooted master node, then kube services not going to restart run
- systemctl start kubelet
- systemctl enable kubelet
- Kubectl get -n
- Kubectl delete -n
- Kubectl describe -n
- Common resource types:
- nodes
- pods
- services
- pv
- pvc
- Storageclass
- Kubectl label
- Kubectl apply -f -n
- Kops create cluster
- Kops get cluster
- Kops get
- Kops get ig
- Kops edit ig
- kubeadm token create --print-join-command
- Kubeadm init
- Kubeadm join
- Apply new config file to helm
- helm upgrade --cleanup-on-fail jhub jupyterhub/jupyterhub --namespace jhub --version=0.11.1 --values config.yaml (replace version, config file name and namespace)
- Helm show past revision:
- helm history jhub -n jhub --kube-context mykubes.k8s.local
- Helm rollback to a previous revision designated
- helm rollback jhub -n jhub --kube-context mykubes.k8s.local
- No second node can have same instance type as master node. Since master node is t2 instance type, then both spot-ig and spot-ig-2 can’t be assigned with t2 related instance type
- The limit to guarentee ratio can be first set to 2:1, then adjust based on performance
- Use on-demand with spot instance groups, reserve instances are not preferred due to the variable nature of jupyterhub
- Possible implementation size:
- Actual nodes size to be r5n.2xlarge and g4dn.12xlarge
- soft limite cpu: 2-4 cores memory: 16 - 32 GB