This is a pure transparent bridge between Wifi and serial using any ESP8266 device for RN2483 LoraWAN module. It's very useful for testing or talking to remote serial device such as RN2483 that have no network connection. It's dedicated to works with WeMos RN2483 shield and I'm Using it with The Things Network LoraWan Backend but you can use other provider.
I'm using it on WeMos target, you can find more information on WeMos on their site, it's really well documented.
This project is mainly based on excellent @me-no-dev ESPAsyncWebServer library and great JQuery Terminal done by Jakub Jankiewicz.
Once uploaded SPIFFS data (web page) you can connect with a browser to http://ip_of_esp8266 and start playing with it.
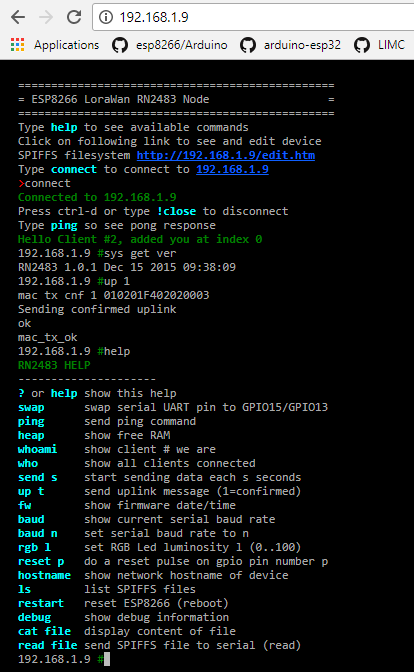
The main index.htm web page include a full javascript terminal so you can type command and receive response.
The main web page can also be hosted anywhere and it's not mandatory to have it on the device (except if device and your computer have no access on Internet). I've published the fully fonctionnal WEB page from github so you can access it from here and then connect to your device on wich you flashed the firmware.
Some commands will be interpreted by the target (ESP8266) and not passed to serial, so you can interact with ESP8266 doing some variable stuff.
First time setup (assuming you're using the RN2483 shield)
- Register your device on TTN before using and obtain APP_EUI, APP_KEY and DEV_EUI from TTN
- Setup WiFi SSID/Password into the sketch (the .ino file)
- Setup Web Editor login/password into the sketch
- Compile and flash the device
- Connect to the device IP (seen after connect on Serial Monitor) http://your_IP
- Type
connectto connect to the local device, one connected check all is fine typing sys get ver=> should return someting likeRN2483 1.0.1 Dec 15 2015 09:38:09- if not try reseting module wit
reset 12and retry until banner mac set appeui YOUR_APP_EUImac set appkey YOUR_APP_KEYmac set deveui YOUR_DEV_EUImac savemac join otaa
Then wait for ok and accepted, then you're in!
Push button (long press for different behaviour)
- pressed lower than 1 second will just send packet
- pressed between 1 and 2 seconds (led blink purple)=> send packet with ACK
- pressed between 2 and 3 seconds (led blink green) => enable autosend packet every 300 seconds
- pressed between 3 and 4 seconds (led blink yellow)=> disable autosend packet
PS : If you just want hardware is okay, use the simplified check-rn2483 sketch
You need to have nodejs and some dependencies installed npm install zlib.
webdev folder is the development folder to test and validate web pages. It's used to avoid flashing the device on each modification.
All source files are located in this folder the ESP8266 data folder (containing web pages) is filled by a nodejs script launched from webdev folder. This repo contain in data latest files so if you don't change any file, you can upload to SPIFFS as is.
To test web pages, go to a command line, go into webdev folder and issue a:
node web_server.js
then connect your browser to htpp://localhost:8080 you can them modidy and test source files such index.htm
Once all is okay issue a:
node create_spiffs.js
this will gzip file and put them into data folder, after that you can upload from Arduino IDE to device SPIFFS
See comments in both create_spiffs.js and web_server.js files, it's also indicated dependencies needed by nodejs.
You can also afterward edit file directly from device with integrated editor, very usefull to change configuration files for example. http://your_device_ip/edit.htm with login pass (admin/admin)
- connect : connect do target device
- help : show help
!closeor CTRL-D : close connectionswapswap ESP8266 UART pin between GPIO1/GPIO3 with GPIO15/GPIO13pingtyping ping on terminal and ESP8266 will send back pong?orhelpshow helpheapshow ESP8266 free RAMwhoamishow WebSocket client # we arewhoshow all WebSocket clients connectedsend secondauto send data each second (0=disable send)fwshow firmware date/timebauddisplay ESP8266 serial baud rate configbaud nset ESP8266 serial baud rate to n (to be compatble with device driven)rgb lset RGB Led luminosity l (0..100)reset preset gpio pin number plslist SPIFFS filesread fileexecute SPIFFS file commandhostnameshow network hostname of devicerestartreset ESP8266 (reboot)debugshow debug informationcat filedisplay content of fileup typesend uplink message (type 0=unconfirmed type 1=confirmed)
Every command in file startup.ini are executed in setup() you can chain with other files.
I'm using this sketch to drive Microchip RN2483 Lora module to test LoraWan, see the boards I used.
For example my startup.ini file contains command to read microchip RN2483 config file named rn2483-cfg.txt then chain to join otaa with file rn2483-ttn-otaa.txt
startup.ini
# Startup config file executed once in setup()
# commands prefixed by ! are executed by ESP
# all others passed to serial module

# Set Onboard RGB LED luminosity (0=off 100=full light)
!rgb 50

# Microchip Lora rn2483 configuration
!read /rn2483-cfg.txt

# Join ttn in otaa mode
!read /rn2483-ttn-otaa.txt
RN2483 configuration file example for RN2483 shield rn2483-cfg.txt
# Startup config file for Microchip RN2483
# commands prefixed by ! or $ are executed by ESP all others passed to serial module
# command starting with $ wait until device return \n
# RN2483 always return string followed by "\r\n" on each command (ex "ok\r\n")
# so $ wait a response (good or not) before sending next command
# !delay or any $ are not executed when connected via browser web terminal (websocket)
# See schematics here https://github.com/hallard/WeMos-RN2483

# Set ESP Module serial speed (RN2483 is 57600)
# as reminder, it's now done in sketch
# !baud 57600
# !delay 50

# For Hardware boards V1.1+
# -------------------------
# reset RN2483 module
$reset 12

# !baud 57600
# !delay 50

# Wired GPIO to output
$sys set pinmode GPIO1 digout
$sys set pinmode GPIO10 digout

# Light on the LED on all GPIO
$sys set pindig GPIO1 1
$sys set pindig GPIO10 1

# Custom config here
# ------------------

# Set Power Max
$radio set pwr 14
RN2483 join TTN otaa configuration file example for RN2483 shield rn2483-otaa.txt
# Startup config file for Microchip RN2483 join TTN in otaa
# commands prefixed by ! or $ are executed by ESP all others passed to serial module (RN2483)
# command starting with $ wait until device return \n
# RN2483 always return string followed by "\r\n" on each command (ex "ok\r\n")
# so $ wait a response (good or not) before sending next command
# !delay or any $ are not executed when connected via browser web terminal (websocket)
# See schematics here https://github.com/hallard/WeMos-RN2483

# Your device should have been registered on TTN before using, here is how to
# On the RN2483, use `sys get hweui` and `mac get deveui`
# you then get the devices hweui & deveui, They are probably the same
# then register device on TTN console dashboard

# Then you must setup your keys (obtained from TTN console dashboard)
# Personnaly I prefer setup the 3 fixed values in TTN dashboard
# then put them into the RN2483 module

# then on RN2483 device (1st setup, then don't need to be set again)
# $mac set appeui YOUR_APP_EUI
# $mac set appkey YOUR_APP_KEY
# $mac set deveui YOUR_DEV_EUI
# and saved with `mac save`
# $mac save

# Then Join TTN Network
$mac join otaa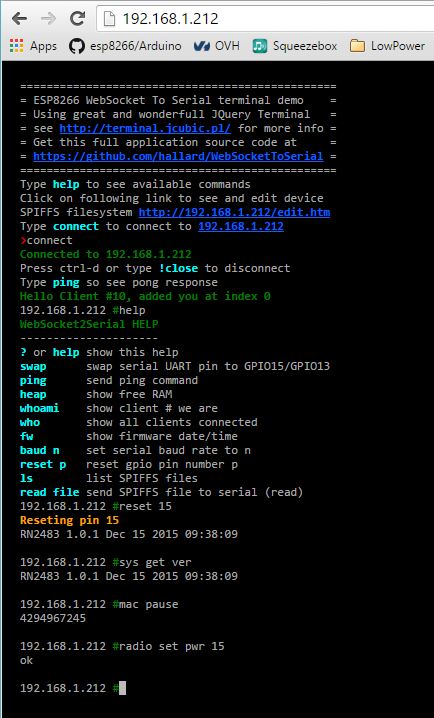
See all in action
http://cdn.rawgit.com/hallard/WeMos-rn2483-firmware/master/WeMos-rn2483/webdev/index.htm
By the way I integrated the excellent @me-no-dev SPIFFS Web editor so you can direct edit configuration files of SPIFFS going to
http://your_module_ip/edit
Your computer need to be connected to Internet (so may be your ESP8266 device) and authenticated for this feature, default login/pass are in the sketch (admin/admin)
- More configuration features
- Add configuration file for SSID/PASSWORD and login/pass for http admin access
- Add some event on push button
- Add listening mode (Class C) feature
- Add sensor data sending
- Add some I2C OLED display
- Better LED Management
If you add some features, don't hesitate to do a pull request so I can merge your changes.
- Arduino ESP8266
- @me-no-dev ESPAsyncWebServer library
- @me-no-dev ESPAsyncTCP library
- nodejs for web pages development test
See news and other projects on my blog