


We built a simulation framework to drive a Clearpath Warthog across rough Martian terrain inside NVIDIA Isaac Sim, using a 3D LiDAR for mapping and an MPPI controller for obstacle-aware path planning. The whole stack runs on ROS 2 Humble and Nav2.
This was our final project for our Space Robotics course, and the idea was: can we take a real-world rugged UGV, drop it on a realistic Mars surface, and have it autonomously navigate around rocks using only LiDAR? Turns out, yes — with the right controller tuning and a lot of costmap debugging.
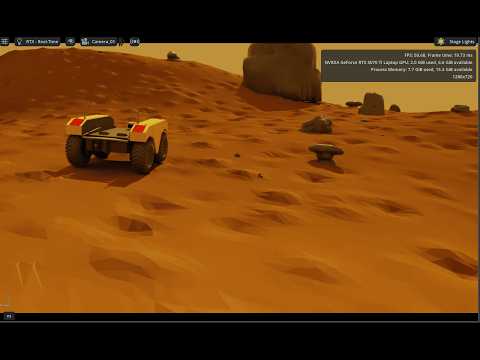
The Warthog spawns on a simulated Martian regolith terrain with scattered boulders. A 3D LiDAR mounted on the front bulkhead scans the environment and feeds PointCloud2 data into a costmap pipeline. RTAB-Map handles SLAM (ICP-based, no GPS), and the MPPI controller rolls out ~2000 candidate trajectories per timestep to find a smooth, collision-free path to a goal waypoint.
We also wrote a simple waypoint mission script (run_mission.py) that uses Nav2's SimpleCommander API to chain together multiple goals — so you can define a patrol route and just let it go.
Isaac Sim (terrain + robot + LiDAR)
        │
        │ ROS 2 Bridge
        ▼
  PointCloud2 ──► Costmap ──► MPPI Controller ──► /cmd_vel ──► Warthog
        │
  RTAB-Map (ICP SLAM) ──► /odom, /map
One of the coolest outcomes from this project was the 3D point cloud map generated by RTAB-Map. Using only LiDAR ICP scan matching (no GPS, no camera), the system built a really detailed reconstruction of the synthetic Martian terrain — you can clearly see all the boulders, the terrain contours, and the ground surface.
 |
 |
Full terrain overview from /cloud_map in RViz |
Close-up showing boulder geometry captured by the LiDAR |
 |
 |
| Side profile — elevation changes in the regolith | Top-down view of the reconstructed environment |
The green points represent the terrain surface and the red highlights are the rock obstacles. The color coding comes from the RGB8 color transformer in RViz, mapped by height (Z-axis).
├── run_mission.py                  # Waypoint mission using nav2_simple_commander
├── mppi_config.yaml                # Full Nav2 parameter file (AMCL, BT, MPPI, costmaps)
├── lidar_map.yaml                  # RTAB-Map config (ICP, LiDAR-only SLAM)
│
└── spacve/
    ├── mppi_navigation/            # Our custom ROS 2 package
    │   ├── mppi_controller.py      #   Standalone MPPI implementation in Python
    │   ├── pointcloud_to_costmap.py#   Converts PointCloud2 → OccupancyGrid
    │   ├── goal_publisher.py       #   Quick CLI tool to send goal poses
    │   └── launch/mppi_launch.py   #   Launches the custom stack
    │
    ├── warthog_descriptions/       # Robot URDF + meshes
    │   ├── urdf/warthog_isaac.urdf #   Clean URDF for Isaac Sim (no Gazebo tags)
    │   └── meshes/                 #   STL files (chassis, wheels, fenders, etc.)
    │
    ├── warthog_nav2_ws/            # Nav2 workspace with MPPI configs
    │   └── src/warthog_nav2/
    │       ├── config/mppi.yaml    #   Nav2 MPPI plugin parameters
    │       └── launch/             #   Launch files for the full Nav2 stack
    │
    └── nav2_mppi_ws/               # Built-from-source Nav2 (for MPPI plugin)
We implemented MPPI both as a custom Python node (for experimentation and visualization) and configured the official Nav2 C++ plugin for production runs. The idea behind MPPI is straightforward:
- Sample a bunch of random control sequences (2000 of them)
- Roll each one forward through a kinematic model to see where the robot would end up
- Score each trajectory based on: how close it gets to the goal, whether it hits anything, how much energy it uses, and how jerky it is
- Take a weighted average of all the control sequences, biased toward the low-cost ones
- Execute the first control command, then repeat
We tuned the cost weights so the robot strongly prefers going forward, doesn't cut corners around obstacles, and produces smooth velocity commands instead of oscillating.
| Parameter | Value |
|---|---|
| Samples per step | 2000 |
| Lookahead | 50 steps (5 sec) |
| Max speed | 1.0 m/s |
| Goal weight | 10.0 |
| Obstacle weight | 100.0 |
You'll need: Isaac Sim (2023.1+), ROS 2 Humble, Nav2, RTAB-Map, and a decent NVIDIA GPU (RTX 5070 or better).
# Build the workspaces
cd spacve/warthog_nav2_ws && colcon build --symlink-install && source install/setup.bash
cd ../mppi_navigation && colcon build --symlink-install && source install/setup.bash

# 1. Open Isaac Sim and load the Mars terrain scene with the Warthog

# 2. Launch navigation
ros2 launch warthog_nav2 warthog_mppi.launch.py

# 3. Send waypoints
python3 run_mission.pymars_manual.mp4
earth_manual.mp4
mars_blooper.mp4
- Jotheesh Reddy Kummathi
- Rahul Reghunath