

An AE2 add-on that lets you access your terminal from a web browser, wherever you are! You can browse your network, submit crafting requests, view and cancel crafting jobs, track their progress, and even send updates through a Discord webhook.
Now works with multiple networks and on public servers, where every player can have their own account!
THIS MOD SHOULD ONLY BE INSTALLED ON THE SERVER. IT ADDS NO ITEMS OR BLOCKS!
The core branch is the brain of the mod. It
contains almost all version-independent logic: the HTTP server, web API, authentication, configuration
definitions, crafting and tracking logic, Discord integration, and the web assets.
The Minecraft-version branches are thin adapters around that shared core. They contain only the code that has to know about a specific Minecraft version, mod loader, or AE2 API: lifecycle hooks, config and command wiring, Mixins, and conversions between AE2 objects and the interfaces understood by core.
| Branch | Purpose |
|---|---|
core |
Shared, version-independent logic and this documentation. It is not a standalone Minecraft mod. |
1.21.1 |
NeoForge 1.21.1 adapter |
1.20.1 |
Forge 1.20.1 adapter |
1.12.2 |
Forge 1.12.2 adapter for AE2 UEL |
1.7.10 |
Forge 1.7.10 adapter for GTNH |
Each version branch includes core as a Git submodule pinned to a tested commit and packages it into the final
mod JAR. Shared behavior should normally be changed on core; a version branch should only contain the adapter
needed to make that behavior work on its Minecraft and AE2 version.
If you only want to use the mod, download a version-specific JAR from
Releases,
CurseForge, or
Modrinth. Do not try to install the core branch by itself.
For development, run core checks with ./gradlew test spotlessCheck. The two shipped web interfaces
also have dependency-free behavioral checks: node --test src/test/js/item-identity.test.cjs
(Node.js 18 or newer).
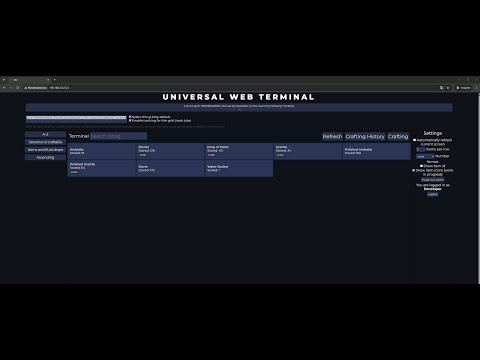
The mod starts an HTTP server when the Minecraft server starts. This server hosts the built-in web panel and exposes the API used by that panel.
Because the mod is server-side only, it does not add another terminal or block for selecting a network.
On modern Minecraft versions, networks are identified through Wireless Access Points and their owners. Every player who wants to access a network through the website must place their own Wireless Access Point on that network.
On older Minecraft versions, networks are identified through AE2 Security Terminals. Players need a biometric card in the Security Terminal with the required permissions. Wild biometric cards are ignored for security reasons.
The Admin web account can access every available network on the server: networks with at least one Wireless
Access Point on modern versions, and networks with a Security Terminal on older versions. Protect the admin
password accordingly!
- Browse, sort, and filter the contents of AE2 networks
- Monitor as many networks as you want
- Public mode for servers with multiple independent players
- Submit new crafting requests, with automatic or manual CPU selection
- View the status of every crafting CPU
- Cancel crafting jobs
- Track active and completed crafting jobs
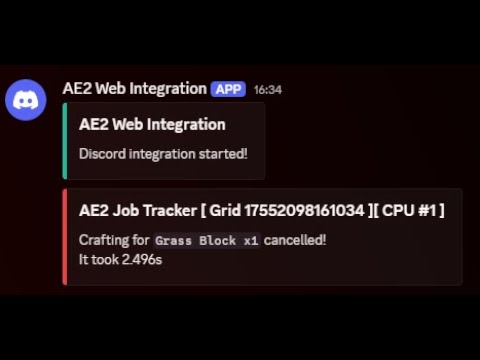
- Send crafting updates through a Discord webhook
Gallery


In public mode, every player can create their own web account and access the AE2 networks they are allowed to use. Registration starts on the website and must be confirmed in game with the command shown by the web panel. The player must be online to register.
Player passwords are stored as salted PBKDF2-HMAC-SHA1 hashes. A normal session is valid for one hour, or seven days when Remember me is selected.
When public mode is disabled, only the Admin account is available. Its password is configured in the mod's
config file. The session mechanism is the same as in public mode.
Connections from the loopback address (127.0.0.1/localhost) are authenticated as admin by default. This is
controlled by allow_no_password_on_localhost. When a reverse proxy is used, this rule applies to the client
address resolved from the proxy headers.
The mod has built-in support for resolving the real client IP behind a reverse proxy. The resolved address is used consistently for both the localhost authentication rule and per-IP rate limiting.
The mod only reads X-Forwarded-For or X-Real-IP when the direct TCP connection comes from:
- a proxy running on the same machine as the Minecraft server; or
- an address or network listed in
trusted_proxies.
A proxy on the same machine is trusted automatically and does not need to be added to the config. For a proxy
running on another machine, set trusted_proxies to a comma-separated list of literal IPv4/IPv6 addresses or
CIDR ranges. For example, in the TOML config:
trusted_proxies = "192.168.1.10, 10.20.0.0/24, 2001:db8::10"
The same option is available in the Forge .cfg file on older versions.
Hostnames are not accepted; use a literal address or CIDR range instead.
X-Forwarded-For takes priority over X-Real-IP. For a chain such as client, proxy1, proxy2, the mod walks
from right to left, skips configured trusted proxies, and uses the first untrusted address as the client. This
prevents a client from granting itself localhost access by sending a forged
X-Forwarded-For: 127.0.0.1 header directly.
For HTTPS termination, preserve the public Host header (including any nonstandard port) and set
X-Forwarded-Proto to the public protocol, http or https. The mod accepts this protocol header only
from the same trusted proxies described above. It is used to validate the origin of browser login and
registration forms when Sec-Fetch-Site is absent. The proxy must overwrite X-Forwarded-Proto, not
forward an arbitrary client value or append a list. With multiple proxy hops, the last trusted proxy
must supply the verified public protocol.
Example Nginx configuration for a proxy running on the same machine:
location / {
    proxy_pass http://127.0.0.1:2324;
    proxy_set_header Host $http_host;
    proxy_set_header X-Forwarded-Proto $scheme;
    proxy_set_header X-Real-IP $remote_addr;
    proxy_set_header X-Forwarded-For $proxy_add_x_forwarded_for;
}- A compatible AE2 installation for one of the supported Minecraft versions
- An available TCP port for the built-in web server
- A firewall/NAT rule if you want to reach the panel from outside your local network
By default, the panel is available at http://your-server-ip-or-domain:2324/. The port is configurable.
- Download the latest JAR for your Minecraft version from the Releases page.
- Drop the mod into the server's
modsfolder. On multiplayer, it only belongs on the server. It also works in a single-player instance, although that is not its main use case. - Start the server once to generate the config.
- Open
config/ae2webintegration/ae2webintegration.toml, orconfig/ae2webintegration/ae2webintegration.cfgon older Minecraft versions. Configure the port, admin password, public mode, and other settings as needed. - Disable public mode if you are playing alone.
- Reload the config with
/ae2webintegration reload, or restart the server. On 1.21.1, NeoForge normally notices file changes automatically, but the command can still force a full config and web server reload. - Allow the configured port through your firewall and router as needed, or route access through a reverse proxy.
- Visit
http://your-server-ip-or-domain:configured-port/and log in with theAdminaccount and the password from the config.
In public mode, a player can create an account from the login page. After choosing a password, the page displays
an /ae2webintegration auth <token> command. The player must run that command in game to finish registration.
Discord integration only works when public mode is disabled.
Create a Discord webhook and set its URL as discord_webhook in the AE2 Web Integration config. You can also
set discord_role_id if a role should be pinged on errors.
Crafting completion notifications can be filtered with discord_minimum_crafting_duration_seconds and
discord_minimum_crafting_amount. A notification must meet both configured minimums. Both values default to 0,
which keeps all crafting completion notifications enabled.

If you already have a web server and want to host the panel there, you can! The
example_website directory contains a ready-to-use simple PHP
proxy. It forwards API calls from your web server to the AE2 Web Integration endpoint.
See the OpenAPI generator guide for generating the API specification from endpoint annotations and Javadocs.
The mod currently supports Minecraft 1.21.1 (NeoForge), 1.20.1 (Forge), 1.12.2 (Forge), and 1.7.10 (Forge/GTNH). Builds for different versions are not interchangeable.
A few additional compatibility notes:
- The 1.7.10 build targets the GTNH forks of AE2 and AE2FC.
- The 1.12.2 build targets AE2 UEL and AE2FC for 1.12.2.
- The 1.20.1 and 1.21.1 builds include optional AdvancedAE integration.