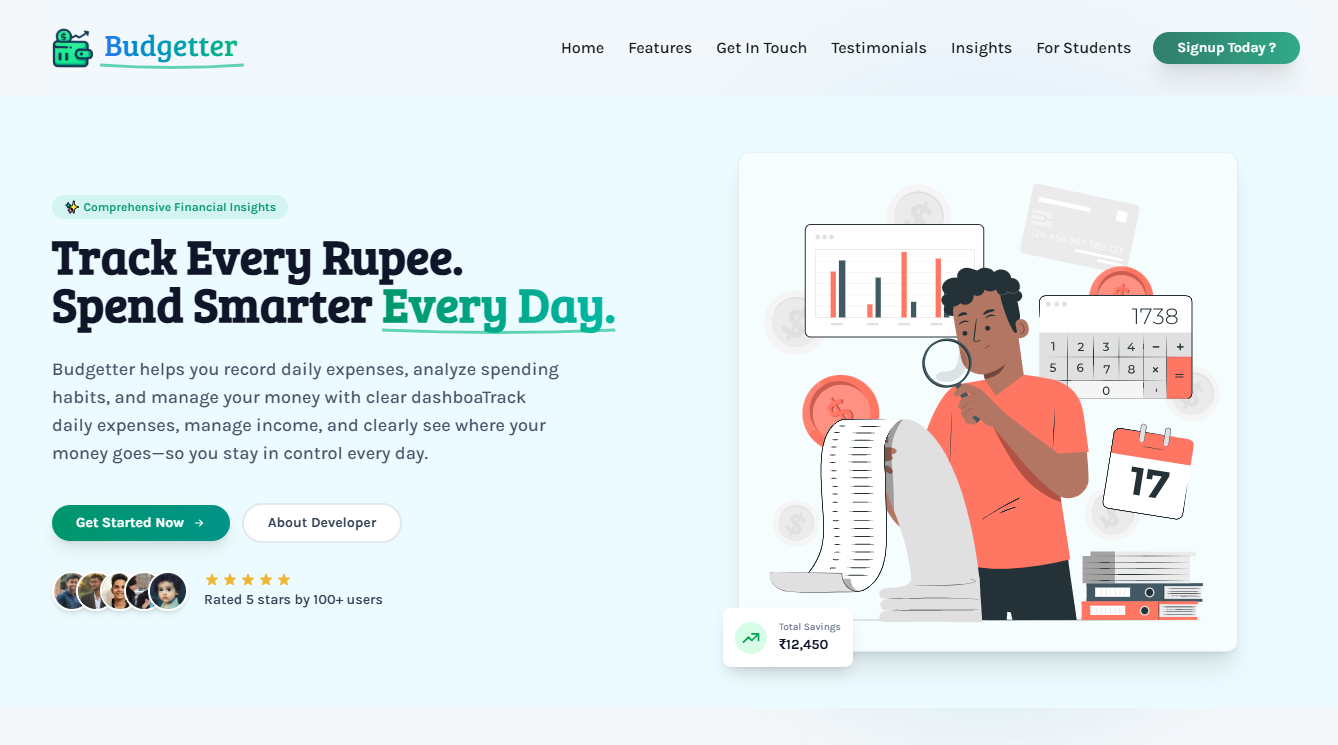
Budgetter is designed to help students and individuals track their daily expenses, analyze their spending habits, and manage their pocket money efficiently. This project was born out of the need for a better system to keep track of personal finances, beyond just noting down expenses without proper analytics.
- Features
- Screenshot of Project
- Project Structure
- Technology Stack
- How to Use Locally
- Docker (Production)
- Testing & Quality Gates
- Contributing
- API Endpoints
- Environment Variables
- Live Demo
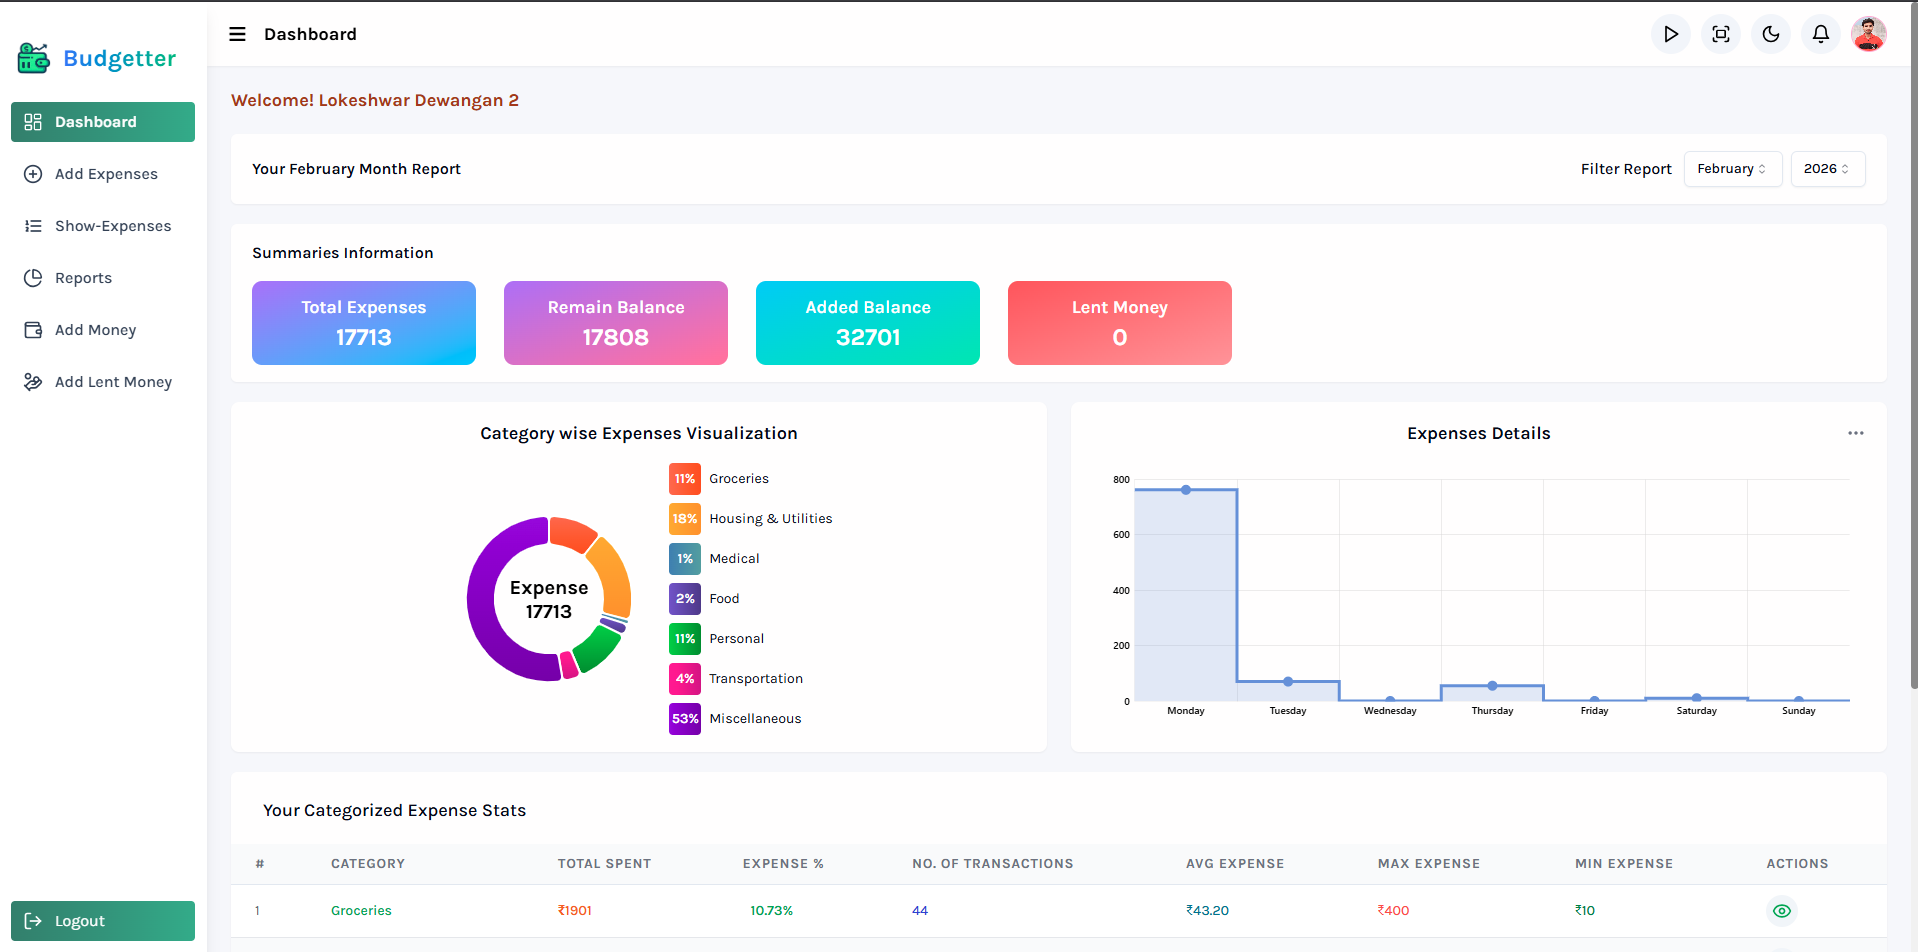
- Visualize your total pocket money, expenses, recent spending, and which categories consume the most money.
- Get a quick overview of your financial status at a glance.
- Users can view and update personal details including name, email, date of birth, profession, and profile picture.
- Social media links (Instagram, Facebook) can be added to your profile.
- Secure password management with update functionality.
- Users can add expenses with the following details: date, name, category, and amount.
- If you've already added an expense today, it will automatically show below in a table displaying today's added expenses.
- By default, this section shows today's expenses.
- It includes a date filter to view expenses based on specific days, displaying details such as ID, name, price, category, and the time the expense was added.
- The Reports section provides detailed insights into your spending:
- Displays all expenses for the current month by default.
- Includes filters such as:
- Last 7 days' expenses.
- Total expenses by category.
- Date range input for expenses.
- Select a specific month to view its expenses.
- Users can add the money they receive from any source (e.g., parents, salary) to their account.
- The wallet shows previous money entries with source and date, stored securely in the database.
- Record money you lend with details (amount, recipient, date). The amount is deducted from your wallet and added back when you mark it as "Money Received".
- Track outstanding loans and money you've lent to others.
- Users can permanently delete their account.
- Removes all data, including expenses, lent money, and records. Data is archived in deleted users collection for audit purposes.
- Email Verification: New users receive a verification link after account creation.
- Forgot Password: Reset password through email with a secure reset link.
- Change Password: Update your password securely through the profile settings.
- Session Management: Active session tracking with token management.
- Google OAuth: Sign in with Google for faster authentication.
- Local Authentication: Traditional email/password login system.
- Admin dashboard to view all registered users.
- User details cards showing comprehensive information.
- Monitor user activity and account status.
- Upload and manage newsletter content.
- Send updates and announcements to all users.
- Fully responsive UI that works seamlessly on desktop, tablet, and mobile devices.
- Adaptive layout with mobile-optimized navigation.
- Toggle between dark and light mode for comfortable viewing.
- Theme preference is persisted across sessions.
- Integrated with Sentry for real-time error tracking and performance monitoring.
- Improved reliability through proactive issue detection.
- Smooth animations and transitions for enhanced user experience.
- Interactive cursor effects on desktop.
Budgetter-Webapp/
├── client/                          # Frontend (Vite + React + TypeScript)
│   ├── src/
│   │   ├── components/             # Reusable UI components
│   │   │   ├── admin/              # Admin-specific components
│   │   │   ├── animation/          # Animation components
│   │   │   ├── auth/               # Authentication components
│   │   │   ├── cards/              # Card components
│   │   │   ├── header/             # Header components
│   │   │   ├── home/               # Landing page components
│   │   │   ├── layout/             # Layout components
│   │   │   ├── navbar/             # Navigation components
│   │   │   ├── profile/            # Profile components
│   │   │   ├── seo/                # SEO components
│   │   │   ├── theme/              # Theme components
│   │   │   ├── ui/                 # Base UI components
│   │   │   └── user/               # User-specific components
│   │   ├── features/               # Redux state slices
│   │   │   ├── expenses/           # Expenses state management
│   │   │   ├── sideNavbar/         # Sidebar navigation state
│   │   │   ├── theme/              # Theme state management
│   │   │   ├── user/               # User state management
│   │   │   └── windowWidth/        # Window width state
│   │   ├── hooks/                  # Custom React hooks
│   │   ├── lib/                    # Library configurations
│   │   ├── pages/                  # Route page components
│   │   │   ├── admin/              # Admin pages
│   │   │   ├── auth/               # Authentication pages
│   │   │   ├── home/               # Landing page
│   │   │   └── user/               # User pages
│   │   ├── routes/                 # React Router configuration
│   │   ├── schemas/                # Zod validation schemas
│   │   ├── services/               # API client services
│   │   ├── styles/                 # Global styles
│   │   ├── types/                  # TypeScript type definitions
│   │   └── utils/                  # Utility functions
│   └── public/                     # Static assets
│
├── server/                          # Backend (Express.js + MongoDB)
│   ├── src/
│   │   ├── controllers/            # Route controllers
│   │   ├── db/                     # Database configuration
│   │   ├── middleware/             # Express middleware
│   │   ├── models/                 # Mongoose models
│   │   ├── routes/                 # API routes
│   │   ├── services/               # Business logic services
│   │   └── utils/                  # Utility functions
│   └── public/                     # Email templates & uploads
│
├── .husky/                          # Git hooks configuration
├── .github/                         # GitHub configuration
├── AGENTS.md                        # AI agent instructions
└── CONTRIBUTING.md                  # Contribution guidelines
If you don't want to run server code then neglect server commands
- Node.js (v16 or higher)
- npm or yarn package manager
- MongoDB (local or MongoDB Atlas)
- Git
-
Clone the repository:
git clone https://github.com/LokeshwarPrasad3/Budgetter-Webapp.git cd Budgetter-Webapp -
Install dependencies for both frontend and backend:
cd client
npm install

cd ../server
npm install
-
Create a
.envfile in theserverfolder with the following content:PORT=5000 MONGO_URL=mongodb://127.0.0.1:27017/budgetter ACCESS_TOKEN_SECRET_KEY=<your-access-token-secret> ACCESS_TOKEN_SECRET_EXPIRY=3d RESET_PASSWORD_TOKEN_SECRET=<your-reset-password-token-secret> RESET_PASSWORD_TOKEN_SECRET_EXPIRY=1d ACCOUNT_VERIFICATION_TOKEN_SECRET=<your-verification-token-secret> ACCOUNT_VERIFICATION_TOKEN_SECRET_EXPIRY=1d CLOUDINARY_CLOUD_NAME=<your-cloudinary-cloud-name> CLOUDINARY_API_KEY=<your-cloudinary-api-key> CLOUDINARY_API_SECRET=<your-cloudinary-api-secret> ADMIN_GMAIL=<your-admin-gmail> GMAIL_PASSKEY=<your-gmail-app-password> FRONTEND_URL=http://localhost:5173 SERVER_URL=http://localhost:5000 -
Create a
.envfile in theclientfolder (optional):VITE_SENTRY_DSN=<your-sentry-dsn> VITE_API_URL=http://localhost:5000 -
Run the backend server:
cd server
npm run dev
The server will start on
http://localhost:5000 -
Run the frontend development server:
cd client
npm run dev
The frontend will start on
http://localhost:5173 -
Open
http://localhost:5173in your browser to access the application.
A production-ready Docker setup is provided for the full stack. Local development is unchanged — keep using npm run dev in client/ and server/. Docker is for production builds and (optionally) running a local MongoDB.
┌──────────┐  :80      :5000      :27017
│  client  │ ──────▶ │ server │ ──────▶ │ mongo │
│  nginx   │ /api/*  │ node   │ MONGO_URL │       │
└──────────┘          └────────┘           └───────┘
   exposed             internal              internal
   :8080 → :80         (no host port)        (no host port)
client— multi-stage build: Vite produces static assets, thennginx:alpineserves them./api/*is reverse-proxied to the backend over the internal docker network.server—node:22-alpine, production dependencies only, runs as the non-rootnodeuser undertinifor proper signal handling.mongo—mongo:7with a persistent named volume (mongo_data).- All three live on the
budgetter-netbridge network. Inter-container traffic uses service names (no hardcoded localhost).
# 1. Copy env templates and fill in real values
cp .env.example .env                  # compose-level vars (mongo creds, VITE_* build args)
cp server/.env.example server/.env    # server runtime secrets (JWT, SMTP, OAuth)
# client/.env is only needed for local `npm run dev`; the docker build reads from root .env

# 2. Build and start the whole stack in the background
docker compose up -d --build

# 3. Open the app
open http://localhost:8080docker compose up -d --build # build images + start everything
docker compose ps # show container status + healthchecks
docker compose logs -f server # tail backend logs
docker compose logs -f client # tail nginx access/error logs
docker compose exec server sh # shell into the backend
docker compose exec mongo mongosh # mongo shell
docker compose restart server # restart one service
docker compose down # stop stack (mongo data preserved)
docker compose down -v # stop AND wipe mongo volume
docker compose build --no-cache client # force a clean rebuildmongostarts and runs its healthcheck (db.adminCommand('ping')) until ready.serverstarts only after mongo reports healthy (depends_on.condition: service_healthy), connects viaMONGO_URL, then exposes/healthzfor its own healthcheck.clientstarts after the server is healthy. nginx serves the SPA on container port 80 and proxies/api/*toserver:5000.- The host publishes only the client port (default
8080), so the API and database are not directly reachable from outside the docker network.
- TLS termination — this stack publishes plain HTTP on port 8080. In a real deploy, put a TLS-terminating proxy (Caddy, Traefik, Nginx, an ALB, Cloudflare) in front of the
clientcontainer. - Secrets — never bake secrets into images.
server/.envis mounted at runtime viaenv_file. For real deployments, prefer a secret manager (Docker secrets, SOPS, Vault, cloud KMS). - Vite vars are build-time —
VITE_*values are inlined into the JS bundle when the client image is built. Changing them requiresdocker compose build client(a runtimerestartwon't pick them up). - Image sizes — multi-stage +
--omit=dev+ alpine bases keep final images small (client ≈ 25 MB onnginx:alpine, server ≈ 180 MB onnode:22-alpine). - Healthchecks — every service has one; orchestrators (compose, swarm, k8s) use them to gate dependents and to auto-restart unhealthy containers.
- No host-exposed API/DB ports — only the client publishes
:8080. To debug the API or connect MongoDB Compass from the host, uncomment theports:blocks indocker-compose.yml. - Scaling —
serveris stateless; you can rundocker compose up -d --scale server=3behind a load balancer. Theclient(nginx) sees them via docker DNS round-robin. - Restart policy — every service uses
restart: unless-stoppedso containers come back after host reboots but respect manualdocker compose down.
To test the application, use the following credentials:
Username: lokeshwardewangan
Password: 12345
| Command | Description |
|---|---|
npm run dev |
Starts the Vite development server |
npm run build |
Runs TypeScript checks and creates production build |
npm run lint |
Runs ESLint for .ts and .tsx files |
npm run typecheck |
Runs TypeScript compiler without emitting files |
npm run format |
Formats files with Prettier |
| Command | Description |
|---|---|
npm run dev |
Starts the server in development mode |
npm run start |
Runs the server with Node.js |
npm run format |
Formats files with Prettier |
The project uses Husky git hooks to ensure code quality. Before each commit:
- Frontend build and linting are automatically run
- Both frontend and backend files are formatted
- Any formatting changes are automatically staged
Contributions are welcome! Please follow these guidelines:
Create an issue for any:
- Bug reports
- Feature requests
- Documentation improvements
- Performance issues
- Fork the repository
- Create a feature or fix branch (see branch naming below)
- Make your changes
- Run linting and type checks (
npm run lintandnpm run typecheckinclient/) - Format your code (
npm run formatin bothclient/andserver/) - Submit a pull request
feature/feature-name- For new features (e.g.,feature/add-budget-export)fix/bug-name- For bug fixes (e.g.,fix/expense-date-validation)chore/task-name- For maintenance tasks (e.g.,chore/update-dependencies)
- Include a short description of changes
- Link related issue when applicable
- Add screenshots for visible frontend updates
- Ensure all quality gates pass (lint, typecheck, build)
- Follow existing code style and conventions
For detailed contribution guidelines, see CONTRIBUTING.md.
| Method | Endpoint | Description |
|---|---|---|
| POST | /api/users/register |
Register a new user |
| POST | /api/users/login |
Login with credentials |
| POST | /api/users/google-login |
Login with Google OAuth |
| POST | /api/users/forgot-password |
Request password reset email |
| POST | /api/users/reset-password |
Reset password with token |
| POST | /api/users/verify-account |
Verify account with token |
| POST | /api/users/logout |
Logout current session |
| GET | /api/users/profile |
Get user profile |
| PUT | /api/users/profile |
Update user profile |
| DELETE | /api/users/account |
Delete user account |
| Method | Endpoint | Description |
|---|---|---|
| POST | /api/expenses |
Create a new expense |
| GET | /api/expenses |
Get all user expenses |
| GET | /api/expenses/today |
Get today's expenses |
| PUT | /api/expenses/:id |
Update an expense |
| DELETE | /api/expenses/:id |
Delete an expense |
| Method | Endpoint | Description |
|---|---|---|
| GET | /api/reports/monthly |
Get monthly expense report |
| GET | /api/reports/category |
Get expenses by category |
| GET | /api/reports/date-range |
Get expenses for date range |
| Method | Endpoint | Description |
|---|---|---|
| POST | /api/users/add-money |
Add money to wallet |
| POST | /api/users/add-lent-money |
Record lent money |
| PUT | /api/users/receive-lent-money |
Mark lent money as received |
| Method | Endpoint | Description |
|---|---|---|
| GET | /api/users/admin/all |
Get all users (admin only) |
| POST | /api/users/admin/newsletter |
Send newsletter to users |
| Variable | Description | Required |
|---|---|---|
PORT |
Server port (default: 5000) | Yes |
MONGO_URL |
MongoDB connection string | Yes |
ACCESS_TOKEN_SECRET_KEY |
Secret for JWT access tokens | Yes |
ACCESS_TOKEN_SECRET_EXPIRY |
Access token expiration (e.g., 3d) |
Yes |
RESET_PASSWORD_TOKEN_SECRET |
Secret for password reset tokens | Yes |
RESET_PASSWORD_TOKEN_SECRET_EXPIRY |
Reset token expiration (e.g., 1d) |
Yes |
ACCOUNT_VERIFICATION_TOKEN_SECRET |
Secret for account verification tokens | Yes |
ACCOUNT_VERIFICATION_TOKEN_SECRET_EXPIRY |
Verification token expiration | Yes |
CLOUDINARY_CLOUD_NAME |
Cloudinary cloud name | Yes |
CLOUDINARY_API_KEY |
Cloudinary API key | Yes |
CLOUDINARY_API_SECRET |
Cloudinary API secret | Yes |
ADMIN_GMAIL |
Admin email for notifications | Yes |
GMAIL_PASSKEY |
Gmail app password for email service | Yes |
FRONTEND_URL |
Frontend URL (for CORS) | Yes |
SERVER_URL |
Backend API URL | Yes |
| Variable | Description | Required |
|---|---|---|
VITE_SENTRY_DSN |
Sentry DSN for error tracking | No |
VITE_API_URL |
Backend API URL | No |
https://budgetter.lokeshwardewangan.in/
- Role: Full Stack Developer
- Email: lokeshwar.prasad.cse@gmail.com
For any questions, feedback, or contributions, feel free to reach out!