Language: [English] | 한국어
- Overview
- Hardware Requirements
- Wiring Diagram
- Software Installation
- 4.1. Install micro-ROS
- 4.2. Install ESP32 IDF
- 4.3. Download FreeRTOS Firmware
- 4.4. Add IMU Control Module
- Build and Flash
- Running the Application
- 6.1. Build the Agent
- 6.2. Identify USB Port
- 6.3. Start Publishing IMU Data
- Troubleshooting
- 7.1. Flashing Errors
- 7.2. IMU Data Reading Issues
- References
- Wifi
| Demo Video | Wire Connection | Wifi Connection |
|---|---|---|
 |
 |
 |
This tutorial demonstrates how to obtain IMU messages in ROS2 using the micro-ROS framework. It connects an MPU6050 IMU sensor to an ESP32 via I2C serial communication and retrieves sensor data using an RTOS-based approach.
Key Features:
- Real-time IMU data streaming to ROS2
- I2C communication with MPU6050
- Serial transport layer for micro-ROS
- FreeRTOS-based implementation
BOM: https://docs.google.com/spreadsheets/d/1wX9Iwj8zxzniESLLwfLKfVcVwFZRYK2gtmtsNySbq_Y/edit?usp=sharing
| Component | Description |
|---|---|
| ESP32 Development Board | Any ESP32 board (ESP32-WROOM or similar) |
| MPU6050 IMU Sensor | 6-axis accelerometer and gyroscope |
| USB Cable | USB-C or Micro USB (must support data transfer) |
| Jumper Wires | 4 wires minimum |
| Breadboard | For prototyping connections |
| 5-pin connector, micro usb connector (for esp32 connection) |
Connect the MPU6050 to ESP32 as follows:
ESP32 Pin    →    MPU6050 Pin
─────────────────────────────
3.3V         →    VCC
GND          →    GND
GPIO 18      →    SDA
GPIO 19      →    SCL
| Simulation | Real World |
|---|---|
 |
 |
- Use 3.3V only for MPU6050 VCC (NOT 5V!)
- Ensure solid wire connections
- GPIO 18 (SDA) and GPIO 19 (SCL) are configured as I2C pins for this project
Follow the official micro-ROS tutorial: https://micro.ros.org/docs/tutorials/core/first_application_linux/
source /opt/ros/$ROS_DISTRO/setup.bash

# Create workspace and download micro-ROS tools
cd ~/
mkdir microros_ws
cd microros_ws
git clone -b $ROS_DISTRO https://github.com/micro-ROS/micro_ros_setup.git src/micro_ros_setup

# Update dependencies
sudo apt update && rosdep update
rosdep install --from-paths src --ignore-src -y

# Install pip
sudo apt-get install python3-pip

# Build micro-ROS tools
colcon build
source install/local_setup.bash
Verification:
| If installation is successful, you should see tab autocomplete working |
|---|
 |
Follow the ESP-IDF setup guide: https://docs.espressif.com/projects/esp-idf/en/stable/esp32/get-started/linux-macos-setup.html
Deactivate any Python virtual environments (venv, conda) before installation. Complete up to Step 4 (get_idf) from the official tutorial.
# For Ubuntu 22.04, install dependencies
sudo apt-get install git wget flex bison gperf python3 python3-pip python3-venv \
  cmake ninja-build ccache libffi-dev libssl-dev dfu-util libusb-1.0-0

# Create ESP directory and clone ESP-IDF
mkdir -p ~/esp
cd ~/esp
git clone -b v5.5.1 --recursive https://github.com/espressif/esp-idf.git

# Install ESP-IDF
cd ~/esp/esp-idf
./install.sh all

# Register get_idf alias in bash
echo "alias get_idf='. \$HOME/esp/esp-idf/export.sh'" >> ~/.bashrc
Verification:
After installation, use the get_idf command to activate the ESP-IDF environment.
| If installation is successful, you should see the ESP-IDF environment activated |
|---|
 |
Create the firmware workspace for ESP32:
cd ~/microros_ws
ros2 run micro_ros_setup create_firmware_ws.sh freertos esp32
After execution, a firmware folder will be created in your workspace.
Clone this repository into the firmware apps directory:
cd ~/microros_ws/firmware/freertos_apps/apps/
git clone https://github.com/luckydipper/mpu6050_imu.gitcd ~/microros_ws
# Configure for your application
ros2 run micro_ros_setup configure_firmware.sh mpu6050_imu --transport serial
# Build the firmware
ros2 run micro_ros_setup build_firmware.sh
# Flash to ESP32
ros2 run micro_ros_setup flash_firmware.shCritical Flashing Tips:
-
Cable Quality Matters:
- Use a data-capable USB cable (not charging-only cables)
- USB-C to USB-C cable with 5-pin converter works well
- Older USB to micro-USB cables often fail for data transfer
-
Hold BOOT Button:
- Press and hold the BOOT button on ESP32 during flashing
- Keep holding until you see "Writing at 0x..." messages
- If holding doesn't work, try pressing it repeatedly
-
Common Issues:
- If flashing fails, see the Troubleshooting section
- Check USB cable first (most common issue)
- Verify USB port permissions
Verification:
| If flashing is successful, you should see completion messages |
|---|
 |
Build the micro-ROS agent for ESP32 communication:
cd ~/microros_ws
ros2 run micro_ros_setup create_agent_ws.sh
ros2 run micro_ros_setup build_agent.sh
source install/local_setup.bashFind your ESP32's USB port:
ls /dev/serial/by-id/*

# Example output:
# /dev/serial/by-id/usb-1a86_USB_Serial-if00-port0
Alternatively:
ls /dev/ttyUSB*
# or
ls /dev/ttyACM*
# Example: /dev/ttyUSB0Run the micro-ROS agent:
ros2 run micro_ros_agent micro_ros_agent serial --dev /dev/serial/by-id/usb-1a86_USB_Serial-if00-port0

# Or use direct port:
ros2 run micro_ros_agent micro_ros_agent serial --dev /dev/ttyUSB0
To see IMU data:
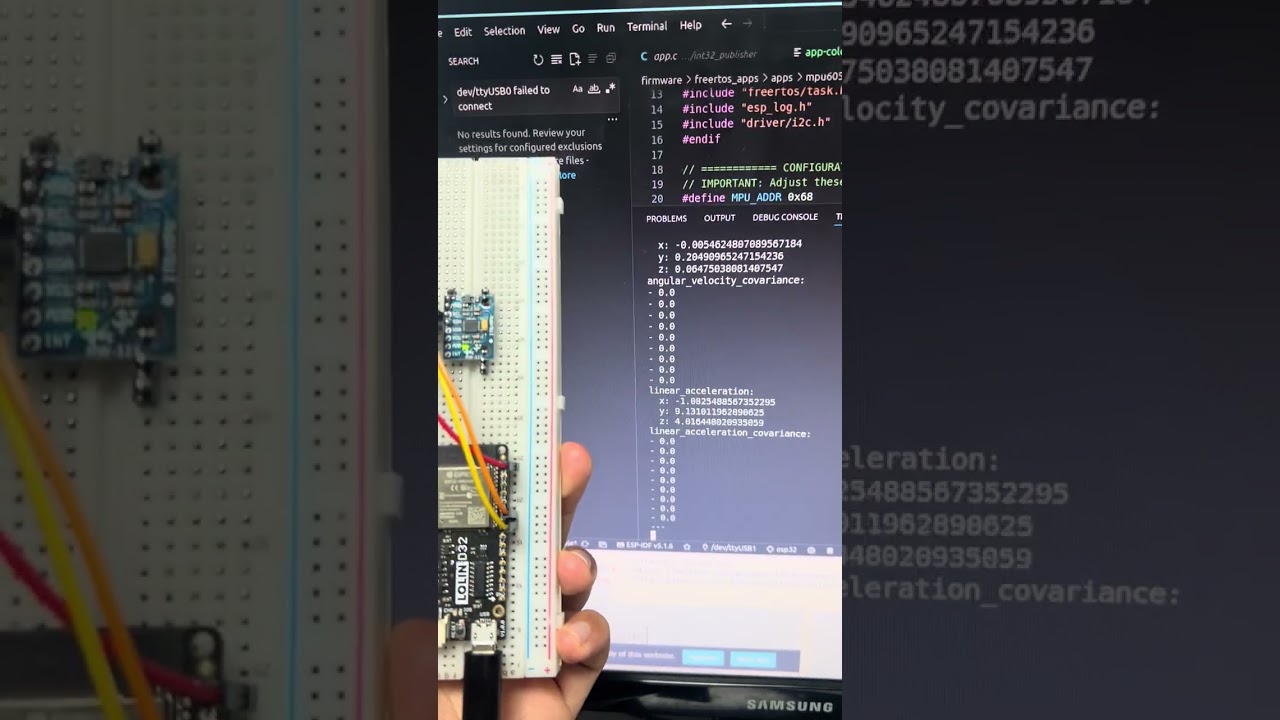
Press the RESET button on ESP32. You should see:
- Connection established messages
- IMU topic appearing:
/imu/data_raw

Check topics:
# In a new terminal
ros2 topic list

# Echo IMU data
ros2 topic echo /imu/data_raw by,
by,
micro-ROS/micro_ros_setup#580
you should remove Make[1]~~~ from flags.make files
Check USB connection:
lsusb
# Disconnect and reconnect USB cable
lsusb
# Compare outputs - a new device should appear
If the device appears in lsusb, your cable supports data transfer.
For ESP32-WROOM models, disable brltty service:
The brltty service can interfere with CH340/CH341 USB-to-serial drivers.
# Check if brltty is installed
dpkg -l | grep brltty

# Remove brltty (if present)
sudo apt remove brltty
Reference: https://www.reddit.com/r/pop_os/comments/uf54bi/how_to_remove_or_disable_brltty/
- Verify soldering quality (if using custom boards)
- Try reversing the USB-C cable (some cables are directional)
- Try a different USB port on your computer
If you've flashed multiple times, clean the build and flash memory:
# Remove build artifacts
rm -rf ~/microros_ws/firmware/freertos_apps/microros_esp32_extensions/build
rm -rf ~/microros_ws/firmware/freertos_apps/microros_esp32_extensions/install

# Erase ESP32 flash memory
esptool.py erase_flash

# Rebuild and reflash
cd ~/microros_ws
ros2 run micro_ros_setup build_firmware.sh
ros2 run micro_ros_setup flash_firmware.shView ESP32 debug output directly:
screen /dev/ttyUSB0 115200
# Exit: Ctrl+A + D
This displays:
- I2C initialization status
- Device scan results
- MPU6050 WHO_AM_I register value
- Sensor data readings
Use standalone ESP-IDF test to verify hardware:
get_idf
cd ~/microros_ws/firmware/freertos_apps/apps/mpu6050_imu/esp32_i2c_test
source ~/microros_ws/firmware/toolchain/esp-idf/export.sh
idf.py build flash monitor
# Exit: Ctrl+]
This pure I2C test helps identify:
- Wiring issues
- Bad solder joints
- Wrong GPIO pins
- MPU6050 hardware problems
Many hardware issues are discovered using this isolated test.
| Problem | Solution |
|---|---|
| No I2C devices found | Check 3.3V power and verify wiring |
| Wrong WHO_AM_I value | Check I2C address (0x68 or 0x69) |
| Erratic sensor readings | Check for loose connections |
| All zeros | MPU6050 in sleep mode or not powered |
- micro-ROS: https://micro.ros.org/
- micro-ROS FreeRTOS Tutorial: https://micro.ros.org/docs/tutorials/core/first_application_rtos/freertos/
- ESP-IDF Setup: https://docs.espressif.com/projects/esp-idf/en/stable/esp32/get-started/
- Medium Tutorial: https://link.medium.com/JFof42RUwib
- ESP32 ROS2 Connection: https://medium.com/@SameerT009/connect-esp32-to-ros2-foxy-5f06e0cc64df
- brltty Issue: https://brltty.app/
- micro-ROS Setup Issues: micro-ROS/micro_ros_setup#580
- esptool Problems: espressif/esptool#626
Ref. https://medium.com/@SameerT009/connect-esp32-to-ros2-foxy-5f06e0cc64df
you can follow after step4. Configuring created firmware in that link. Your host machin must have WIFI NIC to share IP.