How to install the toolbox
In this guide we want to show you a detailed instruction on how to install the Toolbox.
- Downloading the Toolbox
- Installation via SD card / flashdrive
- Installation via eMMC
- Installation via console/telnet
- Accessing the Toolbox
There are two ways of downloading the Toolbox!
Releases are builds which contain every change up to the date of the release. New stuff can only be added by releasing a new build / release.
Release are most likely tested and are working builds.
You can find the latest release on the right side of the repo:

Download it by clicking on the ZIP:

You can always "clone" the master branch of the repo. This way you can get changes that are made in between releases and don't have to wait on the next release. It can contain bugs!
To download the latest copy of the master branch, open the folowing menu and download it as ZIP:

Additional info If you're owning the following systems with navigation, then you can just install the toolbox via SD.
- VW Discover Media with navigation
- Skoda Amundsen with navigation
- Seat System with navigation*
*SD installation on Seat units with firmware 05xx or VW above 06xx is not possible! Addition info can be read HERE
Unpack everything onto a clean SD card / flashdrive. The root should look like this:

Go into Servicemenu by longpressing the Menu button on your unit.
It will kinda look like this (depending on your brand):

Click on Software update/versions and search for the Update button:

After that choose SD card or USB, usually it's not greyed out:

Choose the release MIBStd2_Online_Approval and you'll get a list of all updated modules next.


Hit Start and the installation will start. The unit will reboot several times!
This part is about to be written. WIP https://www.drive2.ru/l/600490854880126611/ https://www.drive2.ru/l/580634774394112538/ https://www.drive2.ru/l/568134976453739872/
This method is only possible if you've activated the console / telnet before. Read more about that HERE.
Unpack everything onto a clean SD card / flashdrive. The root of your SD card / flashdrive should look like this:
Remove metainfo2.txt from the root of the SD card / flashdrive so that when you insert a SD card / flashdrive into the unit, the annoying endless reading indicator does not appear.
There are two ways to connect to your unit, UART or via USB and D-LINK.
Connect your UART dongle to the unit and to your USB and open the device manager to find out on which COM port it is:


Open up Putty or the tool of your desire and enter the COM port.
Change the speed to 115200.
Choose connection type Serial and Telnet.

After that click on Open at the bottom.
If you connected everything correctly you'll be greeted by the console.


Pictures by VadimSK
Plug in the D-Link into the USB port of the unit and connect it to your computer via a network cable.
Go into your computer's network adapter settings and change the IPv4 of your network card:


Open Putty or something else and enter the following details:
- IP
192.168.1.4 - Port
23 - Connection type:
OtherandTelnet

After that click on Open at the bottom.
You will be greeted by the consol login promt:

Enter login: root and Password: root and hit enter afterwards. If you see imx6:/# you're successfully connected:

After you're successfully connected to your unit insert your SD card / flashdrive into the unit. It's recommended to disconnect all other SD cards or flashdrives!
Enter the mount command to find out on which path your SD card / flashdrive is actually mounted.
Usually it's mounted like the following but it can differ in some rare circumstances:
- SD1
/media/mp000 - SD2
/media/mp001 - USB1
/media/mp002 - ...
Enter the following command to start the installation. Change this command to the fitting mount of your SD card / flashdrive:
ksh /media/mp000/install.sh
You'll get this:

Picture by VadimSK
You've installed the Toolbox successfully and now want to access it?
The Toolbox is located inside the Green Menu. This menu is only accessable if your unit is in Developer / Engineering Mode. To activate this mode you need some kind of diagnostic software like OBD11, VCDS, VCP,...
- Open the control module
5F - Head into the
Adaptation channels - Search for
Developer modeand switch it toactive*
*With OBD11 it should just work like this. With VCDS you need to authorize yourself beforehand with S12345. In VCP you need to change the session to Engineer Mode and authorize yourself with the code 20103.
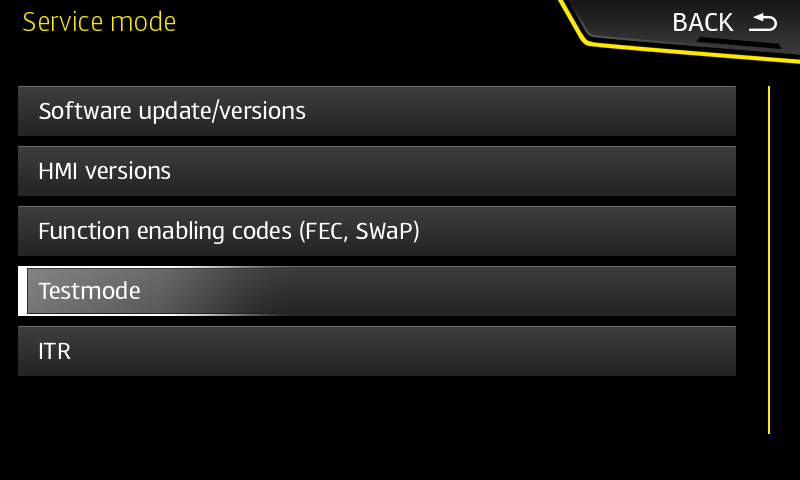
If you managed to active Devmode on the Unit you'll have an additional entry in the Service Menu called Testmode:
In the Testmode menu you'll find the Green Engineering Menu option:

After opening this you'll be greeted by the GEM (Green Engineering Menu). If your installation went successfully you'll now find the entry mibstd2_toolbox in this menu:

Opening this entry you'll be finally inside the Toolbox:
