Mounting your comma device correctly the first time for best results.
Important
Disclaimer: These are NOT official comma.ai templates. This is a community-made project.
Report feedback/issues to GitHub Issues. For official comma mount templates, report success/failure/experience to comma's Discord #installation-help channel: discord.comma.ai. For Konik mount templates, report Konik-specific fitment/usage feedback in the Konik Discord. Please include your vehicle (make/model/year).
This tool is inspired by Apple's Apple Watch band size tool for people who are too cool for straps with holes and Toyota's OEM Dashcam installation instructions.
- Users can check for correct sizing of generated PDFs with an outline of a credit or ID card.
- Users can see the list of PDFs in the Download Templates section below.
- We programmatically generate a PDF for each mount's footprint in commaai/hardware for comma three, comma 3x, and comma four.
All templates are standardized in Landscape orientation for maximum clarity and compatibility.
Universal templates are available as eleven paired clearance-offset variants for each mount: 45/75mm, 50/80mm, 55/85mm, 60/90mm, 65/95mm, 70/100mm, 75/105mm, 80/110mm, 85/115mm, 90/120mm, 95/125mm.
Each paired page includes two mount footprints with one shared camera-housing reference line, so you can test a closer and deeper placement on one sheet.
- 45/75mm: US Letter | A4
- 50/80mm: US Letter | A4
- 55/85mm: US Letter | A4
- 60/90mm: US Letter | A4
- 65/95mm: US Letter | A4
- 70/100mm: US Letter | A4
- 75/105mm: US Letter | A4
- 80/110mm: US Letter | A4
- 85/115mm: US Letter | A4
- 90/120mm: US Letter | A4
- 95/125mm: US Letter | A4
- 45/75mm: US Letter | A4
- 50/80mm: US Letter | A4
- 55/85mm: US Letter | A4
- 60/90mm: US Letter | A4
- 65/95mm: US Letter | A4
- 70/100mm: US Letter | A4
- 75/105mm: US Letter | A4
- 80/110mm: US Letter | A4
- 85/115mm: US Letter | A4
- 90/120mm: US Letter | A4
- 95/125mm: US Letter | A4
- 45/75mm: US Letter | A4
- 50/80mm: US Letter | A4
- 55/85mm: US Letter | A4
- 60/90mm: US Letter | A4
- 65/95mm: US Letter | A4
- 70/100mm: US Letter | A4
- 75/105mm: US Letter | A4
- 80/110mm: US Letter | A4
- 85/115mm: US Letter | A4
- 90/120mm: US Letter | A4
- 95/125mm: US Letter | A4
Konik universal templates use the same paired clearance-offset variants and paper sizes as the official comma templates above.
These stems are normalized user-facing mount families, not raw STL export names.
Quick Mount templates use a convex-hull footprint projection rather than a literal bottom-plane cut. Konik's product photos show a dock body with a recessed underside/open channel, and the raw STL projection produced an overly sparse U shape that likely reflects the plastic shell rather than the practical adhesive/contact patch on glass.
Konik-specific fitment and usage feedback should be reported in the Konik Discord, not comma's #installation-help channel.
- 45/75mm: US Letter | A4
- 50/80mm: US Letter | A4
- 55/85mm: US Letter | A4
- 60/90mm: US Letter | A4
- 65/95mm: US Letter | A4
- 70/100mm: US Letter | A4
- 75/105mm: US Letter | A4
- 80/110mm: US Letter | A4
- 85/115mm: US Letter | A4
- 90/120mm: US Letter | A4
- 95/125mm: US Letter | A4
- 45/75mm: US Letter | A4
- 50/80mm: US Letter | A4
- 55/85mm: US Letter | A4
- 60/90mm: US Letter | A4
- 65/95mm: US Letter | A4
- 70/100mm: US Letter | A4
- 75/105mm: US Letter | A4
- 80/110mm: US Letter | A4
- 85/115mm: US Letter | A4
- 90/120mm: US Letter | A4
- 95/125mm: US Letter | A4
These templates feature custom clearance zones (red dashed lines) derived from actual vehicle scans, offering precise alignment guides for specific car models.
Warning
Beta Feature: These templates are experimental and derived from user scans. Always double-check measurements before permanent installation.
Note
Want to help? We're looking for contributions to expand our vehicle-specific template library! Please submit a flatbed scanner scan of your car's ADAS camera cover (after removing it from the vehicle) along with a card-sized object for scale (e.g., gift card, library card, or any standard credit card-sized item). Share your scans or suggestions at Issue #6.
Vehicle-specific Corolla templates are now available in five clearance-offset variants: 45mm, 50mm, 55mm, 60mm, 65mm.
- 45mm: US Letter | A4
- 50mm: US Letter | A4
- 55mm: US Letter | A4
- 60mm: US Letter | A4
- 65mm: US Letter | A4
- 45mm: US Letter | A4
- 50mm: US Letter | A4
- 55mm: US Letter | A4
- 60mm: US Letter | A4
- 65mm: US Letter | A4
- 45mm: US Letter | A4
- 50mm: US Letter | A4
- 55mm: US Letter | A4
- 60mm: US Letter | A4
- 65mm: US Letter | A4
Vehicle-specific Santa Fe templates are now available in five clearance-offset variants: 45mm, 50mm, 55mm, 60mm, 65mm.
- 45mm: US Letter | A4
- 50mm: US Letter | A4
- 55mm: US Letter | A4
- 60mm: US Letter | A4
- 65mm: US Letter | A4
- 45mm: US Letter | A4
- 50mm: US Letter | A4
- 55mm: US Letter | A4
- 60mm: US Letter | A4
- 65mm: US Letter | A4
- 45mm: US Letter | A4
- 50mm: US Letter | A4
- 55mm: US Letter | A4
- 60mm: US Letter | A4
- 65mm: US Letter | A4
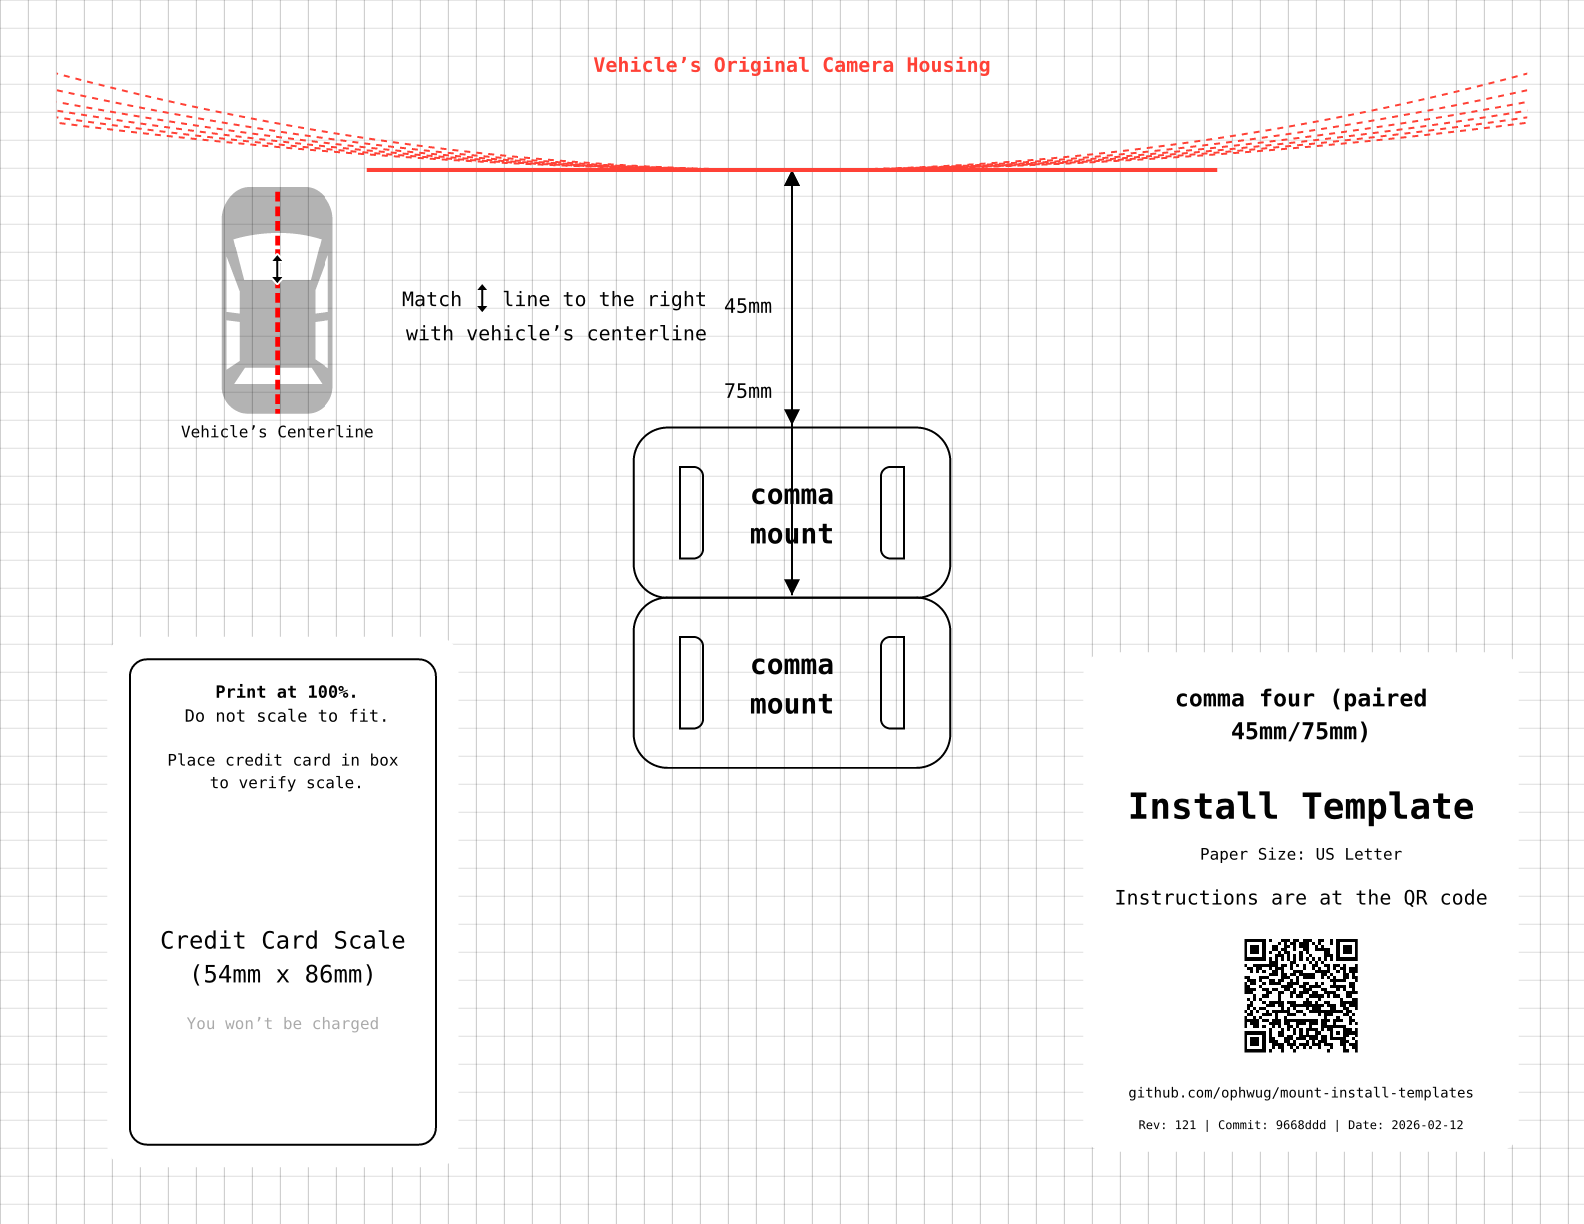
This project generates PDF mount installation templates to help mount comma hardware correctly.
- Print at 100% Scale: Ensure that "Scale to Fit" or "Shrink to Fit" is disabled in your printer settings.
- Paper Size: Templates are available for both US Letter and A4 paper sizes.
- Choose Paired Offset: Start with 45/75 (recommended), then move up through 50/80, 55/85, 60/90, 65/95, 70/100, 75/105, 80/110, 85/115, 90/120, or 95/125 if needed.
- Place a standard credit card or ID card in the marked box at the bottom of the page.
- If the card fits exactly within the box, the scale is correct. If it doesn't fit, do not use the template.
- For official install steps and cable routing guidance, use the comma.ai setup guide.
- Recommended Method (Outside Taping): Tape the template to the outside of the windshield! This makes it much easier to align with the camera/mirror from the inside without the paper getting in the way of your level or tape measure. Since you can't see the other side, you may want to have a very bright light source inside the car to see the template or a helper.
- Alternative Method (Cutting): If taping to the outside doesn't work for you, you can cut the template however you see fit. Usually, cutting around the mount footprint and leaving the clearance arcs intact is best.
- Clearance Zone: The red dashed arcs indicate the required clearance from the top of the mount to the vehicle's original camera housing. Horizontally align the template to the vehicle centerline rather than the camera housing.
- The camera housing should be outside (above) the curved arcs for an unobstructed view. Arcs range from 300mm to 1000mm.
- Mark the corners on the glass (e.g., with a dry-erase marker) or use painters tape to temporarily hold the template in place.
- Follow standard comma.ai instructions to attach the mount using the provided adhesive.
Here are 3D printable STL files that can serve as cutting guides for mount adhesives. These are particularly useful if you are replacing the 3M VHB adhesive and want a perfect fit for the mount's footprint.
Warning
Beta Feature: These templates are experimental. Always verify the fit with your mount before using them to cut adhesive.
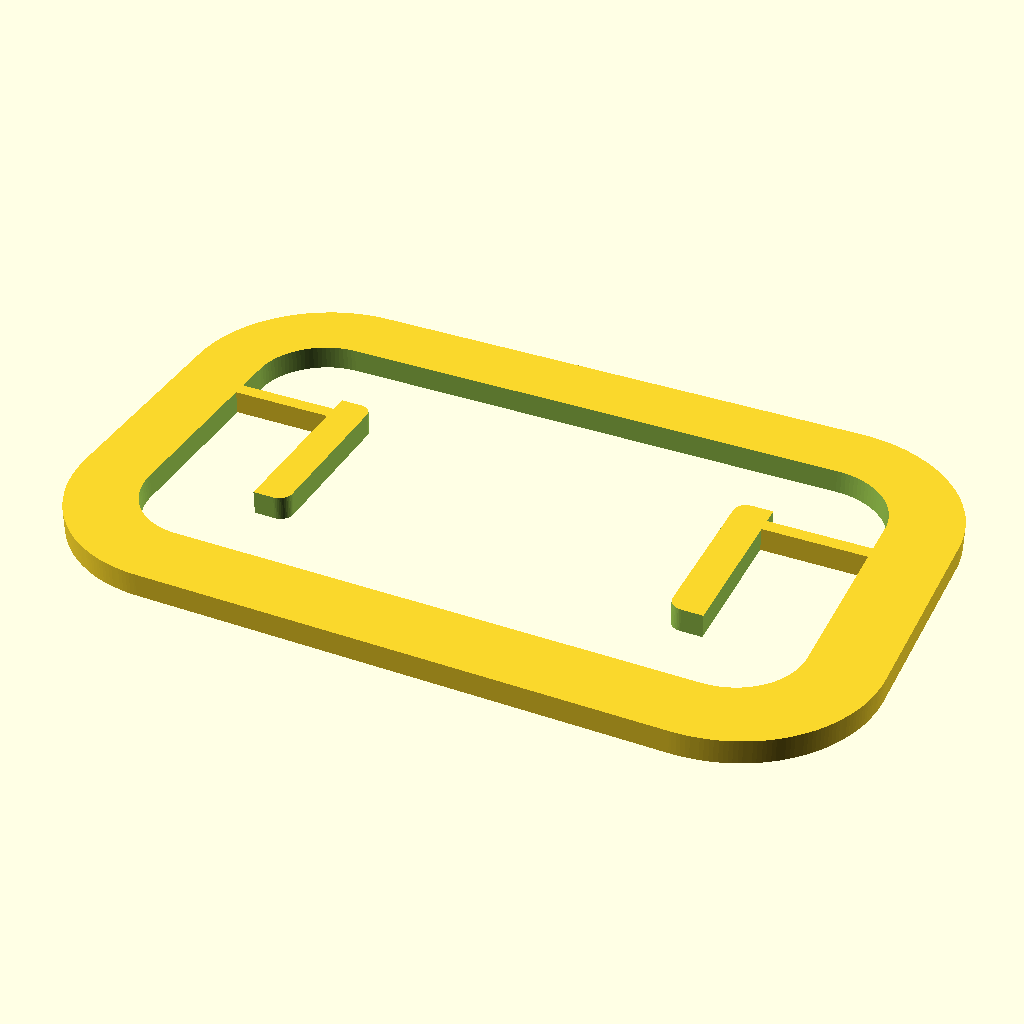
- comma four: Standard (with islands) | Solid (no islands)
- comma 3x: Standard (with islands) | Solid (no islands)
- comma three: Standard
The standard templates for comma four and 3x include split horizontal bridges to support internal island guides (for the mount's own internal relief holes) while keeping the central area clear. The solid versions provide just the outer silhouette.
The PDF generation process is automated using make.
In GitHub Actions, the Pages workflow uses make -j "$(nproc)" so build parallelism follows the runner's actual CPU count instead of a hardcoded job limit.
- Source: Mount models (
.stl) are sourced from the commaai/hardware submodule and the Konik.ai STL repository linked from Issue #12. For Batman-dock, the upstream source CAD lives in dzid26/Batman-dock, but the public Konik STL dump does not preserve those source part names, so this repo selects one canonical Batman proxy and one canonical Quick Mount proxy from the public exports. - Orientation: The
tools/orient_stl.pyPython script loads each STL and rotates it to align the mounting surface with the XY plane (flat). - Projection:
openscadis invoked withtools/project_mount.scadto project the very bottom of the 3D geometry onto a 2D plane, exporting the footprint as an SVG. Konik Quick Mount is an exception: it usestools/project_mount_hull.scadso recessed dock geometry is simplified to a fuller convex-hull install footprint. - Composition:
typstcompilestemplate.typ, which combines the generated SVG footprint with:- A credit card outline for scale validation.
- Clearance zone markings.
- Title and instructional text.
- Mega Rendering: By default,
make all,make universal-variants, andmake vehiclesrender grouped multi-page Typst documents underbuild/mega/, then split or rename the pages back to the same public PDF and PNG filenames. This avoids launching Typst once per variant while preserving the published artifact layout. - Debug Rendering: To render with the older one-file-per-template path, pass
INDIVIDUAL=1, for examplemake INDIVIDUAL=1 build/c4_mount_45_75mm_letter.pdformake INDIVIDUAL=1 universal-render. - Benchmarking: Run
make bench-buildto compare individual Typst rendering against the mega renderer for universal PDFs and PNGs. For a broader comparison, runuv run tools/benchmark_build.py --scope all --jobs 16.
An experimental workflow exists to trace vehicle features (like camera covers) from scans using Gemini and OpenCV. The entire pipeline is automated via make.
- Preparation: Place a scan of the car's ADAS camera cover (after removing it from the vehicle) with a card-sized object for scale (e.g., gift card, library card, or any standard credit card-sized item) in
vehicles/<vehicle_name>/raw/scan.png. - Annotate: Run
make annotate-<vehicle_name>(e.g.make annotate-2020_corolla) to trigger the AI annotation.tools/vehicle_specific/annotate_scan.pyusesgemini-3-pro-image-previewto highlight features (Magenta) and scale cards (Cyan), saving tovehicles/<vehicle_name>/ai/annotated_scan.png. - Process:
tools/vehicle_specific/process_annotation.pyextracts the scale (pixels/mm) and the raw trace from the annotated image tovehicles/<vehicle_name>/gen/raw_trace.svg. - Refine:
tools/vehicle_specific/refine_trace.pyrotates, centers, and symmetrizes the trace for engineering use, saving tovehicles/<vehicle_name>/gen/trace.svg. - Offsets:
tools/vehicle_specific/generate_offsets.pyadds clearance lines and the centerline, creating the finalvehicles/<vehicle_name>/gen/offsets.svgused in the template. - Verify:
make verifyrunstools/verify_build.py, which usesgemini-3-flash-previewthrough Vertex AI to visually inspect all generated PDFs/PNGs. It checks for the presence of red clearance lines, correct labels, and legible text, failing the build if any template is suspect. SetGOOGLE_GENAI_USE_VERTEXAI=TrueandGOOGLE_CLOUD_PROJECTin.envor the environment before running verification.
- Fonts: Uses
DejaVu Sans Mono. - Clearance Zones: Dashed red arcs indicate required clearance radii (default universal templates use 500mm to 1000mm).
- Clearance Offsets:
- Universal templates: 45/75mm, 50/80mm, 55/85mm, 60/90mm, 65/95mm, 70/100mm, 75/105mm, 80/110mm, 85/115mm, 90/120mm, 95/125mm variants for each mount (comma three, comma 3x, comma four).
- Vehicle-specific templates may use different offsets derived from the scan/trace workflow.
To build the templates locally, you will need:
- OpenSCAD (headless support required)
- Typst
- Python dependencies managed by
uv, includingpypdffor splitting mega PDFs back into per-template files. - Make
Those tools can be found in package managers such as brew on macOS, apt on Debian/Ubuntu, dnf on Fedora, etc.
Konik support in this repo is for two third-party mount families:
konik_batmankonik_quickmount
Source:
Why the names are normalized:
- Konik's public STL dump does not preserve clean part names.
- This repo publishes one canonical footprint per Konik mount family instead of exposing the raw numbered exports.
Current proxies:
konik_batmanis derived fromBatman-dock_4.stlkonik_quickmountis derived fromQuickmount_4.stl
Notes:
- Quick Mount uses a convex-hull footprint instead of a literal bottom-plane cut, because the dock underside is recessed and the raw projection was too sparse to be a good install proxy.
- Raw vendor files are still kept under
vendor/konik/for provenance. - Konik-specific fitment feedback should go to the Konik Discord.
- DML Tool - A 3D printed tool with additional added components such as a mini-level bubble tool to help make sure the mount is leveled on the windshield.