This project was generated using Nx.
![]()
🔎 Smart, Fast and Extensible Build System
Table of contents
docker build . -t snip-man:nx-base && docker-compose up --buildThe app start might take up to 10-15 minutes based on your internet connection and your machine's performance. The
system will be fully functional, once snip-man-prisma-migrate exits with code 0. Please note that it is possible
that snip-man-prisma-migrate will exit with code 1 first, indicating an error, but this will be the case iff the
mongo replica set snip-man-mongo starts up too slow. The system will self-heal automatically, you should just wait
until you see snip-man-prisma-migrate exited with code 0 in your logs.
You will be able to access the app via https://localhost. You will need to accept the self-signed certificates, or
ignore them in your browser. Both of the urls below need to be accessible by your browser:
https://localhosthttps://localhost:8443/api-docs/
The development environment of this project is fully dockerized via Dockerfile.dev and docker-compose.dev.yml. The
setup makes it possible to edit the source files locally and run the nx commands inside a docker container. In
addition, the database services can be also managed via docker-compose.
Steps to start the development environment:
- Build and run the services:
make dev-up - Start Nx services of your choice (scripts in
package.jsonmight be helpful)
Note that the repository root gets mounted bi-directionally into the /usr/snip-man-dev/ directory of the nx-dev
service, therefore file-system changes made on the host will be immediately present inside the container, and
vice-versa.
The web and server components can be served in development mode at once by executing npm run project:serve.
Install node modules:
npm installStart the database instances with Docker and serve the project from your local machine:
make dev-up-localThe following services will be started:
postgres:localhost:15432mongo:localhost:37017server:localhost:3333web:localhost:4200
The system can be built using Docker only:
- Build the base
nximage:
docker build . -t snip-man:nx-baseNote that this base image containing the whole repository source is necessary for the build to succeed,
as nx needs access to the whole monorepo to do shared module transpilation and more advanced dependency-graph based
dependency resolution.
- Build the Docker services:
docker-compose buildThe full system can be started by executing:
docker-compose upConvenience command to execute the steps above at once:
Using pure bash:
docker build . -t snip-man:nx-base && docker-compose build && docker-compose up -dUsing make:
make prod-upOnly the web and server components are exposed publicly. They can be accessed both with and without using SSL.
Please note that self-signed SSL certificates are generated upon container startup, hence your browser will complain
about security risks when visiting any of the below HTTPS links.
web:server:
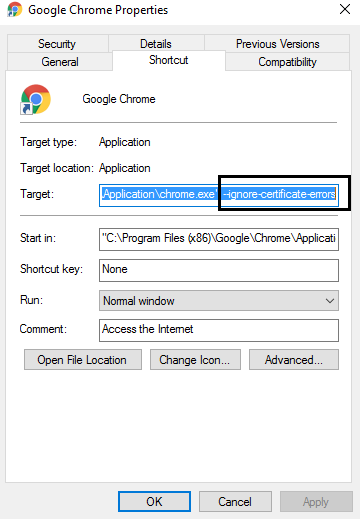
Please note that it is necessary to ignore SSL certificate errors with browsers when visiting the above links.
macOS,Chromium:open /Applications/Chromium.app --args --ignore-certificate-errorsWindows,Chrome: using flag--ignore-certificate-errors
In order to serve the Next application, residing in ./apps/web, execute:
npx nx run web:serveThe app should be accessible under http://localhost:4200.
In order to serve the Nest application, residing in ./apps/server, execute:
npx nx run server:serveThe app should be accessible under http://localhost:3333/api.
In order to execute both the Next and Nest applications, execute:
npx nx run-many --target=serve --projects=web,serverThe whole project source code can be formatted by executing:
npx nx format:writeRun nx graph to see a diagram of the dependencies of your projects.
Visit the Nx Documentation to learn more.

Nx Cloud pairs with Nx in order to enable you to build and test code more rapidly, by up to 10 times. Even teams that are new to Nx can connect to Nx Cloud and start saving time instantly.
Teams using Nx gain the advantage of building full-stack applications with their preferred framework alongside Nx’s advanced code generation and project dependency graph, plus a unified experience for both frontend and backend developers.
Visit Nx Cloud to learn more.
Generate TypeScript clients:
npm run generate:prismaGenerate SQL:
npm run migrate:prisma