Allure notifications is a library that sends automatic notifications about automated test results to your preferred messenger (Telegram, Slack, Skype, Email, Mattermost, Discord, Loop, Rocket.Chat, Zoho Cliq, Microsoft Teams).
Notification languages: 🇬🇧 🇫🇷 🇷🇺 🇺🇦 🇧🇾 🇨🇳
- How it works
- What the notifications look like
- How to use in your project
- Messenger-specific config.json settings
After automated tests finish, a summary.json file is generated in the allure-report/widgets folder. This file contains general test result statistics, which the library uses to build the notification (drawing a chart and adding the corresponding text).
flowchart LR
    A[Running\nautomated tests] --> B[Generating\nsummary.json]
    B --> C
    subgraph C[Allure Notifications]
        D[Building notification\nchart and text] --> E[Sending notification\nto messenger]
    end
Example summary.json:
{
  "reportName" : "Allure Report",
  "testRuns" : [ ],
  "statistic" : {
    "failed" : 182,
    "broken" : 70,
    "skipped" : 118,
    "passed" : 439,
    "unknown" : 42,
    "total" : 851
  },
  "time" : {
    "start" : 1590795193703,
    "stop" : 1590932641296,
    "duration" : 11311,
    "minDuration" : 7901,
    "maxDuration" : 109870,
    "sumDuration" : 150125
  }
}
If the Allure Summary plugin is connected, a suites.json file will also be generated and its data will be included in the statistics.
Example notification in Telegram

- Install Java (not required when running from Jenkins).
- Create a
notificationsfolder in the root of your project. - Download the latest
allure-notifications-<version>.jarand place it in thenotificationsfolder. - Inside
notifications, create aconfig.jsonfile with the following structure (keep thebasesection and only the messenger block you need):
{
  "base": {
    "logo": "",
    "project": "",
    "environment": "",
    "comment": "",
    "reportLink": "",
    "language": "en",
    "allureFolder": "",
    "enableChart": false,
    "darkMode": false,
    "enableSuitesPublishing": false,
    "customData": {}
  },
  "telegram": {
    "token": "",
    "chat": "",
    "topic": "",
    "replyTo": "",
    "templatePath": "/templates/telegram.ftl"
  },
  "slack": {
    "token": "",
    "chat": "",
    "replyTo": "",
    "templatePath": "/templates/markdown.ftl"
  },
  "mattermost": {
    "url": "",
    "token": "",
    "chat": "",
    "templatePath": "/templates/markdown.ftl"
  },
  "rocketChat" : {
    "url": "",
    "auth_token": "",
    "user_id": "",
    "channel": "",
    "templatePath": "/templates/rocket.ftl"
  },
  "mail": {
    "host": "",
    "port": "",
    "username": "",
    "password": "",
    "securityProtocol": null,
    "from": "",
    "to": "",
    "cc": "",
    "bcc": "",
    "templatePath": "/templates/html.ftl"
  },
  "discord": {
    "botToken": "",
    "channelId": "",
    "templatePath": "/templates/markdown.ftl"
  },
  "loop": {
    "webhookUrl": "",
    "templatePath": "/templates/markdown.ftl"
  },
  "cliq": {
    "token": "",
    "chat": "",
    "bot": "",
    "dataCenter": "eu",
    "templatePath": "/templates/markdown.ftl"
  },
  "teams": {
    "webhookUrl": "",
    "templatePath": "/templates/teams.ftl"
  },
  "proxy": {
    "host": "",
    "port": 0,
    "username": "",
    "password": ""
  }
}
The proxy block is used to specify additional proxy configuration.
The templatePath parameter is optional and allows you to provide a path to a custom Freemarker template. Example:
{
  "base": { "..." : "..." },
  "mail": {
    "host": "smtp.gmail.com",
    "port": "465",
    "username": "username",
    "password": "password",
    "securityProtocol": "SSL",
    "from": "test@gmail.com",
    "to": "test1@gmail.com",
    "cc": "testCC1@gmail.com, testCC2@gmail.com",
    "bcc": "testBCC1@gmail.com, testBCC2@gmail.com",
    "templatePath": "/templates/html_custom.ftl"
  }
}- Fill in the
baseblock:
"base": {
    "project": "some project",
    "environment": "some env",
    "comment": "some comment",
    "reportLink": "",
    "language": "en",
    "allureFolder": "build/allure-report/",
    "enableChart": true,
    "darkMode": true,
    "enableSuitesPublishing": true,
    "logo": "logo.png",
    "durationFormat": "HH:mm:ss.SSS",
    "customData": {
      "variable1": "value1",
      "variable2": "value2"
    }
}
Fields:
project,environment,comment— project name, environment name, and an arbitrary comment.reportLink— link to the Allure report with test results (useful when running from Jenkins).language— notification language (en/fr/ru/ua/by/cn).allureFolder— path to the folder containing Allure results.enableChart— whether to display the chart (true/false).darkMode— whether to render the chart in dark mode (true/false).enableSuitesPublishing— whether to publish per-suite statistics (true/false, defaultfalse). Requiressuites.jsoninside<allureFolder>/widgets.logo— path to a logo file; if set, the logo is displayed in the top-left corner of the chart.durationFormat(optional, defaultHH:mm:ss.SSS) — output format for test duration.customData— extra key-value data available in custom Freemarker templates (optional).
-
Fill in the messenger block: see Messenger-specific config.json settings.
-
Run the following command in your terminal:
java "-DconfigFile=notifications/config.json" -jar notifications/allure-notifications-4.11.0.jarNotes:
summary.jsonmust already be generated before running this command.- Replace the jar version with the one you downloaded.
- Settings can be overridden via system properties (system properties take precedence over
config.json):
java "-DconfigFile=notifications/config.json" \
  "-Dnotifications.base.environment=${STAND}" \
  "-Dnotifications.base.reportLink=${ALLURE_SERVICE_URL}" \
  "-Dnotifications.base.project=${PROJECT_ID}" \
  "-Dnotifications.telegram.token=${TG_BOT_TOKEN}" \
  "-Dnotifications.telegram.chat=${TG_CHAT_ID}" \
  "-Dnotifications.telegram.topic=${TG_CHAT_TOPIC_ID}" \
  -jar allure-notifications.jar
ℹ️ Custom data property prefixes are stripped: -Dbase.customData.variable1=someValue becomes the key variable1 with value someValue.
base.customData. without a trailing name is also valid.
- Open the build configuration in Jenkins.
- Under Build, click Add build step and choose Create/Update Text File.
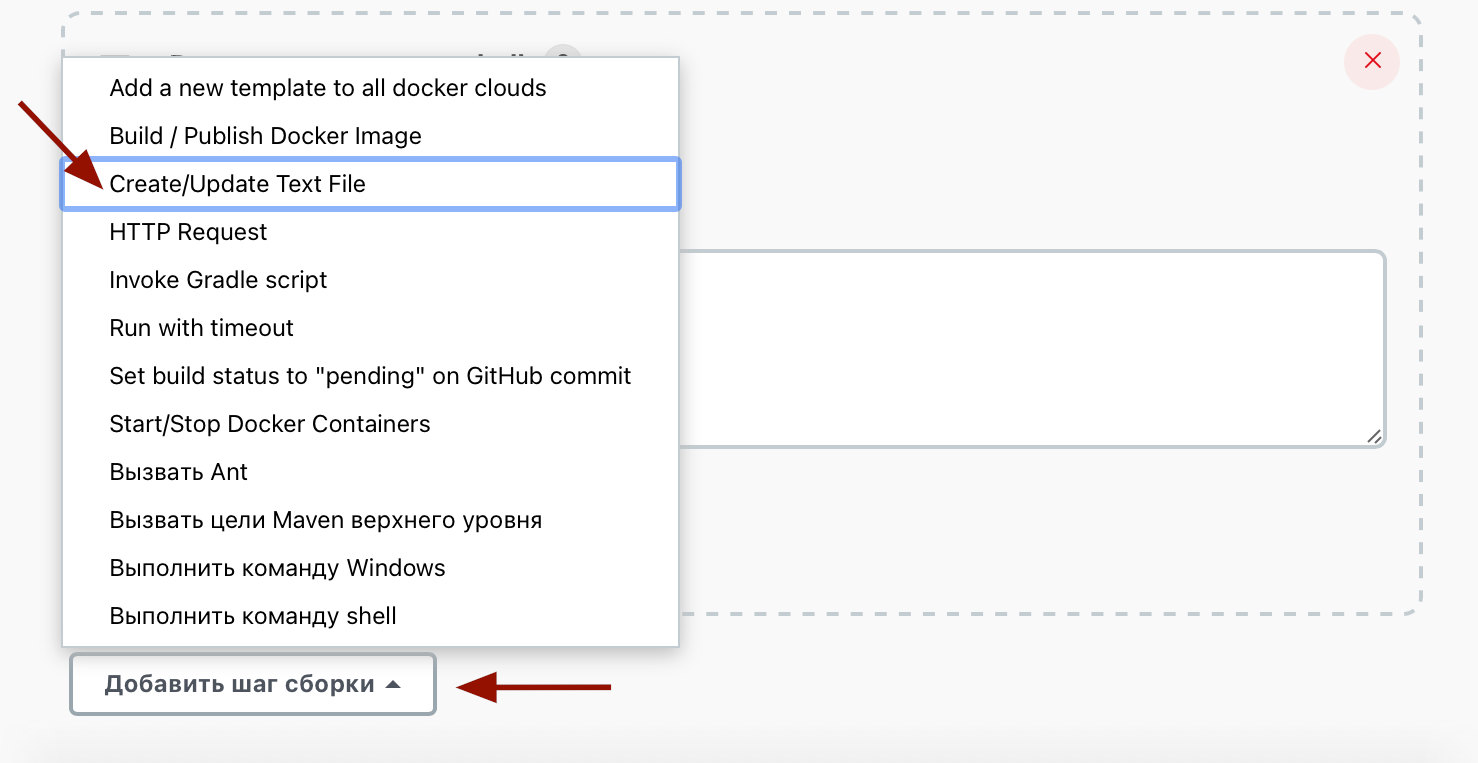
Fill it in as shown below:
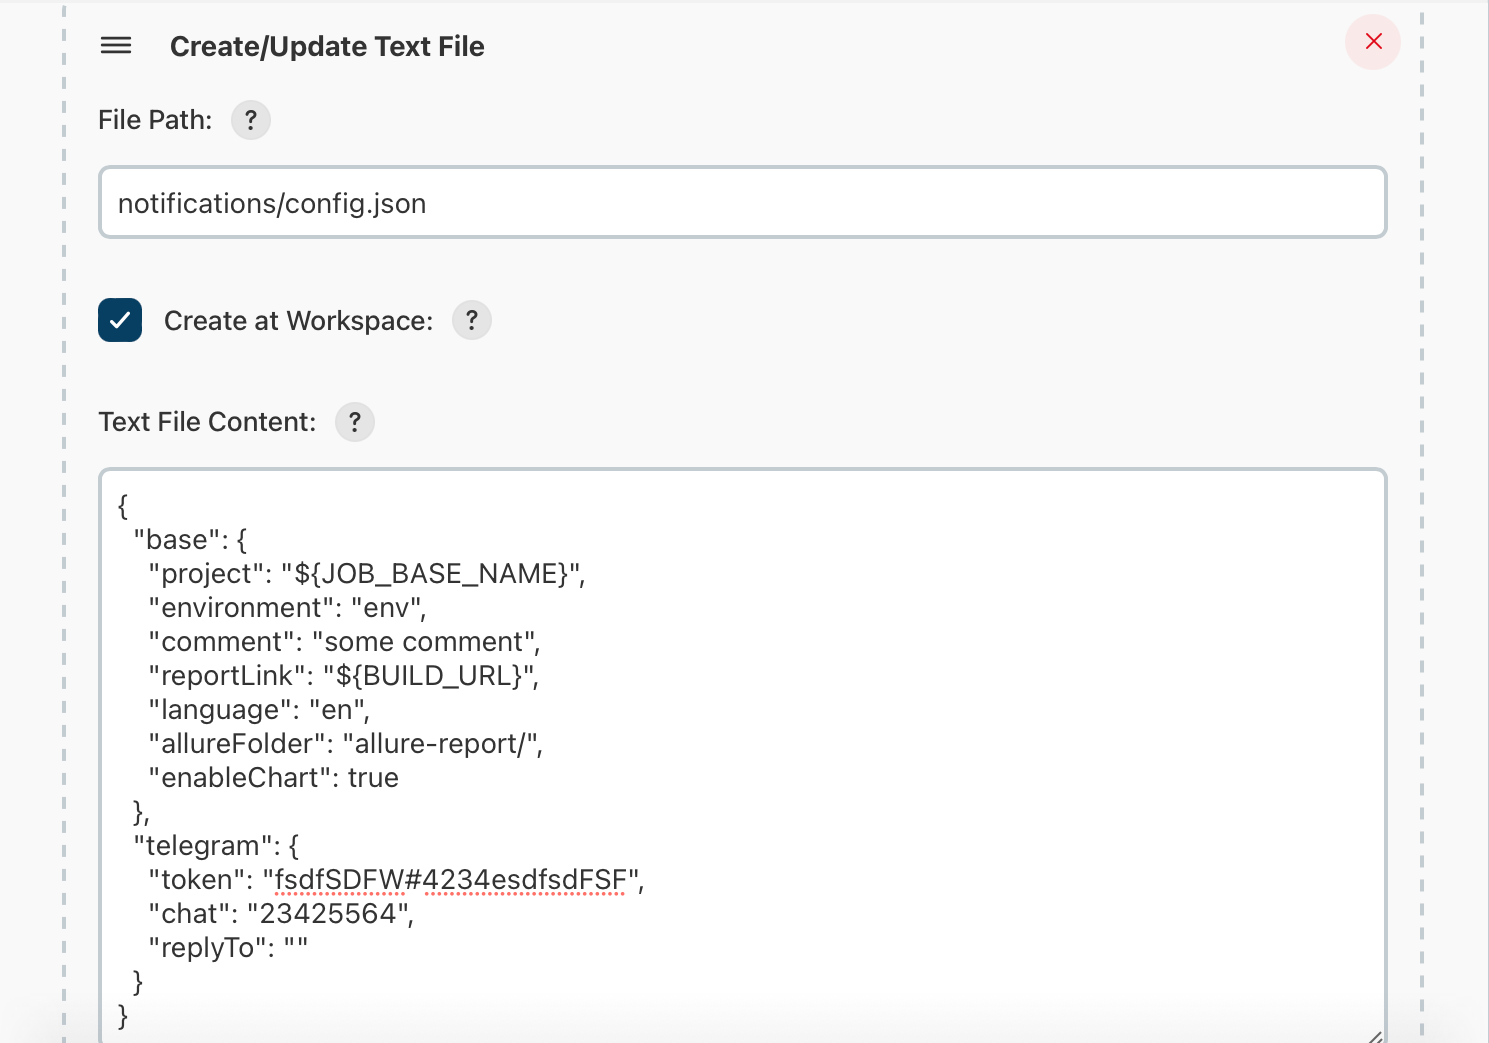

Notes:
- General
baseblock settings are described above. - Use Jenkins variables as values:
"project": "${JOB_BASE_NAME}"and"reportLink": "${BUILD_URL}". - Messenger-specific settings are described in the next section.
- Under Post-build Actions, click Add post-build action → Post build task.

In the Script field, enter:
cd ..
FILE=allure-notifications-4.11.0.jar
if [ ! -f "$FILE" ]; then
   wget https://github.com/qa-guru/allure-notifications/releases/download/4.11.0/allure-notifications-4.11.0.jar
fi
Click Add another task and in the second Script field enter:
java "-DconfigFile=notifications/config.json" -jar ../allure-notifications-4.11.0.jar- Save the configuration and run your tests. A notification will be sent to the configured messenger upon completion.
- Telegram config
telegramblock parameters:topic— optional; unique identifier of the target message thread (topic) of the chat to send the message to. See Stackoverflow answers for how to get this value.
- Slack config
- Email config
- Mattermost config
-
Discord config
To enable Discord notifications provide 2 parameters:botTokenandchannelId.- To create a Discord bot and get its token:
- Enable "Developer mode" in your Discord account.
- Open the Discord API developer portal and click "Applications".
- Click "New Application", name it, and click "Create".
- Go to "Bot" and generate a token with "Add Bot".
- Copy the token and paste it into the JSON config.
- Under "OAuth2", activate "bot", set permissions, and copy the invite URL to add the bot to your server.
- To get a Channel ID: right-click the channel and click "Copy ID", then paste it into the JSON config.
- To create a Discord bot and get its token:
-
Loop config
To create a Loop webhook URL:- Open the main menu of the Loop application.
- Click "Integrations" → "Incoming Webhooks".
- Click "Add Incoming Webhook", fill in the form, select a channel, and click "Save".
- Copy the generated webhook URL into the JSON config.
-
Rocket.Chat config
Required parameters:url,auth_token,user_id,channel.- Generate an
auth_tokenfrom your user settings — this also provides theuser_id. - Retrieve the channel name using the generated tokens via the Rocket.Chat REST API.
- Generate an
-
Zoho Cliq config
Required parameters:token— your Zoho Cliq API token (zapikey). To obtain it:- Go to your Zoho Cliq account settings.
- Navigate to "Bots & Tools" → "Bot".
- Create a new bot or use an existing one.
- Copy the token (zapikey) from the "Webhook URL".
chat— the name of the channel to send notifications to.bot— (optional) unique name of the bot to send messages as.dataCenter— Zoho data center region:com— United States (cliq.zoho.com)eu— Europe (cliq.zoho.eu) — defaultin— India (cliq.zoho.in)au— Australia (cliq.zoho.com.au)jp— Japan (cliq.zoho.jp)ca— Canada (cliq.zohocloud.ca)
-
Microsoft Teams config
Notifications are delivered as an Adaptive Card to a Teams webhook URL generated by the Workflows app (Power Automate). Microsoft 365 Connectors (the legacy "Incoming Webhook" connector) are being retired — use Workflows for new integrations.The only required parameter is
How to obtain the webhook URL:webhookUrl.- In Microsoft Teams open the target team and channel.
- Click More options (…) next to the channel → Workflows.
- Choose the template "Post to a channel when a webhook request is received".
- Configure the parameters and click Save.
- Copy the generated webhook URL and paste it into the
teams.webhookUrlfield ofconfig.json.
Notes & limitations (per Teams docs):
- The chart (when
enableChart=true) is embedded into the Adaptive Card as a base64 image, so no external hosting is required. - Total message payload must be ≤ 28 KB. Very large charts may need to be disabled or hosted externally.
- Teams throttles webhook requests at 4 requests/second.
- The Adaptive Card uses
$schemahttp://adaptivecards.io/schemas/adaptive-card.json, version1.5. To customize the card, provide your own template viatemplatePath— the file content becomes theTextBlock.textfield (Teams-flavored Markdown:**bold**,_italic_, lists, links).