Rodolfo R. de Almeida | November 11th, 2021
This repository will be used to post all topics related to Kubernetes CKA certification. My study will be based on the CLoud Guru training called "Certified Kubernetes Administrator (CKA)".
I am using this basic writing format to create this document.
- CKA Certification Exam
- K8S Getting Started
- Building a Kubernetes Cluster
- LAB01 Building a Kubernetes Cluster
- Namespaces in K8s
- LAB02 Working with Kubernetes Namespaces
- Kubernetes Management
- LAB03 Performing Kubernetes Upgrade
- Backing Up and Restoring Etcd Cluster Data
- LAB04 Backing Up and Restoring Etcd
- Working with kubectl
- kubectl Tips
- RBAC in k8s
- Creating Service Accounts
- Inspecting Pod Resource Usage
- Managing Application Configuration
- Managing Containers Resources
- Monitoring Container Health with Probes
- Building Self-Healing Pods
- Multi-Container Pod
- Introducing Init Containers
- Exploring k8s Scheduling
- Using DaemonSets
- Using Static Pods
- k8s Deployment Overview
- Scaling Applications with Deployments
- Managing Rolling Updates with Deployments
- k8s Networking Architectural Overview
- CNI Plugins Overview
- Understanding k8s DNS
- Using NetworkPolicies
- k8s Service Overview
- Using k8s Services
- Discovering k8s Services with DNS
- Managing Access from Outside with k8s Ingress
- k8s Storage Overview
- Using k8s Volumes
- Exploring k8s Persistent Volumes
- Troubleshooting your k8s Cluster
- Checking Cluster and Node Logs
- Troubleshooting your application
- Checking Container Logs
- Troubleshooting k8s Networking Issues
- LABS
The CKA exam is periodically updated. The current CKA version is 1.24 and the most significant change is that the exam now uses K8s version 1.24. The exam version maches the kubernetes version.
The exam platform is PSI Bridge Proctoring Platform and it uses the PSI Secure Browser that is required to do the exam. It is permited to use Documentation link but no personal bookmarks. It is permited only one active monitor during the exam.
-
What is kubernetes?
Kubernetes is a portable, extensible, open-source platform for manageing containerized workloads and services, that facilitates both declarative configuration and automation.
-
What does "k8s" mean?
K8s is simply a short for Kubernetes. The 8 represents the 8 letters between K ad S!
-
What K8s actualy does?
Kubernetes creates a cluster to manage all nodes (servers) and conteiners is a centralized way. When you run a conteiner inside a Kubernetes cluster you do not need to worry in which server the conteiner will run, because kubernetes will manage that.
-
K8s Features
Container Orchestration - The primary purpose of Kubernetes is to dynamicaly manage conteiners across multipe host systems.
Application Reliability - Kubernetes makes it easier to build reliable, self-healing, and scalable applications.
Automation - Kubernetes offers a variety of features to help automate the management of your container apps.
-
K8s Control Plane
It is what runs our kubernetes cluster. A collection of multiple components that are responsible to manage the cluster globally. Control plane components can run on any machine in the cluster, but usually are run on dedicated controller machines.
-
kube-api-server serves the Kubernetes API, the primary interface to the control plane and the cluster itself. When interacting with your Kubernetes cluster, you will usually do so using the Kubernetes API.
-
Etcd is the backend data store for the kubernetes cluster, and provides high availability sotrage for all data relating to the state of the cluster.
-
Kube-scheduler handles scheduling, the process of selecting an available node in the cluster on which to run containers.
-
kube-controller-mnager runs a collection of multiple controller utilities in a single process. These controllers carry out a variety of automation-related tasks within the Kubernetes cluster.
-
cloud-controller-manager provides an interface between Kubernetes and various cloud platorms. It is only used when using cloud-based resources alongside Kubernetes.
-
-
K8s Nodes
Nodes are the machines where the conteiners managed by the cluster run. A cluster can have any number of nodes. Various node components manage conteiners on the machine and communicate with the control plane.
-
Kubelet is the Kubernetes agent that runs on each node. It communicates with the control plane and ensures that containers are run on its node as instructed by the control plane. It also handles the process of reporting container status and other data about containers back to the control plane.
-
Container Runtime is not built into Kubernetes. It is a separate piece of software that is responsible for actually running containers on the machine. Kubernetes supports multiple container runtime implementations. Some popular container runtimes are Docker and Containerd.
-
kube-proxy is a network proxy. It runs on each node and handles some tasks related to providing networking between containers and services in the cluster.
-
-
A K8s Cluster
This is what the hole kubernetes cluster lookslike.

It is a tool that will simplify the process of setting up our Kubernetes cluster. This tool provide kubeadm init and kubeadm join as best-practice "fast paths" for creating Kubernetes clusters. kubeadm performs the actions necessary to get a minimum viable cluster up and running. By design, it cares only about bootstrapping, not about provisioning machines. Likewise, installing various nice-to-have addons, like the Kubernetes Dashboard, monitoring solutions, and cloud-specific addons, is not in scope.
-
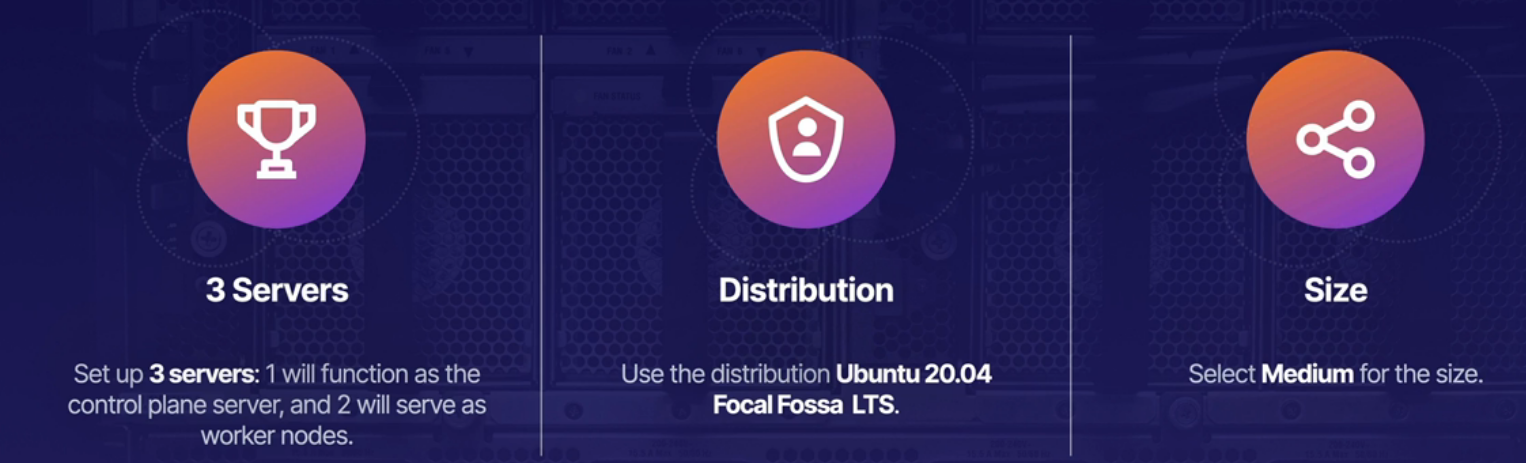
Deploy three nodes in your cloud provider.
-
Change the server host name to controller and worker nodes.
sudo hostnamectl set-hostname k8s-controller1 -
Setup the host file with all servers hostname for name resolution.
sudo vi /etc/hostsExemple to add the IP Address and hostname server.
Allways uses private IP Address because they are static. Public IP Address is dynamic and might change
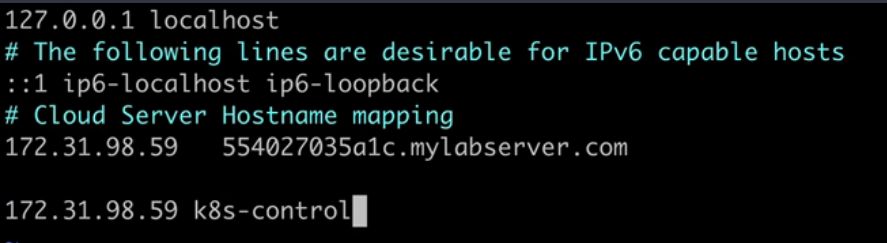
Note In order to hostname changes take effect, logout and login back to the server.
-
Install and configure conteinerd
- Enable
overlayandbr_netfilter. Load kernel modules on startup and everytime the server bootsoverlayandbr_netfilterwill be enabled.
cat << EOF | sudo tee /etc/modules-load.d/conteinerd.conf overlay br-netfilter EOF- This commands will immediatly enable those modules and it is not required to reboot the host to enable them.
sudo modprobe overlay sudo modprobe br_netfilter- Network configurations required that kubernetes is gonna need.
cat <<EOF | sudo tee /etc/sysctl.d/99-kubernetes-cri.conf net.bridge.bridge-nf-call-iptables = 1 net.ipv4.ip_forward = 1 net.bridge.bridge-nf-call-ip6tables = 1 EOF- To apply all this configurations
sudo sysctl --system - Enable
-
Install and configure containerd.
sudo apt-get update && sudo apt-get install -y containerd sudo mkdir -p /etc/containerd sudo containerd config default | sudo tee /etc/containerd/config.toml sudo systemctl restart containerd -
On all nodes, disable swap.
What is Swap on linux?
Swap space in Linux is a part of a machine's virtual memory used when the physical memory runs out of space. Especially when working with a large program or application where a need for extra memory arises, swap space is an ideal choice to hold temporarily inactive memory pages. Sometimes you need to disable Swap on a Linux server. Kubernetes worker nodes need to have Swap turned off in order to increase the performance and stability.
sudo swapoff -a -
On all nodes, install kubeadm, kubelet, and kubectl.
sudo apt-get update && sudo apt-get install -y apt-transport-https curl curl -s https://packages.cloud.google.com/apt/doc/apt-key.gpg | sudo apt-key add - cat << EOF | sudo tee /etc/apt/sources.list.d/kubernetes.list deb https://apt.kubernetes.io/ kubernetes-xenial main EOF sudo apt-get update sudo apt-get install -y kubelet=1.24.0-00 kubeadm=1.24.0-00 kubectl=1.24.0-00 sudo apt-mark hold kubelet kubeadm kubectl -
On the control plane node only, initialize the cluster and set up kubectl access.
sudo kubeadm init --pod-network-cidr 192.168.0.0/16 --kubernetes-version 1.24.0 mkdir -p $HOME/.kube sudo cp -i /etc/kubernetes/admin.conf $HOME/.kube/config sudo chown $(id -u):$(id -g) $HOME/.kube/config -
Verify the cluster is working.
kubectl get nodes -
Install the Calico network add-on.
kubectl apply -f https://docs.projectcalico.org/manifests/calico.yaml -
Get the join command (this command is also printed during kubeadm init . Feel free to simply copy it from there).
kubeadm token create --print-join-command -
Copy the join command from the control plane node. Run it on each worker node as root (i.e. with sudo ).
sudo kubeadm join ... -
On the control plane node, verify all nodes in your cluster are ready. Note that it may take a few moments for all of the nodes to
enter the READY state.
kubectl get nodes
Namespaces are virtual clusters backed by the same physical cluster. Kubernetes objects, such as pods and containers, live in namespaces. Namespaces are a way to separate and organize objects in your cluster.
You can list existing namespaces with kubectl:
kubectl get namespaces
All clusters have a default namespace. This is used when no namespace is specified. kubeadm also creates a kube-system namespace for system components.
When using kubectl, you may need to specify a namspace. You can do this with the --namespace flag.
Alternatively you can use the -n flag, which is the short form of the --namespace flag.
kubectl get pods --namespaces my-namespace
You can also get pods from all namespaces using the command below.
kubectl get pods --all-namespaces
Note If you do not specify a namespace, the default namespace is assumed.
Note In Kubernetes, namespace provides a mechanism for isolating groups of resources within a single cluster. Names of resources need to be unique within a namespace, but not across namespaces. Namespace-based scoping is applicable only for namespaced objects (e.g. Deployments, Services, etc) and not for cluster-wide objects (e.g. StorageClass, Nodes, PersistentVolumes, etc).
You can create a namespace with kubectl.
kubectl create namespace my-namespace
Namespaces are a central component of any Kubernetes infrastructure. This lab will give you the opportunity to work with namespaces in a functioning cluster. You will be able to practice the process of creating, using, and navigating Kubernetes namespaces.
Log in to the provided control plane node server using the credentials provided:
ssh cloud_user@<PUBLIC_IP_ADDRESS>
Create the dev Namespace Create a namespace in the cluster called dev:
kubectl create namespace dev
Get a List of the Current Namespaces List the current namespaces:
kubectl get namespace
Save the namespaces list to a file:
kubectl get namespace > /home/cloud_user/namespaces.txt
Verify the list saved to the file:
cat namespaces.txt
We should see the list of namespaces.
Locate the quark pod:
kubectl get pods --all-namespaces
Copy the name of the namespace where the quark pod is located.
Create a file in which to save its name: :
vi /home/cloud_user/quark-namespace.txt
Paste in the name of the quark pod's namespace.
Save and exit the file by pressing Escape followed by :wq.
K8s favilitates high-availability applications, but you can also design the cluster itself to be high available. To do this, you need multiple control plane nodes.
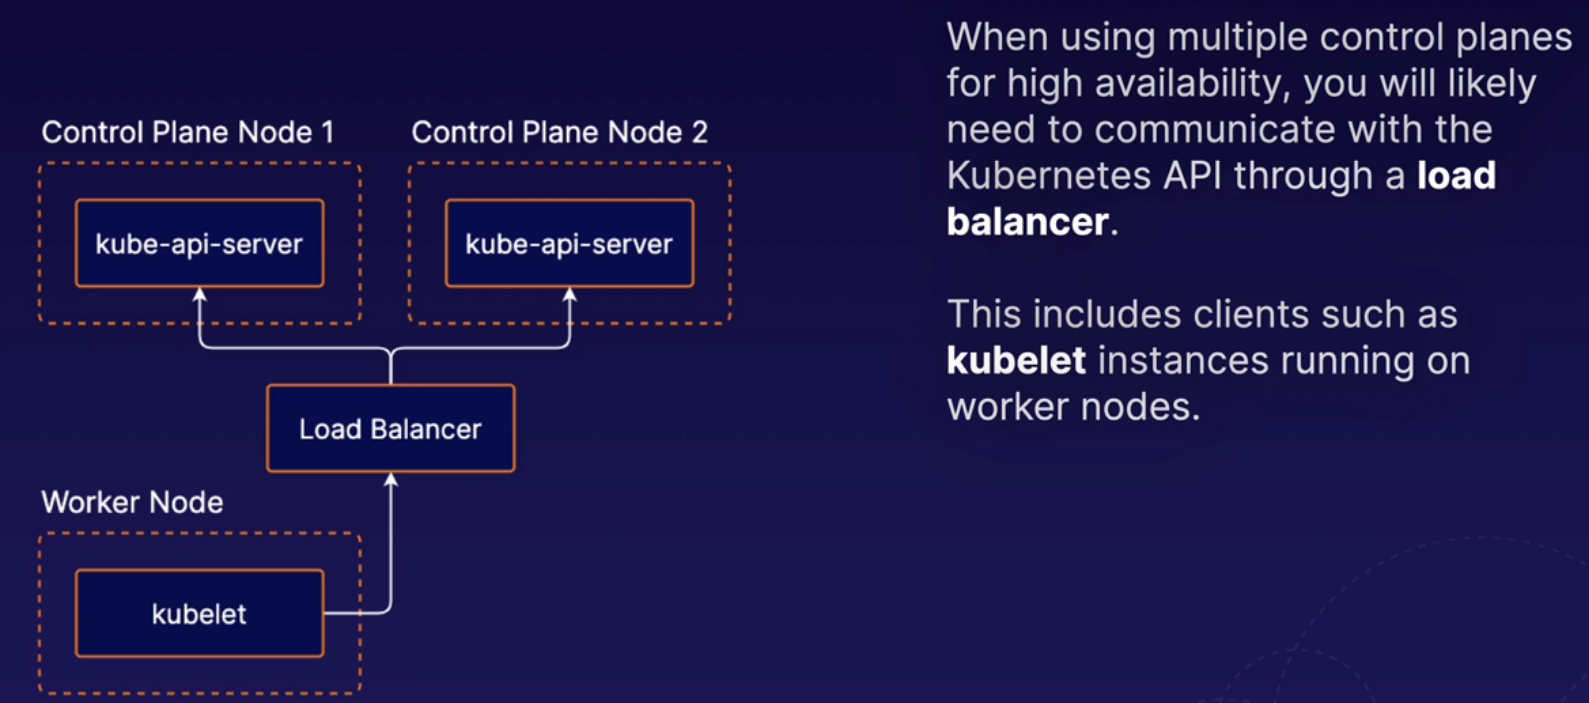
The etcd runs on the same nodes as the rest of control plane components. This is the setup pattern used by clusters that are set up using kubeadm. So we used kubeadm to build our cluster and kubeadm uses this stacked etcd methodology. That means that our control plane node, which is running all of the different control plane components, is also running etcd, and in a high availability setup, each one of those individual control plane nodes would have its own etcd instance.
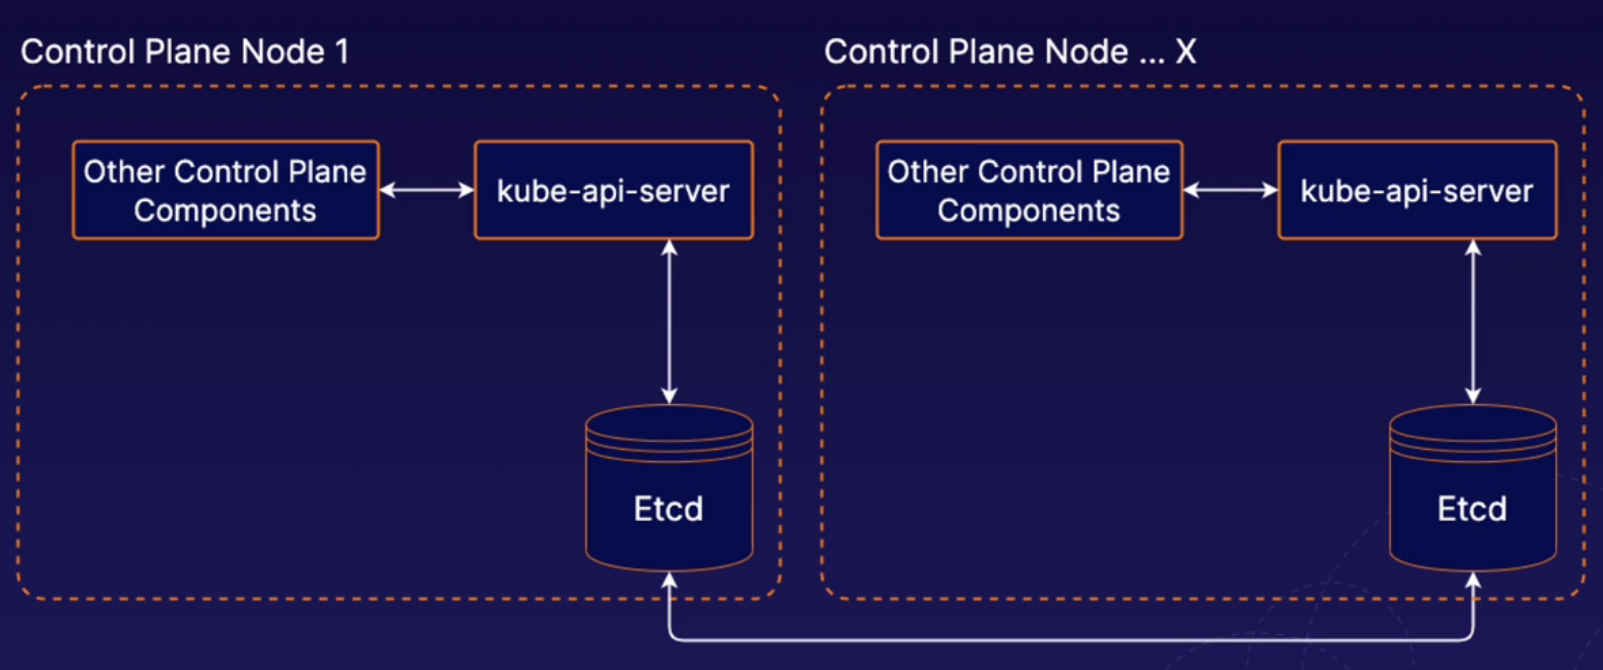
With external etcd, we have etcd running on completely separate nodes. In the context of high availability, we could then have multiple external etcd nodes in a high availability cluster, and that set of servers would be a completely different set of servers from the ones that are running our normal Kubernetes control plane components. With the external etcd model, you can have any number of Kubernetes control plane instances and any number of SED nodes. So in this lesson, we've provided a brief high-level overview of what high availability looks like in a Kubernetes cluster.

Note Link to access Options for High Availability Topolology
What are k8s Managemente tools?
There is a variety of management tools available for kubernetes. THese tools interface with kubernetes to provide additional functionality. When using Kubernetes, it is a good idea to be aware of some of these tools.
-
kubectl
kubectl is the official command line interface for Kubernetes.
-
kubeadm
It is a tool for quickly and easily creating Kubernetes clusters.
-
Minikube
Allows you to automatically set up a local single-node Kubernetes cluster. It igreat for getting k8s up adn running quickly for test and development purposes.
-
Helm
Provides templating and package management for Kubernetes objects. Can be used to manage your own templates (known charts). You can also download and use shared templates.
-
Kompose
It helps you translate Docker compose files into Kubernetes objects. If you are using Docker compose for some part of your workflow, you can move your application to Kubernetes easily with Kompose.
-
Kustomize
-
It is a configuration management tool for managing Kubernetes object configurations. It allows you to share and re-use templated configurations for Kubernetes applications. It is similar to Helm.
When performing maintenance, you may sometimes need to remove a Kubernetes node from service. To do this, you can drain the node. Containers running on the node will be gracefully terminated (and potentially rescheduled on another node).
To drain a node, use the kubectl drain command.
kubectl drain <node name>
When draining a node, you may need to ignore DaemonSets (pods that are tied to each node). If you have any DaemonSet pods running on the node, you will likely need to use the --ignore-daemonsets flag.
kubectl drain <node name> --ignore-daemonsets
If the node reamins part of the cluster, yo can allow pods to run on the node again when maintenance is complete using the kubectl uncordon command.
kubectl uncordon <node name>
Note
Be aware that pods running on the Drained node will be started on the available nodes of the cluster, but once the node is uncordoned, it will not be started back in the uncordoned node. The pods will remain running on the nodes and just new pods will be started on the uncordoned node.
Note
Pods will be started in other nodes if they were deployed as deployments. If a pod is deployed manually in a node, it cannot be started in a different node. The node will be deleted if using--forceflag.
When using kubernetes, you will likely want to periodically upgrade Kubernetes to keep your cluster up to date and kubeadm makes this process easier.
- Upgrade kubeadm on the control plane node.
- Drain the control plane node.
- Plan the upgrade (kubeadm upgrade plan).
- Apply the upgrade (kubeadm upgrade apply).
- Upgrade kubelet and kubectl on the control plane node.
- Uncordon the control plane node.
- Drain the node.
- Upgrade kubeadm.
- Upgrade the kubelet configuration (kubeadm upgrade node).
- Upgrade kubelet and kubectl.
- Uncordon the node.
Drain the control plane node.
kubectl drain k8s-control --ignore-daemonsets
Upgrade kubeadm.
sudo apt-get update && \
sudo apt-get install -y --allow-change-held-packages kubeadm=1.22.2-00
Check the version
kubeadm version
Plan the upgrade.
sudo kubeadm upgrade plan v1.22.2
Upgrade the control plane components.
sudo kubeadm upgrade apply v1.22.2
Upgrade kubelet and kubectl on the control plane node.
sudo apt-get update && \
sudo apt-get install -y --allow-change-held-packages kubelet=1.22.2-00 kubectl=1.22.2-00
Restart kubelet.
sudo systemctl daemon-reload
sudo systemctl restart kubelet
Uncordon the control plane node.
kubectl uncordon k8s-control
Verify that the control plane is working.
kubectl get nodes
Upgrade the worker nodes.
Note : In a real-world scenario, you should not perform upgrades on all worker nodes at the same time. Make sure enough nodes are available at any given time to provide uninterrupted service.
Run the following on the control plane node to drain worker node 1:
kubectl drain k8s-worker1 --ignore-daemonsets --force
Log in to the first worker node, then Upgrade kubeadm.
sudo apt-get update && \
sudo apt-get install -y --allow-change-held-packages kubeadm=1.22.2-00
Upgrade the kubelet configuration on the worker node.
sudo kubeadm upgrade node
Upgrade kubelet and kubectl on the worker node.
sudo apt-get update && \
sudo apt-get install -y --allow-change-held-packages kubelet=1.22.2-00 kubectl=1.22.2-00
Restart kubelet.
sudo systemctl daemon-reload
sudo systemctl restart kubelet
From the control plane node, uncordon worker node 1.
kubectl uncordon k8s-worker1
Repeat the upgrade process to the other worker nodes.
Verify that the cluster is upgraded and working. kubectl get nodes
Kubernetes Cluster
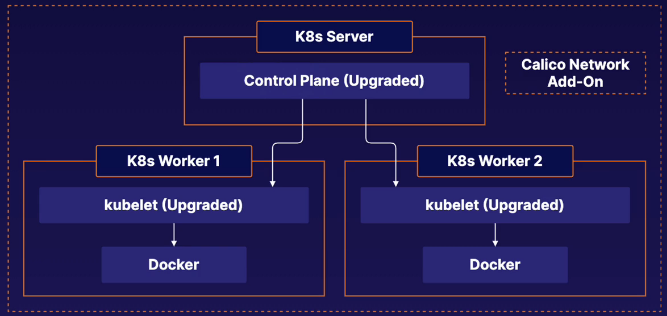
In this cluster we have three servers; One controle plane and two worker nodes. The cluster was built with Kubeadm. First we need to upgrade the control plane and then the worker nodes.
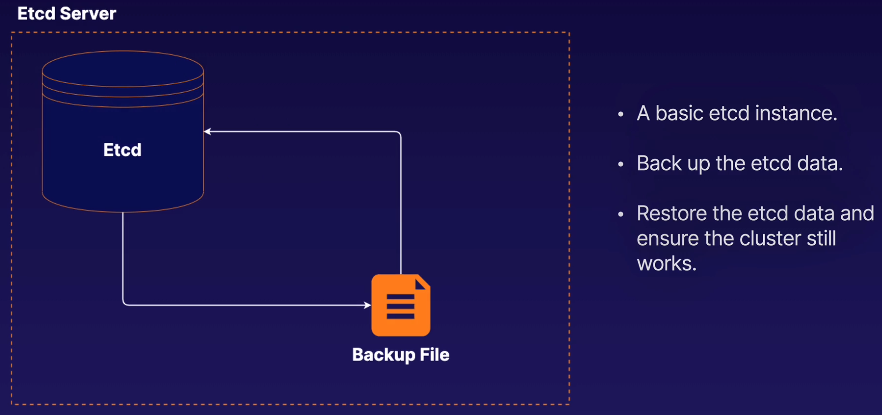
etcd is the backend data data storage solution for your kubernetes cluster. As such, all your kubernetes objects, applications, and configurations are stored in etcd.
Therefore, you will likely data by backing up etcd.
You can back up etcd command line tool, etcdctl.
Use the etcdctl snapshot save command to back up the data.

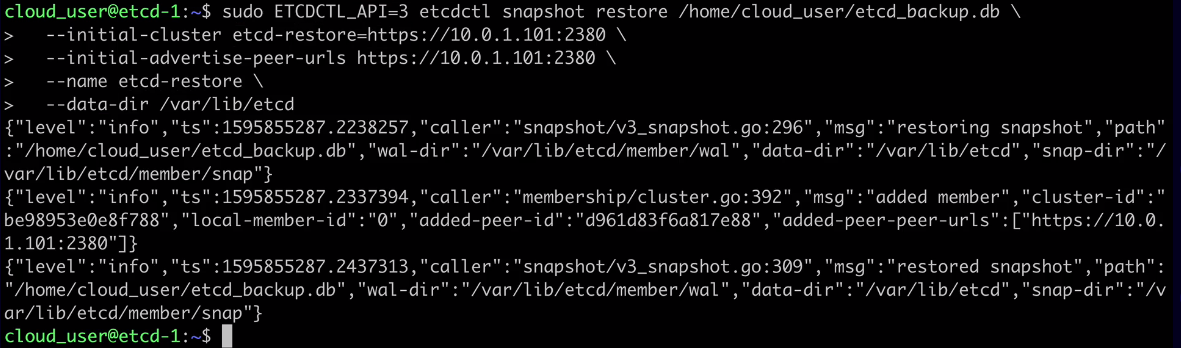
You can restore etcd data from a backup using the etcdctl snapshot restore command.
You will need to supply some additional parameters, as the restore operation creates a new logical cluster.

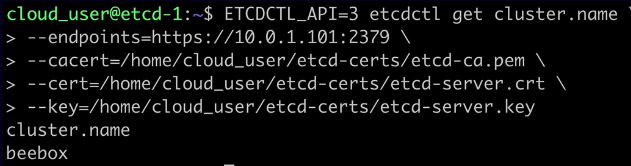
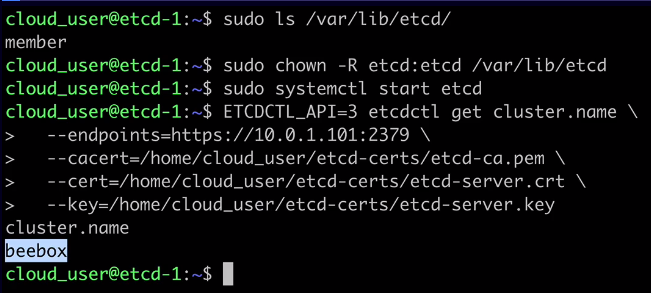
ETCDCTL_API=3 etcdctl get cluster.name \
--endpoints=https://10.0.1.101:2379 \
--cacert=/home/cloud_user/etcd-certs/etcd-ca.pem \
--cert=/home/cloud_user/etcd-certs/etcd-server.crt \
--key=/home/cloud_user/etcd-certs/etcd-server.key
The output should be something similar to:
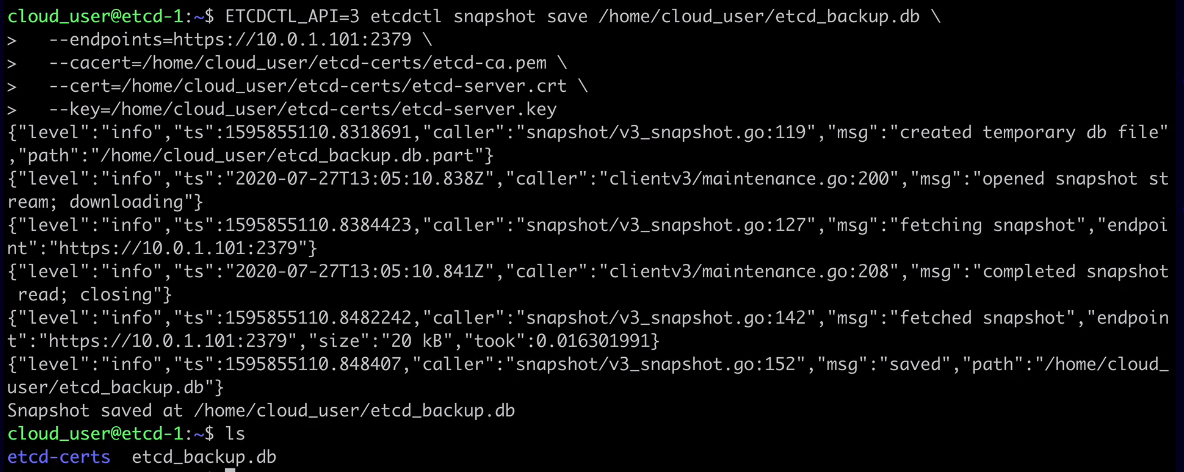
ETCDCTL_API=3 etcdctl snapshot save /home/cloud_user/etcd_backup.db \
--endpoints=https://10.0.1.101:2379 \
--cacert=/home/cloud_user/etcd-certs/etcd-ca.pem \
--cert=/home/cloud_user/etcd-certs/etcd-server.crt \
--key=/home/cloud_user/etcd-certs/etcd-server.key
The output should be something similar to:
sudo systemctl stop etcd
sudo rm -rf /var/lib/etcd
r — recusrsive. all directories and subdirectories will be deleted; f — force. Force delete all files;
sudo ETCDCTL_API=3 etcdctl snapshot restore /home/cloud_user/etcd_backup.db \
--initial-cluster etcd-restore=https://10.0.1.101:2380 \
--initial-advertise-peer-urls https://10.0.1.101:2380 \
--name etcd-restore \
--data-dir /var/lib/etcd
The output should be something similar to:
kubectl is a command line tool that allows you to interact with Kubernetes. kubectl uses the Kubernetes API to communicate with the cluster and carry out your commands. You can use kubectl to deploy applications, inspect and manage cluster resources, and view logs.
Use kubectl get to list objects in the Kubernetes cluster.
-
-o- Set the output formatkubectl get pods -o wide>> Wide provides more detailed information about the command.kubectl get pods -o json>> Gives the output in json formatkubectl get pods -o yaml>> Gives the output in yaml format -
--sort-by- Sort output using a JSONPath expression. -
--selector- Filter results by label.kubectl get pods -n kube-system --selector k8s-app=calico-node>> this will show the pods that contains this lable.
$ kubectl get <object type> <object name> -o <output> --sort-by <JSONPath> --selector <selector>
You can get detailed information about Kubernetes objects using kubectl describe.
kubectl describe <object type> <object name>
Use kubectl create to create objects.
Supply a YAML file with -f create an object from a YAML descriptor stored in the file. If you attempt to create an object that already exists, an error will occur.
kubectl create -f <file name>
kubectl apply is similar to kubectl create. However, if you use kubectl apply on an object that already exists, it will modify the existing object, if possible.
$ kubectl apply -f <file name>
Use kubectl delete to delete objects from the cluster.
kubectl delete <object type> <object name>
kubectl exec can be used to run commnds inside containers. Keep in mind that, in order for a command to succeed, the necessary software must exist within the container to run it.
kubectl exec <pod name> -c <container name> -- <command>
Note
-cis used only if your pod has multiple containers, with that flag you can specify the container.
There are the Declarative and the Imperative commands in kubernetes. The Declarative command define objects using data structures such as YAML or JSON. The Imperative command define objects using kubectl commands and flags.
Example of Imperative command:
kubectl create deployment my-deployment --image=nginx
Run kubectl create to see a list of objects that can be created with imperative commands.
kubectl create
Create a deployment imperatively.
kubectl create deployment my-deployment --image=nginx
Do a dry run to get some sample yaml without creating the object.
kubectl create deployment my-deployment --image=nginx --dry-run -o yaml
Note Dry run is an expression used to indicate a rehearsal of a performance or procedure before the real one. Dry run mode gives you the possibility of issuing a command without side effects for testing an actual command that you intend to run.
Save the yaml to a file.
kubectl create deployment my-deployment --image=nginx --dry-run -o yaml > deployment.yml
Create the object using the file.
kubectl create -f deployment.yml
Scale a deployment and record the command.
kubectl scale deployment my-deployment replicas=5 --record
kubectl describe deployment my-deployment
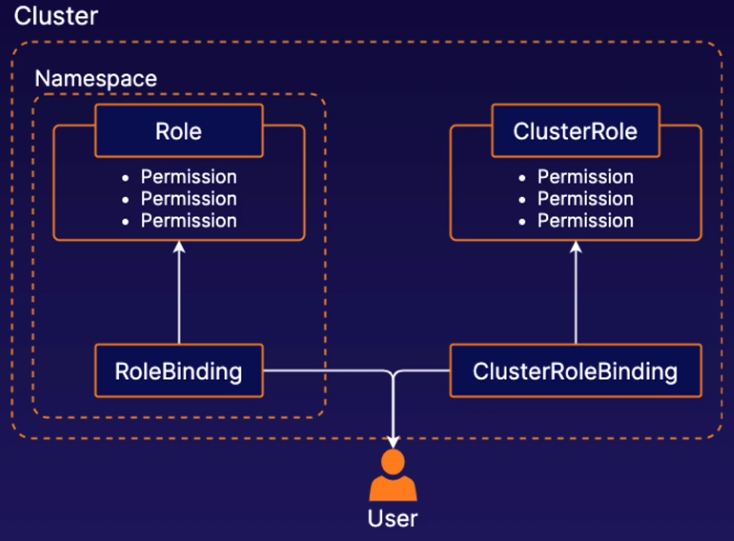
Role-based access control (RBAC) in k8s allows you to control what users are allowed to do and access within your cluster. For example, you can use RBAC to allow developers to read metadata and logs from kubernetes pods but not make changes to them.
Roles and ClusterRoles are kubernetes objects that define a set of permissions. These permissions determine what users can do in the cluster. A Role defines permissions within a particular namespace, and a ClusterRole defines cluster-wide permissions not specific to a single namespace.
RoleBinding and ClusterRoleBinding are objects that connect Roles and ClusterRoles to users.
Create a Role spec file.
vi role.yml
apiVersion: rbac.authorization.k8s.io/v1
kind: Role
metadata:
namespace: default
name: pod-reader
rules:
- apiGroups: [""]
resources: ["pods", "pods/log"]
verbs: ["get", "watch", "list"]
Create the Role.
kubectl apply -f role.yml
Bind the role to the dev user.
vi rolebinding.yml
apiVersion: rbac.authorization.k8s.io/v1
kind: RoleBinding
metadata:
name: pod-reader
namespace: default
subjects:
- kind: User
name: dev
apiGroup: rbac.authorization.k8s.io
roleRef:
kind: Role
name: pod-reader
apiGroup: rbac.authorization.k8s.io
Create the RoleBinding.
kubectl apply -f rolebinding.yml
Is an account used by container processes within Pods to authenticate with the k8s API. If your Pods need to communicate with the k8s API, you can use service accounts to control their access.
A service account object can be created with some YAML just like any other k8s object.
You can manage access control for service accounts, just like any other user, using RBAC objects. Bind service accounts with RoleBindings or ClusterRoleBindings to provide access to k8s API functionality.
Create a basic ServiceAccount.
vi my-serviceaccount.yml
apiVersion: v1
kind: ServiceAccount
metadata:
name: my-serviceaccount
kubectl create -f my-serviceaccount.yml
Create a ServiceAccount with an imperative command.
kubectl create sa my-serviceaccount2 -n default
View your ServiceAccount.
kubectl get sa
Attach a Role to the ServiceAccount with a RoleBinding.
vi sa-pod-reader.yml
apiVersion: rbac.authorization.k8s.io/v1
kind: RoleBinding
metadata:
name: sa-pod-reader
namespace: default
subjects:
- kind: ServiceAccount
name: my-serviceaccount
namespace: default
roleRef:
kind: Role
name: pod-reader
apiGroup: rbac.authorization.k8s.io
kubectl create -f sa-pod-reader.yml
Get additional information for the ServiceAccount.
kubectl describe sa my-serviceaccount
In order to view metrics about the resources pods and containers are using, we need an add-on to collect and provide that data. One such add-on is Kubernetes Metrics Server. This needs to be manually installed after a kubernetes cluster has been deployed.
With kubectl top, you can view data about resource usage in your pods and nodes. kubectl top also support flags like --sort-by and --selector.
kubectl top pod --sort-by <JSONPATH> --selector <selector>
kubectl top node
Install Kubernetes Metrics Server.
https://raw.githubusercontent.com/linuxacademy/content-cka-resources/master/metrics-server-components.yaml
Verify that the metrics server is responsive. Note that it may take a few minutes for the metrics server to become responsive to requests.
kubectl get --raw /apis/metrics.k8s.io/
Create a pod to monitor.
vi pod.yml
apiVersion: v1
kind: Pod
metadata:
name: my-pod
labels:
 app: metrics-test
spec:
containers:
- name: busybox
image: radial/busyboxplus:curl
command: ['sh', '-c', 'while true; do sleep 3600; done']
kubectl apply -f pod.yml
Use kubectl top to view resource usage by pod.
kubectl top pod
Sort output with --sort-by .
kubectl top pod --sort-by cpu
Filter output by label with --selector .
kubectl top pod --selector app=metrics-test
When you are running applications in kubernetes, you may want to pass dynamic values to your applications at runtime to controll how they behave. This is known as application configuration We will pass data to our containers that is going to control what those containers do and how they run.
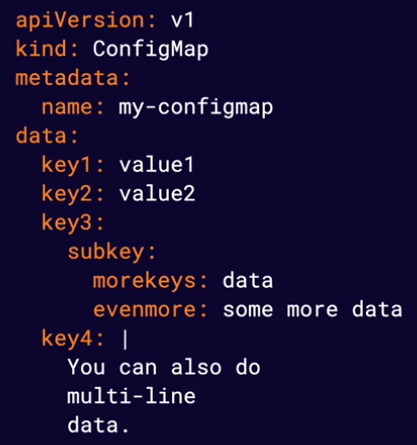
This is one of the primary ways to store configuration data in kubernetes. You can store configuration data in kubernetes using Config Maps. ConfigMaps store data in the form of a key-value map. ConfigMap data can be passed to your container applications.
IMPORTANT ITENS!!
data section It is just a yaml data. It is a map of value key pairs
multi-line data You can specify a configuration file to be applyied to one of your containers.
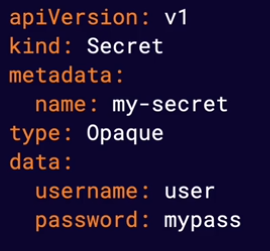
This is another way to store data in kubernetes. Secrets are similar to ConfigMaps but are designed to store sensitive data, such as passwords or API keys, more securely. They are created and used similarly to ConfigMaps.
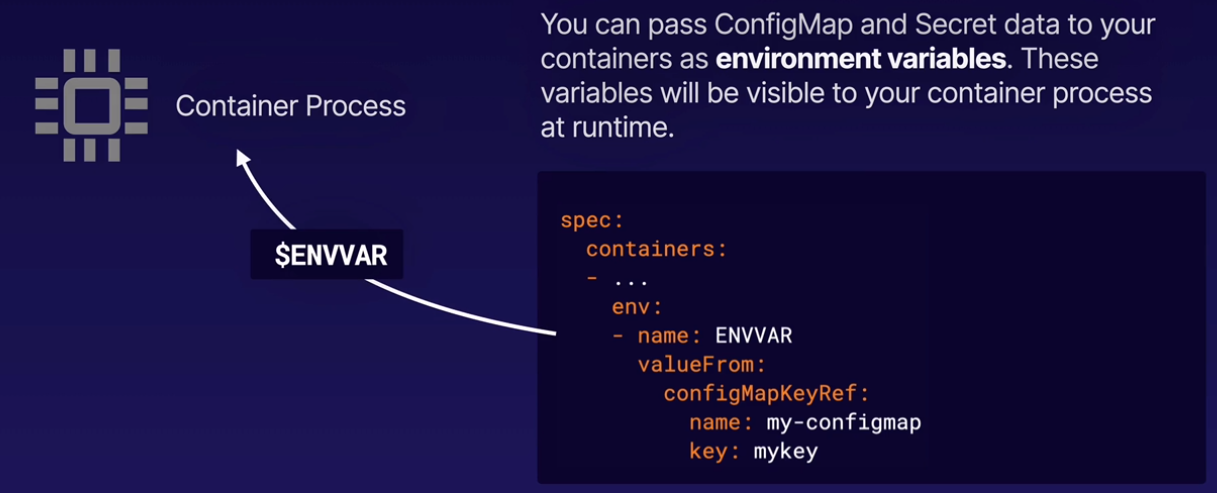
You can pass ConfigMaps and Secret data to your containers as environment variables. These variables will be visable to your container process at runtime.
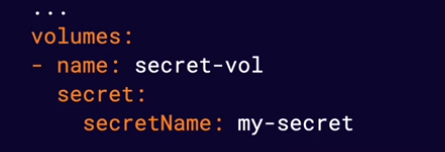
Configuration data from ConfigMaps and Secrets can also be passed to containers in the form of mounted volumes. This will cause the configuration data to appear in files available to the container file system. Each top-level key in the configuration data will appear as a file containing all keys below that top-lvel key.
Managing Application Configuration.pdf
It allow you to define an amount of resources (such CPU or memory) you expect a container to use. The Kubernetes scheduler will use resource requests to avoid scheduling pods on nodes that do not have nough available resources.
Note Containers are allowed to use more (or less) than the requested resources. Resource requests only affect scheduling.
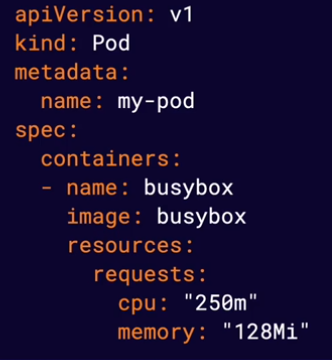
Note Memory is measured in bytes and CPU is measured in CPU units.
Provide a way for you to limit the amount of resources your containers can use. The container runtime is responsible for enforcing these limits, and different container runtimes do this differently.
Note Some runtimes will enforce these limits by terminating container process that attempt to use more than the allowed amount of resources.

k8s provides a number of features that allow you to build robust solutions, such as the ability to automatically restart unhealthy containers. To make the most of these features, k8s needs to be able to accurately determine the status of your applications. This means actively monitoring container health.
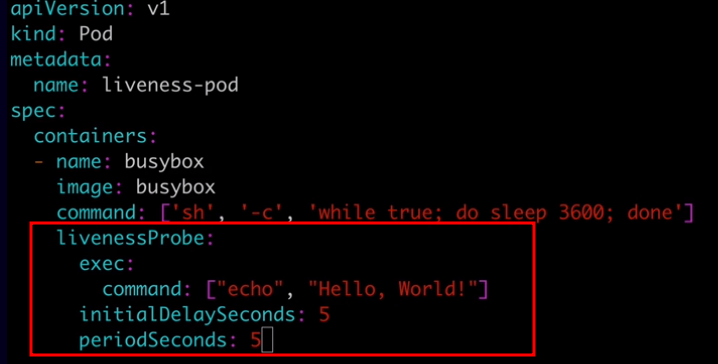
Allow you to automatically determine wether or not a container application is in a healthy state. By default, k8s will only consider a container to be down if the container process stops. Liveness probes allow you to customize this detection mechanism and make it more sphisticated.
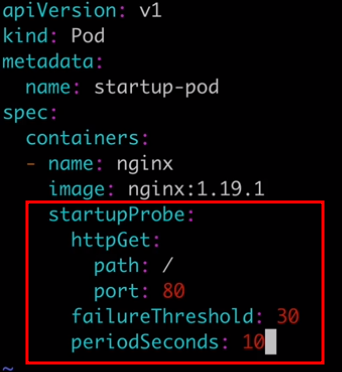
Are very similar to liveness probes. However, while liveness probes run contantly on a shcedule, startup probes run at container startup and stop running once they succeed. They are used to determine when the application has successfully started up. Startup probes are especially useful for legacy applications that can have long startup times.
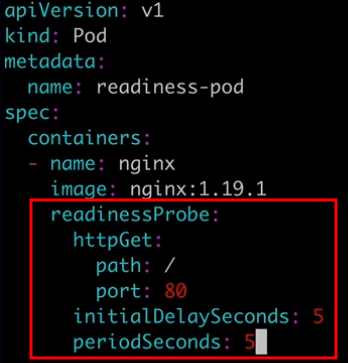
Are used to determine when a container is ready to accept requests. When you have a service backed by multiple container endpoints, user traffic will not be sent to a particular pod until its containers have all passed the readiness checks defined by their readiness probes. Use readiness probes to prevent user traffic from being sent to pods that are still in the process of starting up.
Monitoring Container Health with Probes.pdf
K8s can automatically restart containers when they fail. Restart Policiesallow you to customize this behavior by defining when you want a pod's containers to be automatically restarted. Restart policies are an important component of self-healing applications, which are automatically repaired when a problem araises. There are three possible values for a pod's restart policy in k8s: Always, OnFailure, and Never.
Always is the default restart policy in k8s. With this policy, containers will always be restarted if they stop, even if they completed successfully. Use this policy for applications that should always be running.
The OnFailure restart policy will restart containers only if the container process exits with an error code or the container is determined to be unhealthy by a liveness probe. Use this policy for applications that need to run successfully and then stop.
The Never restart policy will cause the pod's containers to never be restarted, even if the containerexits or a liveness probe fails. Use this for applications that should run once and never be automatically restarted.
1597437528004-devops-wb002 - S05-L05 Building Self-Healing Pods with Restart Policies.pdf
A k8s Pod can have one or more containers. A Pod with more than one container is a multi-container pod. In a multi-container pod, the containers share resources such as network and storage. They can interact with one another, working together to provide functionality.
Note Best Practice: Keep containers in separate Pods unless they need to share resources.
Containers sharing the same Pod can interact with one another using shared resources.
Containers share the same networking namespace and can communicate with one another on any port, even if that port is not exposed to the cluster.
Containers can use volumes to share data in a Pod.
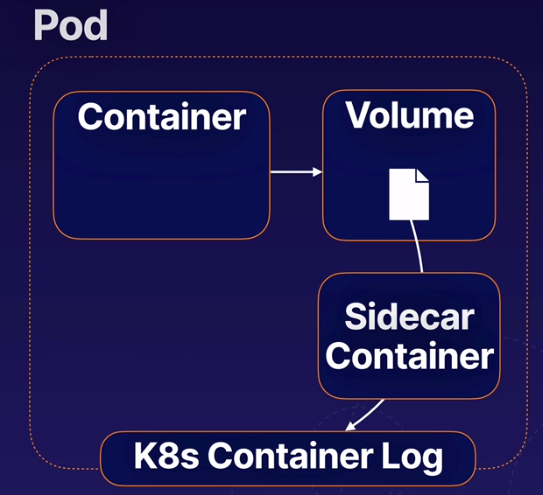
There is an application that is hard-coded to write log output to a file o disk. To solve this issue we can add a secondary container to the Pod (sometimes called a sidecar) that reads the log from a shared volume and prints it to the console so the log output will appear in the container log.
S05-L06 Creating Multi-Container Pods.pdf
Init containers are containers that run once during the startup process of a pod. A pod can have any number of init containers, and they will each run once (in order) to completion.
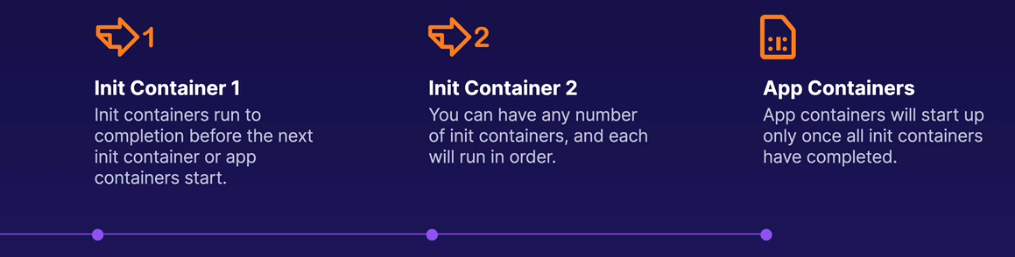
You can use init containers to perfom a variety of startup tasks. They can contain and use software and setup scripts that are not needed by your main containers. They are often useful in keeping your main containers lighter and more secure by offloading startup tasks to a separate container.
- Cause a pod to wait for another k8s resource to be created befor fiishing startup.
- Perform sensitive startup setps securely outside of app contianers.
- Populate data into a shared volume at startup.
- Communicate with another service at startup.
- They have a different type called
initContainers - They will run first during the deployment or daemonset initialization.
- will run in the order listed in the YAML file.
- Each init container need to complete (exit) successfully. If failed the pod will not start depending on the startup policy.
apiVersion: batch/v1
kind: CronJob
metadata:
  name: content
spec:
  schedule: "*/60 * * * *"
  jobTemplate:
    spec:
      template:
        spec:
          initContainers:
            - name: content
              image: alpine
              command:
                - "/bin/sh"
                - "-c"
                - "rm -rf /tmp/* || true"
              volumeMounts:
                - name: tmp
                  mountPath: /tmp/
          containers:
            - name: content
              image: alpine
              command:
                - /scripts/content-download.sh
S05-L06 Introducing Init Containers.pdf
The process of assigning Pods to Nodes so kubelets can run them.
Control plane component that handles scheduling.
The kubernetes scheduler selects a suitable Node for each Pod. It takes into account things like:
- Resources requests vs. available node resources
- Various configurations that affect scheduling using node lables.
You can configure a nodeSelector for your Pods to limit which Node(s) the Pod can be scheduled on. Node selectors use node lables to filter suitable nodes.
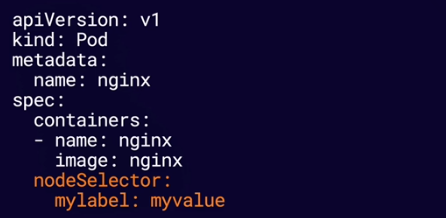
It tells scheduler to only schedule that pod to nodes that only has that lable.
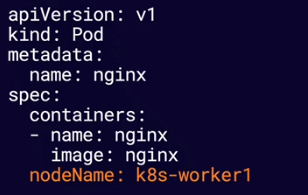
You can bypass scheduling and assign a Pod to a specific Node by name using nodeName.
S06-L01 Exploring k8s Scheduling.pdf
It automatically runs a copy of a Pod on each node. DaemonSets will run a copy of the Pod on new nodes as they are aded to the cluster.
DaemonSets respects normal scheduling rule around node labels, taints, and tolerations. If a pod would not normally be scheduled on a node, a DaemonSet will not create a copy of the Pod on that Node.
A Pod that is managed directly by the kubelet on a node, not by the k8s API server. They can run even if there is no k8s API server present. Kubelet automatically creates static Pods from YAML manifest files located in the manifest path on the node.
This is the main path to store the YAML manifest files.
/etc/kubernetes/manifests/
Note If you want to imediatly start the container, just restart the kubelet service by issuing the command
systemctl restart kubelet
Kubelet will create a mirror Pod for each static Pod. Mirror Pods allow you to see the status of the static Pod via k8s API, but you cannot change or manage them via the API.
A k8s object that defines a desired state for a ReplicaSet (a set of replica Pods). The Deployment Controller seeks to maintain the desired state by creating, deleting, and replacing Pods with new configurations.
The number of replica Pods the Deployment will seek to maintain.
A label selector used to identify the replica Pods managed by the Deployment.
A template Pod definition used to create replica Pods.
There are many use cases for Deployments, such as:
- Easily scale an application up or down by changing the number of replicas.
- Perform rolling updates to deploy a new software version.
- Roll back to a previous software version.
S07-L01 K8s Deployments Overview.pdf
Scaling rfers to dedicating more (or fewer) resources to an application in order to meet changings needs. k8s Deployments are very useful in horizontal scaling, which involves changing the number of containers running an application.
The Deployment's replicas setting determines how many replicas are desired in its desired state. If the replicas number is changed, replica Pods will be created or deleted to satisfy the new number.
You can scale a deployment simply by chnaging the number of replicas in the YAML descriptor with kubectl apply or kubectl edit.
spec:
  replicas: 5
Or use the special kubectl scale command.
kubectl scale --replicas=5 deployment.v1.apps/my-deployment
S07-L02 Scaling Applications With Deployments.pdf
Rolling updates allow you to make changes to a deployment's Pods at a controlled rate, gradually replacing old Pods with new Pods. This allows you to update your Pods without icurring downtime.
To start a rolling update you just need to edit the Deployment and after saving it, the kubernetes will automatically start the rolling update process and update the pods one by one.
To check the status of the rolling update use the following command:
kubectl rollout status deployment.v1.apps/my-deployment
Another way to edit a deployment is usign the following command:
kubectl set image deployment/my-deployment nginx=nginx:broken --record
Note In the above command we set
:brokento define a wrong version. the flag--recordis used to record the rollout steps.
To check the rollout steps you can use the following command:
kubectl rollout history deployment.v1.apps/my-deployment
If an update to a deployment causes a problem, you can roll back the deployment to a previous working state.
To rollback a rolling update you can use the following command:
kubectl rollout undo deployment.v1.apps/my-deployment --to-revision=2
Note You can use the flag
--to-revision=2to rollback to a specific revision.
S07-L03 Managing Rolling Updates With Deployments.pdf
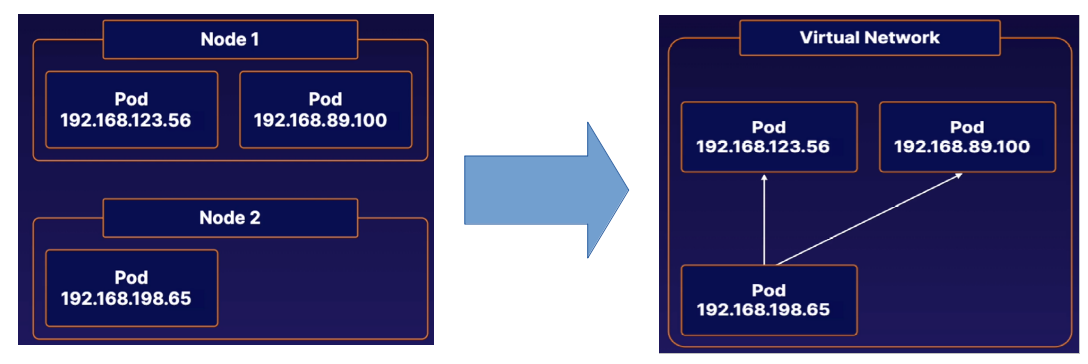
The k8s network model is a set of standards that define how networking between Pods behaves. There are a variety of different implementations of this model - including the Calico network plugin, which we have been using throughout this course.
The k8s network model defines how Pos communicate with each other, regardless of which Node they are running on. Each Pod has its own unique IP address within the cluster. Any Pod can reach any other Pod using that Pod's IP address. This creates a virtual network that allows Pods to easily communicate with each other, regardless of which node they are on.
CNI Plugins are a type of kubernetes network plugin. These plugins provide network conectivity between Pods according to the standard set by the kubernetes network model.
Which network plugin is best for you will depend on your specifc situation. Check the kubernetes documentation for list of available plugins. You may need to research some of these plugins for yourself, depending on your production use case.
Each plugin has its own unique installation process.
Note Kubernetes nodes will remain NotReady until a network plugin is installed. You will b unable to run Pods while this is the case.
The k8s virtual network uses a DNS (Domain Name System) to allow Pods to locate other Pods and Services using domain names instead of IP addresses. This DNS runs as a Service within the cluster. You can usually find it in the kube-system namespace. Kubeadm clusters use CoreDNS.
All Pods in our kubeadm cluster are automatically given a domain name of the following form:
pod-ip-address.namespace-name.pod.cluster.local
A Pod in the default namespace with the IP Address 192.168.10.100 would have a domain name like this.
192-168-10-100.default.pod.cluster.local
S08-L03 Understanding K8s DNS.pdf
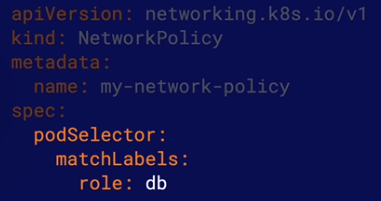
A k8s NetworkPolicy is n object that allows you to control the flow of the network communication to and from Pods. This allows you to build a more secure cluster network by keeping Pods isolated from traffic they do not need.
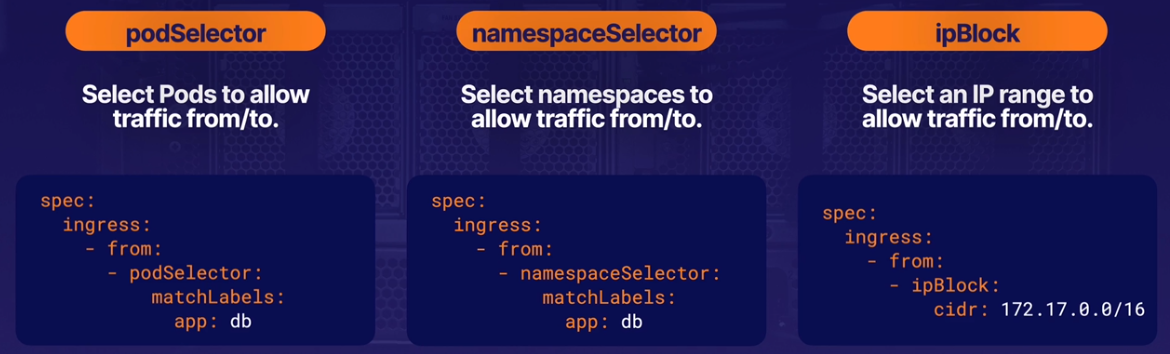
podSelector determines to which Pods in the namespace the NetworkPolicy applies. The podSelector can select Pods using Pod lables.
Note By default, Pods are considered non-isolated and completely open to all communication. If any NetworkPolicy selects a Pod, the Pod is considered isolated ad will only be open to trafic allowed by NetworkPolicies.
A NetworkPolicy can apply to Ingress, Egress or both.
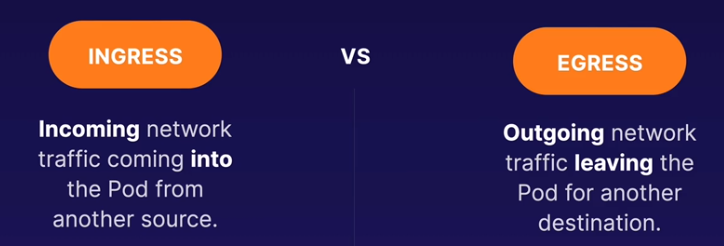
from selector: Selects ingress (incoming) traffic that will be allowed.
to selector: Selects egress (outgoing) traffic that will be allowed.
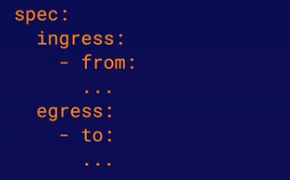
port: Specifies one or more ports that will allow traffic. Traffic is only allowed i it matchs both an allowed port and one of the from/to rules.
S08-L04 Using NetworkPolicies.pdf
Kubernetes Services provide a way to expose an application running as a set of Pods. They provide an abstract way for clients to access applications without needing to be aware of the application Pods.
Clients make requests to a Service, which routes traffic to its pods in a load-balanced fashion.

Endpoints are the backend entities to which Services route traffic. For a Service that routes traffic to multiple Pods, each Pod will have an endpoint associated to the service.
Note One way to determine which Pod(s) a Service is routing traffic to is to look at the services Endpoints.
Each Service has a type. The Service type determines how and where the Service will expose your application. There are four service types:
- ClusterIP
- NodePort
- LoadBalancer
- ExternalName (outside the scope of CKA)
Services expose applications inside the cluster network. Use them when your clients will be other Pods within the cluster.

NodePort Services expose applications outside the cluster network. Use NodePort when applications or users will be accessing yout application from outside the cluster.

LoadBalancer Services also expose applications outside the cluster network, but they use an external cloud load balancer to do so. This service type only works with cloud platforms that include load balancing functionality.

S09-L02 Using K8s Services.pdf
The Kubernetes DBS (Domain Name System) assigns DNS names to Services, allowing applications within the cluster to easily locate them.
A services fully qualified domain name has the following format:
service-name.namespace-name.svc.cluster-domain.example
The default cluster domain is cluster.local.
A Services fully qualified domain name can be used to reach the service from within any Namespace in the cluster.
However, Pods withinthe same Namespace can also simply use the service name.
S09-L03 Discovering K8s Services With DNS.pdf
An Ingress is a kubernetes object that manages external access to Services in the cluster. An Ingress is capable of providing more functionality than a simple NodePort Service, such as SSL termination, advanced load balancing, or name-based virtual hosting.

Ingress objects actually do nothing by themselves. Inorder for Ingresses to do anything, you must install one or more Ingress Controllers. There are a variety of Ingress Controllers available - all of which implement different methds for providing external access to your Services.
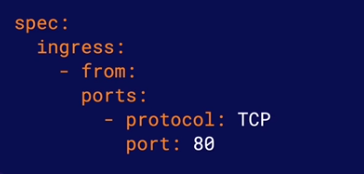
Ingress define a set of routing rules. A routing rules properties determine to which requests it applies. Each rule has a set of paths, each with a backend. requests matching a path will be routed to its associated backend.
In this example a request to https://<some-endpoint./somepath would be routed to port 80 on the my-service Service.

If a Service uses a named port, an Ingress can also use the ports name to choose to which port it will route.

S09-L04 Managing Access from Outside with K8s Ingress.pdf
The conainer file system is ephemeral. Files on the containers file system exist only as long as the container exists. If a container is delete or re-created in k8s, data stored on the container file system is lost.
Many applications need a more persistent method of data storage. Volumes allow you to store data outside the container file system while allowing the container to access the data at runtime. This can allow data to persist beyond the life of the container.

Volumer offer a simple way to provide external storage to containers within the Pod/container spec. Persistent volumes are slightly more advanced form of Volume. They allow you to treat storage as an abstract resource and consume it using your Pods.

Both Volumes and Persistent Volumes each have a volume type. The volume type determines how the storage is actually handled.
Various volume types support storge methods such as:
- NFS
- Cloud storage mechanisms (AWS, Azure, GCP)
- ConfigMaps and Secrets
- A simple directory on the k8s node
Regular volumes can be set up relatively easily within a Pod/container specification.
volumes: In the Pod spec, these specify the storage volumes available to the Pod. They specify the volume type and other data that determines where and how the data is actually stored. You can have any number of volumes in your pod.

volumeMounts: In the container spec, these reference the volumes in the Pod spec and provide a mountPath (the locations on the file system where the container process will access the volume data).

You can use volumeMounts to mount the same volume to multiple containers within the same Pod.

There are many volume types, but there are two you may want to be especially aware of.
hostPath: Stores data in a specified directory on the k8s node.
emptyDir: Stores data in a dynamically created locations on the node. This directory exists only as long as the Pod exists on the node. the directory and the data are deleted when the Pod is removed. This volume type is very useful for simply sharing data between containers in the same Pod.
PersistentVolumes are k8s objects that allow you to treat storage as an abstract resource to be consumed by Pods, much like k8s treats compute resources such as memory and CPU.
A Persistentvolume uses a set of attributes to describe the underlying storage resource (such as a disk or cloud storage location) which will be used to store data.

Storae Classes allow k8s administrators to specify the types of storage services they offer on their platform.

For example, an administrator could create a StorageClass called slow to describe low-performance but inexpensive storage resources, and another called fast for high-performance but more costly resources. This would allow users to choose storage resources that fit the needs of their applications.

The allowVolumeExpansion property of a StorageClass determines whether or not the StorageClass supports the ability to resize volumes after they are created. If this property is not set to true, attempting to resize a volume that uses this StorageClass will result in an error.

A persistentVolumeReclaimPolicy determines how the storage resources can be used when the PersistentVolumes associated PersistentVolumeClaims are deteled.
Keeps all data. This requires an administrator to manually clean up the data and prepare the storage resource for reuse.
Deletes the underlying storage resource automatically (anly works for cloud storage resources).
Automatically deletes all data in the underlying storage resource, allowing the PersistentVolume to be reused.

A PersistentVolumeClaim represents a users request for a storage resources. It defines a set of attributes similar to those of a PersistentVolume (StorageClass, etc.)
When a PersistentVolumeClaim is created, it will look for a PersistentVolume that is able to meet the requested criteria. If it finds one, it will automatically be bound to the PersistentVolume.

PersistentVolumeClaims can be mounted to a Pods containers just like any other volume. If the PersistentVolumeClaim is bound to a PersistentVolume, the containers will use the underlying PersistentVolume storage.

You can exand PersistentVolumeClaims without interrupting applications that are using them. Simply edit the spec.resources.requests.storage attribute of an existing PersistentVolumeClaim, increasing its value.
However, the StorageClass must support resizing volumes and must have allowVolumeExpansion set to true.

S10-L04 Using K8s Persistent Volumes.pdf
If the k8s API server is down, you will not be able to use kubectl to interact with the cluster. You may get a message that looks something like:

Assuming your kubeconfig is set up correctly, this may mean the API server is down.
Possible Fixes: Make sure the docker and kubelet services are up and running on your control plane node(s).
Check the status of your nodes to see if any of them are experiencing issues.
Use kubectl get nodes to see the overall status of each node.
Use kubectl describe nodes to get more information on any nodes that are not in the READY state.
If a node is having problems, it may be because a service is down on that node. Each node runs the kubelet and container runtime (i.e. Docker) services.


In a kubeadm cluster, several k8s components run as pods in the kube-system namespaces. Check the status of these components with kubectl get pods and kubectl describe pod.

S11-L02 Troubleshooting Your K8s Cluster.pdf
You can check the logs for k8s-related services on each node using journalctl.

The Kubernetes cluster componeents have log output redirected to /var/log. For example:

Note These log files may not appear for kubeadm clusters, since some componenets run inside containers. In that case, you can access them with kubectl logs.
S11-L03 Checking Cluster and Node Logs.pdf
You can see a Pods status with kubectl get pods.
kubectl get pods
Use kubectl describe pod, to get more infomation about what may be going on with an unhealthy Pod.
kubectl describe pod <podname>
If you need to troubleshoot what is going on inside a container, you can execute commands with the container with kubectl exec.
kubectl exec <podname> -c <containername> -- command
Note You cannot use kubectl exec to run any software that is not present within the container.
S11-L04 Troubleshooting Your Applications.pdf
k8s containers maintain logs, which you can use to gain insight into what is going on within the container.
A containers log contains everything written to the standard output (stdout) and error (stderr) streams be the container process.
Use kubectl logs command to view a containers logs.
kubectl logs <podname> -c <containername>
S11-L05 Checking Container Logs.pdf
In addition to checking on your k8s networking plugin, it may be a good idea to look at kube-proxy and the k8s DNS if you are experiêncing issues within the k8s cluster network.
In a kubeadm cluster, the k8s DNS and kue-proxy run as Pods in the kube-system namespace.
TIP: You can run a container in the cluster that you can use to run commands to test and gather information about network functionality.
The nikolaka/netshoot image is a great tool for this. This image contains a variety of networking exporation and troubleshooting tools.
Create a container running this image, and thn use kubectl execto explore away!
S11-L06 Troubleshooting K8s Networking Issues.pdf
This lab provides practice scenarios to help prepare you for the Certified Kubernetes Administrator (CKA) exam. You will be presented with tasks to complete as well as server(s) and/or an existing Kubernetes cluster to complete them in. You will need to use your knowledge of Kubernetes to successfully complete the provided tasks, much like you would on the real CKA exam. Good luck!
Create a service account:
kubectl create sa webautomation -n web
Create a ClusterRole That Provides Read Access to Pods
Create a pod-reader.yml file:
vi pod-reader.yml
Define the ClusterRole:
apiVersion: rbac.authorization.k8s.io/v1
kind: ClusterRole
metadata:
  name: pod-reader
rules:
- apiGroups: [""]
  resources: ["pods"]
  verbs: ["get", "watch", "list"]
Create the ClusterRole:
kubectl create -f pod-reader.yml
Bind the ClusterRole to the Service Account to Only Read Pods in the web Namespace Create the rb-pod-reader.yml file:
vi rb-pod-reader.yml
Define the RoleBinding:
apiVersion: rbac.authorization.k8s.io/v1
kind: RoleBinding
metadata:
  name: rb-pod-reader
  namespace: web
subjects:
- kind: ServiceAccount
  name: webautomation
roleRef:
  kind: ClusterRole
  name: pod-reader
  apiGroup: rbac.authorization.k8s.io
Create the RoleBinding:
kubectl create -f rb-pod-reader.yml
Verify the RoleBinding works:
kubectl get pods -n web --as=system:serviceaccount:web:webautomation