This PoC will allow you to start a Confidential VM on AMD SEV-SNP.
In this demo we will see how SVSM can be used to emulate a stateful vTPM (EK keys and EV state are preserved at each boot).
The vTPM state is saved encrypted in the SVSM state file and exposed to SVSM as a virtio-blk device over MMIO. Remote attestation is used to get the SVSM state key after a successful attestation.
This PoC is based on the following Coconut SVSM PRs:
This repository can be used for the following demos:
- Demo 1: Check memory encryption
- Demo 2: Use a stateful vTPM to automatically mount an encrypted rootfs
- Demo 3: Additional uses of the vTPM
This POC was tested on Fedora 41, Fedora 42, and CentOS stream 10 (c10s).
For running this demo, you need the host machine with:
- AMD processor that supports SEV-SNP
- Coconut Linux kernel installed, you can build it yourself or install it
via copr in Fedora:
- Coconut source kernel code.
You can build the host kernel by following the instructions here: https://github.com/coconut-svsm/svsm/blob/main/Documentation/INSTALL.md#preparing-the-host - Fedora copr package
- Coconut source kernel code.
sudo dnf copr enable -y @virtmaint-sig/sev-snp-coconut
sudo dnf install kernel-snp-coconutThis repository contains the QEMU code, EDK2 code, TCG TPM simulator, and several Rust projects, so I recommend that you install the following packages (for Fedora 41, 42, and CentOS Stream 10) to use the scripts contained in this demo.
If you are using a CentOS Stream build host, you need to enable the development and source package repositories. An easy way is to simply enable all configured repositories:
sed -i 's/enabled=0/enabled=1/g' /etc/yum.repos.d/centos.repo# QEMU depepdencies
sudo dnf install \
bzip2 \
findutils \
gcc \
git \
diffutils \
glib2-devel \
libfdt-devel \
make \
ninja-build \
pixman-devel \
python3 \
tar \
zlib-devel
# OVMF depepdencies
sudo dnf install \
acpica-tools \
gcc \
gcc-c++ \
git \
libuuid-devel \
libX11-devel \
libXext-devel \
make \
nasm \
python3 \
python3-pip \
python3-setuptools
# SVSM and igvm dependencies
sudo dnf install cargo rust rust-std-static-x86_64-unknown-none \
autoconf automake autoconf-archive \
buildah podman cbindgen bindgen-cli CUnit-devel openssl \
sqlite-devel ncat gawk util-linux xxd virt-install edk2-ovmf \
perl gettext-envsubst glibc-staticFor automatic setup of the guest image, virt-install is used in a following step.
This requires a running instance of libvirt, which will be installed by the dnf command
above. Alternatively, a standalone instance of QEMU can be used as well. In this case
the installation of libvirt and virt-install can be skipped and the mtools package
is required instead.
This operation is only required the first time, or when git submodules are updated
./prepare.shFor CentOS guests the experimental SVSM-based UEFI variable store needs to be disabled, because the CentOS kernel does not support this yet:
./prepare.sh --no-varstoreTo clean up everything generated by this demo (including VM image, SVSM state, etc.) previously, and rebuild QEMU, EDK2, IGVM, and SVSM, use:
./prepare.sh -cThis is only required the first time or when you want to regenerate a new image (for example, with a different encryption key).
You can choose between Fedora 42 (42 = default) and CentOS (c10s) as the Linux distribution
to be used.
The script will also put the tpm module in the initrd, and configure
/etc/crypttab to use the TPM to unseal the LUKS key.
# Default LUKS passphrase used: MY-LUKS-PASSPHRASE
./build-vm-image.sh --distro f42

# Or you can specify your
./build-vm-image.sh --passphrase <custom LUKS passphrase>
By default virt-install (requiring a running instance of libvirt) is used for automatic guest image installation.
To attempt an installation without libvirt and using the QEMU binary built in the previous step directly,
add the --no-libvirt option to the commands above. This can be useful in containerized environments, for example.
SVSM needs to maintain a persistent state across reboots. This state is encrypted to ensure it remains inaccessible to the host. As a result, SVSM must communicate with a Key Broker Service (KBS) to perform attestation and obtain the decryption key required to unlock its state.
This script starts in the host the Key Broker server (it will be remote in a real scenario) and the proxy used by SVSM to communicate with the server. The proxy forwards requests arriving from SVSM via a serial port to the http connection with the server.
./start-kbs.shThis script first calculates the launch measurement (SVSM, OVMF, etc.) and then registers it in the Key Broker server along with the SVSM state key (512 bits).
# we are using XTS for the encryption layer with AES256
# XTS requires two AES256 keys, so 512 bits (64 bytes) in total
SECRET="$(openssl rand -hex 64)"

./register-resource-in-kbs.sh -p "$SECRET"This operation is only required the first time, or when we want to regenerate the TPM state. In this way, the TPM's EK are recreated and NV state reset, so all sealed secrets can no longer be unsealed.
Note: We currently do not have a tool available, so the script clears the SVSM state and launches a diskless CVM. In this way SVSM, finding the state empty, generates a new vTPM.
./remanufacture-tpm.shNow we can boot the guest image as a confidential VM:
./start-cvm.sh

# LUKS passphrase is now required, since the key is not yet sealed
# with the TPM:
# Please enter passphrase for disk QEMU_HARDDISK (luks-bf91e8fe-c1e3-4696-937f-51c83d312eb9)::
# MY-LUKS-PASSPHRASE or <custom LUKS passphrase>
Verify that we are actually running inside a SEV-SNP VM, at VMPL2 (with an SVSM present):
$ dmesg | grep SEV
[    0.339970] Memory Encryption Features active: AMD SEV SEV-ES SEV-SNP
[    0.340961] SEV: Status: SEV SEV-ES SEV-SNP
[    0.452967] SEV: APIC: wakeup_secondary_cpu() replaced with wakeup_cpu_via_vmgexit()
[    0.520995] SEV: Using SNP CPUID table, 29 entries present.
[    0.521961] SEV: SNP running at VMPL2.
[    0.802219] SEV: SNP guest platform devices initialized.
[   12.889746] sev-guest sev-guest: Initialized SEV guest driver (using VMPCK2 communication key)
Check that the vTPM is SVSM-based and working:
$ dmesg | grep -i tpm-svsm
[   12.905465] tpm-svsm tpm-svsm: SNP SVSM vTPM 2.0 device
$ tpm2 pcrread
...
Check that SecureBoot is active (if the varstore feature was not disabled during the "prepare" step):
$ mokutil --sb-state
SecureBoot enabledIn this demo, we verify that the guest memory is encrypted and inaccessible to the host. We do this by dumping the guest's memory from the host side and attempting to locate a known secret that was deliberately placed in memory. If memory encryption is working correctly, the secret should not be recoverable in plaintext from the dump.
The demo is performed on both a standard virtual machine and a confidential virtual machine, allowing a direct comparison of behavior and security guarantees.
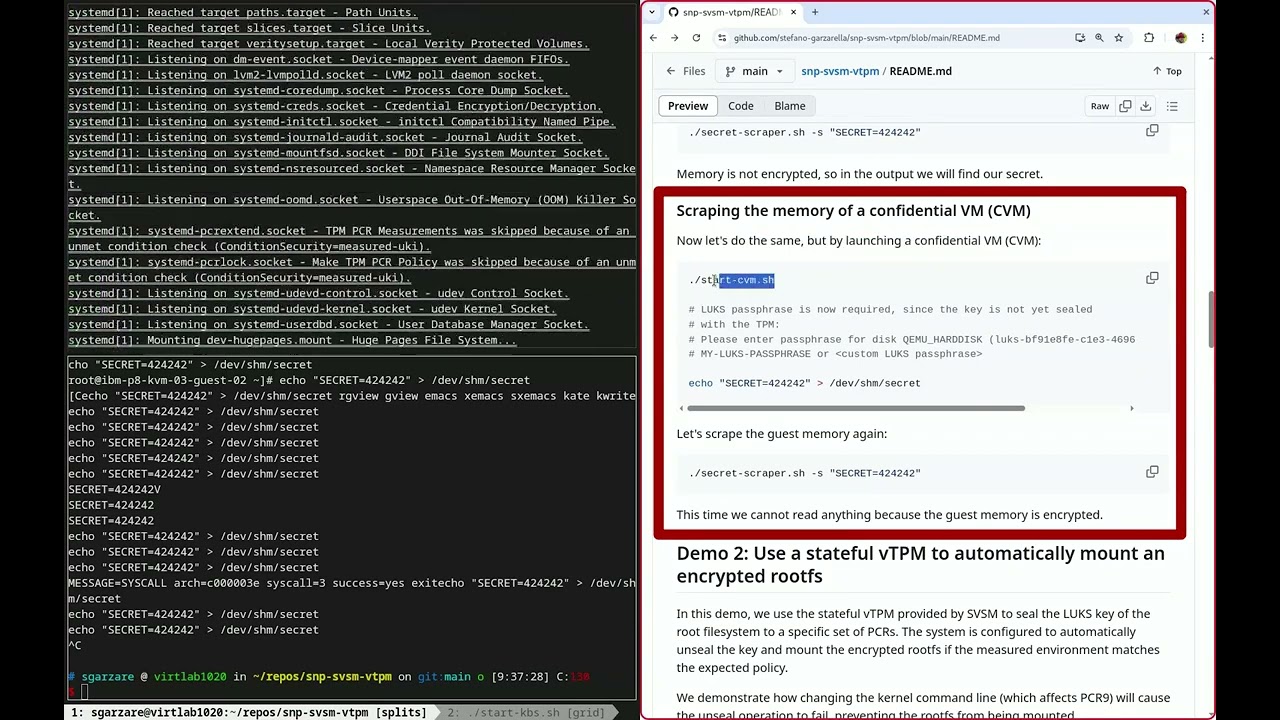
Launch a non-confidential VM and then we write a secret in memory:
./start-no-cvm.sh

# LUKS passphrase is now required, since the TPM is absent:
# Please enter passphrase for disk QEMU_HARDDISK (luks-bf91e8fe-c1e3-4696-937f-51c83d312eb9)::
# MY-LUKS-PASSPHRASE or <custom LUKS passphrase>

echo "SECRET=424242" > /dev/shm/secret
Now let's go scrape the memory of the guest to see if we can find the secret. The script simply asks QEMU to dump the VM's physical memory and then looks in the file:
./secret-scraper.sh -s "SECRET=424242"Memory is not encrypted, so in the output we will find our secret.
Now let's do the same, but by launching a confidential VM (CVM):
./start-cvm.sh

# LUKS passphrase is now required, since the key is not yet sealed
# with the TPM:
# Please enter passphrase for disk QEMU_HARDDISK (luks-bf91e8fe-c1e3-4696-937f-51c83d312eb9)::
# MY-LUKS-PASSPHRASE or <custom LUKS passphrase>

echo "SECRET=424242" > /dev/shm/secret
Let's scrape the guest memory again:
./secret-scraper.sh -s "SECRET=424242"This time we cannot read anything because the guest memory is encrypted.
In this demo, we use the stateful vTPM provided by SVSM to seal the LUKS key of the root filesystem to a specific set of PCRs. The system is configured to automatically unseal the key and mount the encrypted rootfs if the measured environment matches the expected policy.
We demonstrate how changing the kernel command line (which affects PCR9) will cause the unseal operation to fail, preventing the rootfs from being mounted.
SVSM preserves its state (including vTPM NV Data) across reboots using an encrypted state. The key needed to unlock this disk is released by a Key Broker Service (KBS) only after a successful attestation process, ensuring that the VM is running in a trusted environment.
This operation is only required the first time, or when we want to regenerate the TPM state. In this way, the TPM's EK are recreated and NV state reset, so all sealed secrets can no longer be unsealed.
Note: We currently do not have a tool available, so the script clears the SVSM state and launches a diskless CVM. In this way SVSM, finding the state empty, generates a new vTPM.
./remanufacture-tpm.shWe can now launch our CVM. SVSM will receive the key from the Key Broker server and can access its state by decrypting it.
./start-cvm.shIf the VM disk is encrypted (for example, if it was generated with the script included in this repo), the passphrase will be requested during the first boot:
Please enter passphrase for disk QEMU_HARDDISK (luks-bf91e8fe-c1e3-4696-937f-51c83d312eb9)::
# MY-LUKS-PASSPHRASE or <custom LUKS passphrase>
After entering the right passphrase, the rootfs will be mounted and we have access to the CVM.
At this point we can take advantage of the stateful TPM emulated by SVSM to
unlock the disk at every boot.
Then, using systemd-cryptenroll, we can seal the LUKS passphrase with the TPM
and use different PCRs as policy.
# identify the LUKS encrypted volume
blkid -t TYPE=crypto_LUKS
/dev/sda3: UUID="bf91e8fe-c1e3-4696-937f-51c83d312eb9" TYPE="crypto_LUKS" PARTUUID="a7a021b0-f96d-431c-a94f-97ba8761228c"

# install the LUKS key for /dev/sda3 using as policy the PCRs 0,1,4,5,7,9
systemd-cryptenroll /dev/sda3 --wipe-slot=tpm2 --tpm2-device=auto \
  --tpm2-pcrs=0,1,4,5,7,9
# MY-LUKS-PASSPHRASE or <custom LUKS passphrase>
Rebooting CVM we can see how the LUKS passphrase is no longer required, as it is sealed with the TPM:
poweroff

./start-cvm.sh
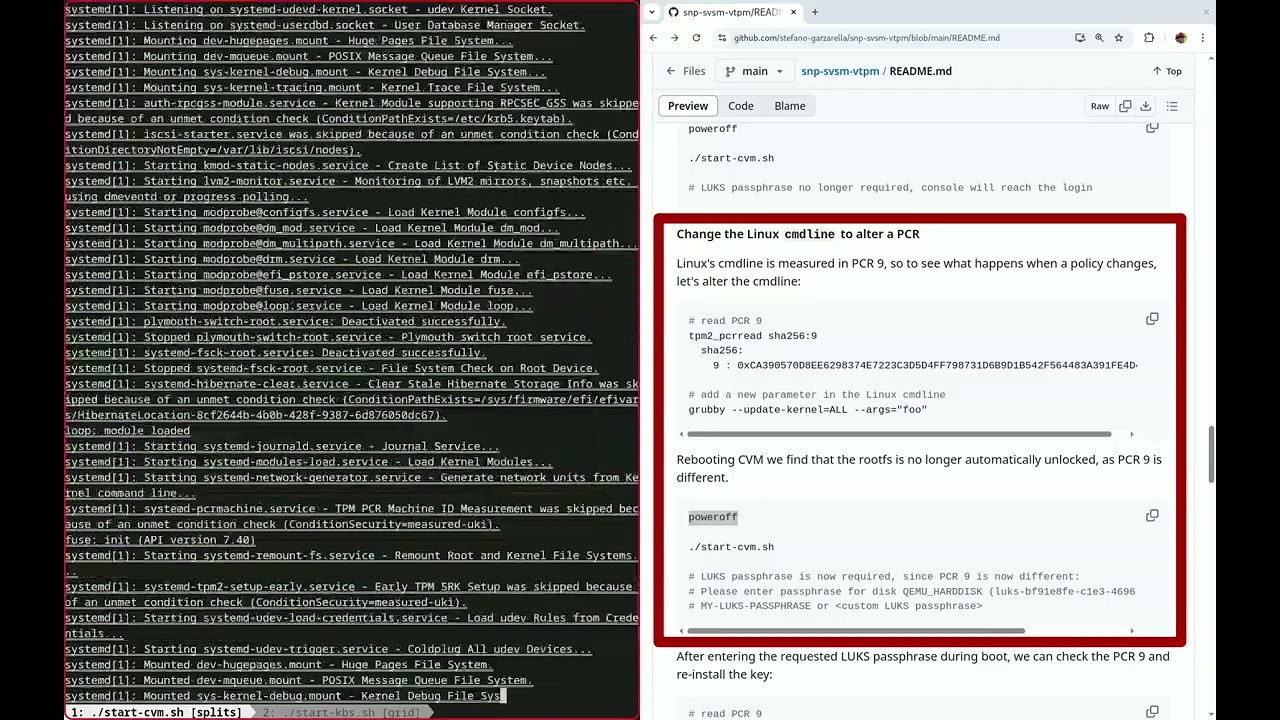
# LUKS passphrase no longer required, console will reach the loginLinux's cmdline is measured in PCR 9, so to see what happens when a policy changes, let's alter the cmdline:
# read PCR 9
tpm2_pcrread sha256:9
  sha256:
    9 : 0xCA390570D8EE6298374E7223C3D5D4FF798731D6B9D1B542F564483A391FE4D4

# add a new parameter in the Linux cmdline
grubby --update-kernel=ALL --args="foo"
Rebooting CVM we find that the rootfs is no longer automatically unlocked, as PCR 9 is different.
poweroff

./start-cvm.sh

# LUKS passphrase is now required, since PCR 9 is now different:
# Please enter passphrase for disk QEMU_HARDDISK (luks-bf91e8fe-c1e3-4696-937f-51c83d312eb9)::
# MY-LUKS-PASSPHRASE or <custom LUKS passphrase>
After entering the requested LUKS passphrase during boot, we can check the PCR 9 and re-install the key:
# read PCR 9
tpm2_pcrread sha256:9
  sha256:
    9 : 0xC7824417EDF7422F2011931ECAC930B789AACAA6E68175622347736D71DEE920

# Update the LUKS key for /dev/sda3 using as policy the PCRs 0,1,4,5,7,9
systemd-cryptenroll /dev/sda3 --wipe-slot=tpm2 --tpm2-device=auto \
  --tpm2-pcrs=0,1,4,5,7,9
# MY-LUKS-PASSPHRASE or <custom LUKS passphrase>
At this point we can reboot and have the rootfs automatically unlock again until the PCRs 0,1,4,5,7,9 are unchanged:
poweroff

./start-cvm.sh

# LUKS passphrase no longer required, console will reach the loginAs we have seen, the LUKS passphrase is soldered with the TPM. This ensures that if the TPM changes (e.g., it is re-manufactured), the new TPM will no longer be able to unseal the secret.
So let's try re-manufacturing it. In this way the TPM's EK are regenerated and NV state completely reset.
# Re-manufacture the TCG TPM state
./remanufacture-tpm.sh

./start-cvm.sh

# LUKS passphrase is now required, since the TPM is re-manufactured:
# Please enter passphrase for disk QEMU_HARDDISK (luks-bf91e8fe-c1e3-4696-937f-51c83d312eb9)::
# MY-LUKS-PASSPHRASE or <custom LUKS passphrase>
Rebooting CVM we find that the rootfs is no longer automatically unlocked, as the TPM is a new one. After entering the requested LUKS passphrase during boot, we can re-install the key:
# Update the LUKS key for /dev/sda3 using as policy the PCRs 0,1,4,5,7,9
systemd-cryptenroll /dev/sda3 --wipe-slot=tpm2 --tpm2-device=auto \
  --tpm2-pcrs=0,1,4,5,7,9
# MY-LUKS-PASSPHRASE or <custom LUKS passphrase>The TCG-TPM does not generate an EK certificate during manufacture, so
launching tpm2_getekcertificate or tpm2_nvread 0x1c00002 in the CVM will
get an error.
In the future we will provide a tool to generate the EK certificate and install it offline in the vTPM, but for now we can generate it directly in the VM on the first boot:
./start-cvm.sh

git clone https://github.com/stefano-garzarella/tpm2_ek_cert_generator.git
cd tpm2_ek_cert_generator
make
At this point the EK certificate is written in the NVRAM, so the following commands now works also after reboot:
tpm2_getekcertificate
tpm2_nvread 0x1c00002
The certificate is self-signed, but in this PoC we only use it to test the vTPM functionality.
Note: The tpm2_ek_cert_generator installs the certificate in the owner
hierarchy, because the platform hierarchy is disabled by EDK2. When the script
for offline manufacturing will become available, we could use the platform
hierarchy.
Now that we have the VM running with the vTPM, we can do secret sealing, also linking it to certain PCRs.
PRIMARY_CTX=/tmp/current_primary.ctx
tpm2_createprimary -c "$PRIMARY_CTX"

tpm2_pcrread -Q -o pcr.bin sha256:0,1,2,3
tpm2_createpolicy --policy-pcr -l sha256:0,1,2,3 -f pcr.bin -L pcr.policy
echo "secret" | \
  tpm2_create -C "$PRIMARY_CTX" -L pcr.policy -i - -u seal.pub \
    -r seal.priv -c seal.ctx
This secret can only be released if the TPM state is preserved, so let's try shutting down the VM and turning it back on:
poweroff

./start-cvm.shPRIMARY_CTX=/tmp/current_primary.ctx
tpm2_createprimary -c "$PRIMARY_CTX"
tpm2_load -C "$PRIMARY_CTX" -u seal.pub -r seal.priv -c seal.ctx
tpm2_unseal -c seal.ctx -p pcr:sha256:0,1,2,3If everything works, we should be able to see our “secret” after the last command.
To see what happens if the state of the vTPM changes, let's try re-manufacturing it. In this way the TPM's EK are regenerated and NV state completely reset.
# Re-manufacture the TCG TPM state
./remanufacture-tpm.sh

./start-cvm.sh
If we try the same steps as in the previous paragraph for unsealing, we see that this fails because we basically have a new TPM.
$ tpm2_load -C "$PRIMARY_CTX" -u seal.pub -r seal.priv -c seal.ctx
WARNING:esys:src/tss2-esys/api/Esys_Load.c:324:Esys_Load_Finish() Received TPM Error
ERROR:esys:src/tss2-esys/api/Esys_Load.c:112:Esys_Load() Esys Finish ErrorCode (0x000001df)
ERROR: Eys_Load(0x1DF) - tpm:parameter(1):integrity check failedThe same behavior is also obtained by changing the encryption key registered in KBS. In this way SVSM is unable to access the previous state and thus the emulated TPM is unable to unseal the keys.
# Generate a new encryption key
SECRET="$(openssl rand -hex 64)"

# Register the new SVSM encryption state key
./register-resource-in-kbs.sh -p $(openssl rand -hex 64)

./start-cvm.sh
And the TPM is not able to unseal the secrets.
$ tpm2_load -C "$PRIMARY_CTX" -u seal.pub -r seal.priv -c seal.ctx
WARNING:esys:src/tss2-esys/api/Esys_Load.c:324:Esys_Load_Finish() Received TPM Error
ERROR:esys:src/tss2-esys/api/Esys_Load.c:112:Esys_Load() Esys Finish ErrorCode (0x000001df)
ERROR: Eys_Load(0x1DF) - tpm:parameter(1):integrity check failedThe security of the guest OS can be improved by using a unified kernel image (UKI). This is a bootable UEFI binary that combines the Linux kernel, initial RAM disk image, and kernel command line.
To install the UKI in the guest image and configure it as default boot option,
boot the guest image using a conventional VM. This is necessary because the
UEFI variable store in the SVSM is not persistent yet and does not retain the
UEFI boot settings (this will be fixed in the future). After successful
installation and reboot in a conventional VM with a functional variable store,
the boot option has been picked up by shim and written to its BOOT64.CSV
file, to be reused independently of the UEFI boot order.
First, boot the image as a regular VM:
./start-no-cvm.shThe GPT partition type UUID of the root partition needs to be set to the
SD_GPT_ROOT_X86_64 UUID so that it will be discovered by the
systemd-gpt-autogenerator automatically. This removing the need to specify the
root partition on the kernel command line, which is already included in the
signed UKI and can not be changed. The type should have been set by the
build-vm-image.sh script, but let's check before proceeding.
# Check that /dev/vda3 has the expected type UUID (4f68bce3-e8cd-4db1-96e7-fbcaf984b709)
$ lsblk -o Name,PARTTYPE
NAME                                          PARTTYPE
sda
├─sda1                                        c12a7328-f81f-11d2-ba4b-00a0c93ec93b
├─sda2                                        0fc63daf-8483-4772-8e79-3d69d8477de4
└─sda3                                        4f68bce3-e8cd-4db1-96e7-fbcaf984b709
  └─luks-26669de3-9181-481a-bc17-6eb9c1b981cb
zram0
Then install the UKI kernel image and the tool that configures it for direct boot (bypassing the GRUB bootloader) and reboot the VM (in non-confidential mode) to complete the installation (the reboot is required).
dnf install --assumeyes uki-direct kernel-uki-virt
# reboot into the new kernel
reboot
QEMU will exit and you need to restart the VM manually using start-no-cvm.sh.
Now you should see that the GRUB menu does not show up and Linux is directly
booting up. After the reboot, verify that the UKI is actually running:
./start-no-cvm.sh

$ kernel-bootcfg
# C - BootCurrent, N - BootNext, O - BootOrder
# --------------------------------------------
# C   O  -  0004  -  Fedora Linux 43 (Server Edition Prerelease) 6.17.0-0.rc1.250812g53e760d89498.18.fc44.x86_64 (UKI)
#     O  -  0003  -  Fedora
#     O  -  0001  -  UEFI QEMU QEMU HARDDISK
#     O  -  0000  -  UiApp
#     O  -  0002  -  EFI Internal Shell
Now the image is ready for use in the CVM with the SVSM.
./start-cvm.shThe TPM PCR values are now different since we a running a different kernel and the boot chain is different (no GRUB used). We need to re-seal the LUKS secret with the new PCRs, as described above in the Seal a secret section.