Getting started
This is the essential guide for getting started using TransMock. For more detailed guide based on a real-world integration please visit the blog post here. It is however still recommended to read this Getting started guide before continuing to the blog post.
This guide is based on the assumption that BTDF is utilized for deployment purposes. A guide for conventional BizTalk deployment is coming soon.
- Add a new unit test project to your solution for integration tests. A good idea might be to name it somthing like .IntegrationTests. From the NuGet pack manager install the TransMock.Framework package. If you prefer using the NPM console type the following:
Install-Package TransMock.FrameworkThe NuGet package contains all the necessary references to dependent framework packages such as BizUnit.
- In your BizTalk solution navigate to the PortBindingsMaster.xml file and tag all the receive locations and send ports with the comment based syntax for mocking as shown below:
<!-- <Mock /> -->Make sure that you have placed the tag right under the ReceiveLocation or SendPort tags respectively as shown in the snippet below:
             .....
             <SendPort Name="SomeSendPort" IsStatic="True" ... >
                 <!-- <Mock /> -->
             .....
             <ReceiveLocation Name="SomeReceiveLocation">
                 <!-- <Mock /> -->
             .....
NOTE: For mocking send ports this is a breaking change in syntax since version 0.9.7. Prior to this version the Mock tag was placed under the PrimaryTransport tag for send ports. If you have used TransMock already you have to update the bindings file to match this requirement.
- In your BTDFproj file add the following code:
             .....
             <Import Project="..\packages\TransMock.Framework.1.x.x\BTDF\TransMock.targets" />
             ......
Where 1.x.x denotes the current version of the TransMock.Framework package installed from NuGet. Make sure that this Import statement is placed at the very end of the .btdfproj file, just prior to the closing Project tag. This will ensure that the Mockifier would be invoked at the correct point in time so that the bindings file with the already mocked endpoints would be imported to the BizTalk application in order to allow for the mocking to funciton properly. At the same time this will ensure that any already existing overrides of the CustomDeployTarget target will be executed as well.
For testing BizTalk 2010 integrations only - make sure that you add the following line to a PropertyGroup section in the btdfproj file:
             .....
             <BTSVersion>2010</BTSVersion>
             ......
This property is defined in the TransMock.targets file and is used to indicate which version of BizTalk Server is being tested. The default value is 2013 which is applicable for versions 2013 and above. Hence there is no need to define a value for this property for testing solutions targeting these versions. The version of the BizTalk server is used as an input parameter for the Mockifier so that it generates the correct mock adapter configuration accordingly due to a difference in the syntax for the bindings file between versions 2010 and 2013 and up.
-
Now it is time to deploy the project by executing the btdfproj file. This is an important step which will ensure that the Mockifier is executed. As a result of this a helper class with the mocked addresses will be created. The default name of this class is MockAddresses and it is stored under the Deployment folder of your BizTalk solution. If you would like to change the placement of this file please look at the article about Customizing MockAddresses class
-
In your IntegrationTests project create a BizUnit test by utilizing the appropriate Mock* steps defined in the TransMock.Integration.BizUnit namespace.
The easiest way to show this is by an example:
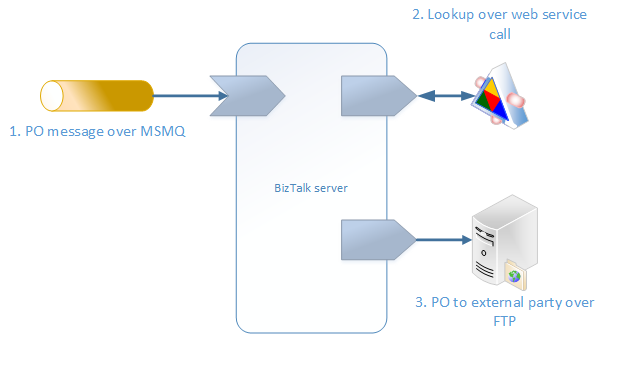
On the figure below is shown a simple integration for the infamous PO submission, involving several different systems utilizing different transports, data formats and message exchange patterns.
In order to mock the reception of the first message that is received over an MSMQ queue in real life, define a step of type MockSendStep. This step emulates one way send from an imaginary system to a one-way receive location in BizTalk. Make sure that you have set the correct mock endpoint URL and point to the correct file in the RequestPath property of the step. For convenience when setting the URL property value use the properties from the generated helper class MockAddresses, where each property has the name of the corresponding receive location or send port that has been mocked. This class is to be found under the Deployment folder under the VS solutions root and should be added manually (for now) to your IntegrationTests project. Setting the URL property is demonstrated with an example below: For simplicity let's assume that our receive location is called ReceivePO_ERP_MSMQ and that the BizTalk solution is called OrderProcess. This will result in having a helper class with name OrderProcessMockAdresses generated for us with a property called ReceivePO_ERP_MSMQ. In order to set the correct mock endpoint URL then we simply write:
var sendPOstep = new MockSendStep(){
    URL = OrderProcessMockAddresses.ReceivePO_ERP_MSMQ,
    RequestPath = "POrder_ERP.xml"
};

test.ExecutionSteps.Add(sendPOStep);
Notice that the property RequestPath is set to a file name pointing to an XML file. This file contains the actual request message that will be sent to BizTalk. In order for the framework to resolve the name to an actual file it is required to add a deployment item to the test which points to this file. For convenience it is advisable to put such files in a separate folder under the IntegrationTests projects, like for instance TestData. Adding a deployment item for this file will look something like shown bellow, assuming the test method is called OrderProcess_HappyPath:
[TestMethod]
[DeploymentItem(@"TestData\POrder_ERP.xml")]
public void OrderProcess_HappyPath()
{
    var test = new BizUnit.Core.TestRunner.TestBuilder();
    ....
}
This will be more than sufficient to be able to refer the file within the test method by its name only. Make sure that all the test files have their "Build action" in the Properties window in Visual studio set to "Content" as well as the "Copy to Output Directory" property is set to "Copy always".
Then it is time to mock the web service that receives a request from and sends a response back to BizTalk server. Mocking this service is achieved by utilizing the MockRequestResponseStep test step. This step should have values set for the URL and ResponsePath properties. The URL value is set the same way as the example above - just remember to use the property named as the corresponding send port. Lets assume that this is a RESTFul service talking Json and the send port used for consuming it is called Send_Enquery_WMS_WebHTTP. The snippet below shows how the step will be configured:
...
var receiveInventoryEnqueryStep = new MockRequestResponseStep(){
    URL = OrderProcessMockAddresses.Send_Enquery_WMS_WebHTTP,
    ResponsePath = "WMSResponse_Success.json"
};

test.ExecutionSteps.Add(receiveInventoryEnqueryStep);
...
Note that the file name referred in the ResponsePath should also be added as a deployment item as shown above.
Finally we mock the sending of a flat file over FTP to the trading party's mainframe with the help of the MockReceiveStep test step. Lets assume that the send port is using the SFTP adapter and is called Send_PO_ExternalSupplier1_SFTP, and that the PO is represented as a flat file in ISO-8859-1 encoding. The snippet bellow depicts how this step will be set:
...
var sendPOToExternalPartyStep = new MockReceiveStep(){
    URL = OrderProcessMockAddresses.Send_PO_ExternalSupplier1_SFTP,
    Encoding = "ISO-8859-1"
};

test.ExecutionSteps.Add(sendPOToExternalPartyStep);
...
The result of the above operations is shown in the picture below:
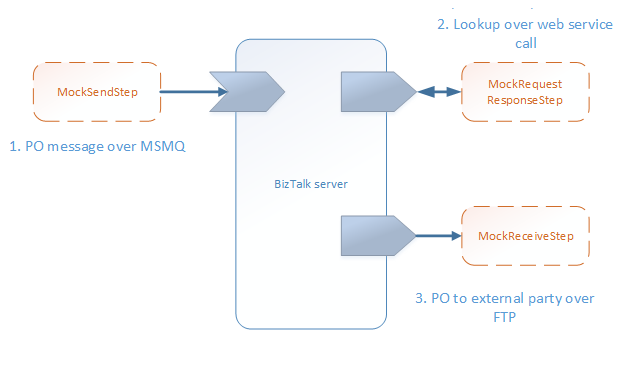
All the involved systems and related infrastructure have been seamlessly replaced by a set of Mock* BizUnit test steps!
-
Make sure that you have the appropriate test files in your test project and that they are properly referred to by the test case. Having correctly structured data with representative values as per the particular requirements for a given interface is an imperative pre-requisite for successful testing! The easiest way to start with getting hold of test data is if you have access to previously used system generated files. If not then generating an instance file from a corresponding XSD schema in VisualStudio is also a very easy way to start. For more complex messages with multi layer nested XML this might be a bit time consuming, but keep in mind that perhaps not all fields should have a specific value. In fact the Generate Instance tool creates all the elements in an XML or flat file with some random data that conforms to the defined formatting rules for the specific element. Hence one can focus on setting specific values to only those elements/attributes that are really required for the integration to work correctly and then continue to expand by setting more appropriate values to the remaining fields whenever seen necessary.
-
Finally it is time to hit the Run tests button and if everything is right with the test and the integration implementation itself, the test should run successfully. You can then inspect the BizTalk group hub and should be able to see the message flow which has been driven by the test case execution.
NOTE: If you have dynamic send ports in your solution read the Advanced usage page for learning how to mock such ports.