| Date | |
|---|---|
TODO |
Assigned |
TODO |
Due |
| Status |
Reported by The Reporter, TNN from TODO on TODO
A bold new proposal from The Mayor promises to make money waves of magnificent magnitudes in the shallower parts of term-world's economic landscape. The Mayor refers to his brainchild as "Prop Stop n' Shop", an apt name for a measure meant to meaningfully magnify the microeconomies of myriad term-world neighborhoods.
"Prop Stop n' Shop" sets aside nearly 10% of each residential area's acreage for purely profitable purposes. It's The Mayor's hope that this endeavor will help jumpstart a jetlagged economy--putting a little more jingle-jangle in our citizen's jean pockets.
The Mayor is formally tasking the residents of each neighborhood with the creation of a neighborhood bodega that might showcase the unique cultures (and commercial capabilities) of each of term-world's compact communities. We wager that within a week or two we should witness the wonders of their work--our wallets certainly can't wait!
In this set of activities we cover:
- Markdown
- working collaboratively using Github
- branching
- merging
- issuing "Pull Requests"
You'll complete three main tasks:
- Developing a department of the bodega that contains
10items in list file (more below) - Collaborating a website for your bodege that demonstrates all it has to offer
- Completing a collaborative reflection authored by all of the members of your neighborhood
We haven't yet talked directly about Markdown, though we've used it a couple of times. The following video introduces you to the ideas behind Markdown and fellow citizen, Professor Bonham-Carter.
If you wish to review previous learning objectives from our assignments, you can visit the Syllabus for helpful information. However, it's also important to make an effort to retain what we have covered thus far as we progress through the course sections of the Readme might be taken out.
In order to complete the workload for the bodega you'll first need to clone the bodega repository into your workshop.
When you clone a repository you're duplicating its contents and adding them to your local workspace. Since you'll be working collaboratively with your neighbors, you'll each need your own copy of the bodega to work with.
Steps to clone collaborative assignments are the same as individual work, and are available in our course CONTRIBUTING.md file.
You must create a branch named for your department in which to conduct your work.
To stock your bodega, each group member is in charge of a single "department" (i.e. category) of items to stock. To stock a department, you must first have a list of items to stock! Here, each person must create a single *.list file containing a new item on each line.
To do this:
- find your
bodega'sstockroomfolder in your file explorer - right click the folder and select
New File - create a file whose name is
DEPARTMENT.list- e.g.
savorysnacks.list
- e.g.
- add no fewer than
10items to your list - follow all python variable naming rules
- no dashes
- no symbols beyond
_ - numbers cannot start the object name (unless spelled out)
Once you've created your list, run the Stocker.py to stock the department. This should create a folder and fill it with goods.
Once finished, running Counter.py should inventory your store!
You must create a branch named YOUR_DEPARTMENT-SITE to conduct your work.
All of the files for your bodega site are located in the site folder. Every neighborhood member should make a "post" in their own file in the _posts folder. This file's name must follow the naming convention:
YEAR-MONTH-DAY-DEPARTMENT_NAME.md
You will need to copy the example file to make your department file. Be sure to rename it using the convention above.
- Provide a short description of yoru department and
- using a Markdown list, list what your department contains
Each .md file contains information about the department page. For example:
---
layout: post
title:  "example"
author: cliv3
categories: [ bodega, departments ]
image: assets/images/bodega_template.png
---
This information helps create, categorize, and design the post. Change it to reflect your contribution to the bodega site (via department).
Anything appearing below this header uses Markdown. See earlier in this section for information on what to write here.
Create one branch called about-page to capture your work on this section of the assignment; all members should contribute to the same branch.
Your group should also edit the about page to give an overview of your bodega and neighborhood. This file is in the pages folder and follows a similar composition as the posts discussed above.
Do not rename or copy this file -- edit the content directly in it.
Create one branch called reflection to capture your work on this section of the assignment; all members should contribute to the same branch.
All of the above tasks completed, finish the collaborative reflection located in the breakroom.
This assignment begins your opportunity to propose and improve the world of term-world at-large. For this assignment, proposals may include making graphics to improve the bodega site experience, creating new items or actions in the traffic-circle itself or another assignment-related improvement not contemplated in the prior narrow categories.
To make an improvement proposal, you must create an issue on this repository. Do so by:
- clicking the
Issuestab at the top of the page. - clicking the green
New Issuebutton - selecting the
Improvement Proposaltemplate
Make sure to link your issue with the pull request you used to make your actually improvement.
Here are some proposal suggestions you can consider implementing for this assignment. Please choose one (and only one) to file using the term-world Improvement Proposal system.
| Improvement Suggestions | Description |
|---|---|
| Design | Add an illustrative header to your bodega department |
| Design | Create a logo for the bodega front page |
| Design | Replace the TNN ad with a neighborhood/bodega-specific ad |
| Markdown | Create a compelling ad copy for your bodega's "About" page |
| Markdown | Create compelling ad copy for your bodega department |
| Data | Add bodega departments to the page menu using _data/menus.yml |
| Programming | Greet visitors on entry to the bodega using the WelcomeSign.py file |
| Programming | Display an ASCII-art logo for your bodega in the WelcomeSign.py file |
| Programming | Figure out how to run the Counter.py file on visitor entry (using the .events file) |
If you are not following an improvement suggestion, you will need to have your improvement approved in writing through the Improvement Proposal process.
Even when working collaboratively with others on a single project, you'll still need to add, commit, and push your work. However, there's a few additional steps that keep your group's workflow organized.
Each repository has a main branch that represents exactly that, the "main" version of the repository. This is the version that is cloned whenever somebody runs a git clone command with that repository as its target, and the contents of main are what is pulled when somebody updates their local workspace's version of the repository with git pull.
However, each repository can also have multiple alternative versions of itself that simultaneously exist. These versions are referred to as "branches".

Branches are very useful when collaborating with other people on the same project--they can keep multiple portions of a developing project organized, and keep partially implemented (or incomplete) code from interfering with other developers.
You'll see firsthand just how useful this is as we work collaboratively over the next couple weeks, but for now, trust us: going through the extra couple of steps to branch your work when starting a new project (especially when working with other people) is a proactive step to avoiding many a headache later in the development process.
So, how do we do all this good stuff?
After having cloned the repository you wish to branch in:
- locate the repository in your
Source Controlsidebar - click the
...menu to expand source control options - locate and click the
Branch >menu - find and click
Create branch

- name your branch

Notice that the branch on the Status bar has changed from main to the name of the branch you've created. You're now on that branch!

This can happen one of two ways:
- click the name of the
branchon the Status bar at the bottom of the screen and choose a new branch - click the name of the
branchyou're on in theSource Controlwindow next to the repository name you'd like to switch in
As written above, clone operations for collaborative assignments stay the same. However, contributing your work is a bit different. Here, we're going to use branches to submit changes for consideration. The Pull Request process, detailed next, governs whether or not those changes make it in to the final work.

The first time you put your branch on GitHub, you'll be asked to Publish it. This is just like synchronizing your changes. Once you're finished doing so, you should be able to see your branch on GitHub.
If this is truly a collaborative effort, we should be able to coordinate their changes, too. (And, we can.)
To retrieve changes to a branch that already exists and is already published to Github:

- make sure you're on the branch you wish to synchronize
- check your Status bar to see if the
branchname matches thebranchyou wish to update
- check your Status bar to see if the
- click the
...menu and locate thePulloption - click
Pull
If a branch exists on GitHub, and it's not part of your local collection, we need to fetch information from GitHub first.
- locate the
...menu inSource Control - click the
Fetchoption to update your copy of the repository

In the above figure:
branches you have have theSource Controlbranching iconbranches still on the remote feature an icon that looks like a cloud- after
Fetching, switch to thebranchyou'd like to update - follow the above steps to
Pull
Once you've completed this step, you'll now need to create a pull request on GitHub. This is a formal request to other collaborators on your project to review the code you've submitted--an important step when working together on the same project.
In a web browser, navigate to the repository page on GitHub (for the repository that you've just submitted new changes for). Towards the upper-left corner you'll see a dropdown that will have main selected as default (main being one of the branches for your repository, this is the "production-ready" branch). Select your branch from the dropdown, and you may see a yellow box prompting you to create a pull request; click that if you see it, or navigate to Pull Requests at the top and subsequently click the green New pull request button.

Now, in the top left corner select the branch you wish to add your updated changes to, or the "base" branch--generally speaking this will likely be main, the aforementioned "production-ready" branch. In the bar on the righthand side, add Reviewers to the pull request (this should be all of your neighborhood collaborators). Finally, click Create pull request.

You'll also be responsible for responding to and reviewing pull requests created by other collaborators on your team. Comment on each other's work about changes you'd like to see made to code submitted, and be sure to keep all communication both specific and professional.
Regardless of the method that you use to merge your changes, you should obey the golden rule of collaboration:
discuss all changes with your fellow citizens to understand what content you should include
As with all collaboration, we should default to behaviors which promote collaboration.
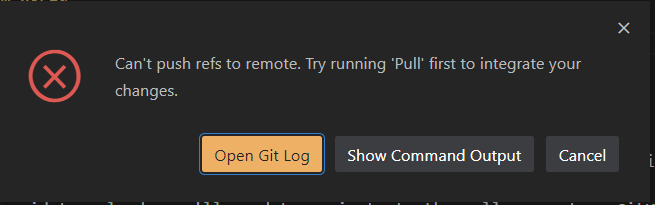
At some point, you may attempt to synchronize your changes only to see something like the following message:

This indicates that we need to manage a conflict. Here, we have the ability to click several options to choose which changes we accept.
After all collaborators have had a chance to weigh in on a new pull request, if the work is up to snuff and ready to join the "production-ready" main branch, then your designated neighborhood team lead will have to merge that work into the main branch.
If you are said team lead, you'll need to navigate to the pull request on GitHub. If there are no "conflicts" (i.e., differences that can't be automatically handled by GitHub) between the pull request's branch and the main branch, simply click the Commit merge button and the merge is complete!
In some cases however, you'll have to specify what parts of a pull request make it into the main branch. If that's the case, you'll instead see a Resolve conflicts button. Click that and you'll be presented with a proposed merged copy of the code, with some extra lines added in. Something akin to:
<<<<<<< HEAD
To reconcile
=======
At some point, you may attempt to synchronize your changes only to see something like the following message:
This indicates that we need to manage a _conflict_.
>>>>>>> 9eb36e10772091394f7b61bfb8eeef32971b8b1d
To resolve said conflicts, you'll need to delete the portion of code you don't want to appear in the final product, as well as any <<<<<<, =======, or >>>>>> lines. The HEAD designation represents what you currently have. The long-numbered entry below the ======== represents the incoming change being proposed.
Once complete, click Mark as resolved followed by Commit merge, and the changes on the branch will be joined with the main branch! This will update your local workspace with the content stored in the main branch.
While we may use this server to store code, you are responsible for using GitHub as your main backup.
In the event that the term-world server goes down for any unforeseen reason, your work may be lost. Though this server is backed up on a regular (i.e., weekly) basis, there is no guarantee that up-to-the-minute data for your work will be restored.
Remember: to err is human; to back up your work is divine.