
![]()
![]()


Local builds:
- NPM
- NodeJS v14
- s2i and Podman
The bot can be configured via a local YAML config file. It watches for changes on this file and reflects the new config internally while running.
Configuration file is specified via SLACK_BOT_CONFIG environment variable. Additionally on call team members can be read from a separate config file specified by ON_CALL_MEMBERS_CONFIG environment variable.
Basic settings:
supportChannelId: ID_OF_SUPPORT_CHANNEL # e.g. C01RY7X79R9
onCall:
   slack: U12345 # Slack user ID
github: github_usernameA person on call duty can be assigned either directly via:
onCall:
   slack: U12345 # Slack user ID
   github: github_username
Or a team can be scheduled using various rotation schemes:
onCall:
  schedule: daily|weekly
  override:
    slack: U123450
    github: github_username0
  members:
    - slack: U123451
      github: github_username1
    - slack: U123452
      github: github_username2
Schedule value has to be exactly:
daily: Rotates through members list on daily basisweekly: Rotates the on-call duty person every week
Seting a value to the override property forces duty for this user. This property is optional and if set the bot behaves the same as with onCall: person-on-call-duty@example.com settings.
Known limitations:
- Exchanging duties/re-scheduling is possible only via reordering the
memberslist or viaoverride dailyrotation works with 7 days long weeks only. That means people will be scheduled/rotated for weekends as well.
Bot tries to make it easier for any on-call person by pattern matching messages in #support channel and offering links to FAQ documents. This is configured via faqs section of the config:
faqs:
  - name: Description displayed on the message
    regexp: /regexp/i # Can be either a string or a full JS regexp
    url: https://example.com/some/link/to/docs.md
You can define as many FAQ matches as you need. If multiple FAQs are matched for a single message, all are offered to the user.
By default the bot can file issues to all repositories you grant it access to.
If you wish to restrict it, you can whitelist repositories for this feature declaratively:
github:
  issues:
    access:
      - organization/repo
      - organization/repo2
Additionally, the labels for newly opened issues can be configured as well:
github:
  issues:
    labels:
- label3Type /oncall and the bot will tell you who is the dedicated support person on call duty for today.

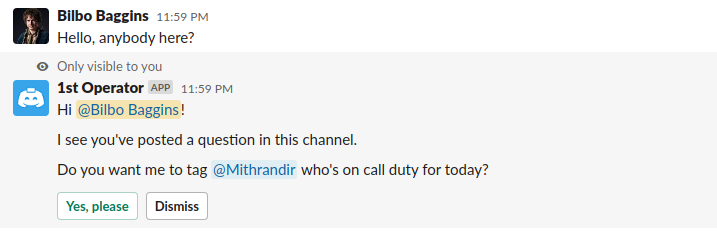
If the bot notices a message in the #support channel's main thread, it will offer the sender to tag the person on call duty for the day. The conversation with this person is opened as a thread to the original message.
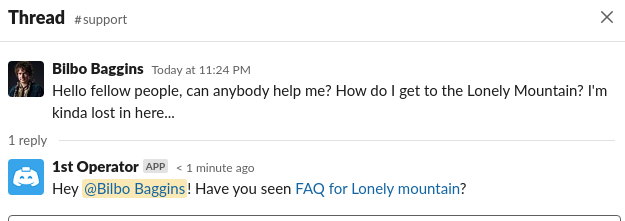
If the bot notices messages in the #support channel's main thread that contains a predefined regexp, it starts a new thread and links FAQ document for each matched regexp.
If you want to raise a particular message to attention of the support team, select Ask for help in a message's context menu (click on More actions).
If you want to start a chat with the support team immediately, select Ask for help from the Shortcuts menu. A message thread will be started in the #support channel for you.
If you want to capture a post or a thread into a GitHub issue, select Create issue in a message's context menu (click on More actions).

Type help in a DM to the bot to receive a full feature list any time.
Bot also supports ChatOps and label actions on GitHub. Add bot/assign-to-oncall label to an issue on watched repository or comment on said issue with /assign-to-oncall to assign person on call duty.
Locally in development mode runs the bot in a hot reloading mode - automatically recompiling on code changes. The config file is also reloaded on any changes.
-
Install all dependencies:
$ npm install
-
Start a local ngrok session
$ ngrok http 3000

Session Status                online
Session Expires               1 hour, 59 minutes
Update                        update available (version 2.3.35,Ctrl-U to update)
Version                       2.3.35
Region                        United States (us)
Web Interface                 http://127.0.0.1:4040
Forwarding                    http://091a516d41fc.ngrok.io -> http://localhost:3000
Forwarding                    https://091a516d41fc.ngrok.io -> http://localhost:3000
Note the
https://...address for Forwarding. We will use this address with/slack/eventsendpoint as Bot URL. E.g.https://091a516d41fc.ngrok.io/slack/events.Please remember that the Ngrok session expires every 2 hours. After this time you have to renew it and you will receive new DNS name, therefore a new Bot URL.
-
Prepare local environment:
cat <<EOF > .env
SLACK_BOT_TOKEN=xoxb-****           # Obtained from Slack config, see Setup Slack application
SLACK_SIGNING_SECRET=****           # ^
SLACK_BOT_CONFIG=./dev.config.yaml
ON_CALL_MEMBERS_CONFIG=./dev.members.yaml
GITHUB_APP_ID=number                # Obtained from Github App config, see Setup Github App
GITHUB_INSTALLATION_ID=number       # ^
GITHUB_PRIVATE_KEY=github.pem       # ^
EOF
-
Create local configuration file at
./dev.config.yaml -
Start local dev instance
$ npm run dev

[0] 2:30:21 PM - Starting compilation in watch mode...
[0]
[1] ⚡️ Bolt app is running!
[1] [nodemon] restarting due to changes...
[1] [nodemon] restarting due to changes...
[1] [nodemon] restarting due to changes...
[1] [nodemon] starting `node dist/app.js`
[0]
[0] 2:30:23 PM - Found 0 errors. Watching for file changes.
[1] [nodemon] restarting due to changes...
[1] [nodemon] restarting due to changes...
[1] [nodemon] starting `node dist/app.js`
[1] ⚡️ Bolt app is running!
If you desire to run the bot locally in container, follow the Run bot locally guide up until the last step. Instead of the last step run:
npm run s2i:build
podman run \
    --env-file=.env \
    -e SLACK_BOT_CONFIG=/mnt/config.yaml \
    -e GITHUB_PRIVATE_KEY=/mnt/github.pem \
    --mount type=bind,source=dev.config.yaml,dst=/mnt/config.yaml \
    --mount type=bind,source=github.pem,dst=/mnt/github.pem \
    -p 3000:3000 \
    slack-first:latest
This launch method uses npm start command which runs the production build of the bot - Hot reloading is disabled.
-
Create your own test Slack workspace.
-
Create a new Slack application
-
Set subscriptions on Event Subscriptions tab:
- Toggle Enable Events
- Set Request URL to the Bot URL obtained from Ngrok with
/slack/eventspath. - Expand the Subscribe bot to events and add following subscriptions:
member_joined_channelmessage.channelsmessage.groupsmessage.immessage.mpim
- Save Changes
-
Enable interactivity at Interactivity & Shortcuts tab:
-
Toggle Interactivity
-
Set Request URL to the Bot URL obtained from Ngrok with
/slack/eventspath. -
Set Options Load URL in the Select Menus section to the Bot URL obtained from Ngrok with
/slack/eventspath. -
Add following shortcuts via Create New Shortcut button:
Name Scope Description Callback ID Ask for help Global Get help from a support person on-call duty tag_on_call_personAsk for help Message Get help from a support person on-call duty tag_on_call_personCreate issue Message Creates an issue from a thread or a message open_issue_for_thread -
Save Changes
-
-
Setup commands on Slash Commands tab via Create New Command dialog:
Command Request URL Short Description User hint /oncallBot URL from Ngrok Tag support person on on-call duty n/a -
Set additional permissions for the app on OAuth & Permissions tab (most of them should already be added, please check the list thoroughly) and Save Changes afterwards:
channels:historychannels:readchat:writecommandsgroups:historygroups:readim:historympim:historyusers:readusers:read.email
-
Obtain credentials:
SLACK_BOT_TOKENcan be found on OAuth & Permissions tab in the Bot User OAuth Token field and starts withxoxb-SLACK_SIGNING_SECRETis the Signing Secret found on Basic Info tab
-
Reinstall your application to the workspace to propagate OAuth permission changes.
Note: Every time the Ngrok session is rotated, the Bot URL changes - this change has to be reflected in Slack App configuration. Please change the Bot URL in Slack application web UI:
- Event Subscriptions tab - Request URL. (The bot must be already running, otherwise Slack won't let you change this value.)
- Interactivity & Shortcuts tab - Request URL.
- Slash Commands tab - edit each command.
- Create new GitHub App
- Fill in a name, homepage URL (can be any valid URL starting with
http://orhttps://) - Set Webhook URL to the Bot URL obtained from Ngrok with
/github/eventspath. - Set Webhook secret to
first-operator. - In Repository permissions section enable Read & Write for Issues scope.
- In Subscribe to events section enable Issues and Issue comment scopes.
- Hit Create GitHub App
- Install your application:
- Go to Install App tab
- Click Install and confirm granted permissions
- In Repository access select all repositories that you want this bot to have access to.
- Obtain credentials:
- Go to your GitHub Apps page and click Edit
GITHUB_APP_IDis App ID in the About section on the General tabGITHUB_INSTALLATION_ID: on Install App tab click the gear button. Check the URL for your installation ID:https://github.com/settings/installations/THIS_IS_THE_IDGITHUB_PRIVATE_KEY: On the General tab scroll to Private Keys section and click Generate a private key. Save the key to your machine and set path to this file into theGITHUB_PRIVATE_KEYvariable
-
Build the image
npm run s2i:build
-
Tag the container image and push to repo
podman tag slack-first quay.io/operate-first/slack-bot
podman push quay.io/operate-first/slack-bot
Use the manifests/base folder as your remote kustomize base.
For development purposes the dev overlay contains all necessary secrets to access myfancytestworkspace.slack.com Slack workspace. Apply via:
kustomize build --enable_alpha_plugins manifests/overlays/dev | kubectl apply -f -