-
Notifications
You must be signed in to change notification settings - Fork 13
docs: create an interledger wallet address guide #14
New issue
Have a question about this project? Sign up for a free GitHub account to open an issue and contact its maintainers and the community.
By clicking “Sign up for GitHub”, you agree to our terms of service and privacy statement. We’ll occasionally send you account related emails.
Already on GitHub? Sign in to your account
Open
motuncoded
wants to merge
9
commits into
WriteTech-Hub:main
Choose a base branch
from
motuncoded:main
base: main
Could not load branches
Branch not found: {{ refName }}
Loading
Could not load tags
Nothing to show
Loading
Are you sure you want to change the base?
Some commits from the old base branch may be removed from the timeline,
and old review comments may become outdated.
Open
Changes from all commits
Commits
Show all changes
9 commits
Select commit
Hold shift + click to select a range
cab5188
docs: set up the submission folder
motuncoded 35dfa24
docs: Update setup documentation
AnalytixTech 357f0da
docs: create the tutorial.md file
motuncoded 52647e0
docs: create the tutorial.md file
motuncoded d4c2fc3
docs: Add use case for automating payouts with Chimoney API
Bridgetamana 2edaa64
Merge branch 'main' of https://github.com/motuncoded/wth-write-a-thon…
motuncoded 3b0c0fe
docs: add the setup guide in the tutorial.md'
motuncoded 91277e0
docs: refractor the files
motuncoded 8bdeb04
docs: change the folder for markdown file
motuncoded File filter
Filter by extension
Conversations
Failed to load comments.
Loading
Jump to
Jump to file
Failed to load files.
Loading
Diff view
Diff view
There are no files selected for viewing
Binary file added
BIN
+339 KB
submissions/Create-Interledger-wallet-address-Motunrayo/assets/api-setup.gif
Loading
Sorry, something went wrong. Reload?
Sorry, we cannot display this file.
Sorry, this file is invalid so it cannot be displayed.
Binary file added
BIN
+465 KB
submissions/Create-Interledger-wallet-address-Motunrayo/assets/postman-setup.gif
Loading
Sorry, something went wrong. Reload?
Sorry, we cannot display this file.
Sorry, this file is invalid so it cannot be displayed.
145 changes: 145 additions & 0 deletions
145
submissions/Create-Interledger-wallet-address-Motunrayo/setup.md
This file contains hidden or bidirectional Unicode text that may be interpreted or compiled differently than what appears below. To review, open the file in an editor that reveals hidden Unicode characters.
Learn more about bidirectional Unicode characters
| Original file line number | Diff line number | Diff line change |
|---|---|---|
| @@ -0,0 +1,145 @@ | ||
| # Chimoney Interledger Wallet Address Setup Guide | ||
|
|
||
| ## Generate a Interledger Wallet Address using Chimoney Sandbox API | ||
|
|
||
| > **Setup Guide:** This walkthrough will help you authenticate and use Chimoney’s | ||
| > `/accounts/issue-wallet-address` endpoint to generate an ILP wallet address for a user. | ||
|
|
||
| --- | ||
|
|
||
| ### **Step 1: Create a Sandbox Account and get Your API Key** | ||
|
|
||
| ### 1. Go to [sandbox.chimoney.io](https://sandbox.chimoney.io) | ||
|
|
||
| Click *“Sign Up”* or *“Sign In”*. | ||
|
|
||
| 📸 **Screenshot Example:** | ||
|
|
||
| 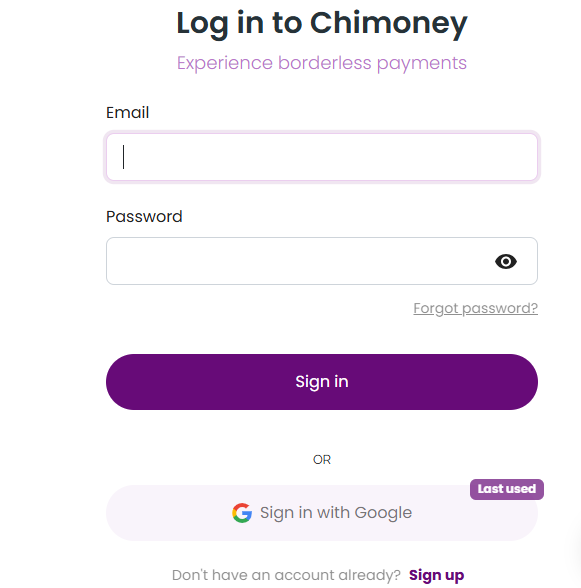 | ||
|
|
||
| ### 2. Developer Dashboard | ||
|
|
||
| Once logged in, you'll land on the **Developer Dashboard**. | ||
| Navigate to the **Developers & API** section from the sidebar. | ||
|
|
||
| 📸 **Screenshot Example:** | ||
|
|
||
| 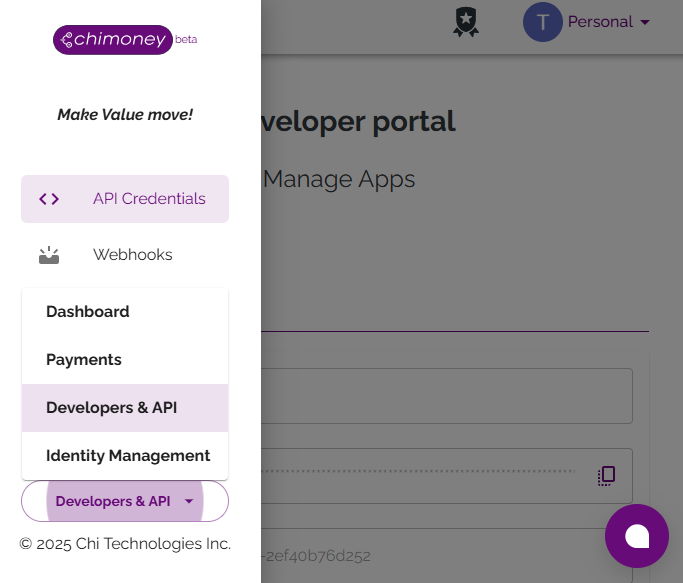 | ||
|
|
||
| ### 3. Create an App | ||
|
|
||
| Click **“Add New App”** and enter an App name. | ||
|
|
||
| Once created: | ||
|
|
||
| - Copy your **API Key** | ||
| - Copy your **User ID** (labelled as `Team ID`) | ||
| <br/> | ||
|
|
||
| 📸 **Screenshot Example:** | ||
|
|
||
| 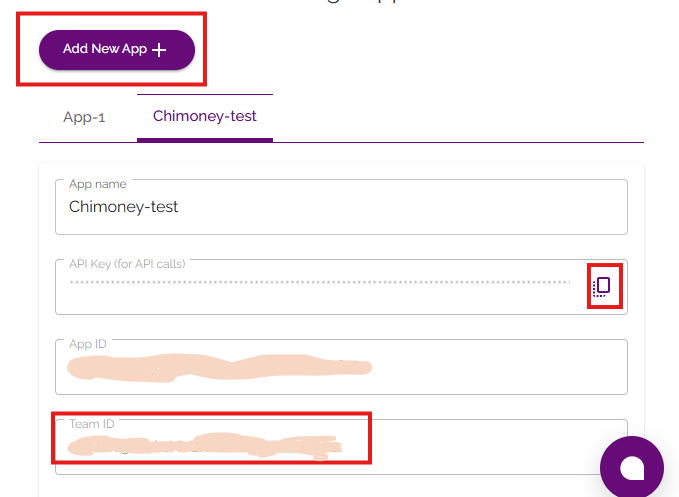 | ||
|
|
||
| > You’ll use the `Team ID` as your `userId` in requests. | ||
|
|
||
| --- | ||
|
|
||
|
|
||
|
|
||
| ### **Step 2: Make Your First API Call** | ||
|
|
||
| ### Prerequisites | ||
|
|
||
| - Chimoney [Sandbox](https://sandbox.chimoney.io) developer account | ||
| - Your **API key** from the Developer dashboard | ||
| - Your **Team ID** (used as `userId`) | ||
| - A unique **ilpUsername** (e.g. `jane.doe`) | ||
| - Postman or cURL for testing the endpoint | ||
|
|
||
| --- | ||
| ### 1. Set Up Authentication in Postman | ||
|
|
||
| - Open your collection or create a new **POST** request. | ||
| - Under **Headers** tab, add: | ||
|
|
||
| | Key | Value | | ||
| | ------------ | ---------------------- | | ||
| | X-API-KEY | `YOUR_SANDBOX_API_KEY` | | ||
| | Content-Type | `application/json` | | ||
|
|
||
| <br/> | ||
|
|
||
| 📸 **Screenshot Example** | ||
|
|
||
| 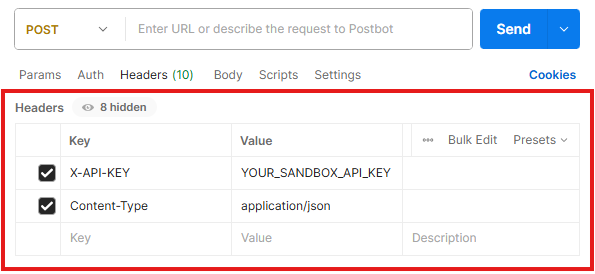 | ||
|
|
||
| ### 2. Configure the Request | ||
|
|
||
| - **Method & URL** | ||
|
|
||
| ```bash | ||
| POST <https://api-v2-sandbox.chimoney.io/v0.2.4/accounts/issue-wallet-address> | ||
| ``` | ||
|
|
||
| - **Body (raw JSON)** | ||
|
|
||
| ```json | ||
| { | ||
| "userID": "your_team_id", | ||
| "ilpUsername": "jane.doe" | ||
| } | ||
| ``` | ||
|
|
||
| <br/> | ||
|
|
||
| 📸 **Screenshot Example** | ||
|
|
||
| 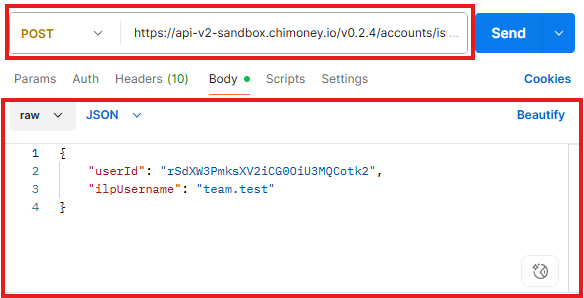 | ||
|
|
||
|
|
||
| ### 3. Send & Verify | ||
|
|
||
| - **Click on **Send** in Postman** | ||
| - **Look for 200 OK response** | ||
|
|
||
| ```json | ||
| { | ||
| "status": "success", | ||
| "message": "Wallet Address issued succesfully", | ||
| "data": { | ||
| "id": "", | ||
| "createdAt": "2025-07-22T22:09:21.756Z", | ||
| "publicName": "Public Name", | ||
| "url": "https://ilp-sandbox.chimoney.com/user", | ||
| "status": "ACTIVE", | ||
| "asset": { | ||
| "code": "USD", | ||
| "createdAt": "2024-08-24T19:57:56.102Z", | ||
| "id": "", | ||
| "scale": 2, | ||
| "withdrawalThreshold": null | ||
| }, | ||
| "additionalProperties": [] | ||
| } | ||
| } | ||
| ``` | ||
|
|
||
| <br/> | ||
|
|
||
| 📸 **Screenshot Example** | ||
|
|
||
| 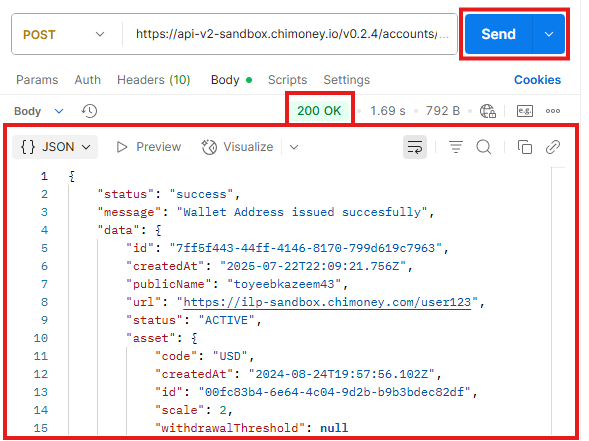 | ||
|
|
||
| ### **4. Common Errors & Fixes** | ||
|
|
||
| | HTTP Status | Type | Code | Message | Likely Cause | Suggested Fix | | ||
| |-------------|------------------|--------------------------|-----------------------------------------------|-------------------------------------------|--------------------------------------------------| | ||
| | 400 | Validation Error | INVALID_REQUEST | The request parameters are invalid. | `userId` or `ilpUsername` is invalid or missing | Double-check the request body and field formats | | ||
| | 401 | Unauthorized | – | Unauthorized access | API key is missing or incorrect | Ensure `X-API-KEY` is present and valid in header | | ||
| | 500 | Server Error | INTERNAL_SERVER_ERROR | An internal server error occurred. | Issue on Chimoney’s end or malformed request | Try again later or contact Chimoney support | | ||
|
|
||
| ### 5. Troubleshooting Tips | ||
|
|
||
| - Use your exact teamId as `userId` from the app settings — not a random string. | ||
| - If you get 401, re-copy the API key from the dashboard. | ||
| - Use a unique `ilpUsername` per user (you can reuse the same userId for multiple ILP addresses). |
72 changes: 72 additions & 0 deletions
72
submissions/Create-Interledger-wallet-address-Motunrayo/tutorial.md
This file contains hidden or bidirectional Unicode text that may be interpreted or compiled differently than what appears below. To review, open the file in an editor that reveals hidden Unicode characters.
Learn more about bidirectional Unicode characters
| Original file line number | Diff line number | Diff line change |
|---|---|---|
| @@ -0,0 +1,72 @@ | ||
| # Chimoney Create Interledger Wallet Address Tutorial | ||
|
|
||
| In this tutorial, you’ll learn how to use Chimoney’s create interledger wallet address endpoint to send money to an Interledger wallet address. | ||
|
|
||
| This guide will walk you through the process step-by-step, from setting up your account to making your first API call. | ||
|
|
||
|
|
||
| ## Overview | ||
| Chimoney’s Interledger Wallet Address is a digital account associated with a user that enables seamless, secure, and instant cross-border transactions using the Interledger Protocol (ILP). This wallet address acts like a virtual bank account on the blockchain or digital asset network, allowing users to send and receive international payments efficiently. | ||
|
|
||
| ### Purpose of the Tutorial | ||
| This tutorial is designed to help you set up your Chimoney account, obtain your API key, and make your first API call to create an Interledger wallet address. | ||
|
|
||
|
|
||
| ## Tutorial Steps | ||
| This section will walk you through the step by step process to create an Interledger wallet address using Chimoney’s API. | ||
|
|
||
| ### Step 1: Create a Sandbox Account & Get Your API Key | ||
|  | ||
|
|
||
| 1. Go to the [sandbox.chimoney.io](https://sandbox.chimoney.io) and sign up for a new account. | ||
| 2. Once the account is created, log in to the Chimoney dashboard. | ||
| 3. Navigate to the API section and generate a new API key. Make sure to save this key securely, as it’s needed to authenticate the API requests. | ||
| 4. There is need `Team ID`, which is used as the `userId` in API requests. | ||
| 5. Ensure a unique Interledger protocol `ilpUsername` (e.g., `jane.doe`) that will be used in the API requests. | ||
|
|
||
|
|
||
|
|
||
| ### Step 2: Make Your First API Call | ||
|
|
||
|  | ||
|
|
||
| _Remember to create a workspace to test your API calls in [Postman](https://postman.co/workspace/create)_ | ||
|
|
||
|
|
||
|
|
||
| ### 1. Set Up Authentication in Postman | ||
| 1. Open Postman and create a new request. | ||
| 2. In the request settings, go to the "Authorization" tab. | ||
| 3. Select "API-KEY" as the type, X-API-KEY as the key and enter your API key in the "value" field. | ||
|
|
||
| ### 2. Configure Request Body | ||
| 1. Set the request method to **POST**. | ||
| 2. Enter the following URL: `https://api-v2-sandbox.chimoney.io/v0.2.4/accounts/issue-wallet-address` | ||
| 3. In the "Body" tab, select "raw" and choose "JSON" as the format. | ||
| 4. Enter the following JSON payload: | ||
| ```json | ||
| { | ||
| "userID": "user123", | ||
| "ilpUsername": "chimoney_user123" | ||
| } | ||
| ``` | ||
| Replace `userID` with the Team ID of the user and `ilpUsername` with the desired Interledger username. | ||
|
|
||
|
|
||
|
|
||
| ### 3. Send & Verify | ||
| 1. Click the "Send" button to make the API call. | ||
| 2. If the request is successful with a 200 OK status, you will receive a response containing the new Interledger wallet address. | ||
|
|
||
| ### 4. Common Errors & Fixes | ||
|
|
||
| - **Error 400: Bad Request**: This error indicates that the request payload is malformed. Ensure that you are sending a valid JSON payload with the required fields. | ||
| - **Error 401: Unauthorized**: This error occurs when the API key is missing or invalid. Double-check your API key and ensure it is included in the request headers. | ||
| - **Error 500: Internal Server Error**: This error is returned when there is an issue with the Chimoney API. If you encounter this error, try again later or contact Chimoney support. | ||
|
|
||
| ### 5. Troubleshooting Tips | ||
| - Ensure that you are using the correct API endpoint and HTTP method. | ||
| - Double-check your request headers and payload for any errors. | ||
| - If you continue to experience issues, consult the [Chimoney API documentation](https://chimoney.readme.io/reference/post_v0-2-4-accounts-issue-wallet-address) or reach out to their support team for assistance. | ||
|
|
||
|
|
54 changes: 54 additions & 0 deletions
54
submissions/Create-Interledger-wallet-address-Motunrayo/use-case.md
This file contains hidden or bidirectional Unicode text that may be interpreted or compiled differently than what appears below. To review, open the file in an editor that reveals hidden Unicode characters.
Learn more about bidirectional Unicode characters
| Original file line number | Diff line number | Diff line change |
|---|---|---|
| @@ -0,0 +1,54 @@ | ||
| # How Hackathon Organizers Can Automate Payouts with Chimoney | ||
|
|
||
| This article shows how hackathon organizers can use the Chimoney `accounts/issue-wallet-address` API to simplify and speed up prize payouts to participants around the world. By pre-issuing Interledger wallets, organizers can offer a smooth payout experience. | ||
|
|
||
|
|
||
| ## The Challenge | ||
|
|
||
| Running a global hackathon comes with a lot of challenges, especially when it’s time to send out prizes. using traditional payment methods often mean: | ||
|
|
||
| - Asking for sensitive banking details from people in many countries. | ||
| - Managing slow and expensive international bank transfers. | ||
| - Excluding participants in countries with limited access to global payment. | ||
|
|
||
| These problems add extra work for organizers and delay winners from receiving their prizes. | ||
|
|
||
| ## The Solution | ||
|
|
||
| Chimoney's `accounts/issue-wallet-address` API offers a better way. Instead of collecting payment details manually, hackathon platforms can automatically create an Interledger (ILP) wallet for each participant as they register. | ||
|
|
||
| This means every participant, no matter where they’re from, has a wallet ready to receive money instantly. This makes payouts fast, secure, and easy for everyone involved. | ||
|
|
||
|
|
||
| ## Use Case | ||
|
|
||
| Let’s walk through a real-world example. | ||
|
|
||
| ### Step 1: Registration and Wallet Creation | ||
|
|
||
| When someone signs up for the hackathon: | ||
|
|
||
| 1. They fill in their basic info (like name and email). | ||
| 2. Behind the scenes, the platform calls the Chimoney `/v0.2.4/accounts/issue-wallet-address` API. | ||
| 3. The new wallet address is saved in the platform’s database and linked to the user’s profile. | ||
|
|
||
| With this, every participant gets a wallet without needing to do anything extra. | ||
|
|
||
| Check the setup guide to see how to use the API → [Setup Instructions](setup.md) | ||
|
|
||
|
|
||
| ### Step 2: Announcing Winners and Sending Payouts | ||
|
|
||
| When winners are chosen: | ||
|
|
||
| 1. The organizer picks the winners and prize amounts. | ||
| 2. Instead of using slow manual transfers, they send the funds using Chimoney's payout options. | ||
| 3. The money is sent directly to the Interledger wallets created earlier. | ||
|
|
||
| ## Why use chimoney's interledger wallet address API | ||
|
|
||
| Using Chimoney’s `accounts/issue-wallet-address` API brings big advantages: | ||
|
|
||
| - Open to Everyone: People from anywhere can join. | ||
| - Fast and Automated: No need to collect bank details later. | ||
| - Fewer Headaches: Organizers don’t have to deal with sensitive data or tricky payment setups. |
Add this suggestion to a batch that can be applied as a single commit.
This suggestion is invalid because no changes were made to the code.
Suggestions cannot be applied while the pull request is closed.
Suggestions cannot be applied while viewing a subset of changes.
Only one suggestion per line can be applied in a batch.
Add this suggestion to a batch that can be applied as a single commit.
Applying suggestions on deleted lines is not supported.
You must change the existing code in this line in order to create a valid suggestion.
Outdated suggestions cannot be applied.
This suggestion has been applied or marked resolved.
Suggestions cannot be applied from pending reviews.
Suggestions cannot be applied on multi-line comments.
Suggestions cannot be applied while the pull request is queued to merge.
Suggestion cannot be applied right now. Please check back later.
There was a problem hiding this comment.
Choose a reason for hiding this comment
The reason will be displayed to describe this comment to others. Learn more.
Hi @motuncoded. Thanks for putting this together! It’s a good start, but there are a few things that would make the tutorial easier to follow and more polished:
Once these changes are made, the tutorial will be much smoother, beginner-friendly, and ready for merging.