Legacy Installation
⚠ This guide applies to Fleet Manager versions up to and including v3.
You install Fleet Manager by
- Getting the installer, configuring, and running it
- Downloading Fleet Manager binaries to a place on the local disk
- Configuring Fleet Manager
- Installing it as a Windows Service
- Starting it
- Creating team administrator user account
The next sections will go through each of the steps mentioned.
Talk to Rebus FM. There's no way of downloading the installer anywhere right now, so you'll have to get in touch to get it.
It's most likely in a ZIP file named something like fm-installer-1.2.0.zip. Extract it to a location on your disk, e.g. C:\apps\fm-installer.
Open up fm7-installer.exe.config in a text editor and set the remote_repo connection string to the one handed to you from Rebus FM. It may come in the form of this XML:
<add name="remote_repo" connectionString="blablablaallkindsoffunnystuffinhere" />which you can simply put in the configuration file instead of the existing, empty setting.
When this is done, you can run it, and you should be greeted by a screen looking somewhat like this:
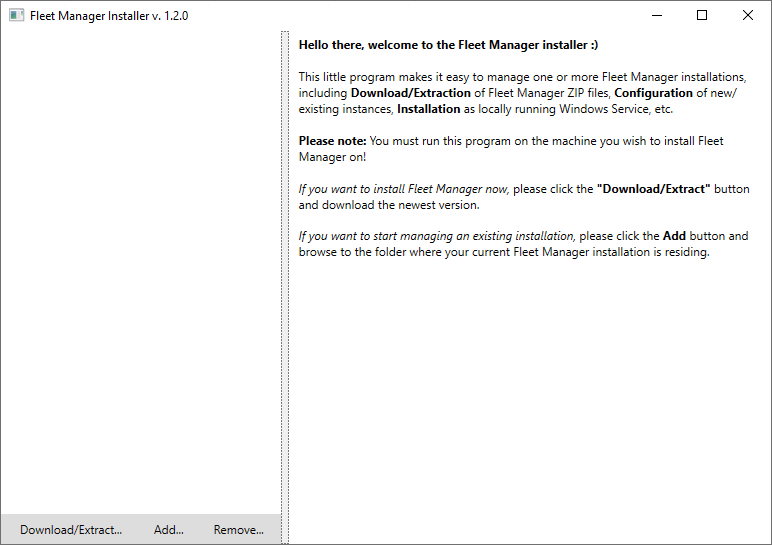
If you then click the "Download/Extract" button, the installer will list all binaries currently available to you. Binaries are residing in Azure Blob Storage and must be downloaded to the installer's local storage to be installable.
You simply do that by clicking "Download" next to the version you intend to install.
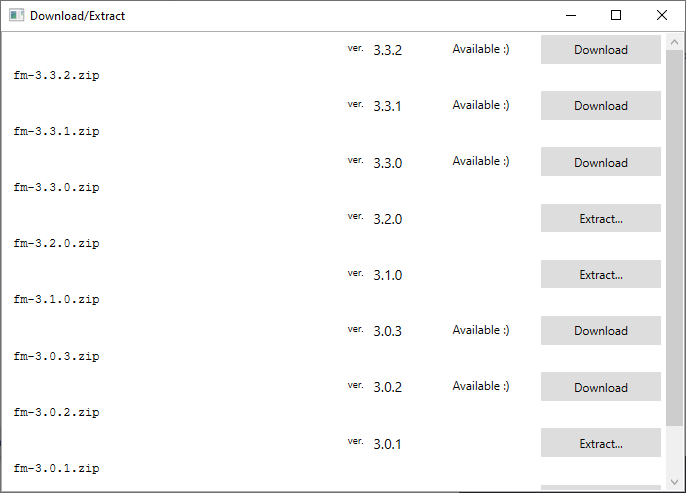
When you do that, the button changes to "Extract"
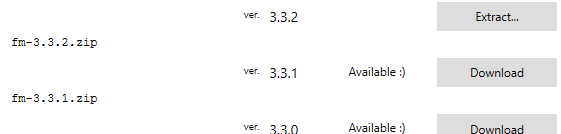
which you may then click to extract the binaries to a location on your disk. In this example, I selected the folder C:\apps\fm, which I created as a new empty folder.
When that has been done, the folder C:\apps\fm will be registered in the installer as a Fleet Manager instance. It should look somewhat like this:
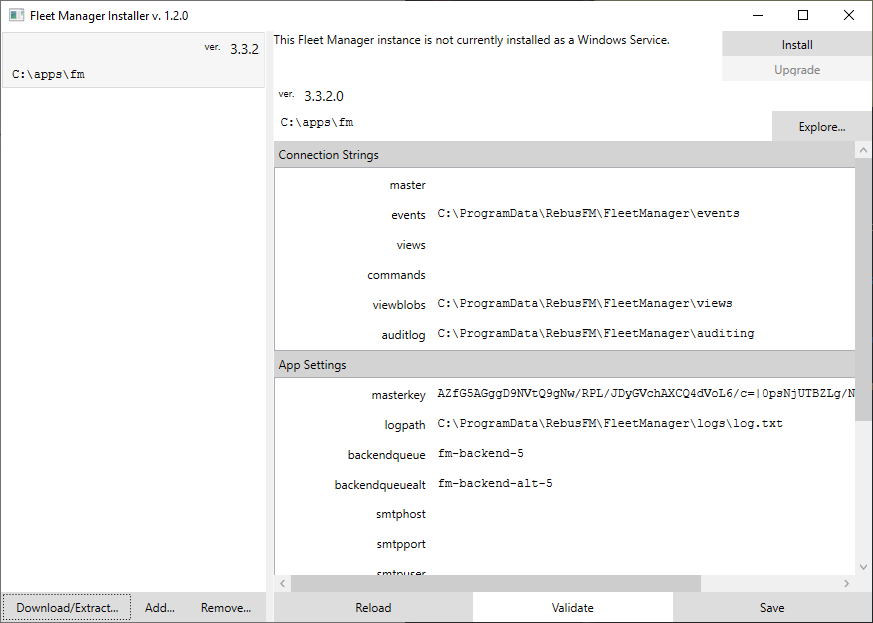
As you can see, the installer will list all of the known Fleet Manager instances in the list to the left. If the list is lost somehow, you can always start over and add an existing Fleet Manager instance to be managed by clicking the "Add" button.
In the portion to the right, you may now configure Fleet Manager. The following settings have to be configured:
-
master: (MongoDB) Master database connection string. Defines where teams, accounts, logins, alerts, etc. are stored. -
events: (file system, Kafka) Events database connection string. This is where events from Rebus instances are buffered. -
views: (MongoDB) View database connection string. Specifies where persistent projections are stored. -
commands: (MongoDB) Command database connection sring. Specifies which database is used for messaging between Fleet Manager and Rebus instances. -
viewblobs: (file system, Azure Storage) View blob database connection string. -
auditlog: (file system) User action audit log directory. -
license: License key. You need to get in touch with Rebus FM to get this one.
and more. Please note that you may press "Validate" at any time to have the installer look if the values look sensible.
When the configuration looks good, you can press "Save", which will cause Fleet Manager's configuration file to be updated (in this case residing in C:\apps\fm\FleetManager.WindowsService.exe.config – a backup will be automatically created on each save).
When you save the configuration the first time, you will be greeted by the following message:
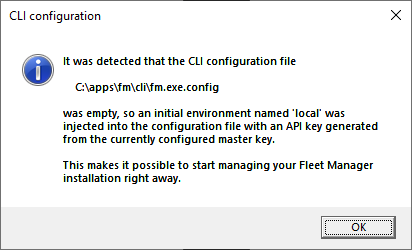
which means that the management CLI has been confgured to manage your Fleet Manager installation.
Now you may press "Install" in the top right corner, which should bring up a screen like this:
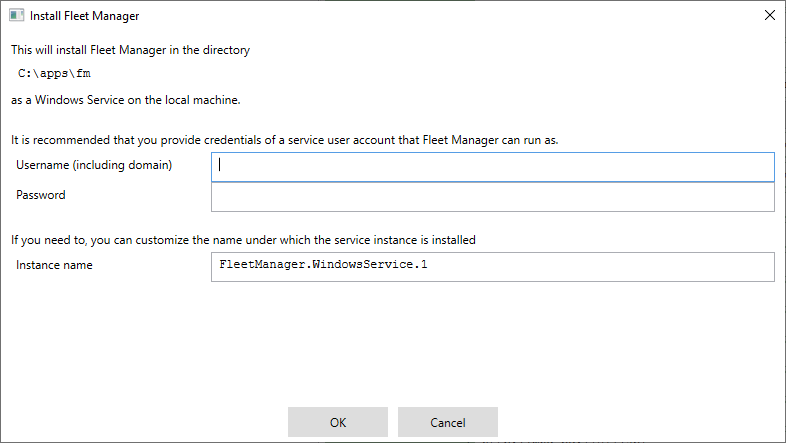
prompting you for credentials of a service user account, under which you intend to run Fleet Manager. If you do not provide anything here, it will be running as "Local System", which should probably not be used for a real installation. It can be fine for development purposes, but your production Fleet Manager should be run as a service user account whose privileges can then be adjusted appropriately.
Just click the "Start" button. It should then start. 🙂
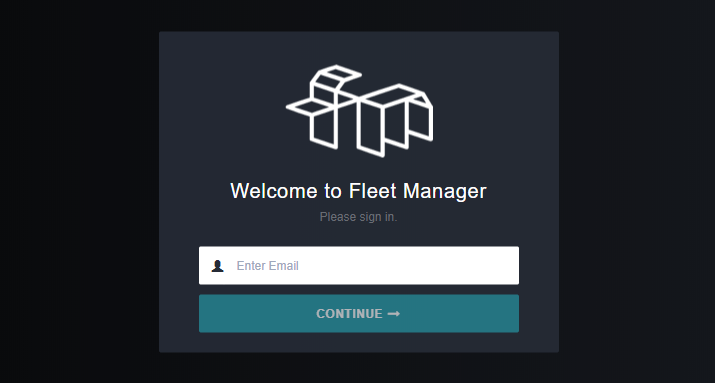
The last step is to create a team administrator user account. Initially, there's no user accounts present in Fleet Manager, so if you navigate to it in a browser, it will look like this:
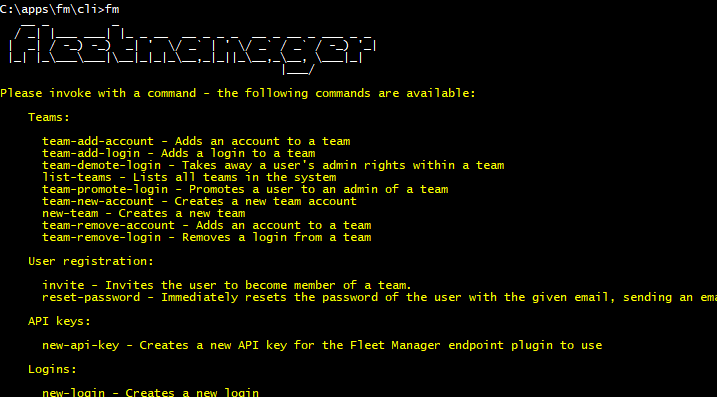
To invite someone (maybe yourself?) in as a team administrator, you need to fire up a Command Prompt and go to the cli directory beneath your Fleet Manager installation – in my case it was C:\apps\fm\cli:
In here we have the Fleet Manager CLI, which you may run by invoking
> fm
in the prompt. On my machine it looked like this:
If you then run it with the list-env command, it should list all of the available environments:
> fm list-env
On my machine it yielded the following output:
+-------------+--------------------------+---------------------+-------------------------+--------+
| Environment | ApiUrl                   | StagingApiUrlOrNull | UiUrl                   | HasKey |
+-------------+--------------------------+---------------------+-------------------------+--------+
| local       | http://mhg-pc:11011//api |                     | http://mhg-pc:11011//ui | True   |
+-------------+--------------------------+---------------------+-------------------------+--------+
which means that the FM CLI knows of an environment called local.
Another fun FM CLI command is poke, which will issue a couple of test requests against Fleet Manager:
> fm poke
On my machine it yielded the following output:
The following required parameters are missing:

    -env - Specifies which environment to work on. Determines which settings are picked up from the configuration file. (ENV)
which is because the FM CLI does not know which environment to poke. Almost all FM CLI commands require the env parameter to be set, but since it's capable of picking it up from an environment variable, we can simply
> set env=local
and then we can
> fm poke
which now yields the following output:
   __ _         _
  / _| |___ ___| |_ _ __  __ _ _ _  __ _ __ _ ___ _ _
 |  _| / -_) -_)  _| '  \/ _` | ' \/ _` / _` / -_) '_|
 |_| |_\___\___|\__|_|_|_\__,_|_||_\__,_\__, \___|_|
                                        |___/

GET http://mhg-pc:11011//api/poke?check-key=true => OK (200, 49 ms)
{
  "status": "OK :)",
  "message": "Hello there :) this is the API that Rebus endpoints can talk to",
  "serverTime": "2020-04-29T09:50:39.5110725+02:00",
  "assembly": "FleetManager.Api",
  "version": "3.3.2.0",
  "service": "api"
}
GET http://mhg-pc:11011//ui/poke?check-key=true => OK (200, 2 ms)
{
  "status": "OK :)",
  "message": "Hello there :) this is the UI API",
  "serverTime": "2020-04-29T09:50:39.628747+02:00",
  "assembly": "FleetManager.UI",
  "version": "3.3.2.0",
  "service": "ui"
}
This means that FM CLI could successfully connect to FM, and furthermore its administration key was approved – everything is OK :).
So now we're ready to invite outselves in – we do that by issuing a command like this:
> fm invite -email mogens@rebus.fm -name "A Team"
which will send appropriate invitation emails to mogens@rebus.fm, setting up the user account as an administrator of a team named "A Team".
The rest of your Fleet Manager installation can be managed using Fleet Manager itself.