Import
The addon would not be complete without a way to bring already existing model configurations into Blender. The import function serves this purpose.
While the addon contains versatile nodes that allow for a wide variety of setups, due to the nature of the written model.cfg syntax, and the own inner workings of Blender, there are limitations to the importer functionality.
The import function is only a utility tool in the addon, it is not the main point of it. An imported config is inherently cluttered with nodes, hard to read, manage and navigate. Often times it may be better to recreate the configuration from scratch rather than importing it.
Because of the complications that the syntax of the model.cfg files introduces, there may be bugs during import (certain model.cfg files may even cause fatal errors that stop the importing). It is best that if a model config was imported, the node structure is checked against the original file manually to correct errors if something went wrong.
- CfgConvert.exe is required from the official Arma 3 Tools for preprocessing of the config
- the model config must be syntactically correct and without errors
- preprocessor macros cannot be preserved, they get applied by the CfgConvert.exe
- the import process can take a long time and temporarily freeze up Blender with larger config files
- only simple mathematical expressions are supported for floating point values
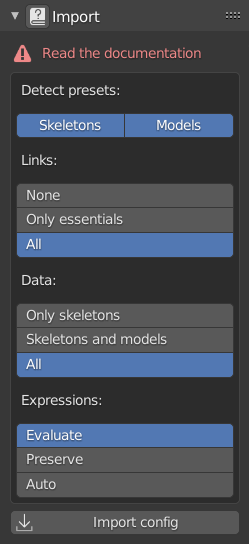
The importer can be told to try to identify some typical preset classes. The setting can be enabled for Skeletons and Models. Identification is mainly based on the name of the class, and a few other characteristics.
Can identify:
- Skeletons: Default and OFP2_ManSkeleton
- Models: Default, ArmaMan and copy class
Due to the Blender API, the real bottleneck is not the processing of the config or the creation of the nodes, but the creation of links between the nodes. For this reason, a setting is present to limit the created links if need be, as limiting the number of links speeds up the process significantly. If not all links are created, the connections need to be reconstructed by hand, and inheritance settings may break.
- None: none of the links are created (fastest, but most inaccurate)
- Only essentials: parenting links, unique value links (sections, inherit bones etc.) are created, but links to list type nodes are omitted
- All: all links are created (slowest, but most accurate)
There may be scenarios when not all data is needed from the config to be imported.
- Only skeletons: only the skeletons are imported
- Skeletons and models: skeletons and models are imported too, but animations are ignored
- All: all data is imported
The importer supports simple mathematical expressions in the floating point value of animations. Depending on the setting, the values can be all preserved, or be tried to be evaluated an only the results stored.
- Evaluate: try to evaluate all expressions and feed the results back into the animation nodes directly (default value is 0 for when the evaluation fails)
- Preserve: preserve all expressions (including simple floating points) in Simple expression nodes
- Auto: evaluate simple floating point values and preserve actual expressions
If an expression could not be evaluated for some reason, a warning is printed to the import log.
In order to spare the need for an entirely custom syntax parser, the addon makes use of the Arma 3 Tools, as well as the built-in modules of Blender.
- File browser window pops up to select file to import
- Import options are saved
- The CfgConvert.exe is called to convert the model.cfg to .xml format and saved to the active temporary folder
- XML format file is read and parsed to an ElementTree object
- ElementTree is translated to a custom class structure to support easier processing
- Class structure is processed and nodes are created
- Class nodes are created
- Relevant connecting nodes are created
- Links are created according to the options
- Node values are set
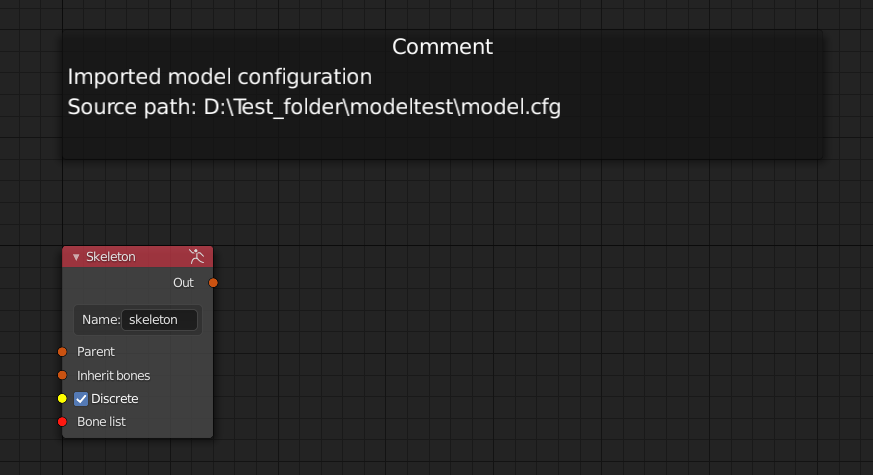
A note is created to indicate that the node tree is an imported setup, and also marks the path to the original file
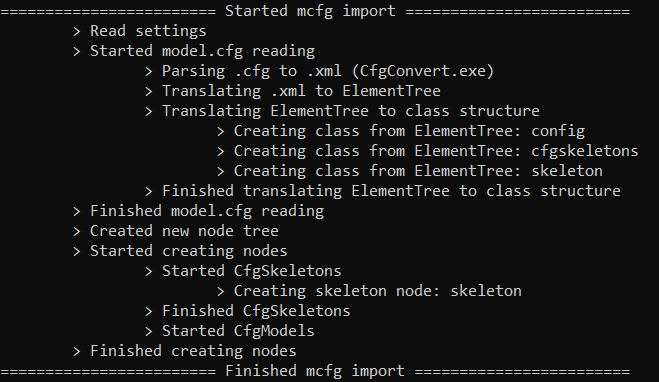
To make debugging easier, some measure of logging is present in the importer functions.